


系统自带的一些东西总是让我们不太满意, 对于Android开发来说,自定义一些东西也不是很难,但是仅局限于Android系统提供的那些自定义的一些方式,自己感觉Google官方给开发者自定义一些东西有一些局限性,对于一个普通开发者来说,如果不去深入Android源码的话,要做一个比较好的效果,特别是那种很不常规,不常见的一些东西,就会显得碍手碍脚,各种坑就会随之而来. 但程序员注定就是要生命不息,折腾不止.所以没事折腾折腾,做点炫酷的东西~~
好了,先废话不多说,上图看效果,觉得效果很一般的,那就不要浪费时间了, 觉得效果不错的可以继续研究下去:

先说说自己的思路吧:
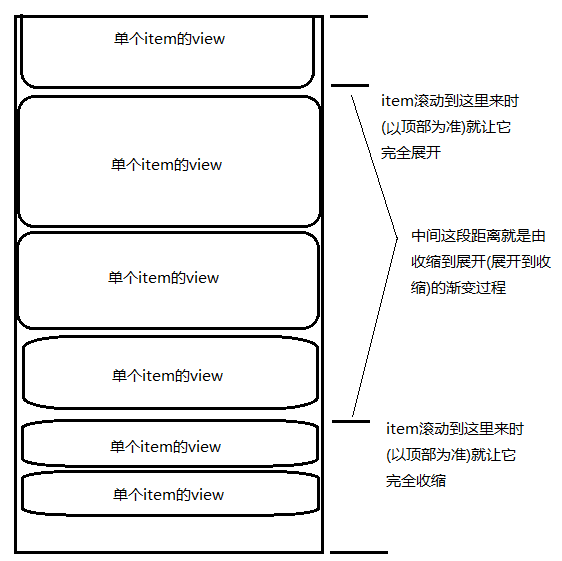
首先,简单分析可知: 其实就是根据手指的滑动,动态改变每一个item的高度. 监听listview的滑动,可以重写Listview的onScroll方法,在这里我们可以知道listview滑动到哪儿了, 然后根据滑动的位置,动态修改每一个item的高度, 到这里有一个矛盾,你修改了item的高度,就会间接的让listview滚动,然后又修改.很有可能陷入一个死循环中. 而且每一个item的高度是否可动态调整也是不确定的,就算高度可调整了,每个item的高度的计算也不是件容易的事. 现在想想可真是困难重重啊!!!
知难而上,越挫越勇! 作为一个程序员应该有的素质,我必须去尝试一下,不成功也会有收获!
一步一步来:首先把Listview的滚动事件拿到吧:
写一个MagnifyListView继承自ListView,重写onScroll方法
    @Override
    public void onScroll(AbsListView view, int firstVisibleItem, int visibleItemCount, int totalItemCount) {
        int myScrollY = getMyScrollY();
    //到这里我们就可以获取到listview的滚动事件了
    }

    /**
     * 获取当前listView的Y轴的滚动距离
     * @return
     */
    public int getMyScrollY() {
         View c = this.getChildAt(0);
         if (c == null ) {
             return 0;
         }
         int firstVisiblePosition = getFirstVisiblePosition();
         int top = c.getTop();
         return -top + firstVisiblePosition * c.getHeight() ;
    }
现在的任务就是把滚动的数据让每一个item的View知道,它们知道listview滚动到哪儿才能调整自己的高度嘛:
所以,我要自定一个MyChangeLinearLayout继承自LinearLayout,以后item布局中都要用这个view来作为最外层的view
主要功能如下:
public class MyChangeLinearLayout extends LinearLayout{
    //其他该有的方法我就不写了,会在最后面附上完整的源码
    /**
     * 在这里写一个方法用了让刚才那个自定义Listview告诉当前这个item的一些滚动数据
     * @param scrollY 当前listview的Y轴滚动距离
     * @param currentItem  当前这个itemView在listview的子view中的位置,注意不是真实数据中的位置,因为listview的item是重复利用的
     */
    public void onItemChange(int scrollY,int currentItem){

    }
}
到这里就要让listview把滚动信息告诉每一个itemView了,上代码:
import android.content.Context;
import android.util.AttributeSet;
import android.view.View;
import android.widget.AbsListView;
import android.widget.AbsListView.OnScrollListener;
import android.widget.ListView;

public class MagnifyListView extends ListView implements OnScrollListener{

    private int minHeight;
    private int maxHeight;

    public MagnifyListView(Context context) {
        super(context);
        // TODO Auto-generated constructor stub
        setOnScrollListener(this);
    }

    public MagnifyListView(Context context, AttributeSet attrs) {
        super(context, attrs);
        // TODO Auto-generated constructor stub
        setOnScrollListener(this);
    }

    public MagnifyListView(Context context, AttributeSet attrs, int defStyle) {
        super(context, attrs, defStyle);

        setOnScrollListener(this);
    }

    @Override
    public void onScrollStateChanged(AbsListView view, int scrollState) {

    }

    private int lastScroll;

    @Override
    public void onScroll(AbsListView view, int firstVisibleItem, int visibleItemCount, int totalItemCount) {
        int myScrollY = getMyScrollY();
        //防止进入死循环
        if (lastScroll!=myScrollY) {
            for (int i = 0; i < visibleItemCount; i++) {
                MyChangeLinearLayout childAt = (MyChangeLinearLayout) getChildAt(i);
                childAt.onItemChange(myScrollY, i);
            }
        }
        lastScroll=myScrollY;

    }

    /**
     * 获取当前listView的Y轴的滚动距离
     * @return
     */
    public int getMyScrollY() {
         View c = this.getChildAt(0);
         if (c == null ) {
             return 0;
         }
         int firstVisiblePosition = getFirstVisiblePosition();
         int top = c.getTop();
         return -top + firstVisiblePosition * c.getHeight() ;
    }
}
好了,到这里,每一个item的view都知道滚动到了哪儿,自己身处的位置,现在就要根据这些信息来调整自己的高度了,
调整方式如下:
上代码:
import android.annotation.SuppressLint;
import android.content.Context;
import android.util.AttributeSet;
import android.view.View;
import android.view.ViewGroup;
import android.widget.LinearLayout;

public class MyChangeLinearLayout extends LinearLayout{

    public static int minheight = 250;//view的最小高度
    public static int maxheight = 500;//view的最大高度

    public static float startAlpha = 0.2f;//view收缩状态时的透明度
    public static float endAlpha = 1;//view展开状态时的透明度

    public static int endBigLoc = maxheight/2+100;//完全展开时的位置
    public static int startBigLoc = endBigLoc+minheight*3+120;//完全收缩时的位置

    public MyChangeLinearLayout(Context context, AttributeSet attrs, int defStyle) {
        super(context, attrs, defStyle);
        // TODO Auto-generated constructor stub
    }

    public MyChangeLinearLayout(Context context, AttributeSet attrs) {
        super(context, attrs);
        // TODO Auto-generated constructor stub
    }

    public MyChangeLinearLayout(Context context) {
        super(context);
        // TODO Auto-generated constructor stub
    }

    private boolean isLast = false;//最后几个设置为透明

    public void setLast(boolean b){
        isLast=b;
    }

    /**
     * 在这里写一个方法用了让刚才那个自定义Listview告诉当前这个item的一些滚动数据
     * @param scrollY 当前listview的Y轴滚动距离
     * @param currentItem  当前这个itemView在listview的子view中的位置,注意不是真实数据中的位置,因为listview的item是重复利用的
     */
    public void onItemChange(int scrollY,int currentItem){

//      L.e("第"+currentItem+":"+scrollY);

        if (scrollY%maxheight==0) {
            return;
        }

        //计算距离顶部的距离
        int itemTop = getItemTop(currentItem, scrollY);
        int itemHerght = getCurrentItemHerght(itemTop);
        //最后一个是全透明的,为了保证最后一条数据能被完全展开
        if (isLast) {
            setAlpha(0);
            ViewGroup parent = (ViewGroup) getParent();
            setMinimumHeight(parent.getHeight()-endBigLoc-maxheight);
        }else{
            setAlpha(getCurrentItemAlpha(itemTop, startAlpha, endAlpha));
            setMinimumHeight(itemHerght);
        }
        View childAt = getChildAt(0);
        LinearLayout.LayoutParams layoutParams = (LayoutParams) childAt.getLayoutParams();
        layoutParams.height=itemHerght;

//      if (currentItem==0||currentItem==1) {
//          L.e("di:"+currentItem+" :"+itemHerght);
//      }
    }

    /**
     * 计算当前item的距离顶部的距离
     * @param item
     * @return
     */
    private int getItemTop(int item,int scrollY){
        if (item==0) {
            return -(scrollY%maxheight);
        }
        int itemTop = getItemTop(item-1,scrollY);
        int currentItemHerght = getCurrentItemHerght(itemTop);
//      L.e("第"+item+"  "+(currentItemHerght+itemTop));
        return currentItemHerght+itemTop;

    }

    /**
     * 根据当前item距离顶部的距离,计算当前item的高度
     * @param top
     * @return
     */
    private int getCurrentItemHerght(int top){
        if (top<=endBigLoc) {
//          setMinimumHeight(height+dheight);
            return maxheight;
        }else if(top>=startBigLoc){
//          setMinimumHeight(height);
            return minheight;
        }else{
            //渐变
            int h=(int) (minheight+((startBigLoc-top+0.0)/(startBigLoc-endBigLoc))*(maxheight-minheight));
//          L.e("调整:"+currentItem+"  top:"+top+"  gaodu:"+h);
//          setMinimumHeight(h);
            return h;
        }
    }
    /**
     * 根据当前item距离顶部的距离,计算当前item的透明度
     * @param top
     * @return
     */
    private float getCurrentItemAlpha(int top,float start,float end){
        if (top<=endBigLoc) {
            return end;
        }else if(top>=startBigLoc){
            return start;
        }else{
            //渐变
            float h=start+((startBigLoc-top+0.0f)/(startBigLoc-endBigLoc))*(end-start);

            return h;
        }
    }

}
到这里看似任务都完成了,其实还有一个问题, 就是listview的最后几个item似乎永远都无法展开,因为listview滑到底了不可能再往上滑, 我的解决思路是让最后一个item变成透明的并且高度要足够高,能让倒数第二个的item完全展开. 这些代码又改写在哪儿呢? 好像只有adapter知道数据是否到了最后一个,所以只能自己再自定义一个adapter:
核心代码:
    @Override
    public int getCount() {
        //让adapter中的item数量比真实数据多一个
        return getMyCount()+1;
    }
    @Override
    public View getView(int item, View view, ViewGroup arg2) {
        //...balabala省略
        MyChangeLinearLayout v = (MyChangeLinearLayout) view;
        //告诉MyChangeLinearLayout 是否是是数据中的最后一个,来让MyChangeLinearLayout 变透明变得足够的高
        if (getCount()-1==item) {
            v.setLast(true);
        }else{
            v.setLast(false);
        }


        return view;
    }
adapter的代码我简单封装了一下,继承自这个adapter就可以了:
import android.content.Context;
import android.view.LayoutInflater;
import android.view.View;
import android.view.ViewGroup;
import android.widget.BaseAdapter;
import android.widget.LinearLayout;
import android.widget.LinearLayout.LayoutParams;

import com.yuc.yuc_magnifyitemlistview.R;
import com.yuc.yuc_magnifyitemlistview.view.MyChangeLinearLayout;

public abstract class MagnifyListviewAdapter extends BaseAdapter{

    protected Context context;
//  private LayoutInflater inflater;

    public  MagnifyListviewAdapter(Context context) {
        this.context=context;

        MyChangeLinearLayout.minheight=getMinheight();
        MyChangeLinearLayout.maxheight=getMaxheight();
        MyChangeLinearLayout.endBigLoc=getEndBigLoc();
        MyChangeLinearLayout.startBigLoc=getStartBigLoc();

    }

    @Override
    public int getCount() {
        return getMyCount()+1;
    }

    public abstract int getMyCount();//这里用getMyCount代替getCount

    @Override
    public View getView(int item, View view, ViewGroup arg2) {

        if (view==null) {
            LayoutInflater inflater = LayoutInflater.from(context);
            view = inflater.inflate(R.layout.listview_magnify_item_layout, null);
            LinearLayout listview_item_ll = (LinearLayout) view.findViewById(R.id.listview_item_ll);
            listview_item_ll.addView(getMyView(item, null, arg2));

            //初始化高度
            MyChangeLinearLayout v = (MyChangeLinearLayout) view;
            v.onItemChange(1, item);
        }else{
            view = getMyView(item, view, arg2);

            view.setMinimumHeight(getMaxheight());
            View childAt = ((ViewGroup)view).getChildAt(0);
            LinearLayout.LayoutParams layoutParams = (LayoutParams) childAt.getLayoutParams();
            layoutParams.height=getMaxheight();
        }


        MyChangeLinearLayout v = (MyChangeLinearLayout) view;
        if (getCount()-1==item) {
            v.setLast(true);
        }else{
            v.setLast(false);
        }


        return view;
    }

    public abstract View getMyView(int item, View view, ViewGroup arg2);

    /**
     * 最小高度
     * @return
     */
    public abstract int getMinheight();
    /**
     * 最大高度
     * @return
     */
    public abstract int getMaxheight();
    /**
     * 完全展开位置-Y轴
     * @return
     */
    public abstract int getEndBigLoc();
    /**
     * 完全收缩位置-Y轴
     * @return
     */
    public abstract int getStartBigLoc();

}
好了,控件都已准备完毕,现在让我们试试:
生成MainActivity:
布局文件:
<RelativeLayout xmlns:android="http://schemas.android.com/apk/res/android"
    xmlns:tools="http://schemas.android.com/tools"
    android:layout_width="match_parent"
    android:layout_height="match_parent"
    tools:context=".MainActivity" >

    <com.yuc.yuc_magnifyitemlistview.view.MagnifyListView
        android:id="@+id/lv"
        android:layout_width="match_parent"
        android:layout_height="match_parent"
        android:background="#000000"
        android:divider="@null"
        ></com.yuc.yuc_magnifyitemlistview.view.MagnifyListView>

</RelativeLayout>
Java代码:
import android.app.Activity;
import android.os.Bundle;
import android.widget.ListView;

import com.yuc.yuc_magnifyitemlistview.adapter.DemoListAdapter;

public class MainActivity extends Activity {

    private ListView lv;

    @Override
    protected void onCreate(Bundle savedInstanceState) {
        super.onCreate(savedInstanceState);
        setContentView(R.layout.activity_main);
        initView();
    }

    private void initView() {
        lv = (ListView) findViewById(R.id.lv);
        DemoListAdapter adapter = new DemoListAdapter(this);
        lv.setAdapter(adapter);

    }
}
还有adapter,继承自MagnifyListviewAdapter就可以了:
import android.content.Context;
import android.view.LayoutInflater;
import android.view.View;
import android.view.ViewGroup;
import android.widget.TextView;

import com.yuc.yuc_magnifyitemlistview.R;
import com.yuc.yuc_magnifyitemlistview.util.DensityUtils;

public class DemoListAdapter extends MagnifyListviewAdapter{

    private LayoutInflater inflater;

    public DemoListAdapter(Context context){
        super(context);
        inflater = LayoutInflater.from(context);
    }

    @Override
    public Object getItem(int arg0) {
        // TODO Auto-generated method stub
        return null;
    }

    @Override
    public long getItemId(int arg0) {
        // TODO Auto-generated method stub
        return 0;
    }

    @Override
    public int getMyCount() {
        return 30;
    }

    @Override
    public View getMyView(int item, View view, ViewGroup arg2) {

        if (view==null) {
            view = inflater.inflate(R.layout.commodity_list_item_layout, null);
        }

        return view;

    }

    @Override
    public int getMinheight() {
        return DensityUtils.dp2px(context, 50);
    }

    @Override
    public int getMaxheight() {
        return DensityUtils.dp2px(context, 150);
    }

    @Override
    public int getEndBigLoc() {
        return getMaxheight()/2;
    }

    @Override
    public int getStartBigLoc() {
        return (int) (getEndBigLoc()+getMaxheight()*2.5);
    }


}
item的布局文件:
<?xml version="1.0" encoding="utf-8"?>
<LinearLayout
    xmlns:android="http://schemas.android.com/apk/res/android"
    android:layout_width="match_parent"
    android:layout_height="wrap_content"
    android:orientation="vertical"
    >
    <ImageView
        android:layout_width="match_parent"
        android:layout_height="match_parent"
        android:scaleType="centerCrop"
        android:src="@drawable/community1" />
</LinearLayout>
搞定! 使用起来是不是很简单,完全没有改变原始的使用习惯~~!
好了到这里就该结束了,送上源码:
https://github.com/yuchong123/MagnifyItemListView


 7180
7180

 被折叠的 条评论
为什么被折叠?
被折叠的 条评论
为什么被折叠?
 到【灌水乐园】发言


