安卓setTitle()不显示怎么办

1.在AndroidManifest.xml文件中找到 android:theme="@style/Theme.Tablayout"

2.ctrl+右键点击@style/Theme.Tablayout,跳转到themes.xml;

3.将"Theme.Material3.DayNight.NoActionBar"替换为Theme.MaterialComponents.Light.Bridge即可显示title;

4.Theme.MaterialComponents.Light.Bridge 显示title;
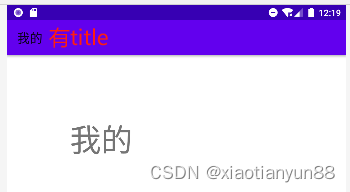
在这里插入图片描述

5.Theme.Material3.DayNight.NoActionBar 不显示title;
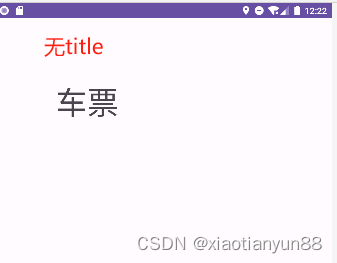
在这里插入图片描述

AndroidManifest.xml
<?xml version="1.0" encoding="utf-8"?>
<manifest xmlns:android="http://schemas.android.com/apk/res/android"
    xmlns:tools="http://schemas.android.com/tools">

    <application
        android:allowBackup="true"
        android:dataExtractionRules="@xml/data_extraction_rules"
        android:fullBackupContent="@xml/backup_rules"
        android:icon="@mipmap/ic_launcher"
        android:label="@string/app_name"
        android:roundIcon="@mipmap/ic_launcher_round"
        android:supportsRtl="true"
        android:theme="@style/Theme.Tablayout"
        tools:targetApi="31">
        <activity
            android:name=".MainActivity"
            android:exported="true">
            <intent-filter>
                <action android:name="android.intent.action.MAIN" />

                <category android:name="android.intent.category.LAUNCHER" />
            </intent-filter>
        </activity>
    </application>

</manifest>
themes.xml
<resources xmlns:tools="http://schemas.android.com/tools">
    <!-- Base application theme. -->
    <style name="Base.Theme.Tablayout" parent="Theme.Material3.DayNight.NoActionBar">
        <!-- Customize your light theme here. -->
        <!-- <item name="colorPrimary">@color/my_light_primary</item> -->
    </style>

    <style name="Theme.Tablayout" parent="Base.Theme.Tablayout" />
</resources>
  • 1
    点赞
  • 1
    收藏
    觉得还不错? 一键收藏
  • 打赏
    打赏
  • 1
    评论
以下是一个简单的实现方式: 1. 首先,在布局文件中添加多个ImageView控件,并为它们分别设置一个唯一的ID,例如: ``` <ImageView android:id="@+id/image1" android:src="@drawable/image1" android:layout_width="wrap_content" android:layout_height="wrap_content" /> <ImageView android:id="@+id/image2" android:src="@drawable/image2" android:layout_width="wrap_content" android:layout_height="wrap_content" /> <ImageView android:id="@+id/image3" android:src="@drawable/image3" android:layout_width="wrap_content" android:layout_height="wrap_content" /> ``` 2. 在Java代码中,为每个ImageView控件设置点击事件,并在事件处理函数中显示不同的对话框,例如: ``` ImageView image1 = findViewById(R.id.image1); ImageView image2 = findViewById(R.id.image2); ImageView image3 = findViewById(R.id.image3); image1.setOnClickListener(new View.OnClickListener() { @Override public void onClick(View v) { AlertDialog.Builder builder = new AlertDialog.Builder(MainActivity.this); builder.setTitle("Image 1 Dialog") .setMessage("This is the dialog for Image 1.") .setPositiveButton("OK", null) .show(); } }); image2.setOnClickListener(new View.OnClickListener() { @Override public void onClick(View v) { AlertDialog.Builder builder = new AlertDialog.Builder(MainActivity.this); builder.setTitle("Image 2 Dialog") .setMessage("This is the dialog for Image 2.") .setPositiveButton("OK", null) .show(); } }); image3.setOnClickListener(new View.OnClickListener() { @Override public void onClick(View v) { AlertDialog.Builder builder = new AlertDialog.Builder(MainActivity.this); builder.setTitle("Image 3 Dialog") .setMessage("This is the dialog for Image 3.") .setPositiveButton("OK", null) .show(); } }); ``` 在这个示例中,我们为每个ImageView控件设置了一个点击事件,在事件处理函数中创建一个AlertDialog,并为其设置标题和内容。点击“OK”按钮将关闭对话框。 注意,在上面的代码中,我们使用了MainActivity.this作为AlertDialog.Builder的上下文,这是因为我们在MainActivity类中编写了这段代码。如果你在其他类中编写这段代码,你应该使用相应的上下文。

“相关推荐”对你有帮助么?

  • 非常没帮助
  • 没帮助
  • 一般
  • 有帮助
  • 非常有帮助
提交
评论 1
添加红包

请填写红包祝福语或标题

红包个数最小为10个

红包金额最低5元

当前余额3.43前往充值 >
需支付:10.00
成就一亿技术人!
领取后你会自动成为博主和红包主的粉丝 规则
hope_wisdom
发出的红包

打赏作者

xiaotianyun88

你的鼓励将是我创作的最大动力

¥1 ¥2 ¥4 ¥6 ¥10 ¥20
扫码支付:¥1
获取中
扫码支付

您的余额不足,请更换扫码支付或充值

打赏作者

实付
使用余额支付
点击重新获取
扫码支付
钱包余额 0

抵扣说明:

1.余额是钱包充值的虚拟货币,按照1:1的比例进行支付金额的抵扣。
2.余额无法直接购买下载,可以购买VIP、付费专栏及课程。

余额充值