


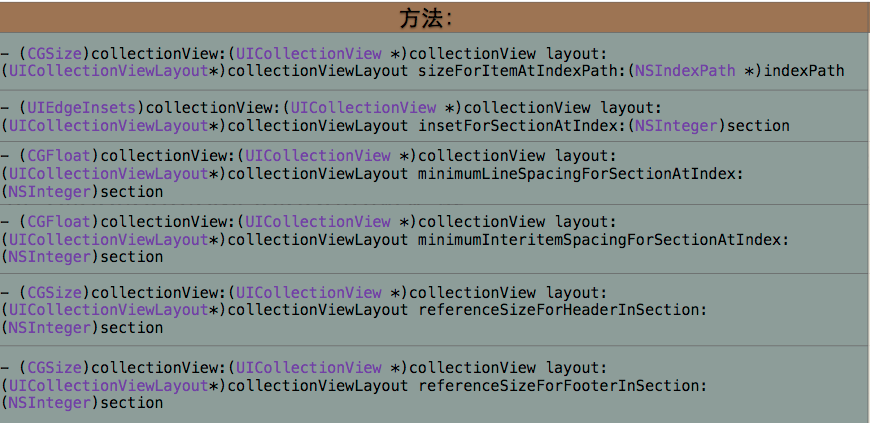
1.集合视图的基本概念
- UICollectionView和UITableView的实现类似, 都需要设置delegate和dataSource, 布局协议UICollectionViewDelegateFlowLayout
在collectionView中, cell的布局比tableView复杂, 需要使用一个类描述集合视图的布局和行 UICollectionViewLayout - 创建集合视图的步骤: 1.使用系统的布局UICollectionViewFlowLayout 2.设置代理和数据源 3.设置自定义cell
- UICollectionViewLayout布局:它是一个基类,集合视图使用其的子类实现布局,UICollectionViewFlowLayout是系统提供的网格形式的布局类,只要简单的配置
- UICollectionView使用UICollectionViewCell创建cell,UICollectionView包含contentView,但是没有提供其它控件(与tableView不同),通常都是自定义cell
- 通过UICollectionViewFlowLayout的设定来改变布局的限制性很大,对于一些类似瀑布流的效果就难以实现,比如当每一张图片的大小都不固定,这时我们通过协议来实现每个item的设置.我们所使用的布局协议是UICollectionViewDelegateFlowLayout,它使对UICollectionViewDelegate的扩展<布局协议插图>


2.简单运用
自定义cell, MyCell文件
#import <UIKit/UIKit.h>
@interface MyCell : UICollectionViewCell
@property(nonatomic,retain)UIImageView *myImageView;
@property(nonatomic,retain)UILabel *titleLable;
@end
#import "MyCell.h"
@implementation MyCell
- (instancetype)initWithFrame:(CGRect)frame
{
//这里和tableView的自定义cell不同,这里只能这么写,且就一个方法
self = [super initWithFrame:frame];
if (self) {
self.myImageView = [[UIImageView alloc] initWithFrame:CGRectMake(0, 0, 120, 160)];
[self.contentView addSubview:self.myImageView];
[_myImageView release];
self.titleLable = [[UILabel alloc] initWithFrame:CGRectMake(0, 160, 120, 30)];
self.titleLable.textAlignment = NSTextAlignmentCenter;
[self.contentView addSubview:self.titleLable];
[_titleLable release];
}
return self;
}
- (void)dealloc
{
[_myImageView release];
[_titleLable release];
[super dealloc];
}
@end自定义头视图, MyCollectionReusableView文件
#import <UIKit/UIKit.h>
@interface MyCollectionReusableView : UICollectionReusableView
@property(nonatomic,retain)UILabel *myLabel;
@end
#import "MyCollectionReusableView.h"
@implementation MyCollectionReusableView
- (instancetype)initWithFrame:(CGRect)frame{
self = [super initWithFrame:frame];
if (self) {
//创建子视图
self.myLabel = [[UILabel alloc] init];
self.myLabel.backgroundColor = [UIColor cyanColor];
[self addSubview:self.myLabel];
[_myLabel release];
}
return self;
}
- (void)layoutSubviews{
[super layoutSubviews];
self.myLabel.frame = CGRectMake(5, 0, 365, 30);
self.myLabel.textAlignment = NSTextAlignmentCenter;
}
@endViewController.m文件
#import "ViewController.h"
#import "MyCell.h"
#import "UIImageView+WebCache.h"
#import "MyCollectionReusableView.h"
#import "Singleton.h"
@interface ViewController ()<UICollectionViewDataSource,UICollectionViewDelegate>
@property(nonatomic,retain)NSMutableArray *arr;
@end

@implementation ViewController
- (void)viewDidLoad {
    [super viewDidLoad];
    self.navigationController.navigationBar.translucent = NO;
    [self createData];
    //它是苹果官方提供的一种瀑布流效果
    UICollectionViewFlowLayout *flowLayout = [[UICollectionViewFlowLayout alloc] init];
    //不同于tableView,它用item进行显示,所以需要先设置每个item有多大
    flowLayout.itemSize = CGSizeMake(120, 190);
    //设置行间距(默认是10)
    flowLayout.minimumLineSpacing = 10;
    //设置列间距
    flowLayout.minimumInteritemSpacing = 2.5;
    //设置滚动方向(默认垂直)
    //flowLayout.scrollDirection = UICollectionViewScrollDirectionHorizontal;
    //设置item距离屏幕左右边界距离
    flowLayout.sectionInset = UIEdgeInsetsMake(5, 5, 5, 5);
    //设定头或者尾部视图的尺寸
    flowLayout.headerReferenceSize = CGSizeMake(0, 30);

    UICollectionView *collectionView = [[UICollectionView alloc] initWithFrame:CGRectMake(0, 20, 375, self.view.frame.size.height) collectionViewLayout:flowLayout];
    //接下来就是和tableview很相似,使用前要签订两个协议dataSource和delegate
    collectionView.delegate = self;
    collectionView.dataSource = self;
    //设置集合视图的背景颜色(默认是黑色)
    collectionView.backgroundColor = [UIColor whiteColor];
    [self.view addSubview:collectionView];
    [collectionView release];

    //通过注册的方式创建,两个参数:需要制定注册对象的类型.重用标志
    [collectionView registerClass:[MyCell class] forCellWithReuseIdentifier:@"reuse"];
    //注册一个头视图,三个参数:1.需要注册的对象类型 2.制定是头视图嗨是尾视图,常量字符串在系统的UICollectionViewFlowlayout最上面 3.重用标志
    [collectionView registerClass:[MyCollectionReusableView class] forSupplementaryViewOfKind:UICollectionElementKindSectionHeader withReuseIdentifier:@"headerView"];
}-(void)createData{
NSString *path = [[NSBundle mainBundle] pathForResource:@"Data.json" ofType:nil];
NSData *data = [NSData dataWithContentsOfFile:path];
NSArray *picArr = [NSJSONSerialization JSONObjectWithData:data options:0 error:nil];
self.arr = [NSMutableArray array];
//遍历picArr把里面的图片地址放到self.arr里
for (NSDictionary *dic in picArr) {
[self.arr addObject:dic[@"thumbURL"]];
}
}
#warning 和tableView类似,有以下两个必须实现的数据源方法
- (NSInteger)collectionView:(UICollectionView *)collectionView numberOfItemsInSection:(NSInteger)section{
return self.arr.count;
}
- (UICollectionViewCell *)collectionView:(UICollectionView *)collectionView cellForItemAtIndexPath:(NSIndexPath *)indexPath{
#warning 在collectionCell的创建的时候,提供了一种不同于tableView的cell创建方式
MyCell *cell = [collectionView dequeueReusableCellWithReuseIdentifier:@"reuse" forIndexPath:indexPath];
//只要通过注册的方法创建的cell,在取值的时候就不需要再进行是否为空的判断
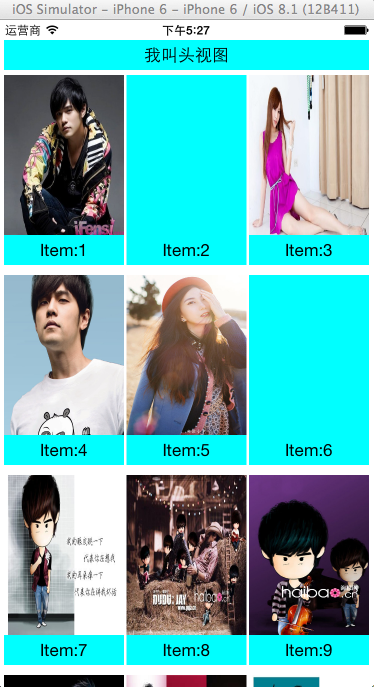
cell.titleLable.text = [NSString stringWithFormat:@"Item:%ld",indexPath.row+1];
//用SD让图片显示在myImageView里面
[cell.myImageView sd_setImageWithURL:[NSURL URLWithString:self.arr[indexPath.row]]];
//设置contentView(Item)的背景颜色,有图片的地方就被覆盖,其中Item2和Item6图片有问题
cell.contentView.backgroundColor = [UIColor cyanColor];
return cell;
}
#warning 使用注册的方式创建cell,必须使用自定义的cell,否则在里面会大量的创建视图,为了杜绝重复创建,必须使用自定义cell
- (UICollectionReusableView *)collectionView:(UICollectionView *)collectionView viewForSupplementaryElementOfKind:(NSString *)kind atIndexPath:(NSIndexPath *)indexPath{
if ([kind isEqualToString:UICollectionElementKindSectionHeader]) {
MyCollectionReusableView *view = [collectionView dequeueReusableSupplementaryViewOfKind:UICollectionElementKindSectionHeader withReuseIdentifier:@"headerView" forIndexPath:indexPath];
view.myLabel.text = @"我叫头视图";
return view;
}
return nil;
}


 415
415

 被折叠的 条评论
为什么被折叠?
被折叠的 条评论
为什么被折叠?
 到【灌水乐园】发言


