


搭建一个 ChatGPT-SDK 组件工程,专门用于封装对 OpenAI 接口的使用。由于 OpenAI 接口本身较多,并有各类配置的设置,所以开发一个共用的 SDK 组件,更合适我们在各类工程中扩展使用
整个流程为:以会话模型为出口,,驱动整个服务的调用链路。并对外提供会话工厂的创建和使用。

通过工厂模式,开启一个使用okhttp3封装的OpenAi会话服务,进行流程的调用。同时这里还包括请求拦截的处理,因为我们需要对http请求设置一些必要的参数信息,如:apiKey、token。
这里还用到Retrofit2,Retrofit2可以将HTTP API转化为java接口,并通过注解的方式描述请求参数和响应结果等信息,从而方便的发送网络请求。
具体实现
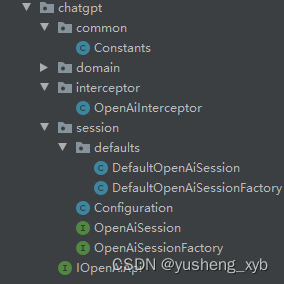
工程目录
定义IOpenAiApi 接口
 String v1_chat_completions = "v1/chat/completions";

    /**
     * 默认 GPT-3.5 问答模型
     * @param chatCompletionRequest 请求信息
     * @return                      返回结果
     */
    @POST(v1_chat_completions)
    Single<ChatCompletionResponse> completions(@Body ChatCompletionRequest chatCompletionRequest);
在IOpenAiApi接口里定义访问接口,后续可直接扩展功能如画图等
会话接口
public interface OpenAiSession {

     /**
     * 默认 GPT-3.5 问答模型
     * @param chatCompletionRequest 请求信息
     * @return                      返回结果
     */
    ChatCompletionResponse completions(ChatCompletionRequest chatCompletionRequest);


    /**
     *  问答模型,流式响应接口
     * @param chatCompletionRequest 请求信息
     * @param eventSourceListener 实现监听;通过监听的 onEvent 方法接收数据
     * @return 返回结果
     */
    EventSource completions(ChatCompletionRequest chatCompletionRequest, EventSourceListener eventSourceListener) throws JsonProcessingException;

}
会话工厂
public class DefaultOpenAiSessionFactory implements OpenAiSessionFactory {

    private final Configuration configuration;

    public DefaultOpenAiSessionFactory(Configuration configuration) {
        this.configuration = configuration;
    }

    @Override
    public OpenAiSession openSession() {
        // 1. 日志配置
        HttpLoggingInterceptor httpLoggingInterceptor = new HttpLoggingInterceptor();
        httpLoggingInterceptor.setLevel(HttpLoggingInterceptor.Level.HEADERS);

        // 2. 开启 Http 客户端
        OkHttpClient okHttpClient = new OkHttpClient
                .Builder()
                .addInterceptor(httpLoggingInterceptor)
                .addInterceptor(new OpenAiInterceptor(configuration.getApiKey()))
                .connectTimeout(450, TimeUnit.SECONDS)
                .writeTimeout(450, TimeUnit.SECONDS)
                .readTimeout(450, TimeUnit.SECONDS)
                //.proxy(new Proxy(Proxy.Type.HTTP, new InetSocketAddress("127.0.0.1", 21284)))
                .build();
        configuration.setOkHttpClient(okHttpClient);

        // 3. 创建 API 服务
        IOpenAiApi openAiApi = new Retrofit.Builder()
                .baseUrl(configuration.getApiHost())
                .client(okHttpClient)
                .addCallAdapterFactory(RxJava2CallAdapterFactory.create())
                .addConverterFactory(JacksonConverterFactory.create())
                .build().create(IOpenAiApi.class);
        configuration.setOpenAiApi(openAiApi);

        return new DefaultOpenAiSession(configuration);
    }

}
你可以想象一下,只要你想调用OpenAI官网的接口,就一定需要用到HTTP服务。那么这些类似零件的装配就需要一个统一收口的地方进行管理。所以我使用工厂模型封装。
会话接口的实现
下面只展示流式会话的接口实现
@Override
    public EventSource completions(ChatCompletionRequest chatCompletionRequest, EventSourceListener eventSourceListener) throws JsonProcessingException {
        return this.completions(Constants.NULL, Constants.NULL, chatCompletionRequest, eventSourceListener);
    }

    @Override
    public EventSource completions(String apiHostByUser, String apiKeyByUser, ChatCompletionRequest chatCompletionRequest, EventSourceListener eventSourceListener) throws JsonProcessingException{
        // 核心参数校验;不对用户的传参做更改,只返回错误信息。
        if (!chatCompletionRequest.isStream()) {
            throw new RuntimeException("illegal parameter stream is false!");
        }
        // 动态设置 Host、Key,便于用户传递自己的信息
        String apiHost = Constants.NULL.equals(apiHostByUser) ? configuration.getApiHost() : apiHostByUser;
        String apiKey = Constants.NULL.equals(apiKeyByUser) ? configuration.getApiKey() : apiKeyByUser;
        // 构建请求信息
        Request request = new Request.Builder()
                // url: https://api.openai.com/v1/chat/completions - 通过 IOpenAiApi 配置的 POST 接口,用这样的方式从统一的地方获取配置信息
                .url(apiHost.concat(IOpenAiApi.v1_chat_completions))
                .addHeader("apiKey", apiKey)
                // 封装请求参数信息,如果使用了 Fastjson 也可以替换 ObjectMapper 转换对象
                .post(RequestBody.create(MediaType.get(ContentType.JSON.getValue()), new ObjectMapper().writeValueAsString(chatCompletionRequest)))
                .build();
        // 返回结果信息;EventSource 对象可以取消应答
        return factory.newEventSource(request, eventSourceListener);
    }
下面是测试代码
@Slf4j
public class ApiTest {

    private OpenAiSession openAiSession;

    @Before
    public void test_OpenAiSessionFactory() {
        // 1. 配置文件
        Configuration configuration = new Configuration();
        configuration.setApiHost("转发地址");
        configuration.setApiKey("你的apiKey");
        // 2. 会话工厂
        OpenAiSessionFactory factory = new DefaultOpenAiSessionFactory(configuration);
        // 3. 开启会话
        this.openAiSession = factory.openSession();
    }


    /**
     * 【常用对话模式,推荐使用此模型进行测试】
     * 此对话模型 3.5/4.0 接近于官网体验 & 流式应答
     */
    @Test
    public void test_chat_completions_stream_channel() throws JsonProcessingException, InterruptedException {
        // 1. 创建参数
        ChatCompletionRequest chatCompletion = ChatCompletionRequest
                .builder()
                .stream(true)
                .messages(Collections.singletonList(Message.builder().role(Constants.Role.USER).content("用java写一个冒泡排序").build()))
                .model(ChatCompletionRequest.Model.GPT_3_5_TURBO.getCode())
                .maxTokens(1024)
                .build();

        // 2. 用户配置 【可选参数,支持不同渠道的 apiHost、apiKey】- 方便给每个用户都分配了自己的key,用于售卖场景
        String apiHost = "转发地址";
        String apiKey = "你的apiKey";

        // 3. 发起请求
        EventSource eventSource = openAiSession.completions(apiHost, apiKey, chatCompletion, new EventSourceListener() {
            @Override
            public void onEvent(EventSource eventSource, String id, String type, String data) {
                log.info("测试结果 id:{} type:{} data:{}", id, type, data);
            }

            @Override
            public void onFailure(EventSource eventSource, Throwable t, Response response) {
                log.error("失败 code:{} message:{}", response.code(), response.message());
            }
        });
        // 等待
        new CountDownLatch(1).await();
    }
}
这样一个简单的java chatGPT-SDK就实现了,现在你可以在其他的项目使用chatgpt了哦


 564
564


 被折叠的 条评论
为什么被折叠?
被折叠的 条评论
为什么被折叠?
 到【灌水乐园】发言


