


 本文介绍了如何在RockyLinux 8.5上设置最大化和最小化按钮、切换默认启动界面、管理主机名、配置网桥、使用nmcli、添加sudo权限、安装Google Chrome及SSH免密登录,还包括了nfts分区和ntfs-3g软件包的安装。
一、设置窗口上显示最大化和最小化按钮
安装完Rocky Linux 8.5后,窗口上没有没有最大化和最小化按钮,如下图所示:
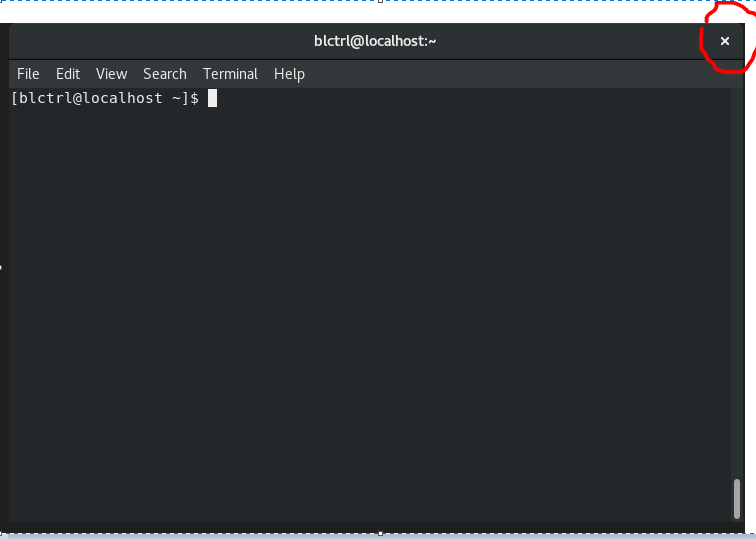
解决办法:
安装gnome-tweaks软件包,并且启动这个软件进行设置:
1、安装gnome-tweaks软件包:
[root@localhost blctrl]# dnf install gnome-tweaks
Last metadata expiration check: 2:02:15 ago on Fri 24 Jun 2022 08:44:01 AM CST.
Dependencies resolved.
=========================================================================================================================================================================================
 Package                                                      Architecture                       Version                                     Repository                             Size
=========================================================================================================================================================================================
Installing:
 gnome-tweaks                                                 noarch                             3.28.1-7.el8                                appstream                             330 k
Installing dependencies:
 gnome-shell-extension-user-theme                             noarch                             3.32.1-27.el8                               appstream                              27 k

Transaction Summary
=========================================================================================================================================================================================
Install  2 Packages

Total download size: 357 k
Installed size: 1.4 M
Is this ok [y/N]: y
Downloading Packages:
(1/2): gnome-shell-extension-user-theme-3.32.1-27.el8.noarch.rpm                                                                                         168 kB/s |  27 kB     00:00
(2/2): gnome-tweaks-3.28.1-7.el8.noarch.rpm                                                                                                              928 kB/s | 330 kB     00:00
-----------------------------------------------------------------------------------------------------------------------------------------------------------------------------------------
Total                                                                                                                                                    178 kB/s | 357 kB     00:02
Running transaction check
Transaction check succeeded.
Running transaction test
Transaction test succeeded.
Running transaction
  Preparing        :                                                                                                                                                                 1/1
  Installing       : gnome-shell-extension-user-theme-3.32.1-27.el8.noarch                                                                                                           1/2
  Installing       : gnome-tweaks-3.28.1-7.el8.noarch                                                                                                                                2/2
  Running scriptlet: gnome-tweaks-3.28.1-7.el8.noarch                                                                                                                                2/2
  Verifying        : gnome-shell-extension-user-theme-3.32.1-27.el8.noarch                                                                                                           1/2
  Verifying        : gnome-tweaks-3.28.1-7.el8.noarch                                                                                                                                2/2

Installed:
  gnome-shell-extension-user-theme-3.32.1-27.el8.noarch                                                 gnome-tweaks-3.28.1-7.el8.noarch

Complete!
[root@localhost blctrl]#
2、启动刚才在命令行中刚才安装的软件:
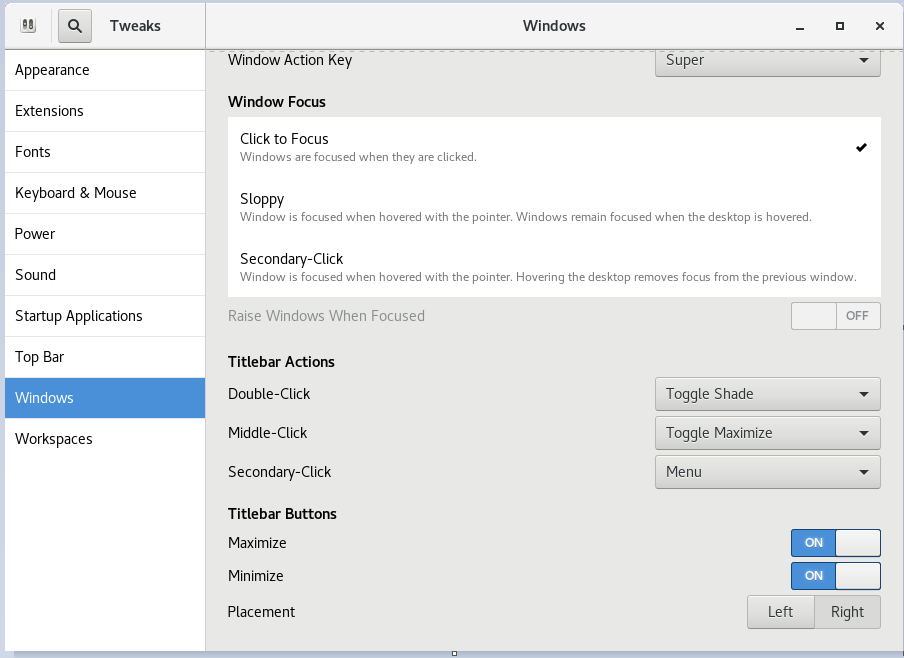
[root@localhost blctrl]# gnome-tweaks3、在启动的设置窗口中,选择windows项,并且设置Maximize和Minimize为ON:
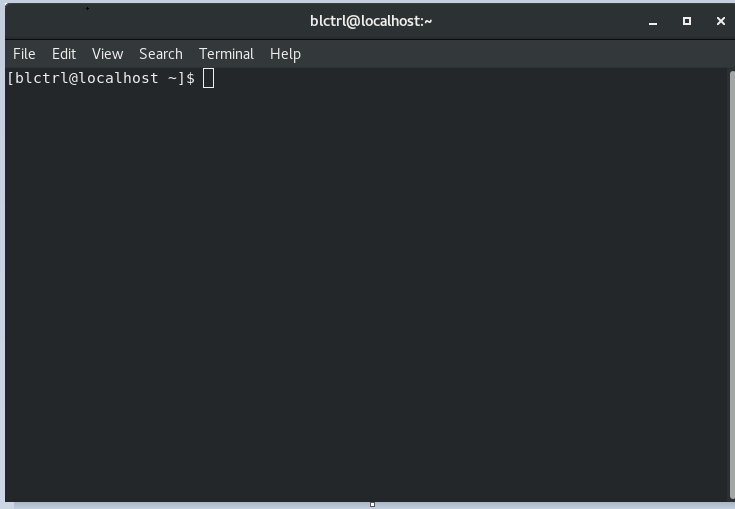
4、在打开一个终端,窗口上最大化和最小化按钮出现了:
二、设置启动时默认进入图形用户界面:
在root用户权限下:
查看当前启动模式
systemctl get-default
[blctrl@localhost ~]$ systemctl get-default
graphical.target
更改模式命令:
由命令行模式更改为图形界面模式:systemctl set-default graphical.target
由图形界面模式更改为命令行模式:systemctl set-default multi-user.target
跟以前使用的linux版本一样,编辑 vi /etc/inittab 文件,修改系统初始化方式
[blctrl@localhost ~]$ cat /etc/inittab
# inittab is no longer used.
#
# ADDING CONFIGURATION HERE WILL HAVE NO EFFECT ON YOUR SYSTEM.
#
# Ctrl-Alt-Delete is handled by /usr/lib/systemd/system/ctrl-alt-del.target
#
# systemd uses 'targets' instead of runlevels. By default, there are two main targets:
#
# multi-user.target: analogous to runlevel 3
# graphical.target: analogous to runlevel 5
#
# To view current default target, run:
# systemctl get-default
#
# To set a default target, run:
# systemctl set-default TARGET.target
三、查看以及修改主机名
[root@localhost blctrl]# cat /etc/hostname        # 查看主机名
localhost.localdomain
[root@localhost blctrl]# hostnamectl set-hostname areadetector   # 修改主机名
[root@localhost blctrl]# hostnamectl                             # 查看修改之后的主机名
   Static hostname: areadetector
         Icon name: computer-desktop
           Chassis: desktop
        Machine ID: 8441fa311fda46f9b78427fa61317010
           Boot ID: 73263affd07c4f9f92b878f355c54468
  Operating System: Rocky Linux 8.6 (Green Obsidian)
       CPE OS Name: cpe:/o:rocky:rocky:8:GA
            Kernel: Linux 4.18.0-372.9.1.el8.x86_64
      Architecture: x86-64
[root@localhost blctrl]# cat /etc/hostname                       # 查看修改之后的主机名
areadetector
四、添加网桥
1、安装brctl
[root@areadetector blctrl]# dnf install bridge-utils
Last metadata expiration check: 1:58:45 ago on Tue 28 Jun 2022 01:01:26 PM CST.
Dependencies resolved.
================================================================================
 Package               Architecture    Version              Repository     Size
================================================================================
Installing:
 bridge-utils          x86_64          1.7.1-2.el8          epel           40 k

Transaction Summary
================================================================================
Install  1 Package

Total download size: 40 k
Installed size: 61 k
Is this ok [y/N]: y
Downloading Packages:
bridge-utils-1.7.1-2.el8.x86_64.rpm              62 kB/s |  40 kB     00:00
...
Installed:
  bridge-utils-1.7.1-2.el8.x86_64

Complete!
[root@areadetector blctrl]#
2、创建网桥br0
[root@areadetector blctrl]# brctl addbr br0        # 创建网桥br0
[root@areadetector blctrl]# brctl show             # 显示网桥信息
bridge name     bridge id               STP enabled     interfaces
br0             8000.000000000000       no
virbr0          8000.5254004c7ae5       yes             vnet5
3、将eno1添加到网桥br0
[root@areadetector blctrl]# ifconfig
eno1: flags=4163<UP,BROADCAST,RUNNING,MULTICAST>  mtu 1500
        inet 192.168.50.150  netmask 255.255.255.0  broadcast 192.168.50.255
        inet6 fe80::1a60:24ff:fea8:cde3  prefixlen 64  scopeid 0x20<link>
        ether 18:60:24:a8:cd:e3  txqueuelen 1000  (Ethernet)
        RX packets 8438290  bytes 12473837852 (11.6 GiB)
        RX errors 0  dropped 2343  overruns 0  frame 0
        TX packets 2107929  bytes 212100725 (202.2 MiB)
        TX errors 0  dropped 0 overruns 0  carrier 0  collisions 0
        device interrupt 16  memory 0x90280000-902a0000
[root@areadetector blctrl]# brctl addif br0 eno1
4、查看网桥信息
[root@areadetector blctrl]# brctl show
bridge name     bridge id               STP enabled     interfaces
br0             8000.186024a8cde3       no              eno1
virbr0          8000.5254004c7ae5       yes             vnet5
5、备份和复制eno1的配置文件:
cd /etc/sysconfig/network-scripts/
cp ifcfg-eno1 ifcfg-eno1.bak          # 备份原来的eno1配置文件
cp ifcfg-eno1 ifcfg-br0               # 从ifcfg-eno1复制一个名为ifcfg-br0的文件
6、1) 对fcfg-br0进行以下修改:
# ifcfg-br0
TYPE=Bridge          ## TYPE修改成Bridge
PROXY_METHOD=none
BROWSER_ONLY=no
BOOTPROTO=dhcp
DEFROUTE=yes
IPV4_FAILURE_FATAL=no
IPV6INIT=yes
IPV6_AUTOCONF=yes
IPV6_DEFROUTE=yes
IPV6_FAILURE_FATAL=no
NAME=br0              ## NAME修改为br0
#UUID=d5ebd91b-846e-43b9-908c-fcb4dce6be3a  # 用#号把UUID这行注释掉
DEVICE=br0            ## DEVICE修改成br0
2) 对ifcfg-eno1文件进行以下修改:
[root@areadetector network-scripts]# cat ifcfg-eno1
TYPE=Ethernet
PROXY_METHOD=none
BROWSER_ONLY=no
BOOTPROTO=no               ## 把BOOTPROTO更改为no
DEFROUTE=yes
IPV4_FAILURE_FATAL=no
IPV6INIT=yes
IPV6_AUTOCONF=yes
IPV6_DEFROUTE=yes
IPV6_FAILURE_FATAL=no
NAME=eno1
UUID=d5ebd91b-846e-43b9-908c-fcb4dce6be3a
DEVICE=eno1
ONBOOT=yes
BRIDGE=br0                 ## 添加这一行BRIDGE=br0
7、关闭eno1,启动br0:发现自动获取的IP地址设置到了br0上。
[root@areadetector blctrl]# ifdown eno1
[root@areadetector blctrl]# ifup br0
[root@areadetector blctrl]# ifconfig
br0: flags=4163<UP,BROADCAST,RUNNING,MULTICAST>  mtu 1500
        inet 192.168.50.150  netmask 255.255.255.0  broadcast 192.168.50.255
        inet6 fe80::1a60:24ff:fea8:cde3  prefixlen 64  scopeid 0x20<link>
        ether 18:60:24:a8:cd:e3  txqueuelen 1000  (Ethernet)
        RX packets 1940  bytes 326030 (318.3 KiB)
        RX errors 0  dropped 0  overruns 0  frame 0
        TX packets 530  bytes 77299 (75.4 KiB)
        TX errors 0  dropped 0 overruns 0  carrier 0  collisions 0

eno1: flags=4163<UP,BROADCAST,RUNNING,MULTICAST>  mtu 1500
        ether 18:60:24:a8:cd:e3  txqueuelen 1000  (Ethernet)
        RX packets 8440809  bytes 12474290949 (11.6 GiB)
        RX errors 0  dropped 2491  overruns 0  frame 0
        TX packets 2108877  bytes 212211564 (202.3 MiB)
        TX errors 0  dropped 0 overruns 0  carrier 0  collisions 0
        device interrupt 16  memory 0x90280000-902a0000
五、网卡管理命令nmcli
1、显示网卡的配置信息和运行状态
[root@areadetector network-scripts]# nmcli
br0: connected to eno1
        "br0"
        bridge, 18:60:24:A8:CD:E3, sw, mtu 1500
        ip4 default
        inet4 192.168.50.150/24
        route4 192.168.50.0/24 metric 425
        route4 default via 192.168.50.1 metric 425
        inet6 fe80::1a60:24ff:fea8:cde3/64
        route6 fe80::/64 metric 1024

vnet6: connected (externally) to vnet6
        "vnet6"
        tun, FE:54:00:80:87:7F, sw, mtu 1500
        master br0
        inet6 fe80::fc54:ff:fe80:877f/64
        route6 fe80::/64 metric 256

eno1: connected (externally) to eno1
        "Intel I219-LM"
        ethernet (e1000e), 18:60:24:A8:CD:E3, hw, mtu 1500
        master br0

enp4s0f2: disconnected
        "Intel X722"
        ethernet (i40e), 18:60:24:A8:CD:E6, hw, port 186024a8cde6, mtu 1500

ens4: disconnected
        "Intel 82599ES SFI/SFP+"
        ethernet (ixgbe), 00:1B:21:C2:20:96, hw, mtu 1500

lo: unmanaged
        "lo"
        loopback (unknown), 00:00:00:00:00:00, sw, mtu 65536

DNS configuration:
        servers: 192.168.50.1
        interface: br0
2、查看所有网卡的状态
[root@areadetector network-scripts]# nmcli device show
GENERAL.DEVICE:                         br0
GENERAL.TYPE:                           bridge
GENERAL.HWADDR:                         18:60:24:A8:CD:E3
GENERAL.MTU:                            1500
GENERAL.STATE:                          100 (connected)
GENERAL.CONNECTION:                     eno1
GENERAL.CON-PATH:                       /org/freedesktop/NetworkManager/ActiveC>
IP4.ADDRESS[1]:                         192.168.50.150/24
IP4.GATEWAY:                            192.168.50.1
IP4.ROUTE[1]:                           dst = 192.168.50.0/24, nh = 0.0.0.0, mt>
IP4.ROUTE[2]:                           dst = 0.0.0.0/0, nh = 192.168.50.1, mt >
IP4.DNS[1]:                             192.168.50.1
IP6.ADDRESS[1]:                         fe80::1a60:24ff:fea8:cde3/64
IP6.GATEWAY:                            --
IP6.ROUTE[1]:                           dst = fe80::/64, nh = ::, mt = 1024


GENERAL.DEVICE:                         vnet6
GENERAL.TYPE:                           tun
GENERAL.HWADDR:                         FE:54:00:80:87:7F
GENERAL.MTU:                            1500
GENERAL.STATE:                          100 (connected (externally))
GENERAL.CONNECTION:                     vnet6
GENERAL.CON-PATH:                       /org/freedesktop/NetworkManager/ActiveConnection/17
IP4.GATEWAY:                            --
IP6.ADDRESS[1]:                         fe80::fc54:ff:fe80:877f/64
IP6.GATEWAY:                            --
IP6.ROUTE[1]:                           dst = fe80::/64, nh = ::, mt = 256

GENERAL.DEVICE:                         eno1
GENERAL.TYPE:                           ethernet
GENERAL.HWADDR:                         18:60:24:A8:CD:E3
GENERAL.MTU:                            1500
GENERAL.STATE:                          100 (connected (externally))
GENERAL.CONNECTION:                     eno1
GENERAL.CON-PATH:                       /org/freedesktop/NetworkManager/ActiveConnection/14
WIRED-PROPERTIES.CARRIER:               on
IP4.GATEWAY:                            --
IP6.GATEWAY:                            --

GENERAL.DEVICE:                         enp4s0f2
GENERAL.TYPE:                           ethernet
GENERAL.HWADDR:                         18:60:24:A8:CD:E6
GENERAL.MTU:                            1500
GENERAL.STATE:                          30 (disconnected)
GENERAL.CONNECTION:                     --
GENERAL.CON-PATH:                       --
WIRED-PROPERTIES.CARRIER:               off
IP4.GATEWAY:                            --
IP6.GATEWAY:                            --

GENERAL.DEVICE:                         ens4
GENERAL.TYPE:                           ethernet
GENERAL.HWADDR:                         00:1B:21:C2:20:96
GENERAL.MTU:                            1500
GENERAL.STATE:                          30 (disconnected)
GENERAL.CONNECTION:                     --
GENERAL.CON-PATH:                       --
WIRED-PROPERTIES.CARRIER:               off
IP4.GATEWAY:                            --
IP6.GATEWAY:                            --

GENERAL.DEVICE:                         lo
GENERAL.TYPE:                           loopback
GENERAL.HWADDR:                         00:00:00:00:00:00
GENERAL.MTU:                            65536
GENERAL.STATE:                          10 (unmanaged)
GENERAL.CONNECTION:                     --
GENERAL.CON-PATH:                       --
IP4.ADDRESS[1]:                         127.0.0.1/8
IP4.GATEWAY:                            --
IP6.ADDRESS[1]:                         ::1/128
IP6.GATEWAY:                            --
IP6.ROUTE[1]:                           dst = ::1/128, nh = ::, mt = 256
3、查看ens4sf2网卡设备详细信息
[root@areadetector network-scripts]# nmcli device show enp4s0f2
GENERAL.DEVICE:                         enp4s0f2
GENERAL.TYPE:                           ethernet
GENERAL.HWADDR:                         18:60:24:A8:CD:E6
GENERAL.MTU:                            1500
GENERAL.STATE:                          30 (disconnected)
GENERAL.CONNECTION:                     --
GENERAL.CON-PATH:                       --
WIRED-PROPERTIES.CARRIER:               off
IP4.GATEWAY:                            --
IP6.GATEWAY:                            --
4、开启或关闭网卡
[root@areadetector network-scripts]# nmcli connection up enp4s0f2    # 开启网卡
Connection successfully activated (D-Bus active path: /org/freedesktop/NetworkManager/ActiveConnection/18)

[root@areadetector network-scripts]# nmcli connection down enp4s0f2   # 关闭网卡
Connection 'enp4s0f2' successfully deactivated (D-Bus active path:    /org/freedesktop/NetworkManager/ActiveConnection/18)
5、设置IP地址
nmcli connection modify enp4s0f2 +ipv4.address 10.30.55.52/246、重载网卡配置
nmcli connection reload 六、普通用户添加sudo功能
1) 测试blctrl用户是否有sudo功能:
[blctrl@areadetector ~]$ sudo ls

We trust you have received the usual lecture from the local System
Administrator. It usually boils down to these three things:

    #1) Respect the privacy of others.
    #2) Think before you type.
    #3) With great power comes great responsibility.

[sudo] password for blctrl:
blctrl is not in the sudoers file.  This incident will be reported.
2) 切换到root用户编辑/etc/sudoers
root    ALL=(ALL)       ALL           # 找到这一行,并在其下添加需要sudo功能的用户
blctrl  ALL=(ALL)       ALL
3) 再次测试blctrl的sudo功能
[blctrl@areadetector ~]$ sudo ls
[sudo] password for blctrl:
data  Desktop  diffraction  Documents  Downloads  Music  Pictures  Public  Templates  Videos
[blctrl@areadetector ~]$
七、安装google chrome浏览器
1) 在/etc/yum.repos.d/目录下创建一个名为google-chrome.repo的文件
[root@areadetector ~]# vi /etc/yum.repos.d/google-chrome.repo2) 在以上创建的文件中添加以下内容
[google-chrome]
name=google-chrome
baseurl=https://dl.google.com/linux/chrome/rpm/stable/x86_64
enabled=1
gpgcheck=1
gpgkey=https://dl.google.com/linux/linux_signing_key.pub
3) 在Linux中安装Chrome Web浏览器
首先使用dnf命令检查拉妻子Google自己的仓库的最新版本是否可用
[root@areadetector blctrl]# dnf info google-chrome-stable
google-chrome                                                                                                       16 kB/s | 3.6 kB     00:00
Available Packages
Name         : google-chrome-stable
Version      : 103.0.5060.53
Release      : 1
Architecture : x86_64
Size         : 82 M
Source       : google-chrome-stable-103.0.5060.53-1.src.rpm
Repository   : google-chrome
Summary      : Google Chrome
URL          : https://chrome.google.com/
License      : Multiple, see https://chrome.google.com/
Description  : The web browser from Google
             :
             : Google Chrome is a browser that combines a minimal design with sophisticated technology to make the web faster, safer, and easier.
按如下,使用dnf命令,将自动安装所有所需的依赖包:
[root@areadetector blctrl]# dnf install google-chrome-stable
google-chrome                                                                                                      8.0 kB/s | 1.3 kB     00:00
Dependencies resolved.
...
Installed:
  google-chrome-stable-103.0.5060.53-1.x86_64        liberation-fonts-1:2.00.3-7.el8.noarch       liberation-mono-fonts-1:2.00.3-7.el8.noarch
  liberation-serif-fonts-1:2.00.3-7.el8.noarch       libmetalink-0.1.3-7.el8.x86_64               mesa-vulkan-drivers-21.3.4-1.el8.x86_64
  vulkan-loader-1.3.204.0-2.el8.x86_64               wget-1.19.5-10.el8.x86_64

Complete!
4) 在终端中启动chrome浏览器:
[root@areadetector blctrl]# google-chrome&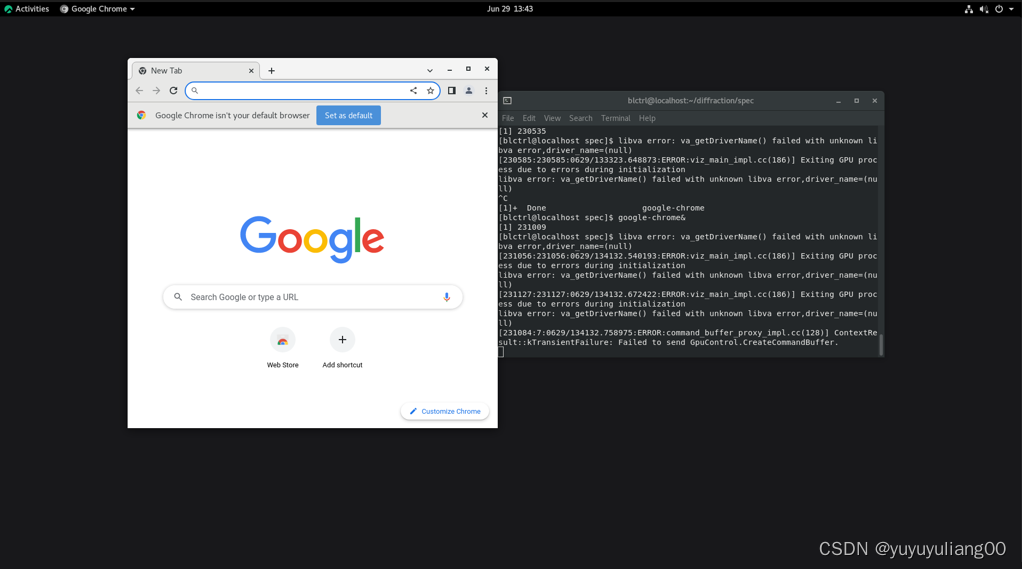
八、在Linux中设置SSH免密登录
用SSH密钥使用免密登录将在两台Linux服务器之间增强对简单文件同步或者传输的信任。
我的设置环境:
SSH客户端:    192.168.50.150         Rocky Linux release 8.6 (Green Obsidian)
SSH远程主机:  192.168.50.197         AlmaLinux release 8.6 (Sky Tiger)
如果你处理很多Linux远程服务器,则SSH免密登录是其中一种自动化任务的最好方法,诸如用脚本自动备份,使用scp命令同步文件以及远程命令执行。
在这个示例中,我们设置以用户blctrl从服务器192.168.50.150 SSH免密自动登录到用户为dbuser的服务器192.168.50.197。
第一步:在192.168.50.150上创建身份验证SSH-Keygen密钥对
首先使用用户blctrl登录到服务器192.168.50.150并且用以下命令产生一对密钥(回车到底):
[blctrl@areadetector ~]$ ssh-keygen -t rsa
Generating public/private rsa key pair.
Enter file in which to save the key (/home/blctrl/.ssh/id_rsa):
Created directory '/home/blctrl/.ssh'.
Enter passphrase (empty for no passphrase):
Enter same passphrase again:
Your identification has been saved in /home/blctrl/.ssh/id_rsa.
Your public key has been saved in /home/blctrl/.ssh/id_rsa.pub.
The key fingerprint is:
SHA256:/lEJRZculrAKsCu1A7AzeL9hBwzWhynuRi0yVBImWYA blctrl@areadetector
The key's randomart image is:
+---[RSA 3072]----+
|+B+o o     .o .. |
|E.= = .   .. ..  |
|o= = +    .o o   |
|B * * .   ..+..  |
| O = + .S. .o.   |
|  + B ...  .     |
| . o =  . .      |
|    .    . .     |
|          .      |
+----[SHA256]-----+
第二步:上传SSH公钥到192.168.50.197
使用来自服务器192.168.50.150 ssh并且在用户dbuser下上传一个生成的公钥(id_rsa.pub)到服务器192.168.50.197
[blctrl@areadetector ~]$ ssh-copy-id dbuser@192.168.50.197
/usr/bin/ssh-copy-id: INFO: Source of key(s) to be installed: "/home/blctrl/.ssh/id_rsa.pub"
The authenticity of host '192.168.50.197 (192.168.50.197)' can't be established.
ECDSA key fingerprint is SHA256:9DgivX1sI9QIt7TOIlT7yWmMpB2qcSbTijuCkRXQDTk.
Are you sure you want to continue connecting (yes/no/[fingerprint])? yes
/usr/bin/ssh-copy-id: INFO: attempting to log in with the new key(s), to filter out any that are already installed
/usr/bin/ssh-copy-id: INFO: 1 key(s) remain to be installed -- if you are prompted now it is to install the new keys
dbuser@192.168.50.197's password:

Number of key(s) added: 1

Now try logging into the machine, with:   "ssh 'dbuser@192.168.50.197'"
and check to make sure that only the key(s) you wanted were added.

[blctrl@areadetector ~]$
第三步:测试从192.168.50.150免密登录到192.168.50.197
[blctrl@areadetector ~]$ ssh dbuser@192.168.50.197
Activate the web console with: systemctl enable --now cockpit.socket

Last login: Wed Jun 29 15:26:06 2022
[dbuser@localhost ~]$
九 识别nfts分区的磁盘需要软件包ntfs-3g
[root@areadetector Downloads]# dnf install ntfs-3g
Last metadata expiration check: 0:25:50 ago on Wed 29 Jun 2022 04:24:25 PM CST.
Dependencies resolved.
================================================================================
 Package             Architecture  Version                    Repository   Size
================================================================================
Installing:
 ntfs-3g             x86_64        2:2021.8.22-2.el8          epel        133 k
Installing dependencies:
 ntfs-3g-libs        x86_64        2:2021.8.22-2.el8          epel        186 k

Transaction Summary
================================================================================
Install  2 Packages

Total download size: 318 k
Installed size: 685 k
Is this ok [y/N]: y
...
Installed:
  ntfs-3g-2:2021.8.22-2.el8.x86_64     ntfs-3g-libs-2:2021.8.22-2.el8.x86_64

Complete!


 1680
1680

 被折叠的 条评论
为什么被折叠?
被折叠的 条评论
为什么被折叠?
 到【灌水乐园】发言


