


root用户登录mysql
mysql -u root -p
创建用户
create user 'yuzhiyun'@'%' identified by '1234';
由于在使用navicate远程访问数据库使用root用户不太安全,所以应该新建用户,然后授予权限,只让该用户访问一个数据库,达到安全目的。
root下给某个用户授与所有权限
grant all privileges on *.* to yuzhiyun@'%' identified by '1234';. 表示所有数据库,@’%’表示所有终端,如果是localhost就不能远程访问
查看所有用户
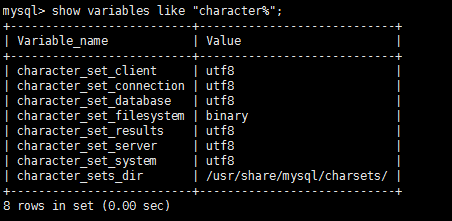
select * from mysql.user;查看编码
show variables like "character%";
出现下图就说明编码修改是正确的,全部是utf8了
修改编码
如果不是如图所示,而是ltin1编码,就要修改编码,在ubuntu下修改编码是修改etc/mysql/my.cnf文件,
1、在[client]下添加default-character-set=utf8
2、在[mysqld]下添加character_set_server=utf8
具体my.cnf内容示例:
#
# The MySQL database server configuration file.
#
# You can copy this to one of:
# - "/etc/mysql/my.cnf" to set global options,
# - "~/.my.cnf" to set user-specific options.
#
# One can use all long options that the program supports.
# Run program with --help to get a list of available options and with
# --print-defaults to see which it would actually understand and use.
#
# For explanations see
# http://dev.mysql.com/doc/mysql/en/server-system-variables.html

# This will be passed to all mysql clients
# It has been reported that passwords should be enclosed with ticks/quotes
# escpecially if they contain "#" chars...
# Remember to edit /etc/mysql/debian.cnf when changing the socket location.
[client]
port        = 3306
socket      = /var/run/mysqld/mysqld.sock
default-character-set=utf8

# Here is entries for some specific programs
# The following values assume you have at least 32M ram

# This was formally known as [safe_mysqld]. Both versions are currently parsed.
[mysqld_safe]
socket      = /var/run/mysqld/mysqld.sock
nice        = 0


[mysqld]
#
# * Basic Settings
#
user        = mysql
pid-file    = /var/run/mysqld/mysqld.pid
socket      = /var/run/mysqld/mysqld.sock
port        = 3306
basedir     = /usr
datadir     = /var/lib/mysql
tmpdir      = /tmp
lc-messages-dir = /usr/share/mysql
skip-external-locking
character_set_server=utf8
max_connections=1000
#
# Instead of skip-networking the default is now to listen only on
# localhost which is more compatible and is not less security

bind-address        = 0.0.0.0
#
# * Fine Tuning
#
key_buffer      = 16M
max_allowed_packet  = 16M
thread_stack        = 192K
thread_cache_size       = 8
# This replaces the startup script and checks MyISAM tables if needed
# the first time they are touched
myisam-recover         = BACKUP
#max_connections        = 100
#table_cache            = 64
#thread_concurrency     = 10
#
# * Query Cache Configuration
#
query_cache_limit   = 1M
query_cache_size        = 16M
#
# * Logging and Replication
#
# Both location gets rotated by the cronjob.
# Be aware that this log type is a performance killer.
# As of 5.1 you can enable the log at runtime!
#general_log_file        = /var/log/mysql/mysql.log
#general_log             = 1
#
# Error log - should be very few entries.
#
log_error = /var/log/mysql/error.log
#
# Here you can see queries with especially long duration
#log_slow_queries   = /var/log/mysql/mysql-slow.log
#long_query_time = 2
#log-queries-not-using-indexes
#
# The following can be used as easy to replay backup logs or for replication.
# note: if you are setting up a replication slave, see README.Debian about
#       other settings you may need to change.
#server-id      = 1
#log_bin            = /var/log/mysql/mysql-bin.log
expire_logs_days    = 10
max_binlog_size         = 100M
#binlog_do_db       = include_database_name
#binlog_ignore_db   = include_database_name
#
# * InnoDB
#
# InnoDB is enabled by default with a 10MB datafile in /var/lib/mysql/.
# Read the manual for more InnoDB related options. There are many!
#
# * Security Features
#
# Read the manual, too, if you want chroot!
# chroot = /var/lib/mysql/
#
# For generating SSL certificates I recommend the OpenSSL GUI "tinyca".
#
# ssl-ca=/etc/mysql/cacert.pem
# ssl-cert=/etc/mysql/server-cert.pem
# ssl-key=/etc/mysql/server-key.pem


[mysqldump]
quick
quote-names
max_allowed_packet  = 16M

[mysql]
#no-auto-rehash # faster start of mysql but no tab completition

[isamchk]
key_buffer      = 16M

#
# * IMPORTANT: Additional settings that can override those from this file!
#   The files must end with '.cnf', otherwise they'll be ignored.
#
!includedir /etc/mysql/conf.d/
navicate 远程连接数据库报错 2003 cannot connect mysql server 10038
错误原因很多种,举例:
1、服务未开启
2、数据库用户权限不够,要授权该用户可以远程访问
3、该数据库只可以在本机被访问(也就是在my.cnf文件中有这一句话:bind-address = 127.0.0.1)
但是在我这里发生错误的原因是第三种,没有修改my.cnf,
设置允许所有ip地址访问该数据库,
vim /etc/MySQL/my.cnf
找到bind-address = 127.0.0.1
注释掉这行,如:#bind-address = 127.0.0.1
或者改为: bind-address = 0.0.0.0
允许任意IP访问;
或者自己指定一个IP地址。
ubuntu启动mysql服务
~$ sudo service mysql start
ubuntu下千万别忘记sudo,windows下cmd是不需要sudo的,直接就是service mysql start
修改密码
比如需要把root的密码从1234改成5670
mysqladmin -u root -p1234 password 5670注意,-p1234是没有空格的,mysqladmin 也没有。
然后注意重启mysql ,先sudo mysql stop 再sudo mysql start.不重启的话,navicate 的那个连接仍旧可以使用,重启后,连接就失效了,必须重新新建连接才能连接到数据库。


 648
648

 被折叠的 条评论
为什么被折叠?
被折叠的 条评论
为什么被折叠?
 到【灌水乐园】发言


