


TMXTiledMap* tilemap=TMXTiledMap::create("test1.tmx");
Sprite *sprite=Sprite("HelloWorld.png");
当你使用上面语句,有没有产生这样的疑问?为什么把资源test1.tmx和HelloWorld.png放在项目目录下的Resources文件中即可直接引用而不用标明具体路径,并且可以在多个平台下引用?或许很多人就会这样说:“别人告诉我放在这个文件夹中就可以了,我自己使用确实可行,也没有出错,我就没有多去探究了”。如果你想知道这具体原因,就要阅读下面的分析了。如果你并不关心其原因,你可以关闭这个网页了。
我以TMXTiledMap::Create函数为讲解对象。
代码1:

TMXTiledMap * TMXTiledMap::create(const std::string& tmxFile)
{
    TMXTiledMap *ret = new TMXTiledMap();
   if (ret->initWithTMXFile(tmxFile))
    {
        ret->autorelease();
     return ret;
    }
    CC_SAFE_DELETE(ret);
   return nullptr;
}
在代码1中,我们可以看到先创建一个TMXTileMap对象,然后初始化,最后加入自动释放池。在这里我们也完全没有看到关于路径相关的字符串。其中让人觉得,路径设置有可能在TMXTiledMap()::initWithTMXFile()中,于是我们继续转到TMXTiledMap()::initWithTMXFile()定义中。代码2如下。
bool TMXTiledMap::initWithTMXFile(const std::string& tmxFile)
{
    CCASSERT(tmxFile.size()>0, "FastTMXTiledMap: tmx file should not be empty");
    setContentSize(Size::ZERO);
    TMXMapInfo *mapInfo = TMXMapInfo::create(tmxFile);
    if (! mapInfo)
    {
        return false;
    }
    CCASSERT( !mapInfo->getTilesets().empty(), "FastTMXTiledMap: Map not found. Please check the filename.");
    buildWithMapInfo(mapInfo);
    return true;
}
在代码2中,我们也没有发现关于路径字符串的信息。再看看代码1中只调用了此函数,我们由此推断路径字符串设定在此函数或此函数的调用中的概率非常大。在代码2中,我们可以看到两个函数的调用,TMXMapInfo::create()和buildWithMapInfo(),显然,TMXMapInfo::create的函数名让我们觉得路径字符串的设置在其中概率更大,因此我们转到TMXMapInfo::create代码定义中,其代码在CCTMXXMLParser.cpp文件中,如代码3。其目录是E:\mycoscos2d\test2\cocos2d\cocos\2d,这就说明与平台无关。
代码3:
TMXMapInfo * TMXMapInfo::create(const std::string& tmxFile)
{
    TMXMapInfo *ret = new TMXMapInfo();
   if(ret->initWithTMXFile(tmxFile))
    {
        ret->autorelease();
     return ret;
    }
    CC_SAFE_DELETE(ret);
   return nullptr;
}
在代码3中,如同代码1的分析,我们要转到TMXMapInfo::initWithTMXFile()的定义中,如代码4。
代码4:bool TMXMapInfo::initWithTMXFile(const std::string& tmxFile) { internalInit(tmxFile, ""); return parseXMLFile(_TMXFileName.c_str()); }
void TMXMapInfo::internalInit(const std::string& tmxFileName, const std::string& resourcePath)
{
    if (tmxFileName.size() > 0)
    {
        _TMXFileName = FileUtils::getInstance()->fullPathForFilename(tmxFileName);
    }
    if (resourcePath.size() > 0)
    {
        _resources = resourcePath;
    }
    ...
}
在代码5中,我们终于看到fullpath的字样了,这就说明路径字符串的设定就在眼前了。于是我们就要转到FileUtils::getInstance()->fullPathForFilename()函数定义中,其类定义在CCFileUtils.cpp中,如代码6,由于代码有点长,只贴出关键部分。此时我们看看CCFileUtils.cpp的路径,我们会发现路径是E:\mycoscos2d\test2\cocos2d\cocos\platform,到这里我们终于看到platform这个关键字,这就说明已经到了与平台相关的代码中。
代码6:
std::string FileUtils::fullPathForFilename(const std::string &filename)
{
    ...
    std::string fullpath;
    for (auto searchIt = _searchPathArray.cbegin(); searchIt != _searchPathArray.cend(); ++searchIt)
    {
        for (auto resolutionIt = _searchResolutionsOrderArray.cbegin(); resolutionIt != _searchResolutionsOrderArray.cend(); ++resolutionIt)
        {
            fullpath = this->getPathForFilename(newFilename, *resolutionIt, *searchIt);

            if (fullpath.length() > 0)
            {
                // Using the filename passed in as key.
                _fullPathCache.insert(std::make_pair(filename, fullpath));
                return fullpath;
            }
        }
    }
   ...
}
在代码6中,我们看到了this->getPathForFilename(),你会不会觉得奇怪,其他函数的调用都没有加this,就它加了this,具体原因在后面讲解。在这里,显然我们对this->getPathForFilename()的兴趣最大,于是我们就转到其定义中如代码7,其实从后面讲解中,可以看到代码是先转到与平台一致的FileUtilsxxx::getPathForFilename()中,然后再由平台FileUtilsxxx::getPathForFileName 调用FileUtils::getPathForFilename()。平台的getPathForFillname作用是把路径格式转化为符合平台路径的格式。
代码7:
std::string FileUtils::getPathForFilename(const std::string& filename, const std::string& resolutionDirectory, const std::string& searchPath)
{
    std::string file = filename;
    std::string file_path = "";
    size_t pos = filename.find_last_of("/");
    if (pos != std::string::npos)
    {
        file_path = filename.substr(0, pos+1);
        file = filename.substr(pos+1);
    }
    // searchPath + file_path + resolutionDirectory
    std::string path = searchPath;
    path += file_path;
    path += resolutionDirectory;
    path = getFullPathForDirectoryAndFilename(path, file);
    //CCLOG("getPathForFilename, fullPath = %s", path.c_str());
    return path;
}
在代码 7中,我们看到这个函数作用是把资源路径和一开始create的文件名相连接。我们转到getFullPathForDirectoryAndFilename()函数定义中,如代码8。
代码8:
std::string FileUtils::getFullPathForDirectoryAndFilename(const std::string& directory, const std::string& filename)
{
    // get directory+filename, safely adding '/' as necessary
    std::string ret = directory;
    if (directory.size() && directory[directory.size()-1] != '/'){
        ret += '/';
    }
    ret += filename;

    // if the file doesn't exist, return an empty string
    if (!isFileExistInternal(ret)) {
        ret = "";
    }
    return ret;
}
在代码8中,我们看到是字符串的连接,根本没有看到资源路径的获取。于是我们就回到代码7中。
在代码7中,我们看到searchPath变量,从代码注释中可以看到//searchPath + file_path + resolutionDirectory,就可以发现searchPath就是我们路径的名称。
在代码7中我们看到也只是字符串的连接,而且searchPath是作为参数传入的。于是我们就回到代码6中。
在代码6中,代码7中的searchPath只是_searchPathArray中的一个迭代器。好,这就说明路径就藏_searchPathArray中,最后我们在CCFileUtils.cpp文件中找到了FileUtils::init(),如代码9。
代码9:bool FileUtils::init() { _searchPathArray.push_back(_defaultResRootPath); _searchResolutionsOrderArray.push_back(""); return true; }
在代码9中,我们看到了_searchPathArray.push_back(_defaultResRootPath),好的,这就是把路径放进容器中。而又是什么函数调用init()函数?当然是调用代码6中的函数的变量,也我们就回到代码5中this->getInstance()返回的变量。
于是我们就转到this->getInstance代码中,此时的目录是E:\mycoscos2d\test2\cocos2d\cocos\platform\win32\CCFileUtilsWin32.cpp,好的,终于转到与平台相关的目录中了。注意我用的VS2012来开发,所以才转到win32这个目录中,如果你是Eclipse来开发,你就转到E:\mycoscos2d\test2\cocos2d\cocos\platform\android\CCFileUtils-Android.cpp这个目录中。如果是IOS,你就转到E:\mycoscos2d\test2\cocos2d\cocos\platform\apple\CCFileUtils-Apple.mm。为什么转到相关的平台的CCFileUtilsxxx.cpp中呢?这是因为在每个与平台相关的头文件中有#if CC_TARGET_PLATFORM == CC_PLATFORM_XXX的条件预处理,也这样说在哪个平台就包含哪个头文件。例如:在CCFileUtilsWin32.h文件中有代码10。这是很巧妙的技巧!#include "base/CCPlatformConfig.h" #if CC_TARGET_PLATFORM == CC_PLATFORM_WIN32 #include "CCStdC.h" #include "platform/CCCommon.h" #include "platform/CCApplicationProtocol.h" #include <string>
我们来看看this->getInstance()的代码,如代码11。此时的FileUtils* FileUtils::getInstance()是在CCFileUtils-Win32.cpp中的而不是在CCFileUtils.cpp中。这是为了跨平台,s_sharedFileUtils是在FileUtils中定义的。FileUtils-Win32是继承FileUtils的。这是很巧妙的技巧!
代码11:
FileUtils* FileUtils::getInstance()
{
    if (s_sharedFileUtils == nullptr)
    {
        s_sharedFileUtils = new FileUtilsWin32();
        if(!s_sharedFileUtils->init())
        {
          delete s_sharedFileUtils;
          s_sharedFileUtils = nullptr;
          CCLOG("ERROR: Could not init CCFileUtilsWin32");
        }
    }
    return s_sharedFileUtils;
}
在代码11中,我们看到s_sharedFileUtils->init(),于是转到定义处,由于此时s_sharedFileUtils是从FileUtilsWin32转换而来的,而且在FileUtils中init()为虚函数,所以init()会转到FileUtilsWin32::init(),而不是FileUtils->init(),这是c++的多态。FileUtilsWin32::init()如代码12。
代码12:bool FileUtilsWin32::init() { _checkPath(); _defaultResRootPath = s_resourcePath; return FileUtils::init(); }
在代码12中,我们看到_checkPath()函数,那就转到它的定义看看,如代码13。
代码13:
static void _checkPath()
{
    if (0 == s_resourcePath.length())
    {
        WCHAR utf16Path[CC_MAX_PATH] = {0};
        GetCurrentDirectoryW(sizeof(utf16Path)-1, utf16Path);

        char utf8Path[CC_MAX_PATH] = {0};
        int nNum = WideCharToMultiByte(CP_UTF8, 0, utf16Path, -1, utf8Path, sizeof(utf8Path), nullptr, nullptr);

        s_resourcePath = convertPathFormatToUnixStyle(utf8Path);
        s_resourcePath.append("/");
    }
}
好吧,在这里我们终于看到win32平台获得路径的函数GetCurrentDirectoryW(sizeof(utf16Path)-1, utf16Path),这个函数就是获得资源路径的,例如路径E:\mycoscos2d\test2\Resources。到此为止,我们终于找到这个设置资源路径的函数了。在Android平台的代码如代码14,每次在用Eclipse导入项目,会先把Resource的资源复制到E:\mycoscos-2d\test2\proj.android\assets这个路径中,以保持同步。
代码14:bool FileUtilsAndroid::init() { _defaultResRootPath = "assets/"; return FileUtils::init(); }
回到代码12中,FileUtilsWin32::init()最后还是调用了FileUtils::init(),那我们来看看FileUtils::init()的定义,如代码15。这是很巧妙的机巧!
代码15:bool FileUtils::init() { _searchPathArray.push_back(_defaultResRootPath); _searchResolutionsOrderArray.push_back(""); return true; }
在代码15中,路径字符串加入了_searchPathArray容器中!
我们现在回到代码6中,this->getPathForFilename(newFilename, *resolutionIt, *searchIt), 为什么加入this?那就要看看代码6的函数调用者代码5,在代码5中有FileUtils::getInstance(),它返回的是由FileUtilsWin32转换而来的,而FileUtils中getPathForFilename为虚函数,根据C++多态,所以会调用FileUtilsWin32::getPathForFilename()。如代码16。代码16:
std::string FileUtilsWin32::getPathForFilename(const std::string& filename, const std::string& resolutionDirectory, const std::string& searchPath)
{
    std::string unixFileName = convertPathFormatToUnixStyle(filename);
    std::string unixResolutionDirectory = convertPathFormatToUnixStyle(resolutionDirectory);
    std::string unixSearchPath = convertPathFormatToUnixStyle(searchPath);
    return FileUtils::getPathForFilename(unixFileName, unixResolutionDirectory, unixSearchPath);
}
在代码16中,我们看到FileUtilsWin32::getPathForFilename()作用是把路径转换为符合平台的路径格式。
到此为止,我们详细讲解了cocos2d-x3.2如何通过FileUtils类来实现把资源放在Resources文件目录下达到多平台的引用。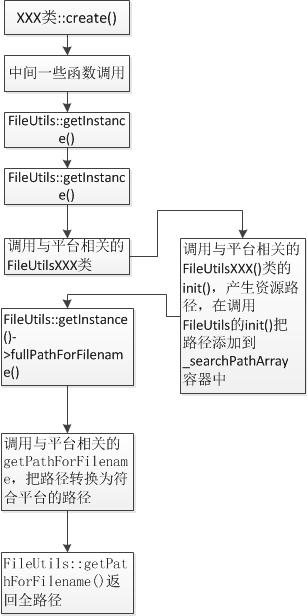


 7551
7551

 被折叠的 条评论
为什么被折叠?
被折叠的 条评论
为什么被折叠?
 到【灌水乐园】发言


