Objective-C学习之snapshotViewAfterScreenUpdates创建一个复合视图的快照

54 篇文章 51 订阅 ¥9.90 ¥99.00

       ios7中添加了调用snapshotViewAfterScreenUpdates创建一个复合视图的快照。然后返回一个uiview对象来表示调用视图的整体外观。由于我们可以看出来创建一个快照是如此的简单,而且比以前的旧方法(需要生成一个位图)要快得多。
该方法有一个BOOL类型的参数,这个参数表示是否立即生成快照,还是在需要更新视图的时候生成。

       为了验证一下,我们开一下两个效果

 UIView *showView = [[UIView alloc] initWithFrame:CGRectMake(0, 0, 100, 100)];

    showView.backgroundColor = [UIColor redColor];

    [self.view addSubview:showView];

 UIView *snap1 = [showView snapshotViewAfterScreenUpdates:NO];

    snap1.center = self.view.center;

    [self.view addSubview:snap1];

这里写图片描述

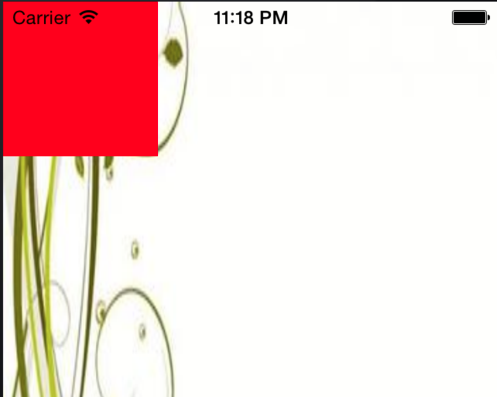
       设置No会立即生成快照,并不会调用重新设置颜色的方法,图中只显示了一个正方形,另一个是无色的

       下面设置为YES,看下效果
这里写图片描述

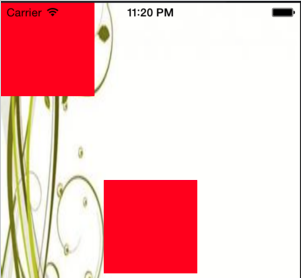
       设置YES,会等到当前队列的所有方法完成之后,才会生成快照,
       在设置NO的情况,延时生成快照,也能达到YES的效果,原理是一样的

转自: http://rralun.blog.163.com/blog/static/1039042962014929111334870/

  • 1
    点赞
  • 2
    收藏
    觉得还不错? 一键收藏
  • 0
    评论
好的,以下是用Objective-C纯代码实现的签到日期界面。实现的界面包括一个导航栏、一个显示当前日期的标签和一个签到按钮。 ViewController.h文件: ```objective-c #import <UIKit/UIKit.h> @interface ViewController : UIViewController @end ``` ViewController.m文件: ```objective-c #import "ViewController.h" @interface ViewController () @property (nonatomic, strong) UILabel *dateLabel; @end @implementation ViewController - (void)viewDidLoad { [super viewDidLoad]; // Do any additional setup after loading the view. // 设置导航栏标题 self.navigationItem.title = @"签到"; // 设置背景颜色 self.view.backgroundColor = [UIColor whiteColor]; // 创建并添加日期标签 self.dateLabel = [[UILabel alloc] initWithFrame:CGRectMake(0, 0, 200, 50)]; self.dateLabel.center = CGPointMake(self.view.frame.size.width/2, self.view.frame.size.height/2 - 50); self.dateLabel.textAlignment = NSTextAlignmentCenter; self.dateLabel.textColor = [UIColor blackColor]; [self.view addSubview:self.dateLabel]; // 更新日期标签的文本 [self updateDateLabel]; // 创建并添加签到按钮 UIButton *checkInButton = [UIButton buttonWithType:UIButtonTypeSystem]; checkInButton.frame = CGRectMake(0, 0, 200, 50); checkInButton.center = CGPointMake(self.view.frame.size.width/2, self.view.frame.size.height/2 + 50); [checkInButton setTitle:@"签到" forState:UIControlStateNormal]; [checkInButton addTarget:self action:@selector(checkInButtonClicked:) forControlEvents:UIControlEventTouchUpInside]; [self.view addSubview:checkInButton]; } // 更新日期标签的文本 - (void)updateDateLabel { NSDateFormatter *formatter = [[NSDateFormatter alloc] init]; formatter.dateFormat = @"yyyy年MM月dd日"; self.dateLabel.text = [formatter stringFromDate:[NSDate date]]; } // 签到按钮点击事件 - (void)checkInButtonClicked:(UIButton *)sender { // TODO: 处理签到逻辑 // 更新日期标签的文本 [self updateDateLabel]; } @end ``` 在AppDelegate.m文件中,将ViewController设置为根视图控制器: ```objective-c #import "AppDelegate.h" #import "ViewController.h" @interface AppDelegate () @end @implementation AppDelegate - (BOOL)application:(UIApplication *)application didFinishLaunchingWithOptions:(NSDictionary *)launchOptions { // Override point for customization after application launch. self.window = [[UIWindow alloc] initWithFrame:[UIScreen mainScreen].bounds]; ViewController *viewController = [[ViewController alloc] init]; UINavigationController *navigationController = [[UINavigationController alloc] initWithRootViewController:viewController]; self.window.rootViewController = navigationController; [self.window makeKeyAndVisible]; return YES; } ``` 这样就完成了一个简单的签到日期界面的实现。运行程序后,可以看到一个带有日期标签和签到按钮的界面。点击签到按钮后,日期标签上的日期会更新为当前日期。

“相关推荐”对你有帮助么?

  • 非常没帮助
  • 没帮助
  • 一般
  • 有帮助
  • 非常有帮助
提交
评论
添加红包

请填写红包祝福语或标题

红包个数最小为10个

红包金额最低5元

当前余额3.43前往充值 >
需支付:10.00
成就一亿技术人!
领取后你会自动成为博主和红包主的粉丝 规则
hope_wisdom
发出的红包
实付
使用余额支付
点击重新获取
扫码支付
钱包余额 0

抵扣说明:

1.余额是钱包充值的虚拟货币,按照1:1的比例进行支付金额的抵扣。
2.余额无法直接购买下载,可以购买VIP、付费专栏及课程。

余额充值