


一、项目描述
本项目通过集成百度AI人脸识别API,实现了人脸检测和识别功能。用户可以上传图片,系统将自动识别人脸并返回识别结果。
二、开发环境
- Visual Studio 2019或更高版本
- .NET Framework 4.7.2或更高版本
- AForge.NET库
- 百度AI平台人脸识别API
三、具体实现
1.界面设计
1.1所用的库
- AForge.Controls
VideoSourcePlayer- AForge.Video
VideoCaptureDevice- AForge.Video.DirectShow
FilterInfoCollectionFilterInfo- Baidu.Aip.Face
Face- BaiduAI.Common
ClassLogerJsonHelper- Newtonsoft.Json.Linq
JArrayJObject- System
- 各种基本的系统功能和类型(如
Exception,EventArgs, 等等)- System.Collections.Generic
Dictionary- System.ComponentModel
BackgroundWorker和其他组件模型支持- System.Data
- 数据处理
- System.Drawing
Image,Bitmap,Graphics,Pen,Point- System.Drawing.Imaging
ImageFormat- System.IO
- 文件操作,如
File,FileStream,MemoryStream,Path, 等等- System.Linq
- LINQ 查询
- System.Security.Policy
- 安全策略
- System.Text
StringBuilder- System.Threading
Thread,ThreadPool,WaitCallback- System.Windows.Forms
- 各种 WinForms 控件(如
Form,Button,TextBox,OpenFileDialog,MessageBox,ComboBox, 等等)- System.Windows.Interop
Imaging- System.Windows.Media.Imaging
BitmapSource,BitmapFrame,BitmapSizeOptions,JpegBitmapEncoder,PngBitmapEncoder
1.2所用到的控件
- Form1
- WinForms 窗体类
- Button
button1,button2,button3,button4,button5,button6,button7,button8,button9- TextBox
textBox1,textBox2,textBox3,textBox4,textBox5,textBox6,textBox7- ComboBox
comboBox1- OpenFileDialog
- 文件打开对话框
- MessageBox
- 信息框
- VideoSourcePlayer
- 来自 AForge.Controls,用于视频显示
- WindowsMediaPlayer
axWindowsMediaPlayer1,用于播放音频(使用 AxWindowsMediaPlayer 控件)
1.3最终设计界面显示如下:

2.代码实现
2.0初始化
首先要在百度AI官网注册账号然后再人脸识别项目中申请创建应用,就可以获得自己的APP_ID,API_KEY,SECRET_KEY。
using AForge.Controls;
using AForge.Video;
using AForge.Video.DirectShow;
using Baidu.Aip.Face;
using BaiduAI.Common;
using Newtonsoft.Json.Linq;
using System;
using System.Collections.Generic;
using System.Drawing;
using System.Drawing.Imaging;
using System.IO;
using System.Text;
using System.Threading;
using System.Windows.Forms;

namespace BaiduAI
{
    public partial class Form1 : Form
    {

        private readonly string APP_ID = "8xxx0583";
        private readonly string API_KEY = "Chxxxx3evL5rPW3skOL";
        private readonly string SECRET_KEY = "VT2FxxxxqEH1ZYcJSw";
        private Face client = null;
        private bool IsStart = false;
        private FaceLocation location = null;
        private FilterInfoCollection videoDevices = null;
        private VideoCaptureDevice videoSource;

        public Form1()
        {
            InitializeComponent();
            axWindowsMediaPlayer1.uiMode = "Invisible";
            client = new Face(API_KEY, SECRET_KEY);
        }
    }
}
2.1人脸检测
1.下面的自己的图片文件路径替换进去的话,使用应用的时候点击按钮就会先进入这个文件夹里面找图片,如果不更改的话,系统找不到文件路径,可能会按默认的进去。
2.设置参数这里,可以去官网的人脸识别技术文档里面查看具体有哪些token可以设置,也有一些参数有默认值。
private void button1_Click(object sender, EventArgs e)
{
    OpenFileDialog dialog = new OpenFileDialog();
    dialog.InitialDirectory = "C:\\";//自己的图片文件路径
    dialog.Filter = "所有文件|*.*";
    dialog.RestoreDirectory = true;
    dialog.FilterIndex = 1;

    if (dialog.ShowDialog() == DialogResult.OK)
    {
        string filename = dialog.FileName;
        try
        {
            Image im = Image.FromFile(filename);
            var image = ConvertImageToBase64(im);
            string imageType = "BASE64";

            var options = new Dictionary<string, object>{
                {"max_face_num", 2},
                {"face_field", "age,beauty"},
                {"face_fields", "age,qualities,beauty"}
            };

            var result = client.Detect(image, imageType, options);
            textBox1.Text = result.ToString();
        }
        catch (Exception ex)
        {
            MessageBox.Show(ex.Message);
        }
    }
}

public string ConvertImageToBase64(Image file)
{
    using (MemoryStream memoryStream = new MemoryStream())
    {
        file.Save(memoryStream, file.RawFormat);
        byte[] imageBytes = memoryStream.ToArray();
        return Convert.ToBase64String(imageBytes);
    }
}
2.2人脸对比
通过选择两张图片,调用百度AI的人脸比对接口,比较两张图片中的人脸。
private void button2_Click(object sender, EventArgs e)
{
    if (string.IsNullOrEmpty(textBox2.Text) || string.IsNullOrEmpty(textBox3.Text))
    {
        MessageBox.Show("请选择要对比的人脸图片");
        return;
    }
    try
    {
        string path1 = textBox2.Text;
        string path2 = textBox3.Text;

        var faces = new JArray
        {
            new JObject
            {
                {"image", ReadImg(path1)},
                {"image_type", "BASE64"},
                {"face_type", "LIVE"},
                {"quality_control", "LOW"},
                {"liveness_control", "NONE"},
            },
            new JObject
            {
                {"image", ReadImg(path2)},
                {"image_type", "BASE64"},
                {"face_type", "LIVE"},
                {"quality_control", "LOW"},
                {"liveness_control", "NONE"},
            }
         };

        var result = client.Match(faces);
        textBox1.Text = result.ToString();
    }
    catch (Exception ex)
    {
        MessageBox.Show(ex.Message);
    }
}

public string ReadImg(string img)
{
    return Convert.ToBase64String(File.ReadAllBytes(img));
}
2.3获取系统摄像头
通过AForge库获取摄像头设备,并显示实时视频。
private void Form1_Load(object sender, EventArgs e)
{
    videoDevices = new FilterInfoCollection(FilterCategory.VideoInputDevice);
    if (videoDevices != null && videoDevices.Count > 0)
    {
        foreach (FilterInfo device in videoDevices)
        {
            comboBox1.Items.Add(device.Name);
        }
        comboBox1.SelectedIndex = 0;
    }

    videoSourcePlayer1.NewFrame += VideoSourcePlayer1_NewFrame;
    ThreadPool.QueueUserWorkItem(new WaitCallback(p =>
    {
        while (true)
        {
            IsStart = true;
            Thread.Sleep(500);
        }
    }));
}

private void VideoSourcePlayer1_NewFrame(object sender, ref Bitmap image)
{
    if (IsStart)
    {
        IsStart = false;
        ThreadPool.QueueUserWorkItem(new WaitCallback(this.Detect), image.Clone());
    }
    if (location != null)
    {
        try
        {
            Graphics g = Graphics.FromImage(image);
            g.DrawLine(new Pen(Color.Black), new Point(location.left, location.top), new Point(location.left + location.width, location.top));
            g.DrawLine(new Pen(Color.Black), new Point(location.left, location.top), new Point(location.left, location.top + location.height));
            g.DrawLine(new Pen(Color.Black), new Point(location.left, location.top + location.height), new Point(location.left + location.width, location.top + location.height));
            g.DrawLine(new Pen(Color.Black), new Point(location.left + location.width, location.top), new Point(location.left + location.width, location.top + location.height));
            g.Dispose();
        }
        catch (Exception ex)
        {
            MessageBox.Show("绘制方框出错:" + ex.Message);
        }
    }
}
2.4摄像头拍照
实现拍照功能,并保存图像到本地。
private void button5_Click(object sender, EventArgs e)
{
    if (comboBox1.Items.Count <= 0)
    {
        MessageBox.Show("请插入视频设备");
        return;
    }
    try
    {
        if (videoSourcePlayer1.IsRunning)
        {
            BitmapSource bitmapSource = System.Windows.Interop.Imaging.CreateBitmapSourceFromHBitmap(
                            videoSourcePlayer1.GetCurrentVideoFrame().GetHbitmap(),
                            IntPtr.Zero,
                             Int32Rect.Empty,
                            BitmapSizeOptions.FromEmptyOptions());
            PngBitmapEncoder pE = new PngBitmapEncoder();
            pE.Frames.Add(BitmapFrame.Create(bitmapSource));
            string picName = GetImagePath() + "\\" + DateTime.Now.ToFileTime() + ".jpg";
            if (File.Exists(picName))
            {
                File.Delete(picName);
            }
            using (Stream stream = File.Create(picName))
            {
                pE.Save(stream);
            }
            //拍照完成后刷新界面,不关闭窗体
            if (videoSourcePlayer1 != null && videoSourcePlayer1.IsRunning)
            {
                videoSourcePlayer1.SignalToStop();
                videoSourcePlayer1.WaitForStop();
            }

            MessageBox.Show("拍照成功,请进行人脸注册!");
        }
    }
    catch (Exception ex)
    {
        MessageBox.Show("摄像头异常:" + ex.Message);
    }
}
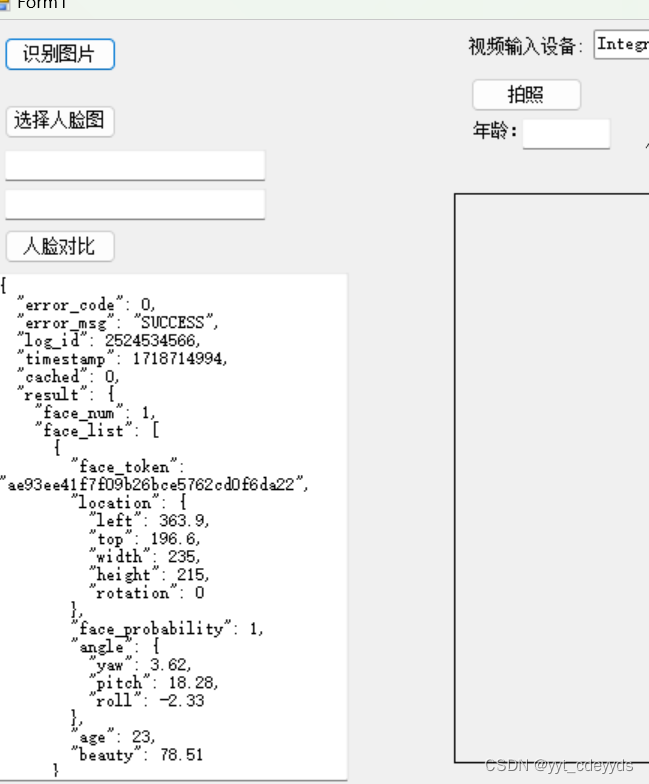
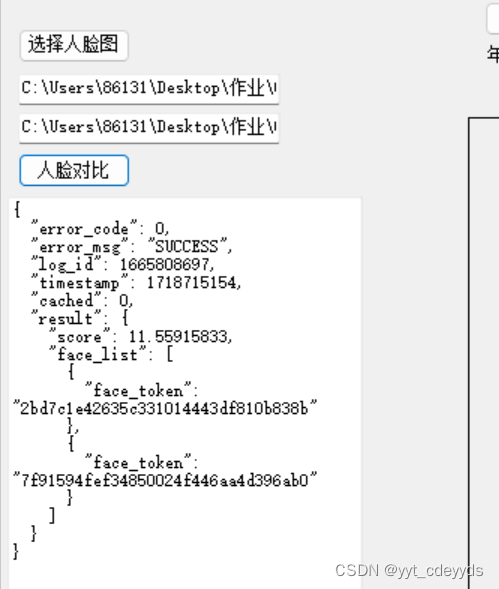
三、结果
人脸检测:
人脸对比:
四、结语
通过以上步骤,我们成功实现了一个使用百度AI进行人脸识别的项目。该项目包括人脸检测、人脸比对、摄像头拍照、人脸注册和人脸登录等功能,展示了如何结合百度AI平台和AForge库实现实用的人脸识别应用。希望本博客能对你有所帮助。


 1304
1304


 被折叠的 条评论
为什么被折叠?
被折叠的 条评论
为什么被折叠?
 到【灌水乐园】发言


