


操作题(详解)
选择题:https://blog.csdn.net/yzqtcc/article/details/111672517?spm=1001.2014.3001.5501
主从数据库管理
在xserver1、xserver2上安装mariadb数据库,并配置为主从数据库(xserver1为主节点、xserver2为从节点),实现两个数据库的主从同步。配置完毕后,请在xserver2上的数据库中执行“show slave status \G”命令查询从节点复制状态,将查询到的结果以文本形式提交到答题框。
#server1主
[root@xserver1 ~]#yum install mariadb-server mariadb -y
[root@xserver1 ~]# vi /etc/my.cnf
[mysqld]
server-id=1
log-bin=mysql-bin
datadir=/var/lib/mysql
socket=/var/lib/mysql/mysql.sock
 # Disabling symbolic-links is recommended to prevent assorted security risks
symbolic-links=0
"/etc/my.cnf" 21L, 600C written
[root@xserver1 ~]# systemctl restart mariadb
#server2从
[root@xserver2 ~]#yum install -y mariadb mariadb-server
[root@xserver2 ~]# vi /etc/my.cnf
[mysqld]
server-id = 2
log-bin=mysql-bin
datadir=/var/lib/mysql
socket=/var/lib/mysql/mysql.sock
[root@xserver2 ~]# systemctl restart mariadb
#server1主
[root@xserver1 ~]# mysql
Welcome to the MariaDB monitor.  Commands end with ; or \g.
Your MariaDB connection id is 2
Server version: 5.5.56-MariaDB MariaDB Server

Copyright (c) 2000, 2017, Oracle, MariaDB Corporation Ab and others.

Type 'help;' or '\h' for help. Type '\c' to clear the current input statement.

MariaDB [(none)]> flush tables with read lock;
Query OK, 0 rows affected (0.00 sec)
MariaDB [(none)]> exit
Bye
[root@xserver1 ~]# mysql
Welcome to the MariaDB monitor.  Commands end with ; or \g.
Your MariaDB connection id is 3
Server version: 5.5.56-MariaDB MariaDB Server

Copyright (c) 2000, 2017, Oracle, MariaDB Corporation Ab and others.

Type 'help;' or '\h' for help. Type '\c' to clear the current input statement.

MariaDB [(none)]> grant replication slave on *.* to 'yzq'@'192.168.182.129' identified by '000000';
Query OK, 0 rows affected (0.00 sec)

MariaDB [(none)]> show master status;
+------------------+----------+--------------+------------------+
| File             | Position | Binlog_Do_DB | Binlog_Ignore_DB |
+------------------+----------+--------------+------------------+
| mysql-bin.000003 |      400 |              |                  |
+------------------+----------+--------------+------------------+
1 row in set (0.00 sec)
#server2从
[root@xserver2 ~]# mysql
Welcome to the MariaDB monitor.  Commands end with ; or \g.
Your MariaDB connection id is 2
Server version: 5.5.56-MariaDB MariaDB Server

Copyright (c) 2000, 2017, Oracle, MariaDB Corporation Ab and others.

Type 'help;' or '\h' for help. Type '\c' to clear the current input statement.

MariaDB [(none)]> change master to master_host='192.168.182.128',master_user='yzq',master_password='000000',master_log_file='mysql-bin.000003',master_log_pos=400;
Query OK, 0 rows affected (0.00 sec)

MariaDB [(none)]> slave start;
Query OK, 0 rows affected (0.00 sec)

MariaDB [(none)]> show slave status\G
*************************** 1. row ***************************
               Slave_IO_State: Waiting for master to send event
                  Master_Host: 192.168.182.128
                  Master_User: yzq
                  Master_Port: 3306
                Connect_Retry: 60
              Master_Log_File: mysql-bin.000003
          Read_Master_Log_Pos: 400
               Relay_Log_File: mariadb-relay-bin.000002
                Relay_Log_Pos: 529
        Relay_Master_Log_File: mysql-bin.000003
             Slave_IO_Running: Yes
            Slave_SQL_Running: Yes
              Replicate_Do_DB:
          Replicate_Ignore_DB:
           Replicate_Do_Table:
       Replicate_Ignore_Table:
      Replicate_Wild_Do_Table:
  Replicate_Wild_Ignore_Table:
                   Last_Errno: 0
                   Last_Error:
                 Skip_Counter: 0
          Exec_Master_Log_Pos: 400
              Relay_Log_Space: 825
              Until_Condition: None
               Until_Log_File:
                Until_Log_Pos: 0
           Master_SSL_Allowed: No
           Master_SSL_CA_File:
           Master_SSL_CA_Path:
              Master_SSL_Cert:
            Master_SSL_Cipher:
               Master_SSL_Key:
        Seconds_Behind_Master: 0
Master_SSL_Verify_Server_Cert: No
                Last_IO_Errno: 0
                Last_IO_Error:
               Last_SQL_Errno: 0
               Last_SQL_Error:
  Replicate_Ignore_Server_Ids:
             Master_Server_Id: 1
1 row in set (0.00 sec)

MariaDB [(none)]>
Mariadb
使用VMware软件和提供的CentOS-7-x86_64-DVD-1511.iso创建虚拟机,自行配置好网络和YUM源,安装mariadb数据库,安装完毕后登录数据库,查询当前系统的时间和用户。依次将操作命令和返回结果以文本形式提交到答题框。(数据库用户名root,密码000000;关于数据库的命令均使用小写)
[root@xserver ~]# cat /etc/yum.repos.d/local.repo
[centos]
name=centos
baseurl=file:///opt/centos
gpgcheck=0
enabled=1
[root@xserver ~]# yum install -y mariadb mariadb-server
[root@xserver ~]# mysql -uroot -p000000
Welcome to the MariaDB monitor.  Commands end with ; or \g.
Your MariaDB connection id is 46
Server version: 10.1.17-MariaDB MariaDB Server

Copyright (c) 2000, 2016, Oracle, MariaDB Corporation Ab and others.

Type 'help;' or '\h' for help. Type '\c' to clear the current input statement.

MariaDB [(none)]> select sysdate();
+---------------------+
| sysdate()           |
+---------------------+
| 2020-12-07 10:17:33 |
+---------------------+
1 row in set (0.00 sec)

MariaDB [(none)]> select user();
+----------------+
| user()         |
+----------------+
| root@localhost |
+----------------+
1 row in set (0.00 sec)
OpenStack题
OpenStack Neutron管理
使用VMWare软件启动提供的opensatckallinone镜像,自行检查openstack中各服务的状态,若有问题自行排查。在dashboard界面创建云主机外部网络ext-net。子网为ext-subnet,云主机浮动IP可用网段为192.168.200.100~192.168.200.200,网关为192.168.200.1。创建云主机内部网络int-net1,子网为int-subnet1,云主机子网IP可用网段为10.0.0.100 ~ 10.0.0.200,网关为10.0.0.1。添加名为extrouter的路由器,添加网关在ext-net网络,添加内部端口到int-net1网络,完成内部网络int-net1和外部网络的连通。将执行neutron router-show ext-router命令所返回的结果以文本形式提交到答题框。
(1)在管理员网络里创建外部网ext-net
 (2)创建外部网络子网ext-subnet


(3)创建内部网络int-net1
 (4)创建内部网络子网int-subnet1


(5)创建路由ext-router

(6)增加接口

(7)查看网络拓扑图

(8)执行neutron router-show ext-router命令(查看ext-router路由)

Cinder管理
使用VMWare软件启动提供的opensatckallinone镜像,自行检查openstack中各服务的状态,若有问题自行排查。使用Cinder服务,创建名为" lvm的卷类型,然后创建一块带"Ivm”标识的云硬盘,名称为BlockVloume,大小为2G,查询该云硬盘详细信息。完成后,将cinder show BlockVloume命令的返回结果以文本形式提交到答题框。
[root@controller ~]# source /etc/keystone/admin-openrc.sh
[root@controller ~]# cinder type-create lvm
+--------------------------------------+------+-------------+-----------+
|                  ID                  | Name | Description | Is_Public |
+--------------------------------------+------+-------------+-----------+
| 96d48f5e-7f57-43da-aa02-ec1446b9f3a5 | lvm  |      -      |    True   |
+--------------------------------------+------+-------------+-----------+
[root@controller ~]# cinder create --name BlockVloume --volume-type lvm 2
+--------------------------------+--------------------------------------+
|            Property            |                Value                 |
+--------------------------------+--------------------------------------+
|          attachments           |                  []                  |
|       availability_zone        |                 nova                 |
|            bootable            |                false                 |
|      consistencygroup_id       |                 None                 |
|           created_at           |      2020-12-08T15:23:41.000000      |
|          description           |                 None                 |
|           encrypted            |                False                 |
|               id               | ea2bfd3c-3017-4a66-b0db-fe6f5ab41425 |
|            metadata            |                  {}                  |
|        migration_status        |                 None                 |
|          multiattach           |                False                 |
|              name              |             BlockVloume              |
|     os-vol-host-attr:host      |                 None                 |
| os-vol-mig-status-attr:migstat |                 None                 |
| os-vol-mig-status-attr:name_id |                 None                 |
|  os-vol-tenant-attr:tenant_id  |   f9ff39ba9daa4e5a8fee1fc50e2d2b34   |
|       replication_status       |               disabled               |
|              size              |                  2                   |
|          snapshot_id           |                 None                 |
|          source_volid          |                 None                 |
|             status             |               creating               |
|           updated_at           |                 None                 |
|            user_id             |   0befa70f767848e39df8224107b71858   |
|          volume_type           |                 lvm                  |
+--------------------------------+--------------------------------------+
 [root@controller ~]# cinder show BlockVloume
+--------------------------------+--------------------------------------+
|            Property            |                Value                 |
+--------------------------------+--------------------------------------+
|          attachments           |                  []                  |
|       availability_zone        |                 nova                 |
|            bootable            |                false                 |
|      consistencygroup_id       |                 None                 |
|           created_at           |      2020-12-08T15:23:41.000000      |
|          description           |                 None                 |
|           encrypted            |                False                 |
|               id               | ea2bfd3c-3017-4a66-b0db-fe6f5ab41425 |
|            metadata            |                  {}                  |
|        migration_status        |                 None                 |
|          multiattach           |                False                 |
|              name              |             BlockVloume              |
|     os-vol-host-attr:host      |          controller@lvm#LVM          |
| os-vol-mig-status-attr:migstat |                 None                 |
| os-vol-mig-status-attr:name_id |                 None                 |
|  os-vol-tenant-attr:tenant_id  |   f9ff39ba9daa4e5a8fee1fc50e2d2b34   |
|       replication_status       |               disabled               |
|              size              |                  2                   |
|          snapshot_id           |                 None                 |
|          source_volid          |                 None                 |
|             status             |              available               |
|           updated_at           |      2020-12-08T15:23:42.000000      |
|            user_id             |   0befa70f767848e39df8224107b71858   |
|          volume_type           |                 lvm                  |
+--------------------------------+--------------------------------------+
Nova管理
使用VMWare软件启动提供的opensatckallinone镜像,自行检查openstack中各服务的状态,若有问题自行排查。使用nova相关命令,启动一个云主机,云主机类型使用m1.tiny,镜像使用上一题中上传的mycirros镜像,云主机名称为examtest,将上述所有操作命令及返回结果以文本的方式提交到答题框。
[root@controller ~]# neutron net-create net-1   //要先创建一个内网(用图形命令界面都可以)
Created a new network:
+---------------------------+--------------------------------------+
| Field                     | Value                                |
+---------------------------+--------------------------------------+
| admin_state_up            | True                                 |
| availability_zone_hints   |                                      |
| availability_zones        |                                      |
| created_at                | 2020-12-08T11:29:43                  |
| description               |                                      |
| id                        | a405dd12-cb45-41d7-b4f9-76fd9faccefc |
| ipv4_address_scope        |                                      |
| ipv6_address_scope        |                                      |
| mtu                       | 1458                                 |
| name                      | net-1                             |
| port_security_enabled     | True                                 |
| provider:network_type     | gre                                  |
| provider:physical_network |                                      |
| provider:segmentation_id  | 49                                   |
| router:external           | False                                |
| shared                    | False                                |
| status                    | ACTIVE                               |
| subnets                   |                                      |
| tags                      |                                      |
| tenant_id                 | f9ff39ba9daa4e5a8fee1fc50e2d2b34     |
| updated_at                | 2020-12-08T11:29:43                  |
+---------------------------+--------------------------------------+
[root@controller ~]# neutron subnet-create net-1 10.0.0.0/24 --name int-subnet1 --allocation-pool start=10.0.0.100,end=10.0.0.200 --gateway 10.0.0.1
Created a new subnet:
+-------------------+----------------------------------------------+
| Field             | Value                                        |
+-------------------+----------------------------------------------+
| allocation_pools  | {"start": "10.0.0.100", "end": "10.0.0.200"} |
| cidr              | 10.0.0.0/24                                  |
| created_at        | 2020-12-08T11:31:12                          |
| description       |                                              |
| dns_nameservers   |                                              |
| enable_dhcp       | True                                         |
| gateway_ip        | 10.0.0.1                                     |
| host_routes       |                                              |
| id                | 86cbd211-7794-4089-83d4-f42c475df9c2         |
| ip_version        | 4                                            |
| ipv6_address_mode |                                              |
| ipv6_ra_mode      |                                              |
| name              | int-subnet1                                  |
| network_id        | a405dd12-cb45-41d7-b4f9-76fd9faccefc         |
| subnetpool_id     |                                              |
| tenant_id         | f9ff39ba9daa4e5a8fee1fc50e2d2b34             |
| updated_at        | 2020-12-08T11:31:12                          |
+-------------------+----------------------------------------------+

[root@controller ~]# nova net-list
+--------------------------------------+-------+------+
| ID                                   | Label | CIDR |
+--------------------------------------+-------+------+
| a405dd12-cb45-41d7-b4f9-76fd9faccefc | net-1 | None |
+--------------------------------------+-------+------+
[root@controller ~]# nova boot --flavor m1.tiny --image mycirros --nic net-id=a405dd12-cb45-41d7-b4f9-76fd9faccefc examtest
+--------------------------------------+-------------------------------------------------+
| Property                             | Value                                           |
+--------------------------------------+-------------------------------------------------+
| OS-DCF:diskConfig                    | MANUAL                                          |
| OS-EXT-AZ:availability_zone          |                                                 |
| OS-EXT-SRV-ATTR:host                 | -                                               |
| OS-EXT-SRV-ATTR:hostname             | examtest                                        |
| OS-EXT-SRV-ATTR:hypervisor_hostname  | -                                               |
| OS-EXT-SRV-ATTR:instance_name        | instance-00000005                               |
| OS-EXT-SRV-ATTR:kernel_id            |                                                 |
| OS-EXT-SRV-ATTR:launch_index         | 0                                               |
| OS-EXT-SRV-ATTR:ramdisk_id           |                                                 |
| OS-EXT-SRV-ATTR:reservation_id       | r-i4zad0nm                                      |
| OS-EXT-SRV-ATTR:root_device_name     | -                                               |
| OS-EXT-SRV-ATTR:user_data            | -                                               |
| OS-EXT-STS:power_state               | 0                                               |
| OS-EXT-STS:task_state                | scheduling                                      |
| OS-EXT-STS:vm_state                  | building                                        |
| OS-SRV-USG:launched_at               | -                                               |
| OS-SRV-USG:terminated_at             | -                                               |
| accessIPv4                           |                                                 |
| accessIPv6                           |                                                 |
| adminPass                            | 8nhoL2DfFAB5                                    |
| config_drive                         |                                                 |
| created                              | 2020-12-07T11:14:22Z                            |
| description                          | -                                               |
| flavor                               | m1.tiny (1)                                     |
| hostId                               |                                                 |
| host_status                          |                                                 |
| id                                   | f66b53df-7bf5-4b9c-be8e-b86dccac77fc            |
| image                                | mycirros (904fa2ed-44a9-4812-b743-ae4fd0b68b27) |
| key_name                             | -                                               |
| locked                               | False                                           |
| metadata                             | {}                                              |
| name                                 | examtest                                        |
| os-extended-volumes:volumes_attached | []                                              |
| progress                             | 0                                               |
| security_groups                      | default                                         |
| status                               | BUILD                                           |
| tenant_id                            | f9ff39ba9daa4e5a8fee1fc50e2d2b34                |
| updated                              | 2020-12-07T11:14:22Z                            |
| user_id                              | 0befa70f767848e39df8224107b71858                |
+--------------------------------------+-------------------------------------------------+
Nova管理
使用提供的”all-in-one"虚拟机,通过nova的相关命令创建名为exam,ID为1234,内存为1024M,硬盘为20G,虚拟内核数量为2的云主机类型,查看exam的详细信息。依次将操作命令及返回结果以文本形式提交到答题框。
[root@controller ~]# source /etc/keystone/admin-openrc.sh
[root@controller ~]# nova flavor-create exam 1234 1024 20 2
+------+------+-----------+------+-----------+------+-------+-------------+-----------+
| ID   | Name | Memory_MB | Disk | Ephemeral | Swap | VCPUs | RXTX_Factor | Is_Public |
+------+------+-----------+------+-----------+------+-------+-------------+-----------+
| 1234 | exam | 1024      | 20   | 0         |      | 2     | 1.0         | True      |
+------+------+-----------+------+-----------+------+-------+-------------+-----------+
[root@controller ~]# nova flavor-show 1234
+----------------------------+-------+
| Property                   | Value |
+----------------------------+-------+
| OS-FLV-DISABLED:disabled   | False |
| OS-FLV-EXT-DATA:ephemeral  | 0     |
| disk                       | 20    |
| extra_specs                | {}    |
| id                         | 1234  |
| name                       | exam  |
| os-flavor-access:is_public | True  |
| ram                        | 1024  |
| rxtx_factor                | 1.0   |
| swap                       |       |
| vcpus                      | 2     |
+----------------------------+-------+
keystone管理
使用提供的"all-in-one"虚拟机,创建用户testuser,密码为xiandian,将testuser用户分配给admin项目,赋予用户admin的权限。依次将操作命令和查询结果以文本形式提交到答题框
[root@controller ~]# source /etc/keystone/admin-openrc.sh
[root@controller ~]# openstack user create --domain demo --password xiandian testuser
+-----------+----------------------------------+
| Field     | Value                            |
+-----------+----------------------------------+
| domain_id | b69094af70ad436f9abbe5c81b9f865b |
| enabled   | True                             |
| id        | 50d3ab7bb40e47029a18477e0a002837 |
| name      | testuser                          |
+-----------+----------------------------------+
[root@controller ~]# openstack role add --project admin --user testuser admin
Keystone管理
使用VMWare软件启动提供的opensatckallinone镜像,自行检查openstack中各服务的状态,若有问题自行排查。在keystone中创建用户testuser,密码为123456,创建好之后,查看testuser的详细信息。将上述所有操作命令及返回结果以文本形式提交到答题框。
[root@controller ~]# source /etc/keystone/admin-openrc.sh
[root@controller ~]# openstack user create --domain xiandian --password 123456 testuser
[root@controller ~]# openstack user show testuser
+-----------+----------------------------------+
| Field     | Value                            |
+-----------+----------------------------------+
| domain_id | b69094af70ad436f9abbe5c81b9f865b |
| enabled   | True                             |
| id        | 42c36af871fa4c59b881fe0dc72b421a |
| name      | testuser                         |
+-----------+----------------------------------+
Glance管理
使用VMWare软件启动提供的opensatckallinone镜像,自行检查openstack中各服务的状态,若有问题自行排查。在xserver1节点的/root目录下存在一个cirros-0.3.4-x86_64-disk.img镜像;使用glance命令将镜像上传,并命名为mycirros,最后将glance image-show id命令的返回结果以文本形式提交到答题框。
[root@controller ~]# source /etc/keystone/admin-openrc.sh
[root@controller ~]# glance image-create --name mycirros --disk-format "qcow2" --container-format bare --progress < cirros-0.3.4-x86_64-disk.img
[=============================>] 100%
+------------------+--------------------------------------+
| Property         | Value                                |
+------------------+--------------------------------------+
| checksum         | ee1eca47dc88f4879d8a229cc70a07c6     |
| container_format | bare                                 |
| created_at       | 2020-12-07T09:54:01Z                 |
| disk_format      | qcow2                                |
| id               | 9fc7a721-3e26-4218-8d96-3c301d5b87ac |
| min_disk         | 0                                    |
| min_ram          | 0                                    |
| name             | mycirros                             |
| owner            | f9ff39ba9daa4e5a8fee1fc50e2d2b34     |
| protected        | False                                |
| size             | 13287936                             |
| status           | active                               |
| tags             | []                                   |
| updated_at       | 2020-12-07T09:54:01Z                 |
| virtual_size     | None                                 |
| visibility       | private                              |
+------------------+--------------------------------------+
[root@controller ~]# glance image-show  9fc7a721-3e26-4218-8d96-3c301d5b87ac
+------------------+--------------------------------------+
| Property         | Value                                |
+------------------+--------------------------------------+
| checksum         | ee1eca47dc88f4879d8a229cc70a07c6     |
| container_format | bare                                 |
| created_at       | 2020-12-07T09:54:01Z                 |
| disk_format      | qcow2                                |
| id               | 9fc7a721-3e26-4218-8d96-3c301d5b87ac |
| min_disk         | 0                                    |
| min_ram          | 0                                    |
| name             | mycirros                             |
| owner            | f9ff39ba9daa4e5a8fee1fc50e2d2b34     |
| protected        | False                                |
| size             | 13287936                             |
| status           | active                               |
| tags             | []                                   |
| updated_at       | 2020-12-07T09:54:01Z                 |
| virtual_size     | None                                 |
| visibility       | private                              |
+------------------+--------------------------------------+
LVM
使用提供的"all-in-one""拟机,该虚拟机存在一块大小为20G的磁盘/dev/vdb,使用fdisk命令对该硬盘进形分区,要求分出三个大小为5G的分区。使用这三个分区,创建名xcloudvg的卷组。然后创建名xcloudlv的逻辑卷,大小为12G,最后用xts文件系统对逻辑卷进行格式化并挂载到/mnt目录下。将上述所有操作命令和返回结果以文本形式提交到答题框。
[root@controller ~]# lsblk   //前面分出三个大小为5G的分区这里省略
NAME            MAJ:MIN RM  SIZE RO TYPE MOUNTPOINT
sda               8:0    0   50G  0 disk
├─sda1            8:1    0  200M  0 part /boot
├─sda2            8:2    0   39G  0 part
│ ├─centos-root 253:0    0   35G  0 lvm  /
│ └─centos-swap 253:1    0    4G  0 lvm  [SWAP]
├─sda3            8:3    0    5G  0 part
├─sda4            8:4    0    1K  0 part
└─sda5            8:5    0    5G  0 part
sdb               8:16   0   20G  0 disk
├─sdb1            8:17   0    5G  0 part
├─sdb2            8:18   0    5G  0 part
└─sdb3            8:19   0    5G  0 part
sdc               8:32   0   20G  0 disk
sr0              11:0    1 1024M  0 rom
loop0             7:0    0    5G  0 loop /swift/node
[root@controller ~]# pvcreate /dev/sdb[1-3]
  Physical volume "/dev/sdb1" successfully created
  Physical volume "/dev/sdb2" successfully created
  Physical volume "/dev/sdb3" successfully created
[root@controller ~]# vgcreate xcloudvg /dev/sdb[1-3]
  Volume group "xcloudvg" successfully created
[root@controller ~]# lvcreate -L +12G -n xcloudlv xcloudvg
  Logical volume "xcloudlv" created.
[root@controller ~]# mkfs.xfs /dev/mapper/xcloudvg-xcloudlv
meta-data=/dev/mapper/xcloudvg-xcloudlv isize=256    agcount=4, agsize=786432 blks
         =                       sectsz=512   attr=2, projid32bit=1
         =                       crc=0        finobt=0
data     =                       bsize=4096   blocks=3145728, imaxpct=25
         =                       sunit=0      swidth=0 blks
naming   =version 2              bsize=4096   ascii-ci=0 ftype=0
log      =internal log           bsize=4096   blocks=2560, version=2
         =                       sectsz=512   sunit=0 blks, lazy-count=1
realtime =none                   extsz=4096   blocks=0, rtextents=0
[root@controller ~]# mount /dev/mapper/xcloudvg-xcloudlv  /mnt/
MariaDB
使用提供的" all-in-one"虚拟机,进入数据库。(1)创建本地用户examuser,密码为000000;(2)查询mysql数据库中的user表的host,user,password字段;(3)赋予这个用户对所有数据库拥有"查询"“删除”“更新”"创建"的本地权限。依次将操作命令和返回结果以文本形式提交到答题框。
[root@controller ~]# mysql -uroot -p000000
Welcome to the MariaDB monitor.  Commands end with ; or \g.
Your MariaDB connection id is 222
Server version: 10.1.17-MariaDB MariaDB Server

Copyright (c) 2000, 2016, Oracle, MariaDB Corporation Ab and others.

Type 'help;' or '\h' for help. Type '\c' to clear the current input statement.
MariaDB [(none)]> insert into mysql.user(host,user,Password) values("localhost","examuser",Password("000000"));
Query OK, 1 row affected, 4 warnings (0.00 sec)

MariaDB [(none)]> use mysql
Reading table information for completion of table and column names
You can turn off this feature to get a quicker startup with -A

Database changed
MariaDB [mysql]> select host,user,password from user;
+------------+----------+-------------------------------------------+
| host       | user     | password                                  |
+------------+----------+-------------------------------------------+
| localhost  | root     | *032197AE5731D4664921A6CCAC7CFCE6A0698693 |
| controller | root     | *032197AE5731D4664921A6CCAC7CFCE6A0698693 |
| 127.0.0.1  | root     | *032197AE5731D4664921A6CCAC7CFCE6A0698693 |
| ::1        | root     | *032197AE5731D4664921A6CCAC7CFCE6A0698693 |
| localhost  | keystone | *032197AE5731D4664921A6CCAC7CFCE6A0698693 |
| %          | keystone | *032197AE5731D4664921A6CCAC7CFCE6A0698693 |
| localhost  | glance   | *032197AE5731D4664921A6CCAC7CFCE6A0698693 |
| %          | glance   | *032197AE5731D4664921A6CCAC7CFCE6A0698693 |
| localhost  | nova     | *032197AE5731D4664921A6CCAC7CFCE6A0698693 |
| %          | nova     | *032197AE5731D4664921A6CCAC7CFCE6A0698693 |
| localhost  | neutron  | *032197AE5731D4664921A6CCAC7CFCE6A0698693 |
| %          | neutron  | *032197AE5731D4664921A6CCAC7CFCE6A0698693 |
| localhost  | cinder   | *032197AE5731D4664921A6CCAC7CFCE6A0698693 |
| %          | cinder   | *032197AE5731D4664921A6CCAC7CFCE6A0698693 |
| localhost  | heat     | *032197AE5731D4664921A6CCAC7CFCE6A0698693 |
| %          | heat     | *032197AE5731D4664921A6CCAC7CFCE6A0698693 |
| localhost  | aodh     | *032197AE5731D4664921A6CCAC7CFCE6A0698693 |
| %          | aodh     | *032197AE5731D4664921A6CCAC7CFCE6A0698693 |
| localhost  | examuser | *032197AE5731D4664921A6CCAC7CFCE6A0698693 |
+------------+----------+-------------------------------------------+
19 rows in set (0.00 sec)
MariaDB [mysql]> grant select,delete,update,create on *.* to examuser@"localhost" identified by "000000";
Query OK, 0 rows affected (0.01 sec)

MariaDB [mysql]>
docker题
Dockerfile
使用xserver1节点,新建目录centos-jdk,将提供的jdk-8u141-linux-x64.tar.gz复制新建的目录,然后编辑Dockerfile文件,文件要求如下:1)使用centos:latest基础镜像;2)指定作为为xiandian;3)新建文件夹/usr/local/java用于存放jdk文件;4)将JDK文件复制到镜像内创建的目录并自动解压;5)创建软连接:ln -s /usr/local/java/jdk1.8.0_141 /usr/local/java/jdk;6)设置环境变量如下ENV JAVA_HOME /usr/local/java/jdk;ENV JRE_HOME
J
A
V
A
H
O
M
E
/
j
r
e
;
E
N
V
C
L
A
S
S
P
A
T
H
.
:
{JAVA_HOME}/jre;ENV CLASSPATH .:
JAVAHOME/jre;ENVCLASSPATH.:{JAVA_HOME}/lib:${JRE_HOME}/lib;ENV PATH
J
A
V
A
H
O
M
E
/
b
i
n
:
{JAVA_HOME}/bin:
JAVAHOME/bin:PATH编写完毕后,构建名为centos-jdk的镜像,构建成功后,查看镜像列表。最后将Dockerfile的内容、构建镜像的操作命令、查看镜像列表的命令和返回的结果以文本形式提交到答题框
[root@xserver1 centos-jdk]# cat Dockerfile
FROM centos:latest
MAINTAINER xiandian
RUN mkdir /usr/local/java
ADD jdk-8u141-linux-x64.tar.gz /usr/local/java/jdk
RUN ln -s /usr/local/java/jdk1.8.0_141 /usr/local/java/jdk
ENV JAVA_HOME /usr/local/java/jdk
ENV JRE_HOME ${JAVA_HOME}/jre
ENV CLASSPATH .:${JAVA_HOME}/lib:${JRE_HOME}/lib
ENV PATH ${JAVA_HOME}/bin:$PATH
[root@xserver1 centos-jdk]# docker build -t centos-jdk .
Sending build context to Docker daemon  185.5MB
Step 1/9 : FROM centos:latest
 ---> 0f3e07c0138f
Step 2/9 : MAINTAINER xiandian
 ---> Running in c8f8af9935f2
Removing intermediate container c8f8af9935f2
 ---> f344c3e908ed
Step 3/9 : RUN mkdir /usr/local/java
 ---> Running in f194e2fd187c
Removing intermediate container f194e2fd187c
 ---> 944ec268f060
Step 4/9 : ADD jdk-8u141-linux-x64.tar.gz /usr/local/java/
 ---> 5db39e6d7f27
Step 5/9 : RUN ln -s /usr/local/java/jdk1.8.0_141 /usr/local/java/jdk
 ---> Running in 60873f4f9844
Removing intermediate container 60873f4f9844
 ---> c424c72b0b70
Step 6/9 : ENV JAVA_HOME /usr/local/java/jdk
 ---> Running in 9717b07ae83a
Removing intermediate container 9717b07ae83a
 ---> 16aff5e7ddb3
Step 7/9 : ENV JRE_HOME ${JAVA_HOME}/jre
 ---> Running in 825b2123e832
Removing intermediate container 825b2123e832
 ---> 90f4584e7520
Step 8/9 : ENV CLASSPATH .:${JAVA_HOME}/lib:${JRE_HOME}/lib
 ---> Running in d1e922e71624
Removing intermediate container d1e922e71624
 ---> 9188e2aaf716
Step 9/9 : ENV PATH ${JAVA_HOME}/bin:$PATH
 ---> Running in c9fbd619c19b
Removing intermediate container c9fbd619c19b
 ---> 70facd28adf0
Successfully built 70facd28adf0
Successfully tagged centos-jdk:latest
[root@xserver1 centos-jdk]# docker images
REPOSITORY                  TAG                 IMAGE ID            CREATED             SIZE
centos-jdk                  latest              70facd28adf0        20 seconds ago      596MB
192.168.100.11:5000/mysql   5.6                 b3983abaa3fe        10 months ago       302MB
centos                      latest              0f3e07c0138f        14 months ago       220MB
registry                    latest              f32a97de94e1        18 months ago       25.8MB
docker管理
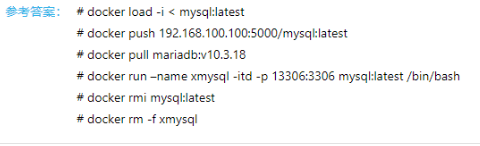
假设当前存在docker境像mysqllatest,将该镜像上传至本地,然后将该镜像推送至本地仓库(假设仓库地址为192.168.100.100:5000),从私有仓库中拉取mariadb:10.3.18镜像。运行mysq)镜像,要求将内部3306端口映射到外部的13306端口,提供交互接口,后台运行,容器名为xmysq。最后将mysql境像和创建的容器删除。依次提交操作命
[root@xserver1 ~]# docker load -i mysql_latest.tar
e7048a1643a4: Loading layer  33.83MB/33.83MB
1574ff8789b1: Loading layer  25.09kB/25.09kB
b610b16e919f: Loading layer  3.584kB/3.584kB
01e91410235e: Loading layer  223.2MB/223.2MB
b26238180bc8: Loading layer  6.144kB/6.144kB
b5d824491b78: Loading layer  8.192kB/8.192kB
ee30b869dd90: Loading layer  1.536kB/1.536kB
Loaded image ID: sha256:d9124e6c552f0e739ef130add0e215af6abfc6efc0b43cc26e5a16b15df6c1ff
[root@xserver1 ~]# docker tag d9124e6c552f 192.168.137.200:5000/mysql:latest
[root@xserver1 ~]# docker push 192.168.137.200:5000/mysql:latest
The push refers to repository [192.168.137.200:5000/mysql]
ee30b869dd90: Pushed
b5d824491b78: Pushed
b26238180bc8: Pushed
01e91410235e: Pushed
b610b16e919f: Pushed
1574ff8789b1: Pushed
e7048a1643a4: Pushed
1bc74a039df4: Pushed
6ebad06b3e49: Pushed
f1621398948b: Pushed
fe4c16cbf7a4: Pushed
latest: digest: sha256:d1363110584666965a349528cff160c95f4a80509b119b9986490229b07d7672 size: 2616
[root@xserver1 ~]#docker pull mariadb:10.3.18  //我这没有这个镜像所以没反馈结果,拉取命令是这个可供参考
[root@xserver1 ~]# docker run -itd --name xmysql -p 13306:3306 192.168.137.200:5000/mysql:latest /bin/bash
133fb5de8e29a21185948222cd5617a55d9b1a877bb5e17fe26918a8d10c0232
[root@xserver1 ~]# docker rm -f xmysql
xmysql
[root@xserver1 ~]# docker rmi 192.168.137.200:5000/mysql:latest
Untagged: 192.168.137.200:5000/mysql:latest
Untagged: 192.168.137.200:5000/mysql@sha256:d1363110584666965a349528cff160c95f4a80509b119b9986490229b07d7672
Deleted: sha256:d9124e6c552f0e739ef130add0e215af6abfc6efc0b43cc26e5a16b15df6c1ff
Deleted: sha256:27ecbee0119bc3abff46b13b4117aec04cf5e7a2fa16b7f1ea6617e64ecccd71
Deleted: sha256:3508c5c217918258514cc41ee5f1507bdba29c1539f9eddb2a024b1d18b6ebaa
Deleted: sha256:a1125db488580d397c5d2bda1f825020a73fbc8f65f336a0b4b4b5f53468759e
Deleted: sha256:1c83626f4ec2898e75e2f707b57b4571a5d23e1c02b811650731e0aa47d7f31b
Deleted: sha256:7ddf3d4ce9c7f6894951b3f3dfee9b10f08470055ecf13c2e7d17eb1d54cd75f
Deleted: sha256:b44b8bdb0b8504973e0fbeb8bce19359a999228882ede2b6df70882404e08fb8
Deleted: sha256:e91a78270995b10bef995bf8ae7de02593ae16ad13d5a0af736d807d53e09611
上题的参考答案如下图
假设当前存在docker境像tomcatlatest。现在将tomcat境像导出,导出名称为tomcat_images.tar,放在/media且录下,将以上操作命令填入答题框。
[root@xserver1 ~]# docker save tomcat:latest > /media/tomcat_images.tar
Docker安装
使用xserver1节点,自行配置YUM源,安装docker服务(需要用到的包为xserver1节点/root目录下的Docker.tar.gz)。安装完服务后,将registry_latest.tar上传到xserver1节点中并配置为私有仓库。要求启动registry容器时,将内部保存文件的目录映射到外部的/opt/registry目录,将内部的5000端口映射到外部5000端口。依次将启动registry容器的命令及返回结果、执行docker info命令的返回结果以文本形式提交到答题框。
[root@xserver1 ~]#tar -zxvf Docker.tar.gz
[root@xserver1 ~]# cat /etc/yum.repos.d/local.repo
[centos]
name=centos
baseurl=file:///opt/centos
gpgcheck=0
enabled=1
[docker]
name=docker
baseurl=file:///root/Docker
gpgcheck=0
enabled=1
[root@xserver1 ~]# docker run -d -v /opt/registry:/usr/lib/registry -p 5000:5000  --restart=always --name registry registry:latest
d1363110584666965a349528cff160c95f4a80509b119b9986490229b07d7672
[root@xserver1 ~]# docker info
Containers: 3
 Running: 3
 Paused: 0
 Stopped: 0
Images: 16
Server Version: 18.09.6
Storage Driver: overlay2
 Backing Filesystem: xfs
 Supports d_type: true
 Native Overlay Diff: true
Logging Driver: json-file
Cgroup Driver: cgroupfs
Plugins:
 Volume: local
 Network: bridge host macvlan null overlay
 Log: awslogs fluentd gcplogs gelf journald json-file local logentries splunk syslog
Swarm: inactive
Runtimes: runc
Default Runtime: runc
Init Binary: docker-init
containerd version: b34a5c8af56e510852c35414db4c1f4fa6172339
runc version: 3e425f80a8c931f88e6d94a8c831b9d5aa481657
init version: fec3683
Security Options:
 seccomp
  Profile: default
Kernel Version: 3.10.0-1062.el7.x86_64
Operating System: CentOS Linux 7 (Core)
OSType: linux
Architecture: x86_64
CPUs: 1
Total Memory: 1.777GiB
Name: repostories
ID: IGEX:FVOV:IUGK:ADAD:EI3I:HPMW:GEXC:K4MU:RAFO:V6KC:53BC:DW2S
Docker Root Dir: /var/lib/docker
Debug Mode (client): false
Debug Mode (server): false
Registry: https://index.docker.io/v1/
Labels:
Experimental: false
Insecure Registries:
 192.168.137.200:5000
 127.0.0.0/8
Registry Mirrors:
 https://192.168.100.128:5000/
Live Restore Enabled: false
Product License: Community Engine

WARNING: bridge-nf-call-iptables is disabled
WARNING: bridge-nf-call-ip6tables is disabled
部署K8S集群
使用xserver1、xserver2节点,自行配置好网络,安装好docker-ce。部署K8S集群,不要求部署kubernetes-dashboard。部署K8S平台完成后,在主节点使用命令依次检查集群状态、Pods状态、各节点的状态。最后将检查状态的命令及返回结果以文本形式提交到答题框。
[root@master ~]# kubectl get cs   (查集群状态)
NAME                 STATUS    MESSAGE             ERROR
controller-manager   Healthy   ok
scheduler            Healthy   ok
etcd-0               Healthy   {"health":"true"}
[root@master ~]#  kubectl get pods -n kube-system  (查看Pods状态)
NAME                             READY   STATUS    RESTARTS   AGE
coredns-8686dcc4fd-b5t7m         1/1     Running   0          90m
coredns-8686dcc4fd-v2zzq         1/1     Running   0          90m
etcd-master                      1/1     Running   0          89m
kube-apiserver-master            1/1     Running   0          89m
kube-controller-manager-master   1/1     Running   0          90m
kube-flannel-ds-amd64-cmdqz      1/1     Running   1          88m
kube-flannel-ds-amd64-npb7n      1/1     Running   0          88m
kube-proxy-vkh8f                 1/1     Running   1          90m
kube-proxy-vq4kn                 1/1     Running   0          90m
kube-scheduler-master            1/1     Running   0          89m
[root@master ~]# kubectl get nodes    (各节点的状态)
NAME     STATUS   ROLES    AGE   VERSION
master   Ready    master   10d   v1.14.1
node     Ready    <none>   10d   v1.14.1
LNMP环境部署
使用xserver1节点,安装单节点lnmp环境。安装lnmp环境需要用到的YUM源为CentOS-7-x86_64-DVD-1511.iso和lnmp目录(均在/root目录下)。安装并配置完lnmp环境后。依次查询数据库、nginx、php服务的状态,并使用netstat -ntpl命令查看端口开放情况。最后依次将查询服务状态的返回结果,和查看端口开放情况的返回结果以文本形式提交到答题框。
[centos]
name=centos
baseurl=file:///opt/centos
gpgcheck=0
enabled=1
[lnmp]
name=lnmp
baseurl=file:///root/lnmp
gpgcheck=0
enabled=1
#yum install -y mariadb-server nginx php-fpm net-tools
#systemctl start mariadb
#systemctl start nginx
#systemctl start php-fpm
#systemctl status mariadb
#systemctl status nginx
#systemctl status php-fpm
#netstat -ntpl
网络管理
使用eNSP模拟器,启动S5700交换机。通过一条命令在S1交换机上创建vlan101、vlan102,配置g0/0/1端口为access模式,所属vlan101,配置g0/0/2端口为trunk模式,放行vlan101、vlan102。将以上所有操作命令和返回结果以文本形式提交大答题框。
[S1]interface GigabitEthernet 0/0/1
[S1-GigabitEthernet0/0/1]port link-type access
[S1-GigabitEthernet0/0/1]port default vlan 101
[S1-GigabitEthernet0/0/1]quit
[S1]interface GigabitEthernet 0/0/2
[S1-GigabitEthernet0/0/2]port link-type trunk
[S1-GigabitEthernet0/0/2]port trunk allow-pass vlan 101 102
[S1-GigabitEthernet0/0/2]quit
网络管理
使用eNSP模拟器。配置路由器R1(路由器使用AR2220)端口g0/0/1地址为192.168.101.1/30,配置g0/0/2端口地址为12.12.12.2/30。添加静态路由去往192.168.1.0/24网段,下一跳地址为192.168.101.2,添加静态路由去往192.168.2.0/24,下一跳地址为12.12.12.1。将以上所有操作命令和返回结果以文本形式提交到答题框。
[R1]interface GigabitEthernet 0/0/1
[R1-GigabitEthernet0/0/1]ip address 192.168.101.1 30
[R1-GigabitEthernet0/0/1]quit
[R1]interface GigabitEthernet 0/0/2
[R1-GigabitEthernet0/0/2]ip address 12.12.12.2 30
[R1-GigabitEthernet0/0/2]quit
[R1]ip route-static 192.168.1.0 24 192.168.101.2
[R1]ip route-static 192.168.2.0 24 12.12.12.1
[R1]quit
网络管理
在eNSP中使用S5700交换机进行配置,通过一条命令划分vlan 2、vlan 3、vlan 1004,通过端口组的方式配置端口1-5为access模式,并添加至vlan2中。配置端口10为trunk模式,并放行vlan3。创建三层vlan 2,配置IP地址为:
172.16.2.1/24,创建三层vlan1004,配置IP地址为: 192.168.4.2/30。通过命令添加默认路由,下一跳为192.168.4.1。(使用完整命令)
[Huawei]vlan batch 2 3 1004
[Huaweil]port-group 1
[Huawei-port-group-1]group-member GigabitEthernet 0/0/1 to GigabitEthernet 0/0/5
[Huawei-port-group-1]port link-type access
[Huawei-port-group-1]port default vlan 2
[Huawei]interface GigabitEthernet 0/0/10
[Huawei-GigabitEthernet0/0/10]port link-type trunk
[Huawei-GigabitEthernetO/0/10]port trunk allow-pass vlan 3
[Huawei]interface Vlanif 2
[Huawei-Vlanif2]ip address 172.16.2.1 24
[Huawei]interface Vlanif 1004
[Huawei-Vlanif1004]ip address 192.168.4.2 30
[Huawei]ip route-static 0.0.0.0 0 192.168.4.1


 2223
2223


 被折叠的 条评论
为什么被折叠?
被折叠的 条评论
为什么被折叠?
 到【灌水乐园】发言


