


实验要求:
- 企业内网划分多个vlan,减少广播域大小,提高网络稳定性
- 用户的网关配置在核心交换机
- 所有设备,都可以被telnet远程管理
- 出口配置NAT
- 所有用户均为自动获取IP地址
- 企业总部和分部采用oSPF路由协议连接
1. 企业内网划分多个vlan,减少广播域大小,提高网络稳定性
基础IP配置省略,读者请自行配置
按照图中所示划分用户 vlan,并设置 access 和 trunk 口
[SW4]vlan batch 10 20 200
Info: This operation may take a few seconds. Please wait for a moment...done.

[SW4]int e0/0/2
[SW4-Ethernet0/0/2]p l a
[SW4-Ethernet0/0/2]p d v 10
[SW4-Ethernet0/0/2]q

[SW4]int e0/0/1
[SW4-Ethernet0/0/1]p l t
[SW4-Ethernet0/0/1]p t a v a
[SW4-Ethernet0/0/1]q
[SW5]vlan batch 10 20 200
Info: This operation may take a few seconds. Please wait for a moment...done.
[SW5]int e0/0/2
[SW5-Ethernet0/0/2]p l a
[SW5-Ethernet0/0/2]p d v 20
[SW5-Ethernet0/0/2]q
[SW5]int e0/0/1
[SW5-Ethernet0/0/1]p l t
[SW5-Ethernet0/0/1]p t a v a
[SW5-Ethernet0/0/1]q[SW2]vlan batch 10 20 200
Info: This operation may take a few seconds. Please wait for a moment...done.
[SW2]int e0/0/1
[SW2-Ethernet0/0/1]p l t
[SW2-Ethernet0/0/1]p t a v a
[SW2-Ethernet0/0/1]q
[SW2]int e0/0/2
[SW2-Ethernet0/0/2]p l t
[SW2-Ethernet0/0/2]p t a v a
[SW2-Ethernet0/0/2]q
[SW2]int g0/0/1
[SW2-GigabitEthernet0/0/1]p l t
[SW2-GigabitEthernet0/0/1]p t a v a
[SW2-GigabitEthernet0/0/1]q[SW3]vlan batch 10 20 200
Info: This operation may take a few seconds. Please wait for a moment...done.
[SW3]int e0/0/1
[SW3-Ethernet0/0/1]p l a
[SW3-Ethernet0/0/1]p d v 200
[SW3-Ethernet0/0/1]q
[SW3]int g0/0/1
[SW3-GigabitEthernet0/0/1]p l t
[SW3-GigabitEthernet0/0/1]p t a v a
[SW3-GigabitEthernet0/0/1]q[SW1]vlan batch 10 20 200
Info: This operation may take a few seconds. Please wait for a moment...done.
[SW1]int g0/0/2
[SW1-GigabitEthernet0/0/2]p l t
[SW1-GigabitEthernet0/0/2]p t a v a
[SW1-GigabitEthernet0/0/2]q
[SW1]int g0/0/3
[SW1-GigabitEthernet0/0/3]p l t
[SW1-GigabitEthernet0/0/3]p t a v a2. 用户的网关配置在核心交换机
[SW1]int vlanif 10
[SW1-Vlanif10]ip add 192.168.10.254 24
[SW1-Vlanif10]q
[SW1]int vlanif 20
[SW1-Vlanif20]ip add 192.168.20.254 24
[SW1-Vlanif20]q
[SW1]int vlanif 200
[SW1-Vlanif200]ip add 192.168.200.254 24
测试连接,PC1、PC2、Server2 可以互相通信
3. 所有设备,都可以被 telnet 远程管理
用 vlan666 作为管理 vlan,管理网段192.168.255.0/24
创建用户名为root,密码为123456,读者也可自行修改
[SW1]vlan 666
[SW1-vlan666]q
[SW1]int vlanif 666
[SW1-Vlanif666]ip add 192.168.255.1 24
[SW1-Vlanif666]q

#telnet配置
[SW1]aaa
[SW1-aaa]local-user root privilege level 3 password cipher 123456
Info: Add a new user.
[SW1-aaa]local-user root service-type telnet
[SW1-aaa]q

[SW1]user-interface vty 0 4
[SW1-ui-vty0-4]aut
[SW1-ui-vty0-4]authentication-mode aaa
[SW2]vlan 666
[SW2-vlan666]q
[SW2]int vlanif 666
[SW2-Vlanif666]ip add 192.168.255.2 24
[SW2-Vlanif666]q
[SW2]aaa
[SW2-aaa]local-user root privilege level 3 password cipher 123456
Info: Add a new user.
[SW2-aaa]local-user root service-type telnet
[SW2-aaa]q
[SW2]user-interface vty 0 4
[SW2-ui-vty0-4]authentication-mode aaa[SW3]vlan 666
[SW3-vlan666]q
[SW3]int vlanif 666
[SW3-Vlanif666]ip add 192.168.255.3 24
[SW3-Vlanif666]q
[SW3]aaa
[SW3-aaa]local-user root privilege level 3 password cipher 123456
Info: Add a new user.
[SW3-aaa]local-user root service-type telnet
[SW3-aaa]q
[SW3]user-interface vty 0 4
[SW3-ui-vty0-4]authentication-mode aaa[SW4]vlan 666
[SW4-vlan666]q
[SW4]int vlanif 666
[SW4-Vlanif666]ip add 192.168.255.4 24
[SW4-Vlanif666]q
[SW4]aaa
[SW4-aaa]local-user root privilege level 3 password cipher 123456
Info: Add a new user.
[SW4-aaa]local-user root service-type telnet
[SW4-aaa]q
[SW4]user-interface vty 0 4
[SW4-ui-vty0-4]authentication-mode aaa[SW5]vlan 666
[SW5-vlan666]q
[SW5]int vlanif 666
[SW5-Vlanif666]ip add 192.168.255.5 24
[SW5-Vlanif666]q
[SW5]aaa
[SW5-aaa]local-user root privilege level 3 password cipher 123456
Info: Add a new user.
[SW5-aaa]local-user root service-type telnet
[SW5-aaa]q
[SW5]user-interface vty 0 4
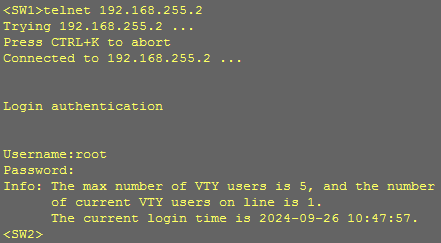
[SW5-ui-vty0-4]authentication-mode aaa验证测试,在 SW1 上 telnet 任意一台交换机,输入用户名和密码后可以进入对应交换机的控制界面,即为成功
4. 出口配置NAT
[SW1]vlan 80
[SW1-vlan80]q

[SW1]int g0/0/1
[SW1-GigabitEthernet0/0/1]p l a
[SW1-GigabitEthernet0/0/1]p d v 80
[SW1-GigabitEthernet0/0/1]q

[SW1]int vlanif 80
[SW1-Vlanif80]ip add 192.168.254.1 24
[SW1-Vlanif80]q

[SW1]ip route-static 0.0.0.0 0 192.168.254.2
[R1]int g0/0/1
[R1-GigabitEthernet0/0/1]ip add 192.168.254.2 24
[R1-GigabitEthernet0/0/1]q
[R1]int g0/0/0
[R1-GigabitEthernet0/0/0]ip add 100.1.1.2 24
[R1-GigabitEthernet0/0/0]q
[R1]ip route-static 0.0.0.0 0 100.1.1.3
[R1]ip route-static 192.168.0.0 16 192.168.254.1
[R1]acl 2000
[R1-acl-basic-2000]rule 5 permit source 192.168.0.0 0.0.255.255
[R1-acl-basic-2000]q
[R1]nat address-group 1 100.1.1.10 100.1.1.20
[R1]int g0/0/1
[R1-GigabitEthernet0/0/1]nat outbound 2000 address-group 1 no-pat [R3]int g0/0/0
[R3-GigabitEthernet0/0/0]ip add 100.1.1.3 24
[R3]ip route-static 192.168.0.0 16 100.1.1.2
[R3]int LoopBack 0
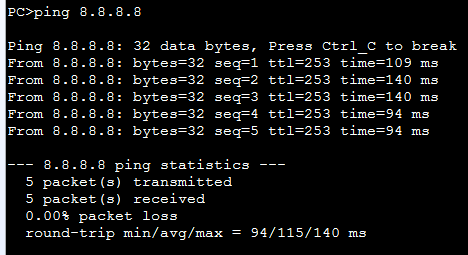
[R3-LoopBack0]ip add 8.8.8.8 32测试连接,PC1 可以 ping 通公网 8.8.8.8,即为成功
5. 所有用户均为自动获取IP地址
配置DHCP
[SW1]ip pool vlan_10
Info:It's successful to create an IP address pool.
[SW1-ip-pool-vlan_10]gateway-list 192.168.10.1
[SW1-ip-pool-vlan_10]network 192.168.10.0 mask 24
[SW1-ip-pool-vlan_10]dns-list 8.8.8.8
[SW1-ip-pool-vlan_10]q
[SW1]ip pool vlan_20
Info:It's successful to create an IP address pool.
[SW1-ip-pool-vlan_20]gateway-list 192.168.20.1
[SW1-ip-pool-vlan_20]network 192.168.20.0 mask 24
[SW1-ip-pool-vlan_20]dns-list 8.8.8.8
[SW1-ip-pool-vlan_20]q
[SW1]dhcp enable
Info: The operation may take a few seconds. Please wait for a moment.done.
[SW1]int vlanif 10
[SW1-Vlanif10]dhcp select global
[SW1-Vlanif10]q
[SW1]int vlanif 20
[SW1-Vlanif20]dhcp select global
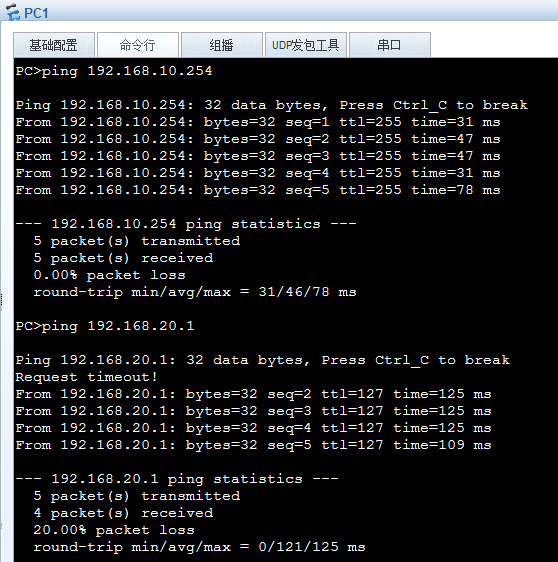
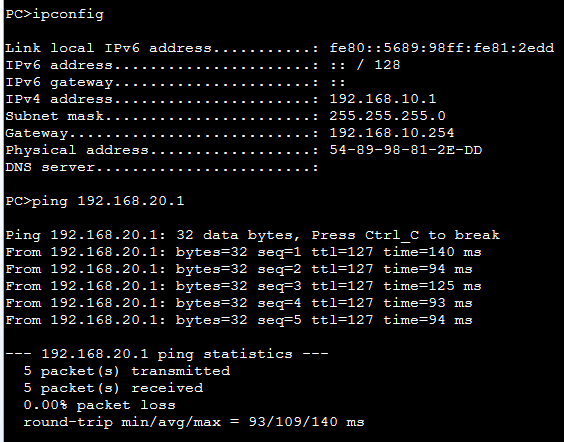
[SW1-Vlanif20]q查看 PC1 的 ip,同时 PC1 和 PC2 可以实现互通
6. 企业总部和分部采用oSPF路由协议连接
配置OSPF
[SW1]ospf 1
[SW1-ospf-1]area 0
[SW1-ospf-1-area-0.0.0.0]network 192.168.10.0 0.0.0.255
[SW1-ospf-1-area-0.0.0.0]network 192.168.20.0 0.0.0.255
[SW1-ospf-1-area-0.0.0.0]network 192.168.200.0 0.0.0.255
[SW1-ospf-1-area-0.0.0.0]network 192.168.254.0 0.0.0.255
[SW1-ospf-1-area-0.0.0.0]network 192.168.255.0 0.0.0.255
[SW1-ospf-1-area-0.0.0.0]q
[R1]int s0/0/0
[R1-Serial0/0/0]ip add 192.168.253.2 24
[R1]ospf 1
[R1-ospf-1]area 0
[R1-ospf-1-area-0.0.0.0]network 192.168.100.0 0.0.0.255
[R1-ospf-1-area-0.0.0.0]network 192.168.253.0 0.0.0.255
[R1-ospf-1-area-0.0.0.0]q[R2]int s0/0/0
[R2-Serial0/0/0]ip add 192.168.253.4 24
[R2-Serial0/0/0]q
[R2]int e0/0/0
[R2-Ethernet0/0/0]ip add 192.168.100.254 24
[R2]ip route-static 192.168.0.0 16 192.168.253.2
[R2]ospf 1
[R2-ospf-1]area 0
[R2-ospf-1-area-0.0.0.0]network 192.168.100.0 0.0.0.255
[R2-ospf-1-area-0.0.0.0]network 192.168.253.0 0.0.0.255
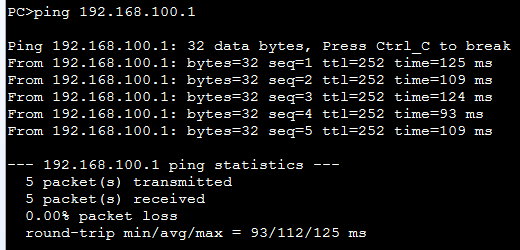
[R2-ospf-1-area-0.0.0.0]q测试连接,PC1 可以与 Server1 通信,即为成功
实验结束


 1808
1808

 被折叠的 条评论
为什么被折叠?
被折叠的 条评论
为什么被折叠?
 到【灌水乐园】发言


