


目录
Vuex
vuex是专门用来管理vue.js应用程序中状态的一个插件,官方称为状态管理
也可以叫它数据管理
vuex的组成结构示意图
vuex的特点是把数据单独隔离,形成一棵树状图。单独隔离就意味着它有自己的生态系统。输入和输出,其中action作为数据的输入,
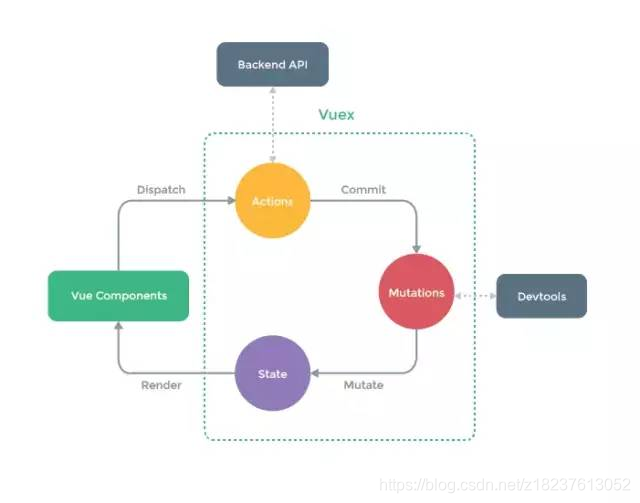
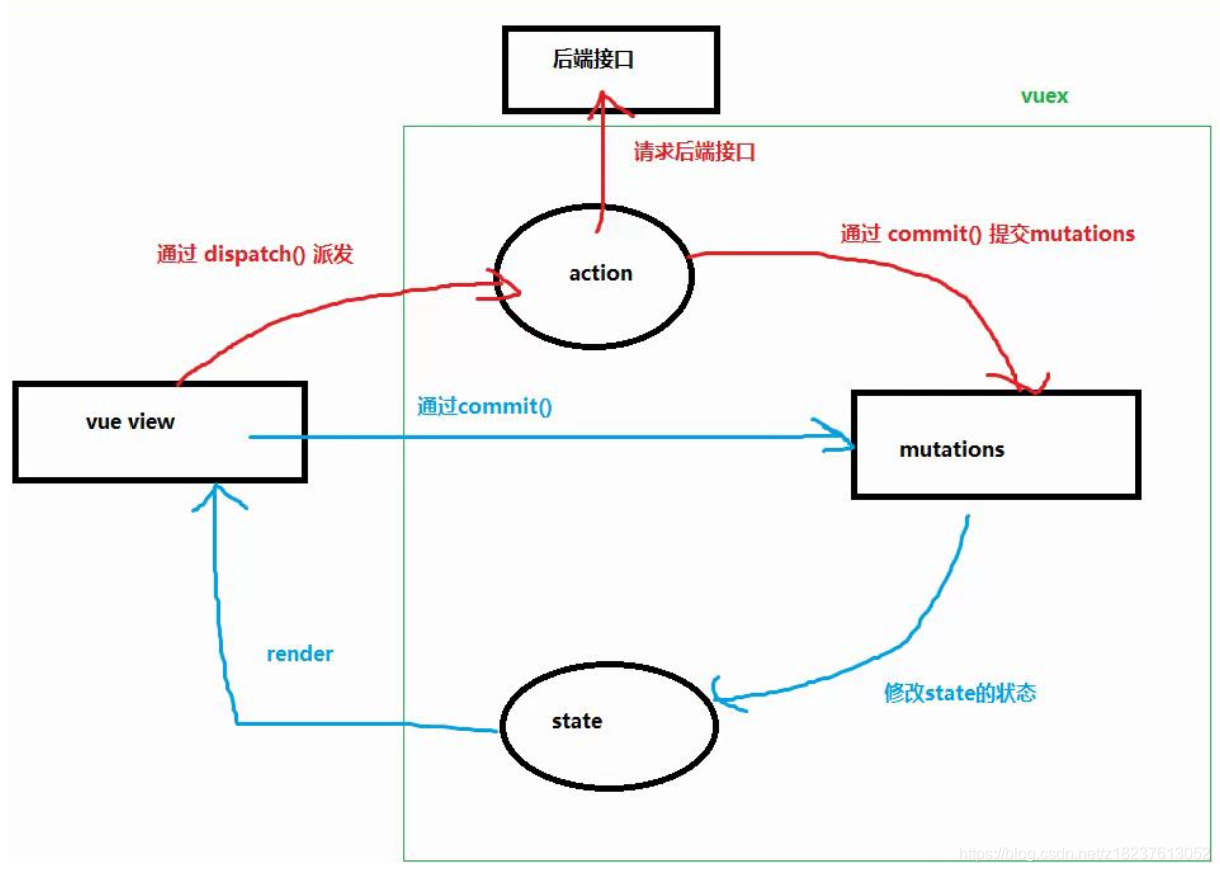
state作为数据的输出。如图:
vuex里有这么一个规则:
只能在mutaions里修改state
mutations即翻译变化,修改state的数据,而且只能是同步的,不能存在异步的操作。如果需要异步怎么办呢?把异步操作放在actions里,拿到数据再通过mutations同步处理。vuex做的其实是把职权明确了,责任细分了。所以它文档里也说,小系统可以不用。状态数据少,没有细分的必要。
pinia官网
pinia(类似vuex)指导中文翻译
vuex 的核心概念
1.1 store(好比data可以存数据)
vuex 中最关键的是store对象,这是vuex的核心。可以说,vuex这个插件其实就是一个store对象,每个vue应用仅且仅有一个store对象。
3.1.1 创建store
const store = new Vuex.Store({…});
可见,store是Vuex.Store这个构造函数new出来的实例。在构造函数中可以传一个对象参数。这个参数中可以包含5个对象:
1.state – 存放状态

2.getters – Vuex的计算属性,对state的状态派生出新的状态

3.mutations – 进行同步操作;修改state的唯一入口

4.actions – 提交mutation,异步操作

5.mudules – 将store模块化,Vuex的模块 : 每个模块都有五个属性 state, mutations, getters, actions, modules
关于store对象,需要先记住两点:
1. store 中存储的状态是响应式的,当组件从store中读取状态时,
 如果store中的状态发生了改变,那么相应的组件也会得到更新;

2 不能直接改变store中的状态。改变store中的状态的唯一途径是提交(commit)mutations。
这样使得我们可以方便地跟踪每一个状态的变化。
一个完整的store的结构是这样的
const store = new Vuex.Store({
  state: {
    // 存放状态
  },
  getters: {
    // state的计算属性
  },
  mutations: {
    // 更改state中状态的逻辑,同步操作
  },
  actions: {
    // 提交mutation,异步操作
  },
  // 如果将store分成一个个的模块的话,则需要用到modules。
   //然后在每一个module中写state, getters, mutations, actions等。
  modules: {
    a: moduleA,
    b: moduleB,
    // ...
  }
});
模块的state有两种写法:
1, 对象形式 state:{} 2, 使用函数的形式 state:() => ({})
(1) state: () => ({
            msgA: '模块a'
         }),
      (2)  state: {
            msgA: '模块a'
        },
模块化开发: 有些模块会是公用的, 为了防止数据污染, 模块中的 state 是一个函数
(和组件中的data 是一个函数原因相同)
使用 vuex 中state的数据方式:
1. 在模板中使用: $store.state.key
2. 在组件中使用: this.$store.state.key
3. 通过 辅助函数 mapState() 访问 : 可以使用 mapState 辅助函数帮助我们生成计算属性
示例:
<body>
    <div id="app">
        <!-- 在模板中使用 -->
        <p>{{$store.state.msg}}</p>
        <!-- 输出hello -->
    </div>
</body>
<script src="./js/vue.js"></script>
<script src="./js/Vuex.js"></script>
<script>
    const store = new Vuex.Store({
        // 存放状态(或者叫数据数据)
        state: {
            msg: 'hello'
        }
    })
    const app = new Vue({
        el: '#app',
        store,
        //created 创建后
        created() {
            // 在组件中使用
            console.log(this.$store.state.msg); //hello
        }
    })
</script>
//  对象形式传递
 computed: Vuex.mapState({
    // 箭头函数可使代码更简练
    count: state => state.count,

    // 传字符串参数 'count' 等同于 `state => state.count`
    countAlias: 'count',

    // 为了能够使用 `this` 获取局部状态,必须使用常规函数
    countPlusLocalState (state) {
      return state.count + this.localCount
    }
  })

//  数组形式传递
computed:{
    // 当映射的计算属性的名称与 state 的子节点名称相同时,我们也可以给 mapState 传一个字符串数组。
    ...Vuex.mapState(['count'])
}
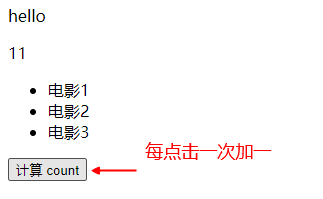
mutations属性(是同步)
mutation 属性作为修改 vuex 中state 的唯一入口,
当你要修改state中的数据时,需要提交一个mutation, 然后通过 mutation进行修改
提交mutation: 通过 commit(‘mutation的名字’)
mutation的名字 对应在 vuex 实例中的 mutations属性中的方法
1,vuex中定义 mutation
const store = new Vuex.Store({
    state:{},
    mutations:{
        自定义的mutation的名字(){

        }
    }
})
2,在vue实例中触发事件,提交mutation
methods:{
    add(){
        this.$store.commit('自定义的提交的mutation名字')
    }
}
<body>
    <div id="app">
        <p>{{$store.state.msg}}</p>
        <p>{{$store.state.count}}</p>
        <ul>
            <li v-for='item in $store.state.list'>{{item.movie}}</li>
        </ul>
        <button @click='count'>计算 count</button>
    </div>
</body>
<script src="./js/vue.js"></script>
<script src="./js/Vuex.js"></script>
<script>
    const store = new Vuex.Store({
        //   存储数据
        state: {
            msg: 'hello',
            list: [{
                movie: '电影1'
            }, {
                movie: '电影2'
            }, {
                movie: '电影3'
            }],
            count: 10
        },
        mutations: {
            //   定义一个mutation, 必须通过commit() 进行触发; mutation接受一个默认的参数 state
            changecount(state) {
                console.log('mutation触发了');
                //  如何获取state 中的数据
                // this.state.count++ ;//这是一种我们知道的常识方式,我们不用这种
                // 修改state中的数据   state是接受的参数
                state.count++
            }
        }
    })
    const app = new Vue({
        el: '#app',
        store,
        methods: {
            count() {
                //  更改state中的数据;  但是不建议使用, 要想修改 state 中的数据,必须提交mutation
                //this.$store.state.count++; // 这是错误的
                //   提交mutation     this.$store.commit('自定义mutations名字')
                this.$store.commit('changecount')
            }
        }
    })
</script>
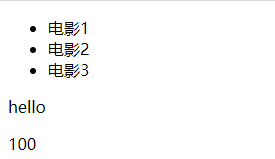
mapState辅助函数
mapState 是 state的辅助函数: 可以快速获取state中的数据
<body>
    <div id="app">
        <p>
            <p>{{msg1}}</p><!-- 输出   hello vuex 基础-->
        </p>
        <!-- 这是没有辅助函数mapState的获取方法 -->
        <!-- <p>{{$store.state.msg}}</p> -->
        <!--  <p>{{$store.state.count}}</p> -->
        <!----##  使用辅助函数 的获取state的方法##------>
        <ul>
            <li v-for='item in list'>{{item.movie}}</li>
        </ul>
        <p>{{msg}}</p>
        <p>{{count}}</p>
    </div>
</body>
<script src="./js/vue.js"></script>
<script src="./js/Vuex.js"></script>
<script>
    const store = new Vuex.Store({
            //   存储数据
            state: {
                msg: 'hello',
                count: 100,
                list: [{
                    movie: '电影1'
                }, {
                    movie: '电影2'
                }, {
                    movie: '电影3'
                }]
            },
        })
        //   mapState 是 state的辅助函数: 可以快速获取state中的数据, 需要单独引入
    const {  mapState } = Vuex;
    const app = new Vue({
        el: '#app',
        store,
        computed: {
            //这是计算属性的原来用法
            // msg1() {
            //     return this.$store.state.msg + "vuex 基础"
            // },
            //--使用mapState辅助函数   可以模板在中直接使用(list)内的值-
            //通过 辅助函数 mapState 访问state中的状态,把state中定义的状态的key 映射为同名的计算属性
            ...mapState(['msg', 'list', 'count']),
            // 本质是这样的
            // msg() { return this.$store.state.msg },
            //list(){return store.state.list}
        }
    })
</script>
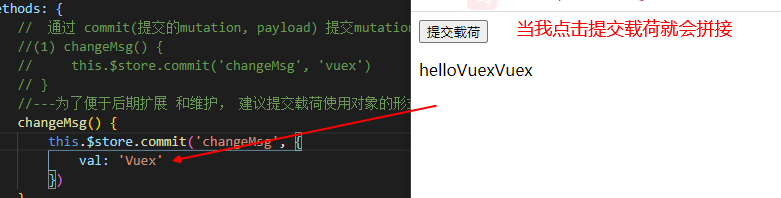
提交载荷
提交载荷 就是传递参数; 建议参数使用对象的形式进行传递; 为了便于维护和扩展;
载荷作为commit()的第二个参数存在
mutations类似于我们的事件 changeMsg 就是事件名,handler(处理者) 就是事件处理程序
mutation 默认接受的第一个参数 state(状态/数据), 第二个参数就是 提交的载荷payload
<body>
    <div id="app">
        <button @click="changeMsg">提交载荷</button>
        <p>{{msg}}</p>
    </div>
</body>
<script src="./js/vue.js"></script>
<script src="./js/Vuex.js"></script>
<script>
    const store = new Vuex.Store({
            //   存储数据
            state: {
                msg: 'hello',
            },
            mutations: {
                //  mutation 默认接受的第一个参数 state(状态), 第二个参数就是 提交的payload(载荷)
                //(1) changeMsg(state, val) {
                //     state.msg += val
                // }
                change(state, {
                    val
                }) {
                    state.msg += val
                }
            }
        })
        // const { mapState} = Vuex; 不用这种了,在计算属性中直接引入   ...Vuex.mapState
    const app = new Vue({
        el: '#app',
        store,
        methods: {
     //  通过 commit(提交的mutation, payload) 提交mutation 可以接受第二个参数: 就是要传递的数据(提交载荷payload)
            //(1) changeMsg() {
            //     this.$store.commit('changeMsg', 'vuex')
            // }
            //---为了便于后期扩展 和维护, 建议提交载荷使用对象的形式 {}
            changeMsg() {
                this.$store.commit('change', {
                    val: 'Vuex'
                })
            }
        },
        computed: {
            //通过 辅助函数 mapState 访问state中的状态,把state中定义的状态的key 映射为同名的计算属性
            ...Vuex.mapState(['msg']),
        }
    })
</script>
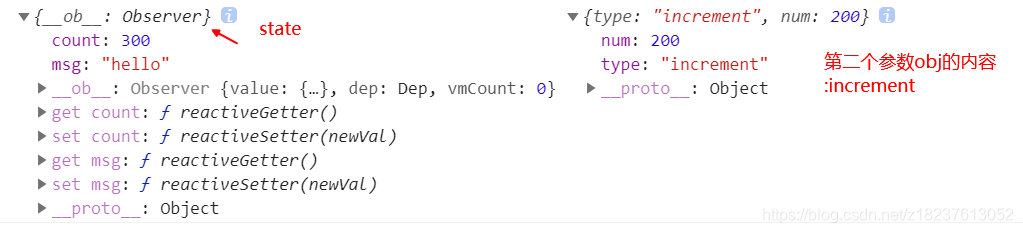
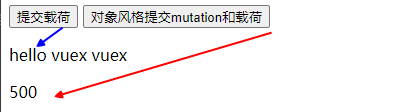
对象风格提交mutation和载荷
需要在对象中定义一个type属性,用来指定mutation ; 整个对象作为载荷被一起提交
1定义mutation
const store = new Vuex.Store({
    state:{},
    mutations:{
        //  mutation 默认接受的第一个参数是state(就是vuex的state), 第二个参数就是提交的载荷(传递的数据)
        自定义的mutation的名字(state, val){

        }
    }
})
2提交mutation
methods:{
    add(){
        this.$store.commit({
            type:'自定义的mutation名字',
            ... // 传递的数据(载荷payload)
        })
    }
}
<body>
    <div id="app">
        <button @click="changeMsg">提交载荷</button>
        <button @click="submit">对象风格提交mutation和载荷</button>
        <!-- 提交载荷的输出点 -->
        <p>{{msg}}</p>
        <!-- 对象风格提交mutation和载荷的输出点 -->
        <p>{{count}}</p>
    </div>
</body>
<script src="./js/vue.js"></script>
<script src="./js/Vuex.js"></script>
<script>
    const store = new Vuex.Store({
            //   存储数据
            state: {
                msg: 'hello',
                count: 100
            },
            mutations: {
                // (1) mutation 默认接受的第一个参数 state(状态), 第二个参数就是 提交的载荷payload
                change(state, {val}) {//{val}解构的意思
                    state.msg += val
                },
                // (2) 第二个参数依然接受载荷, 只不过包含了mutation(increment 就是提交的mutation)
                increment(state, obj) {
                    console.log(state, obj);
                    state.count += obj.num
                }

            }
        })
        // const { mapState} = Vuex; 可以不用这种,在计算属性中直接引入   ...Vuex.mapState
    const app = new Vue({
        el: '#app',
        store,
        methods: {
            changeMsg() {
                this.$store.commit('change', {
                    val: ' vuex'
                })
            },
            //(2)  提交 mutation (定义mutation): 提供了一个 type 属性 提交一个mutation;  increment 就是提交的mutation
            submit() {
                this.$store.commit({
                    type: 'increment',
                    num: 200
                })
            }
        },
        computed: {
           //通过 辅助函数 mapState 访问state中的状态,把state中定义的状态的key 映射为同名的计算属性
            ...Vuex.mapState(['msg', 'count']),
        }
    })
</script>
mapMutation 辅助函数
mapMutation 辅助函数: 方便使用mutation(修改 vuex 中state 的唯一入口)
<body>
    <div id="app">
        <!--(1) <button @click='changeMsg'>没有辅助函数用法</button> -->
        <button @click='changeMsg2'>mapMutation 辅助函数</button>
        <!--(1) <p>{{msg}}</p> -->
        <p>{{count}}</p>
    </div>
</body>
<script src="./js/vue.js"></script>
<script src="./js/Vuex.js"></script>
<script>
    const store = new Vuex.Store({
        //   存储数据
        state: {
            msg: 'hello',
            count: 100,
        },
        mutations: {
            //(1) changeMsg(state, val) {
            //     state.msg += val
            // },
            changeMsg2(state) {
                state.count++
            },
        }
    })

    const app = new Vue({
        el: '#app',
        store,
        methods: {
            //(1) changeMsg() {
            //     this.$store.commit('changeMsg', 'vuex')
            // },
            //  使用mapMutation() 辅助函数  相当于 自动映射 一个和mutation同名的方法: this.changeMsg = this.$store.commit('changeMsg')
            ...Vuex.mapMutations(['changeMsg2']),
        },
        computed: {
            //--使用mapState辅助函数 把state中定义的状态的key 映射为同名的计算属性
            ...Vuex.mapState(['msg', 'count']),
            // 本质是这样的
            // msg() {
            //     return this.$store.state.msg
            // },
            //list(){return store.state.list}
        }
    })
</script>

vuex 的 getter 属性(vuex的计算属性)
vuex 的 getter 属性: 就是vuex的计算属性(用法和 vue的计算属性用法类似)
getter 的作用: 针对state中的状态 派生出一些新的状态(就是对 state状态/数据的修改)
vuex的 计算属性 本质还是函数, 需要通过return 返回数据
使用getter的方式:
- 在模板中: $store.getters.key
- 在组件中: this.$store.getters.key
<body>
    <div id="app">
        <ul>
         <!--  在模板中使用 -->
            <li>{{$store.getters.maxNum}}</li>
            <!-- 这是使用辅助函数mapGetters的写法-->
            <li>{{maxNum}}</li>
            <!-- 都能输出list中所有的信息 -->
        </ul>
    </div>
</body>
<script src="./js/vue.js"></script>
<script src="./js/Vuex.js"></script>
<script>
    const store = new Vuex.Store({
        state: {
            list: [{
                name: '张三',
                age: 18
            }, {
                name: '李四',
                age: 30
            }, {
                name: '王五',
                age: 39
            }, {
                name: '张三',
                age: 10
            }]
        },
        //  vuex的 计算属性  本质还是函数, 需要通过return 返回数据
        getters: {
            //  在getter 中访问state中的状态  : getters 接受默认的第一个参数 是 state
            maxNum(state) {
                console.log(state); //就是state中所有的数据
                return state.list
            }
        }
    })
    const app = new Vue({
        el: "#app",
        store,
        computed: {
            //  使用辅助函数mapGetters
            ...Vuex.mapGetters(['maxNum'])
        },
    })
</script>

getter 接受参数(通过方法访问)
通过让 getter 返回一个函数(通过闭包的形式),来实现给 getter 传参。
在你对 store 里的数组进行查询时非常有用。
getters:{
    自定义getters名字(){
        return function(params){
            // 业务逻辑处理
            //  处理完成后 把结果放回
            return result
        }
    }
}
<body>
    <div id="app">
        <ul>
            <!-- <li>{{$store.getters.count}}</li> (1)输出100 -->
            <!-- getter 接受参数 30就是我们传递的参数 -->
            <li>{{$store.getters.count(30)}}</li>
            <!-- 输出30 -->
        </ul>
    </div>
</body>
<script src="./js/vue.js"></script>
<script src="./js/Vuex.js"></script>
<script>
    const store = new Vuex.Store({
        state: {},
        //  vuex的 计算属性  本质还是函数, 需要通过return 返回数据
        getters: {
            //  getter 接受参数: 需要通过闭包的形式
            // count() {
            //     //(1) return 100
            //     return function(val) {
            //         return val
            //     }
            // }
            //-----完整写法-------
            count: function(state) {
                    return function(val) {
                      console.log(val);//30   val就是参数的形参
                        return val;
                    }
                }
                //-----箭头函数写法-------
                // count: (state, getter) => (val, num) => {
                //     return val;
                // }
        }
    })
    const app = new Vue({
        el: "#app",
        store,
    })
</script>

getter 接受参数,第二个参数演示
getters默认接受第一个参数是state ,
第二个参数是其他的getters (它是一个对象, 通过getters.key访问其他的getters)
例子:每个人年龄加10
<body>
    <div id="app">
        <ul>
            <li>{{addAge}}</li>
        </ul>
    </div>
</body>
<script src="./js/vue.js"></script>
<script src="./js/Vuex.js"></script>
<script>
    const store = new Vuex.Store({
        state: {
            list: [{
                name: '张三',
                age: 18
            }, {
                name: '李四',
                age: 31
            }, {
                name: '王五',
                age: 39
            }, {
                name: '张三',
                age: 10
            }]
        },
        //  vuex的 计算属性  本质还是函数, 需要通过return 返回数据
        getters: {
            num() {
                return 10//这里为getters的第二个参数
            },
            //  getter 可以接受其他的 getters 作为第二个参数(这里为num函数中的10)
            addAge(state, getter) {
                //  console.log(getter); //是num函数和addAge函数
                // console.log(getter.num);//10
                return state.list.map(item => {
                    item.age += getter.num //这是把年龄进行了加10的操作
                    console.log(item.age); //[ 28, 41, 49, 20 ],所以要输出item
                    return item;
                })
            }
        }
    })
    const app = new Vue({
        el: "#app",
        store,
        computed: {
            //  使用辅助函数mapGetters ,这样在模板中就能直接使用addAge(而不是$store.getters.addAge)
            ...Vuex.mapGetters(['addAge'])
        },
    })
</script>

mapGetters 辅助函数
mapGetters (方法辅助函数)辅助函数仅仅是将 store 中的 getter 映射到局部计算属性(vue实例对象的计算属性):
computed:{
    //  数组形式: 自动映射getters同名的计算属性 (在计算属性名字没有被占用的情况下可以使用)
    ...Vuex.mapGetters(['getters名字1', ...]),

    //  对象形式: 重命名计算属性名 和getters名字的映射机制
    ...Vuex.mapGetters({
        // 把 `this.newComputedName` 映射为 `this.$store.getters.getters名字1`
       newgetters:'getters名字1'
    })


}
对getters 重命名,使用对象的形式
<body>
    <div id="app">
        <!--原来的名字 <p>{{maxNum}}</p> -->
         <!--重新起的名字 -->
        <p>{{max}}</p>
    </div>
</body>
<script src="./js/vue.js"></script>
<script src="./js/Vuex.js"></script>
<script>
    const store = new Vuex.Store({
        state: {},
        //  vuex的 计算属性  本质还是函数, 需要通过return 返回数据
        getters: {
            maxNum() {
                return 'hello Vuex'
            }
        }
    })
    const app = new Vue({
        el: "#app",
        store,
        computed: {
            //  使用辅助函数mapGetters
            // ...Vuex.mapGetters(['maxNum'])
            //  对getters 重命名,使用对象的形式
            ...Vuex.mapGetters({
                max: 'maxNum'
            })
        },
    })
</script>
<body>
    <div id="app">
        <!-- getters --state的计算属性  它修改了state,整个state都在同步变
        体现:list中大于20岁的变为了3个(28, 41, 49)-->
        <!-- <p>{{maxNum}}</p>
        <p>{{addAge}}</p> -->
        <!-- 重命名的写法,要用下面的你重新起的名字 -->
        <p>{{max}}</p>
        <p>{{addAge}}</p>
    </div>
</body>
<script src="./js/vue.js"></script>
<script src="./js/Vuex.js"></script>
<script>
    const store = new Vuex.Store({
        state: {
            list: [{
                name: '张三',
                age: 18
            }, {
                name: '李四',
                age: 31
            }, {
                name: '王五',
                age: 39
            }, {
                name: '张三',
                age: 10
            }]
        },
        //  vuex的计算属性  本质还是函数, 需要通过return 返回数据
        getters: {
            //  针对state 派生出新的状态(案例选出大于20的)
            maxNum(state) {
                return state.list.filter(item => item.age > 20)
            },
            num() {
                return 10
            },
            //  getter 可以接受其他的 getters 作为第二个参数(这里为num函数中的10)
            addAge(state, getter) {
                //  console.log(getter); //是num函数和addAge函数
                // console.log(getter.num);//10
                return state.list.map(item => {
                    item.age += getter.num //这是把年龄进行了加10的操作
                    console.log(item.age); //[ 28, 41, 49, 20 ]
                    return item; //,所以要输出item对象
                })
            }
        }
    })
    const app = new Vue({
        el: "#app",
        store,
        computed: {
            //  使用辅助函数mapGetters
            // ...Vuex.mapGetters(['maxNum', 'addAge'])
            //  对getters 重命名,使用对象的形式
            ...Vuex.mapGetters({
                //  max:就是计算属性的名字  maxNum 是gettters 的名字 , 需要添加引号
                max: "maxNum",
                addAge: "addAge"
            })
        },
    })
</script>
因为是同步的所以我们看到对state年龄加10的操作,即使在选出年龄大于20的后面,按照程序的从上往下执行,
大于20的年龄仍然被改变了原来是 [ 18, 31, 39, 10 ]

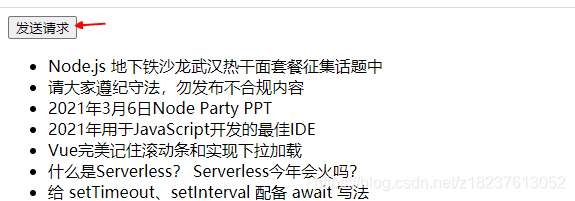
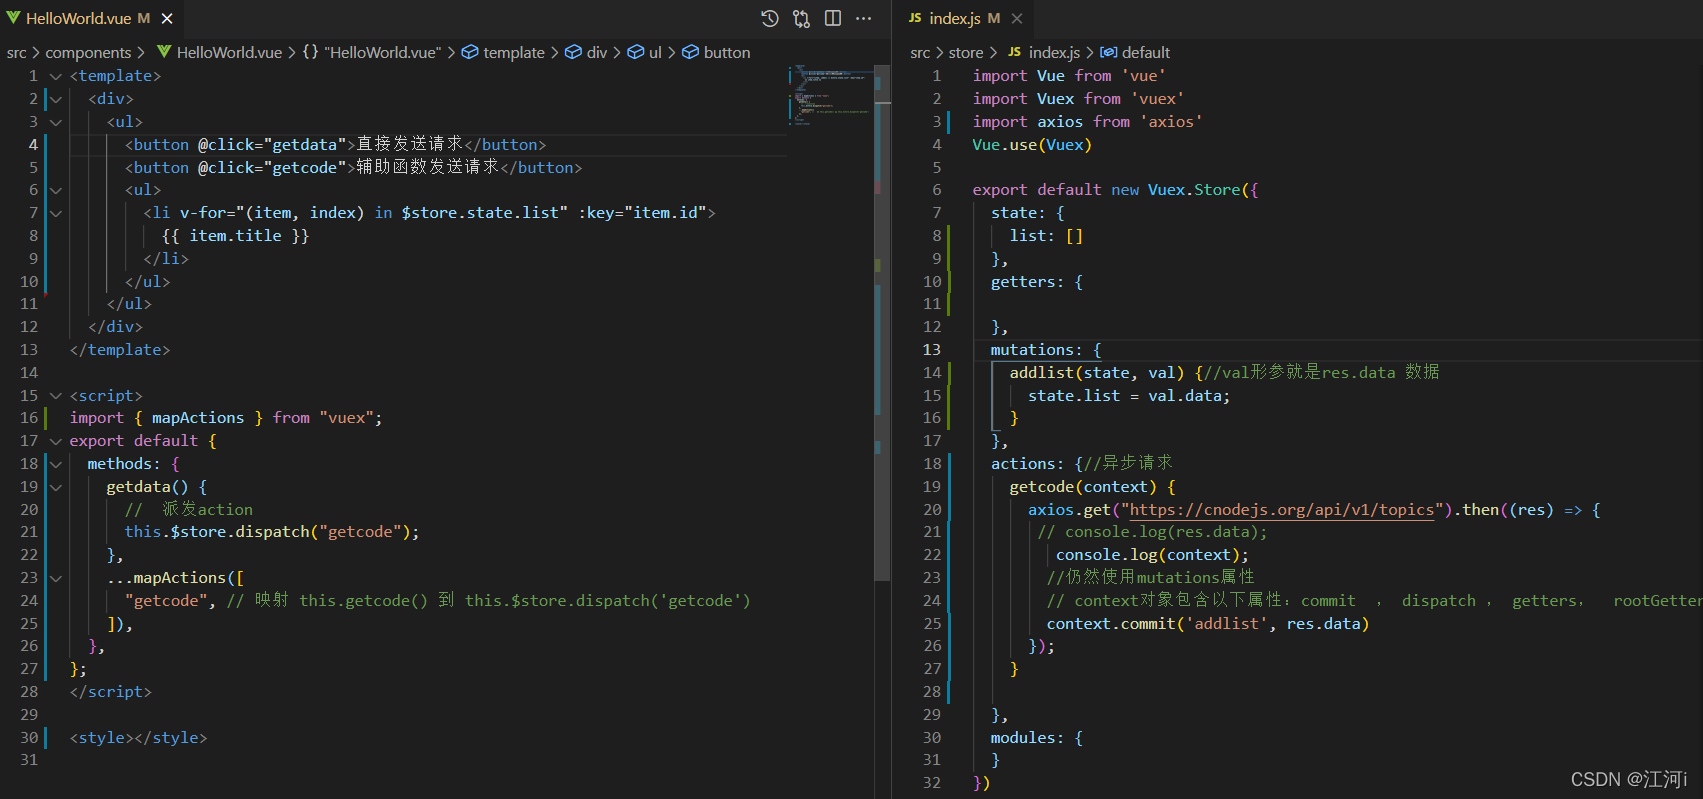
actions可以进行异步操作
actions: 可以进行异步操作(异步请求) actions 不会自动执行,需要通过 store.dispatch() 派发
action 中可以提交mutations
发送请求的同时,提交mutations
<body>
<div id="app">
<button @click='getdata'>发送请求</button>
<ul>
<li v-for="(item,index) in $store.state.list" :key='item.id'>{{item.title}}</li>
</ul>
</div>
</body>
<script src="./js/vue.js"></script>
<script src="./js/vuex.js"></script>
<script src="https://cdn.bootcdn.net/ajax/libs/axios/0.21.1/axios.js"></script>
<script>
const store = new Vuex.Store({
state: {
list: []
},
mutations: {
addlist(state, val) {//val形参就是res.data 数据
state.list = val.data;
}
},
// 执行异步操作, 在这里进行异步请求
actions: {
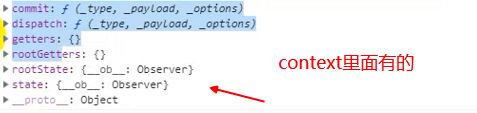
getcode(context) {
console.log(context);
// 定义 actions 接受默认参数 context , 是一个对象,
// context对象包含以下属性:commit , dispatch , getters, rootGetters , rootState,state
axios.get('https://cnodejs.org/api/v1/topics').then(res => {
console.log(res.data);
console.log(context);
//仍然使用mutations属性
context.commit('addlist', res.data)
})
}
}
})
const app = new Vue({
el: "#app",
store,
methods: {
getdata() {
// 派发action
this.$store.dispatch('getcode')
}
}
})
</script>
mapActions 辅助函数
你在组件中使用 this.$store.dispatch(‘xxx’) 分发 action,或者使用 mapActions 辅助函数将组件的 methods 映射为 store.dispatch 调用
Vuex的模块的嵌套
modules: 模块, 每个模块都是独立的, 包含各自state, mutations, actions, getters, modules(模块的嵌套)
模块中的 state 默认是添加到全局state中,但是会自动添加上模块名进行数据的整合
模块中的mutations的默认参数state是模块内部的state(局部的state)
访问模块中的state:
         模板中   $store.state.模块名.key
        组件中  this.$store.state.模块名.key
<body>
<div id="app">
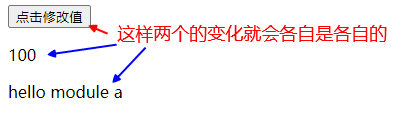
<button @click="change">点击修改值</button>
<p>{{$store.state.count}}</p>
<p>{{$store.state.a.msg}}</p>
</div>
</body>
<script src="./js/vue.js"></script>
<script src="./js/vuex.js"></script>
<script>
const store = new Vuex.Store({
// 根实例下 全局的state
state: {
count: 100,
// (1)a: {
// msg: 'hello module a'
// }
},
mutations: {
change(state) {
console.log(state);
state.count = 300
}
},
actions: {},
getters: {},
modules: {
a: {
//(1) 模块中的 state 默认是添加到全局state中,但是会自动添加上模块名进行数据的整合
state: {
msg: 'hello module a'
},
// 模块中定义 mutations , 默认是添加到 store 根实例下的 mutations中
mutations: {
// 模块中的mutations的默认参数state是模块内部的state(局部的state)
change(state) {
console.log(state);
state.msg = '模块a新的值'
}
},
}
}
})
const app = new Vue({
el: "#app",
store,
methods: {
change() {
//(1)所以我们就能 提交mutation (modules内的模块也能用) this.$store.commit('自定义mutations名字')
this.$store.commit('change')
}
}
})
</script>

命名空间
上一个例子,展示了模块内嵌套模块存在的问题,共用了同一个mutations,命名空间就能解决问题
由于使用单一状态树,应用的所有状态会集中到一个比较大的对象。当应用变得非常复杂时,store 对象就有可能变得相当臃肿。
为了解决以上问题,Vuex 允许我们将 store 分割成模块(module)。每个模块拥有自己的 state、mutation、action、getter、甚至是嵌套子模块
默认情况下,模块内部的 action、mutation 和 getter 是注册在全局命名空间的——这样使得多个模块能够对同一 mutation 或 action 作出响应。
模块的命名空间:
如果希望你的模块具有更高的封装度和复用性,你可以通过添加 namespaced: true 的方式使其成为带命名空间的模块。当模块被注册后,它的所有 getter、action 及 mutation 都会自动根据模块注册的路径调整命名
const store = new Vuex.Store({
    state:{},
    mutations:{
        //  mutations 修改state的唯一入口
    },
    getters:{

    },
    actions:{

    },
    modules:{
        //  定义多个模块
        moduleA:{
            //  给模块添加命名空间:
            namespaced:true,
            //  访问模块中的state : $store.state.模块名.key
            state:{
            },
            //  访问模块中的getters :
            //  没有添加命名空间:$store.getters.key
            //  添加了命名空间: $store.getters['模块名/getters名字']
            getters:{
            },
            //  提交模块中的mutations
            //  没有添加命名空间:$store.commit('mutations名字', paylaod)
            //  添加了命名空间: $store.commit('模块名/mutations名字', paylaod)
            mutations:{
            },
            //  派发actions
            //  没有添加命名空间:$store.dispatch('actions名字', paylaod)
            //  添加了命名空间: $store.dispatch('模块名/actions名字', paylaod)
            //  actions 中也可以提交mutations:
            //  提交的是局部的mutations: context.commit('局部mutations', paylaod)
            //  提交的是全局的mutations:只需要给commit()传入第三个参数{root:true} ; context.commit('全局mutations', paylaod, {root:true})
            actions:{
            },

            modules:{
            }
        },
        moduleB:{
            state:{
            },
            getters:{
            },
            mutations:{
            },
            actions:{
            },
            modules:{
            }
        }
    }
})
模块添加了命名空间后 提交 mutations 和 派发 actions 方式
    提交mutations:
        this.$store.commit('模块名/mutation名字')

    派发actions:
        this.$store.dispatch('模块名/action名字')
访问getters:
this.$store.getters[‘模块名/getters名字’]
<p>{{$store.getters['a/joinMsg']}}</p>
 getters:{
                        /  state 是局部的
                        /  getters 是局部的
                        /  rootState 是全局的state
                        /  rootGetters 是全局的getters
                        joinMsg(state, getters, rootState, rootGetters){
                            console.log(state);
                            console.log(getters);
                            console.log(rootState);
                            console.log(rootGetters);
                        }
                    }
<body>
    <div id="app">
        <button @click="change">点击修改值</button>
        <p>{{$store.state.count}}</p>
        <p>{{$store.state.a.msg}}</p>
        <!-- 访问模块中的state:
         模板中   $store.state.模块名.key
        组件中  this.$store.state.模块名.key -->
    </div>
</body>
<script src="./js/vue.js"></script>
<script src="./js/vuex.js"></script>
<script>
    const store = new Vuex.Store({
        //  根实例下 全局的state
        state: {
            count: 100,
            // modules: 模块中的参数就好比放在这里(1)a: {
            //     msg: 'hello module a'
            // }
        },
        mutations: {
            change(state) {
                console.log(state);
                state.count = 300
            }
        },
        actions: {},
        getters: {},
        modules: {
            a: {
                //  给模块添加 命名空间
                namespaced: true,
                // 模块中的 state 默认是添加到全局state中,但是会自动添加上模块名进行数据的整合
                state: {
                    msg: 'hello module a'
                },
                // (1) 模块中定义 mutations , 默认是添加到 store 根实例下的 mutations中
                mutations: {
                    //  模块中的mutations的默认参数state是模块内部的state(局部的state)
                    change(state) {
                        console.log(state);
                        state.msg = '模块a新的值'
                    }
                },
                actions: {
                    //(2) 在action 中 提交mutations
                    addList(context) {
                        // console.log(context);
                        // console.log('a模块的action');
                        context.commit('change') //和这个效果一样 this.$store.commit('a/change')
                    }

                }

            }
        }
    })
    const app = new Vue({
        el: "#app",
        store,
        methods: {
            change() {
                //(1)提交mutations
                // this.$store.commit('change')
                // this.$store.commit('a/change')

                // (2) 派发action
                this.$store.dispatch('a/addList')
            }
        }

    })
</script>

模块嵌套命名空间所有辅助函数用法
store/modules/home.js
const homeModule = {
    namespaced: true, // 指定命名空间 =>局部
    state() {
        return {
            homeCounter: 100
        }
    },
    getters: {
        doubleHomeCounter(state, getters, rootState, rootGetters) {
            return state.homeCounter * 2
        },
    },
    mutations: {
        increment(state) {
            state.homeCounter++
        }
    },
    actions: {
        incrementAction({ commit, dispatch, state, rootState, getters, rootGetters }) {
            commit("increment")
        }
    }
}
export default homeModule
将home.js引入到index.js里面
import home from './modules/home'
--
--
modules: {
    home,
  }
页面中辅助函数用法
语法:(其余三个辅助函数类似)
  ...mapMutations('模块名', ['xxx']),
  ...mapMutations('模块名',{'新名字': 'xxx'})//起别名
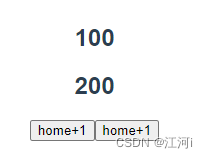
<template>
  <div>
    <h2>{{ first }}</h2>
    <h2>{{ two }}</h2>
    <button @click="increment">home+1</button>
    <button @click="incrementAction">home+1</button>
  </div>
</template>

<script>
import { mapState, mapGetters, mapMutations, mapActions } from "vuex";
export default {
  computed: {
    ...mapState('home', { first: 'homeCounter' }),//方便使用数据
    ...mapGetters('home', { two: 'doubleHomeCounter' })//方便使用计算属性
  },
  methods: {
    ...mapMutations('home', ["increment"]),//方便使用mutations(同步)
    ...mapActions('home', ['incrementAction'])//方便使用actions(异步)
  }
}
</script>
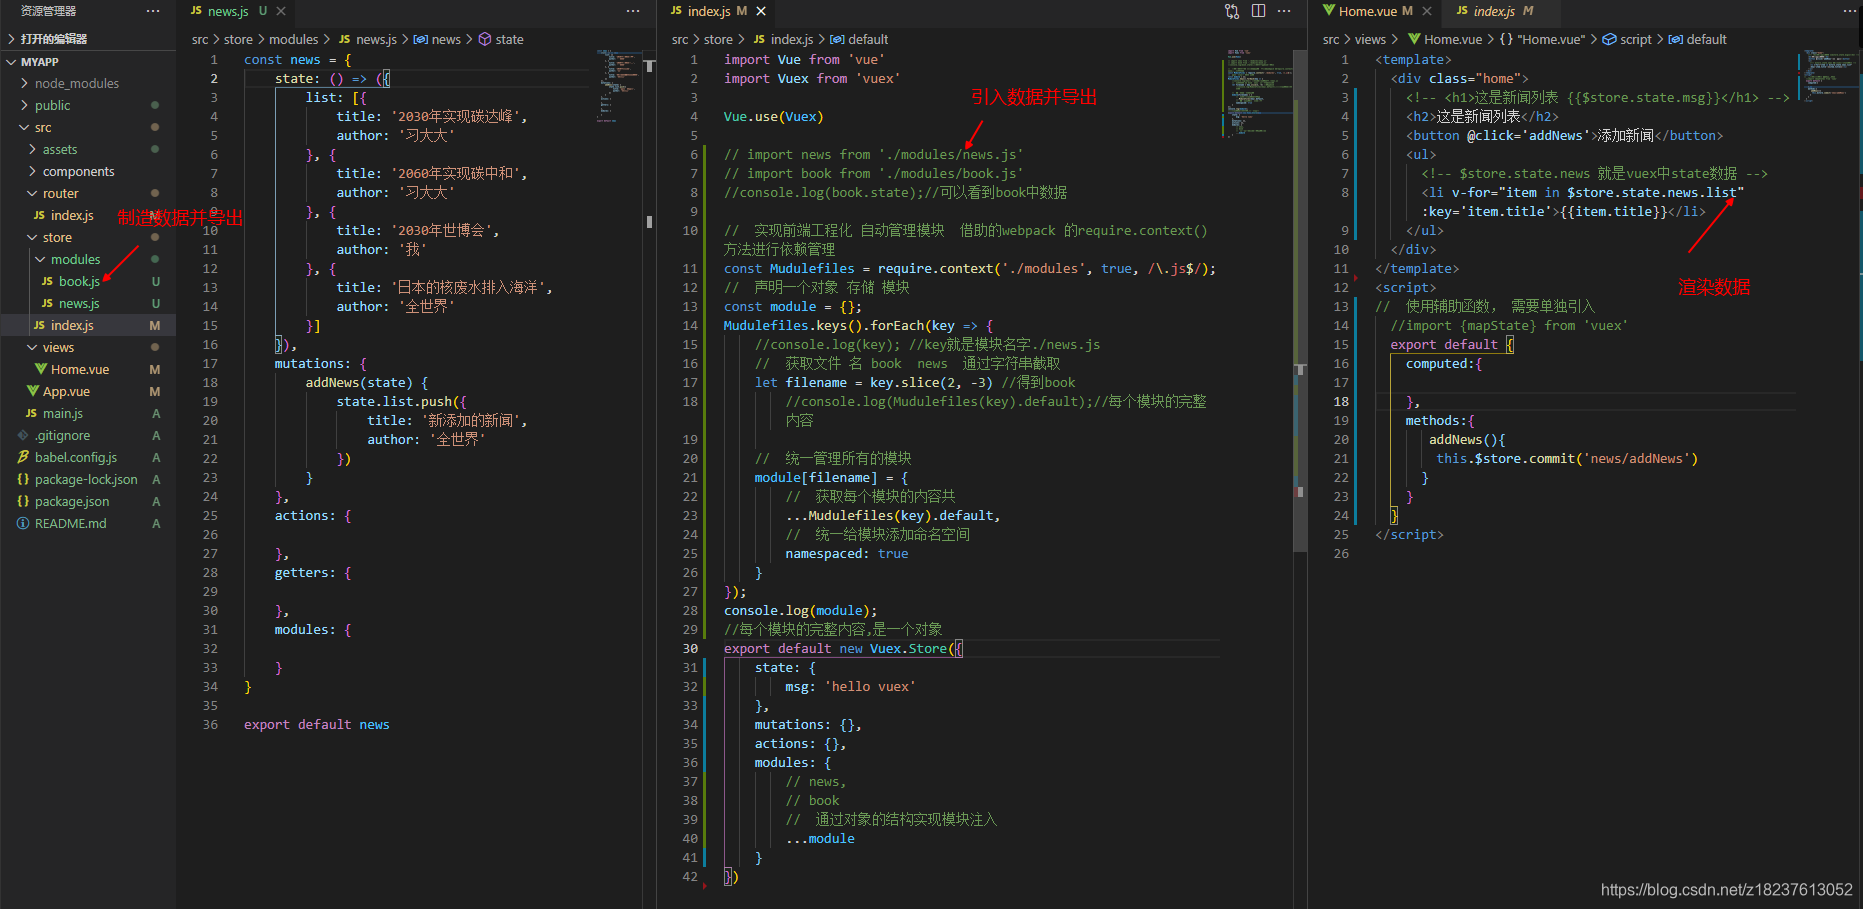
在Vueli中使用Vuex步骤


 310
310


 被折叠的 条评论
为什么被折叠?
被折叠的 条评论
为什么被折叠?
 到【灌水乐园】发言


