


1、查看pom.xml中的配置是否齐全,下面配置供参考:
必须要有最下面的build模块:
<project xmlns="http://maven.apache.org/POM/4.0.0"
	xmlns:xsi="http://www.w3.org/2001/XMLSchema-instance"
	xsi:schemaLocation="http://maven.apache.org/POM/4.0.0 http://maven.apache.org/xsd/maven-4.0.0.xsd">
	<modelVersion>4.0.0</modelVersion>
	<groupId>com</groupId>
	<artifactId>bmSystem</artifactId>
	<version>0.0.1-SNAPSHOT</version>
	<packaging>jar</packaging>

	<!-- Spingboot相关jar包版本 -->
	<parent>
		<groupId>org.springframework.boot</groupId>
		<artifactId>spring-boot-starter-parent</artifactId>
		<version>2.0.5.RELEASE</version>
	</parent>

	<!-- 相关jar包 -->
	<dependencies>
		<!-- Springboot核心jar包 -->
		<dependency>
			<groupId>org.springframework.boot</groupId>
			<artifactId>spring-boot-starter</artifactId>
		</dependency>
		<!-- web开发包:包含Tomcat和Springmvc -->
		<dependency>
			<groupId>org.springframework.boot</groupId>
			<artifactId>spring-boot-starter-web</artifactId>
		</dependency>
		<!-- Junit测试jar包 -->
		<dependency>
			<groupId>junit</groupId>
			<artifactId>junit</artifactId>
			<scope>test</scope>
		</dependency>
		<!-- spring-boot热部署 -->
		<dependency>
			<groupId>org.springframework.boot</groupId>
			<artifactId>spring-boot-devtools</artifactId>
		</dependency>
		<!-- thymeleaf -->
		<dependency>
			<groupId>org.springframework.boot</groupId>
			<artifactId>spring-boot-starter-thymeleaf</artifactId>
		</dependency>
		<!-- jdbc链接容器 -->
		<dependency>
			<groupId>mysql</groupId>
			<artifactId>mysql-connector-java</artifactId>
		</dependency>
		<!-- jpa(已包含hibernate) -->
		<dependency>
			<groupId>org.springframework.boot</groupId>
			<artifactId>spring-boot-starter-data-jpa</artifactId>
		</dependency>
		<!-- 常用工具类 -->
		<dependency>
			<groupId>commons-lang</groupId>
			<artifactId>commons-lang</artifactId>
			<version>2.6</version>
		</dependency>
		<!-- 整合redis时会用到org.apache.commons.pool2.impl.GenericObjectPoolConfig -->
		<dependency>
			<groupId>org.apache.commons</groupId>
			<artifactId>commons-pool2</artifactId>
		</dependency>
		<!-- Shiro -->
		<dependency>
			<groupId>org.apache.shiro</groupId>
			<artifactId>shiro-spring</artifactId>
			<version>1.3.2</version>
		</dependency>
		<!-- 谷歌json -->
		<dependency>
			<groupId>com.google.code.gson</groupId>
			<artifactId>gson</artifactId>
		</dependency>
		<!-- 导入redis依赖,就只需要这一个依赖,不需要spring-boot-starter-cache -->
		<dependency>
			<groupId>org.springframework.boot</groupId>
			<artifactId>spring-boot-starter-data-redis</artifactId>
		</dependency>
		<!-- jackson序列化 -->
		<dependency>
			<groupId>com.fasterxml.jackson.core</groupId>
			<artifactId>jackson-databind</artifactId>
		</dependency>
		<!-- 引入spring aop -->
		<dependency>
			<groupId>org.springframework.boot</groupId>
			<artifactId>spring-boot-starter-aop</artifactId>
		</dependency>
		<!-- 引入CXF jar包 -->
		<dependency>
			<groupId>org.apache.cxf</groupId>
			<artifactId>cxf-spring-boot-starter-jaxws</artifactId>
			<version>3.3.3</version>
		</dependency>
	</dependencies>
	<!-- build这块一定要配置否则打jar的时候会说找不到主类 -->
	<build>
		<plugins>
			<plugin>
				<groupId>org.springframework.boot</groupId>
				<artifactId>spring-boot-maven-plugin</artifactId>

				<configuration>
					<!-- 项目启动类,每个项目的启动类会不一样,发布项目的时候要记得修改 -->
					<mainClass>com.bmSystem.App</mainClass>
				</configuration>
			</plugin>
		</plugins>

		<resources>
			<resource>
				<directory>src/main/webapp</directory>
				<targetPath>META-INF/resources</targetPath>
				<includes>
					<include>**/**</include>
				</includes>
			</resource>
			<resource>
				<directory>src/main/resources</directory>
				<includes>
					<include>**/*.yml</include>
					<include>**/*.properties</include>
					<include>**/*.xml</include>
				</includes>
				<filtering>false</filtering>
			</resource>
		</resources>
	</build>
</project>
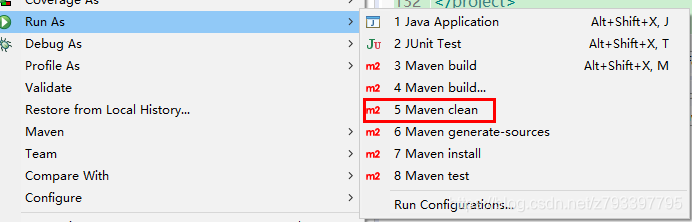
2、选中项目执行maven clean 清除之前的class文件和jar包
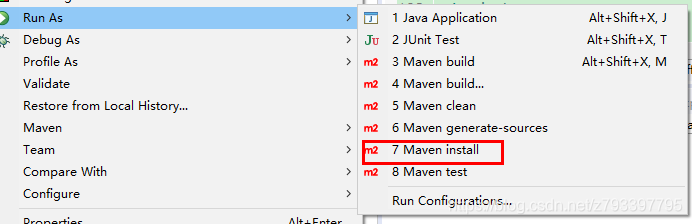
3、执行maven install 重新打包,但是为了稳妥期间,在执行之前看一下本地文件是否有resource里面的配置文件
4、正常情况下,第3步执行完毕后,就已经打包成功了,jar包在target下
然后使用cmd命令执行即可
java -jar xxx.jar
5、如果在运行中报错,如:Failed to configure a DataSource: 'url' attribute is not specified and no ....
那就是配置文件没有正常编译,手动在eclipse中执行clean操作,或者检查pom.xml中是否配置了读取配置文件。
6、使用tomcat启动的时候要继承SpringBootServletInitiailzer类,并复写configure()方法
import org.springframework.boot.SpringApplication;
import org.springframework.boot.autoconfigure.SpringBootApplication;
import org.springframework.boot.builder.SpringApplicationBuilder;
import org.springframework.boot.web.servlet.support.SpringBootServletInitializer;
import org.springframework.context.annotation.ComponentScan;

/**
 * 项目启动类
 */
@SpringBootApplication
@ComponentScan(basePackages = {"com.bmSystem"})
public class App extends SpringBootServletInitializer{

	public static void main(String[] args) {
		SpringApplication.run(App.class, args);
	}

    /**
     * 使用外置的tomcat启动,默认的启动类要继承SpringBootServletInitiailzer类,并复写configure()方法。
     * @see org.springframework.boot.web.servlet.support.SpringBootServletInitializer#configure(org.springframework.boot.builder.SpringApplicationBuilder)
     */
    @Override
    protected SpringApplicationBuilder configure(SpringApplicationBuilder builder) {
        return builder.sources(this.getClass());
    }

}


 3万+
3万+

 被折叠的 条评论
为什么被折叠?
被折叠的 条评论
为什么被折叠?
 到【灌水乐园】发言


