


今天产品中要实现这样的需求,想了想还是把它给整出来了!
第一步:自定义View
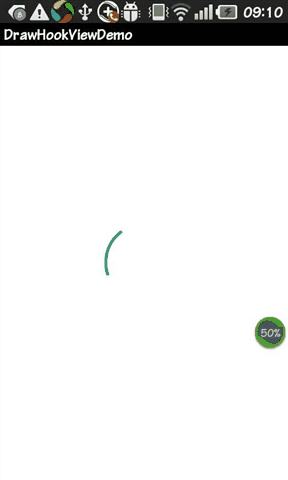
实现步骤:
1、先画好圆弧
2、再画第一根线
3、最后再画第二根线
- /**
- * DrawHook
- * Created by Zane on 2015/3/4.
- */
- public class DrawHookView extends View {
- //绘制圆弧的进度值
- private int progress = 0;
- //线1的x轴
- private int line1_x = 0;
- //线1的y轴
- private int line1_y = 0;
- //线2的x轴
- private int line2_x = 0;
- //线2的y轴
- private int line2_y = 0;
- public DrawHookView(Context context) {
- super(context);
- }
- public DrawHookView(Context context, AttributeSet attrs) {
- super(context, attrs);
- }
- public DrawHookView(Context context, AttributeSet attrs, int defStyle) {
- super(context, attrs, defStyle);
- }
- //绘制
- @Override
- protected void onDraw(Canvas canvas) {
- super.onDraw(canvas);
- progress++;
- /**
- * 绘制圆弧
- */
- Paint paint = new Paint();
- //设置画笔颜色
- paint.setColor(getResources().getColor(R.color.arc_blue));
- //设置圆弧的宽度
- paint.setStrokeWidth(5);
- //设置圆弧为空心
- paint.setStyle(Paint.Style.STROKE);
- //消除锯齿
- paint.setAntiAlias(true);
- //获取圆心的x坐标
- int center = getWidth() / 2;
- int center1 = center - getWidth() / 5;
- //圆弧半径
- int radius = getWidth() / 2 - 5;
- //定义的圆弧的形状和大小的界限
- RectF rectF = new RectF(center - radius -1, center - radius -1 ,center + radius + 1, center + radius + 1);
- //根据进度画圆弧
- canvas.drawArc(rectF, 235, -360 * progress / 100, false, paint);
- /**
- * 绘制对勾
- */
- //先等圆弧画完,才话对勾
- if(progress >= 100) {
- if(line1_x < radius / 3) {
- line1_x++;
- line1_y++;
- }
- //画第一根线
- canvas.drawLine(center1, center, center1 + line1_x, center + line1_y, paint);
- if (line1_x == radius / 3) {
- line2_x = line1_x;
- line2_y = line1_y;
- line1_x++;
- line1_y++;
- }
- if (line1_x >= radius / 3 && line2_x <= radius) {
- line2_x++;
- line2_y--;
- }
- //画第二根线
- canvas.drawLine(center1 + line1_x - 1, center + line1_y, center1 + line2_x, center + line2_y, paint);
- }
- //每隔10毫秒界面刷新
- postInvalidateDelayed(10);
- }
- }
第二步:布局文件引用自定义View
- <?xml version="1.0" encoding="utf-8"?>
- <RelativeLayout xmlns:android="http://schemas.android.com/apk/res/android"
- android:orientation="vertical"
- android:layout_width="fill_parent"
- android:layout_height="fill_parent"
- android:background="@color/color_fff"
- >
- <com.offcn.DrawHookViewDemo.DrawHookView
- android:layout_width="90dp"
- android:layout_height="90dp"
- android:layout_centerInParent="true"
- />
- </RelativeLayout>
附colors.xml:
- <?xml version="1.0" encoding="utf-8"?>
- <resources>
- <color name="arc_blue">#10a679</color>
- <color name="color_fff">#ffffff</color>
- </resources>
示例代码戳Here
https://github.com/ZaneLove/DrawHookView


 1233
1233


 被折叠的 条评论
为什么被折叠?
被折叠的 条评论
为什么被折叠?
 到【灌水乐园】发言


