


偶然接触到Android 控件的tint这一属性,之前一直没有用过,所以非常感兴趣,便花了点时间研究了下。
tint 译为着色。tint一般与tintMode配合使用。 同时还有backgroundTint和backgroundTintMode属性(很明显backgroundTint是针对背景色着色,通过实践也证实了backgroundTint只有在为控件设置了background属性才会生效。)
tintMode和backgroundTintMode有六种模式:
src_in
add
multiply
screen
src_atop
src_over
其中默认是src_in.
为了更直观的看出tint和backgroundTint的用法以及tint各种模式的区别,我们直接通过代码来看吧,否则再怎么说也是云里雾里。。。
首先MainActivity的代码很简单,就是显示activity_main.xml布局文件。如下:
package com.android.monkey.testtint;

import android.support.v7.app.AppCompatActivity;
import android.os.Bundle;

public class MainActivity extends AppCompatActivity {

    @Override
    protected void onCreate(Bundle savedInstanceState) {
        super.onCreate(savedInstanceState);
        setContentView(R.layout.activity_main);
    }
}
现在我们重点看看activity_main.xml:
<?xml version="1.0" encoding="utf-8"?>
<LinearLayout xmlns:android="http://schemas.android.com/apk/res/android"
    xmlns:tools="http://schemas.android.com/tools"
    android:id="@+id/activity_main"
    android:layout_width="match_parent"
    android:layout_height="match_parent"
    tools:context="com.android.monkey.testtint.MainActivity"
    android:orientation="vertical">
    <LinearLayout
        android:layout_width="match_parent"
        android:layout_height="wrap_content"
        android:layout_marginTop="20dp">
        <ImageView
            android:layout_width="100dp"
            android:layout_height="100dp"
            android:src="@android:drawable/star_on"/>
        <ImageView
            android:layout_width="100dp"
            android:layout_height="100dp"
            android:src="@android:drawable/star_on"
            android:tint="#00ff00"
            android:tintMode="src_in"/>
        <ImageView
            android:layout_width="100dp"
            android:layout_height="100dp"
            android:src="@android:drawable/star_on"
            android:tint="#00ff00"
            android:tintMode="add"/>
        <ImageView
            android:layout_width="100dp"
            android:layout_height="100dp"
            android:src="@android:drawable/star_on"
            android:tint="#00ff00"
            android:tintMode="multiply"/>
        <ImageView
            android:layout_width="100dp"
            android:layout_height="100dp"
            android:src="@android:drawable/star_on"
            android:tint="#00ff00"
            android:tintMode="screen"/>
        <ImageView
            android:layout_width="100dp"
            android:layout_height="100dp"
            android:src="@android:drawable/star_on"
            android:tint="#00ff00"
            android:tintMode="src_atop"/>
        <ImageView
            android:layout_width="100dp"
            android:layout_height="100dp"
            android:src="@android:drawable/star_on"
            android:tint="#00ff00"
            android:tintMode="src_over"/>
    </LinearLayout>
    <LinearLayout
        android:layout_width="match_parent"
        android:layout_height="wrap_content">
        <TextView
            android:layout_width="100dp"
            android:layout_height="100dp"
            android:text="原图"
            android:gravity="center"/>
        <TextView
            android:layout_width="100dp"
            android:layout_height="100dp"
            android:text="src_in"
            android:gravity="center"/>
        <TextView
            android:layout_width="100dp"
            android:layout_height="100dp"
            android:text="add"
            android:gravity="center"/>
        <TextView
            android:layout_width="100dp"
            android:layout_height="100dp"
            android:text="multiply"
            android:gravity="center"/>
        <TextView
            android:layout_width="100dp"
            android:layout_height="100dp"
            android:text="screen"
            android:gravity="center"/>
        <TextView
            android:layout_width="100dp"
            android:layout_height="100dp"
            android:text="src_atop"
            android:gravity="center"/>
        <TextView
            android:layout_width="100dp"
            android:layout_height="100dp"
            android:text="src_over"
            android:gravity="center"/>
    </LinearLayout>
    <LinearLayout
        android:layout_width="match_parent"
        android:layout_height="wrap_content">
        <ImageView
            android:layout_width="100dp"
            android:layout_height="100dp"
            android:background="#ffffff"
            android:src="@android:drawable/star_on" />
        <ImageView
            android:layout_width="100dp"
            android:layout_height="100dp"
            android:background="#ffffff"
            android:backgroundTint="#0000ff"
            android:backgroundTintMode="src_in"
            android:src="@android:drawable/star_on" />
        <ImageView
            android:layout_width="100dp"
            android:layout_height="100dp"
            android:backgroundTintMode="add"
            android:background="#ffffff"
            android:backgroundTint="#0000ff"
            android:src="@android:drawable/star_on" />
        <ImageView
            android:layout_width="100dp"
            android:layout_height="100dp"
            android:backgroundTintMode="multiply"
            android:background="#ffffff"
            android:backgroundTint="#0000ff"
            android:src="@android:drawable/star_on" />
        <ImageView
            android:layout_width="100dp"
            android:layout_height="100dp"
            android:backgroundTintMode="screen"
            android:background="#ffffff"
            android:backgroundTint="#0000ff"
            android:src="@android:drawable/star_on" />
        <ImageView
            android:layout_width="100dp"
            android:layout_height="100dp"
            android:backgroundTintMode="src_atop"
            android:background="#ffffff"
            android:backgroundTint="#0000ff"
            android:src="@android:drawable/star_on" />
        <ImageView
            android:layout_width="100dp"
            android:layout_height="100dp"
            android:backgroundTintMode="src_over"
            android:background="#ffffff"
            android:backgroundTint="#0000ff"
            android:src="@android:drawable/star_on" />
    </LinearLayout>

</LinearLayout>
根布局是一个垂直的线性布局,里面有三个水平的线性布局。第一个水平线性布局使用的是tint和tintMode。第二个线性布局显示的是tintMode的名称,方便运行之后与效果对应起来看。第三个线性布局使用的是android:backgroundTint和android:backgroundTintMode。
在manifest.xml清单文件中我们将MainAcitivty的方向设置为水平,运行之后结果如下:
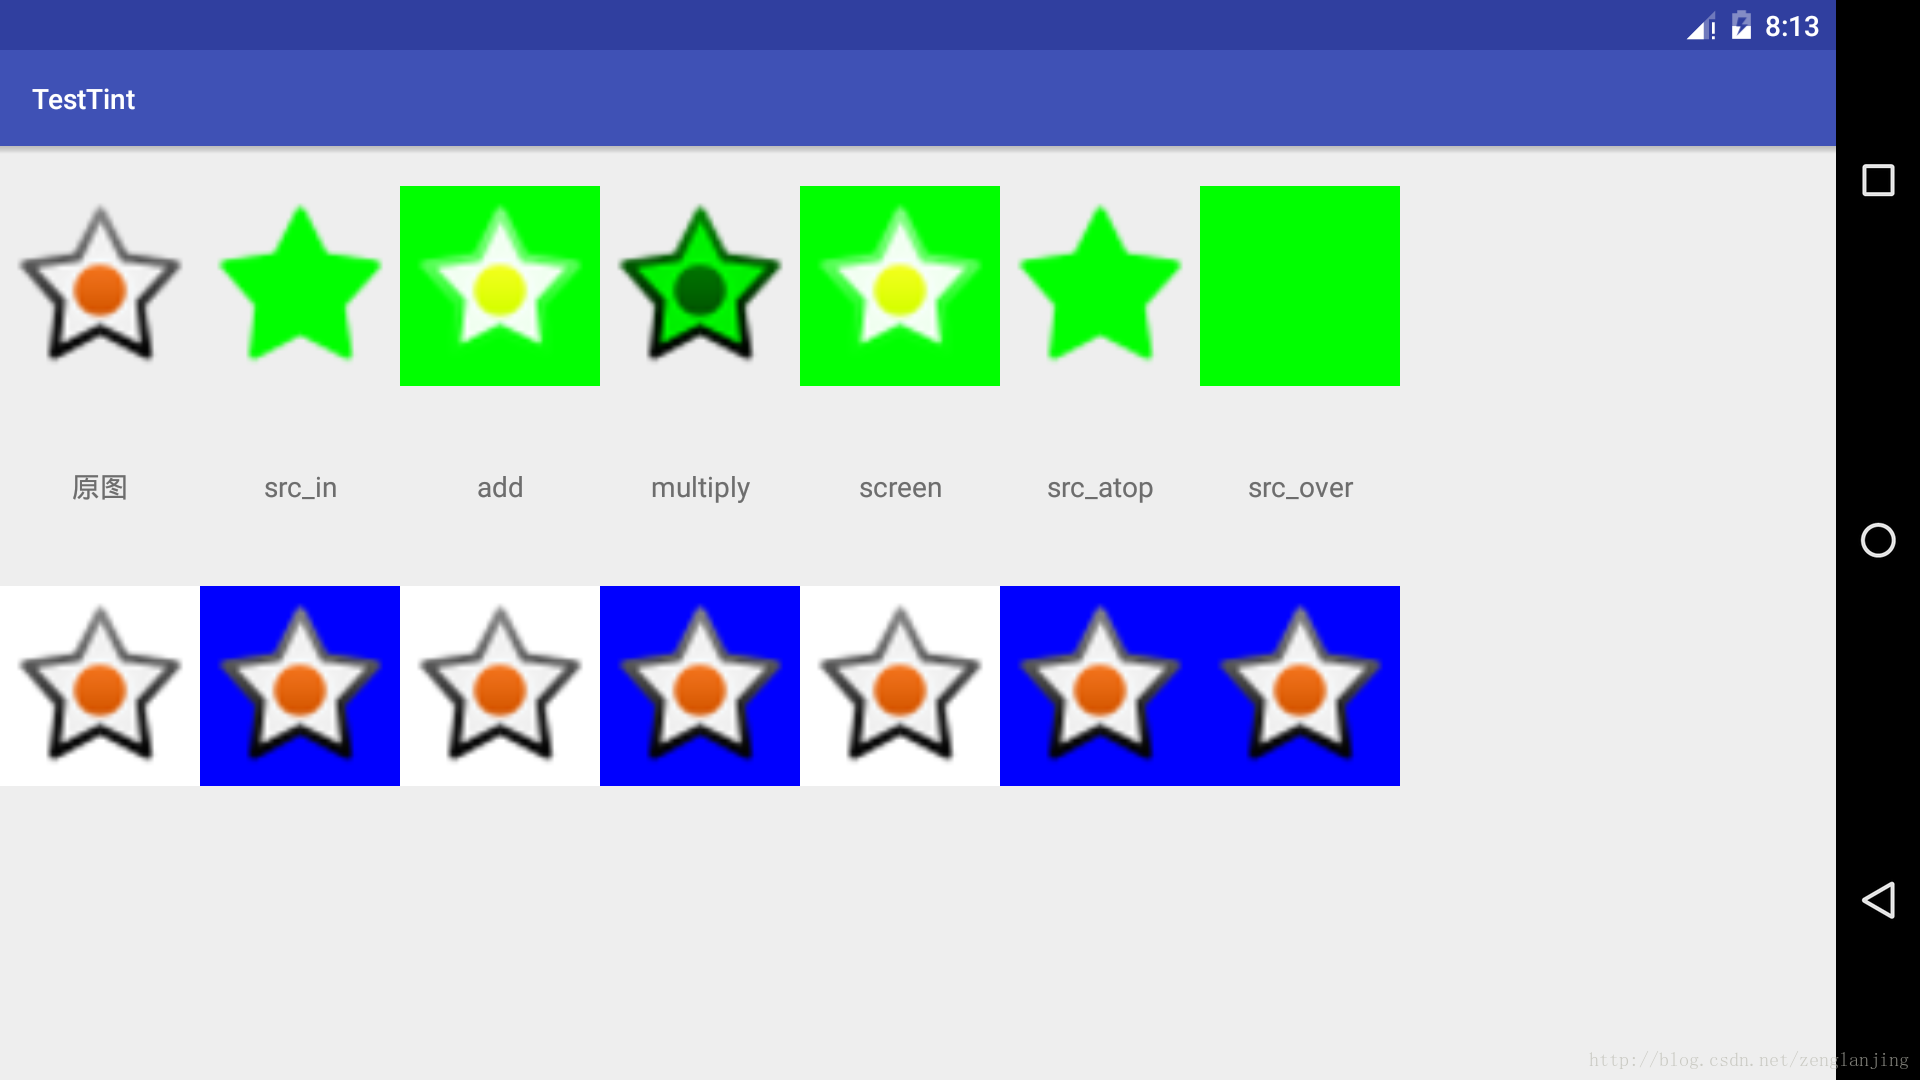
这样可以比较明显的看出各种TintMode对应的效果。
值得注意的是:
1.backgroundTint只有在设置了background才有效。
2.在Andrid 5.0以后使用才不会出现问题,如果是5.0以下的系统则需要通过support包提供的兼容控件来实现,这里不多说,感应趣的自己可以研究下。
通过tint这一属性我们只是用了一张图片便得到了不同的效果。很自然的我们会想到是否可以使用tint来实现Android中selector的效果,如果可以那么将对缩小APK的大小有帮助。通过实例证明这种方式可行的,只是在最开始遇到了很多坑。
1.使用selector的方式实现各种点击态的方式很简单,所以这里不做说明了,只是简单的贴下代码:
<?xml version="1.0" encoding="utf-8"?>
<selector xmlns:android="http://schemas.android.com/apk/res/android">
    <item android:state_pressed="true" android:drawable="@mipmap/selected"/>
    <item android:drawable="@mipmap/normal"/>

</selector>
2.通过tint属性实现selector效果。这里我们使用ImageView来做说明。
首先看下color文件夹下color_tint.xml代码:
<?xml version="1.0" encoding="utf-8"?>
<selector xmlns:android="http://schemas.android.com/apk/res/android">
    <item android:state_pressed="true" android:color="@color/color_ff0000"></item>
    <item android:color="@color/color_ff6c38"></item>
</selector>
其中:
    <color name="color_ff0000">#ff0000</color>
    <color name="color_ff6c38">#ff6c38</color>
在布局文件中显示一个有点击态的ImageView:
<ImageView
        android:layout_width="150px"
        android:layout_height="150px"
        android:src="@mipmap/ic_launcher"
        android:tint="@color/color_tint"
        android:clickable="true"/>
注意一定要将ImageView设置为可点击的状态,否则无论怎么样你都看不到效果。
运行程序后点击并没有效果出现我们想要的效果。然后想到通过代码来实现tint效果看行不行呢?
    //代码设置tint同时实现selector的功能
    private void addViewOne() {
        ImageView imageView = CreateImageView();
        Drawable drawable =
            ContextCompat.getDrawable(this,R.mipmap.ic_launcher);
        //Drawable.ConstantState state = drawable.getConstantState();
        //Drawable wrapDrawable = DrawableCompat.wrap(
        // state==null?drawable:state.newDrawable()).mutate();
        Drawable wrapDrawable = DrawableCompat.wrap(drawable).mutate();
        wrapDrawable.setBounds(
            0,
            0,
            wrapDrawable.getIntrinsicWidth(),

        DrawableCompat.setTint(
            wrapDrawable,
            ContextCompat.getColor(this,R.color.color_tint));
        imageView.setImageDrawable(wrapDrawable);
        imageView.setClickable(true);//这一步很重要,否则点击无效果
        mLlContainer.addView(imageView);
    }
很遗憾,同样没有效果。
分析原因:在图片点击之后会执行drawable的onStateChange(int[] state)方法。这里我们对应的是BitmapDrawable,查看那个类的onStateChange(int[] state)方法,我猜测是在点击的时候并没有执行drawable的invalidateSelf()方法,从而并没有更新界面的UI显示。
后来尝试使用StateListDrawable来看是否能实现上述功能。在布局文件中的xml代码如下:
<ImageView
        android:layout_width="150px"
        android:layout_height="150px"
        android:src="@drawable/selector"
        android:tint="@color/color_tint"
        android:clickable="true"/>
其中selector.xml文件如下:
<?xml version="1.0" encoding="utf-8"?>
<selector xmlns:android="http://schemas.android.com/apk/res/android">
    <item android:state_pressed="true"
          android:drawable="@mipmap/ic_launcher"/>
    <item android:drawable="@mipmap/ic_launcher"/>

</selector>
通过对比这里和我们第一次的xml代码会发现只有一处不同,那就是src属性不一样。这里src属性的selector文件就相当于StateListDrawable,而selector文件为什么要写两个一模一样的图片ic_launcher,那是因为如果不是每种状态都对应一个drawable文件,在状态改变的时候StateListDrawable不会更新UI。运行程序发现效果终于出来了。
上面演示的是xml如何实现,接着来看看java代码中如何实现:
    //使用StateListDrawble实现selector
    private void addViewTwo() {
        ImageView imageView = CreateImageView();
        Drawable drawable =
            ContextCompat.getDrawable(this,R.mipmap.ic_launcher);
        int[][] states = new int[2][];
        states[0] = new int[]{android.R.attr.state_pressed};
        states[1] = new int[]{};

        StateListDrawable stateListDrawable = new StateListDrawable();
        stateListDrawable.addState(states[0],drawable);
        stateListDrawable.addState(states[1],drawable);

        int[] color = new int[]{
                ContextCompat.getColor(this,R.color.color_ff0000),
                ContextCompat.getColor(this,R.color.color_ff6c38)};

        ColorStateList colorStateList = new ColorStateList(states,color);

        Drawable.ConstantState state =
            stateListDrawable.getConstantState();
        Drawable wrapDrawable =
            DrawableCompat.wrap(state == null ? stateListDrawable :      state.newDrawable()).mutate();

        wrapDrawable.setTintList(colorStateList);

        imageView.setImageDrawable(wrapDrawable);
        imageView.setClickable(true);//这一步很重要,否则点击无效果
        mLlContainer.addView(imageView);
    }
通过代码也能顺利实现我们想要的效果。
这里有个问题就是如果我使用ImageButton的话使用第一种方式也能实现效果,目前还没有找到原因,贴下代码,知道的同学欢迎随时告知,灰常感谢:
<ImageButton
        android:layout_width="150px"
        android:layout_height="150px"
        android:src="@mipmap/ic_launcher"
        android:tint="@color/color_tint" />
但是此时如果使用android:backgroundTint也不行。
<ImageButton
        android:layout_width="150px"
        android:layout_height="150px"
        android:background="@mipmap/ic_launcher"
        android:backgroundTint="@color/color_tint" />
好了,遇到的坑都说得差不多了,贴下完整的代码吧,以供参考:
SecondActivity:
package com.android.monkey.testtint;

import android.content.res.ColorStateList;
import android.graphics.drawable.Drawable;
import android.graphics.drawable.StateListDrawable;
import android.os.Bundle;
import android.support.annotation.Nullable;
import android.support.v4.content.ContextCompat;
import android.support.v4.graphics.drawable.DrawableCompat;
import android.support.v7.app.AppCompatActivity;
import android.widget.ImageButton;
import android.widget.ImageView;
import android.widget.LinearLayout;

/**
 * Description:
 * Author: Monkey
 * Time: 2017/1/13 14:24
 */

public class SecondActivity extends AppCompatActivity {
    private LinearLayout mLlContainer;

    @Override
    protected void onCreate(@Nullable Bundle savedInstanceState) {
        super.onCreate(savedInstanceState);
        setContentView(R.layout.activity_second);
        initView();
    }

    private void initView() {
        mLlContainer = (LinearLayout)findViewById(R.id.ll_container);
        addViewOne();
        addViewTwo();
    }
    public ImageButton CreateImageButton(){
        ImageButton imageButton = new ImageButton(this);
        LinearLayout.LayoutParams lp = new LinearLayout.LayoutParams(150, 150);
        imageButton.setLayoutParams(lp);
        return imageButton;
    }
    public ImageView CreateImageView(){
        ImageView imageView = new ImageView(this);
        LinearLayout.LayoutParams lp = new LinearLayout.LayoutParams(150, 150);
        imageView.setLayoutParams(lp);
        return imageView;
    }

    //代码设置tint同时实现selector的功能。(实现了tint,但是没有实现selector。BitmapDrawable实现不了)
    private void addViewOne() {
        ImageView imageView = CreateImageView();
        Drawable drawable = ContextCompat.getDrawable(this,R.mipmap.ic_launcher);
        //Drawable.ConstantState state = drawable.getConstantState();
        //Drawable wrapDrawable = DrawableCompat.wrap(
        // state==null?drawable:state.newDrawable()).mutate();
        Drawable wrapDrawable = DrawableCompat.wrap(drawable).mutate();
        wrapDrawable.setBounds(0,0,wrapDrawable.getIntrinsicWidth(),wrapDrawable.getIntrinsicHeight());
        DrawableCompat.setTint(wrapDrawable,ContextCompat.getColor(this,R.color.color_tint));
        imageView.setImageDrawable(wrapDrawable);
        imageView.setClickable(true);//这一步很重要,否则点击无效果
        mLlContainer.addView(imageView);
    }

    //使用StateListDrawble实现selector
    private void addViewTwo() {
        ImageView imageView = CreateImageView();
        Drawable drawable = ContextCompat.getDrawable(this,R.mipmap.ic_launcher);
        int[][] states = new int[2][];
        states[0] = new int[]{android.R.attr.state_pressed};
        states[1] = new int[]{};

        StateListDrawable stateListDrawable = new StateListDrawable();
        stateListDrawable.addState(states[0],drawable);
        stateListDrawable.addState(states[1],drawable);

        int[] color = new int[]{
                ContextCompat.getColor(this,R.color.color_ff0000),
                ContextCompat.getColor(this,R.color.color_ff6c38)};

        ColorStateList colorStateList = new ColorStateList(states,color);

        Drawable.ConstantState state = stateListDrawable.getConstantState();
        Drawable wrapDrawable = DrawableCompat.wrap(
                state == null ? stateListDrawable : state.newDrawable()).mutate();
        wrapDrawable.setTintList(colorStateList);
        imageView.setImageDrawable(wrapDrawable);
        imageView.setClickable(true);//这一步很重要,否则点击无效果
        mLlContainer.addView(imageView);
    }

}
activity_second.xml:
<?xml version="1.0" encoding="utf-8"?>
<LinearLayout xmlns:android="http://schemas.android.com/apk/res/android"
    android:id="@+id/ll_container"
    android:layout_width="match_parent"
    android:layout_height="match_parent"
    android:orientation="vertical">
    <ImageView
        android:layout_width="150px"
        android:layout_height="150px"
        android:src="@mipmap/ic_launcher"
        android:tint="@color/color_tint"
        android:clickable="true"/>
    <ImageView
        android:layout_width="150px"
        android:layout_height="150px"
        android:src="@drawable/selector"
        android:tint="@color/color_tint"
        android:clickable="true"/>

    <ImageButton
        android:layout_width="150px"
        android:layout_height="150px"
        android:background="@mipmap/ic_launcher"
        android:backgroundTint="@color/color_tint" />
    <ImageButton
        android:layout_width="150px"
        android:layout_height="150px"
        android:src="@mipmap/ic_launcher"
        android:tint="@color/color_tint" />
</LinearLayout>
上面用到的selector.xml:
<?xml version="1.0" encoding="utf-8"?>
<selector xmlns:android="http://schemas.android.com/apk/res/android">
    <item android:state_pressed="true" android:drawable="@mipmap/ic_launcher"/>
    <item android:drawable="@mipmap/ic_launcher"/>

</selector>
color文件夹下color_tint.xml:
<?xml version="1.0" encoding="utf-8"?>
<selector xmlns:android="http://schemas.android.com/apk/res/android">
<item android:state_pressed="true" android:color="@color/color_ff0000"></item>
<item android:color="@color/color_ff6c38"></item>
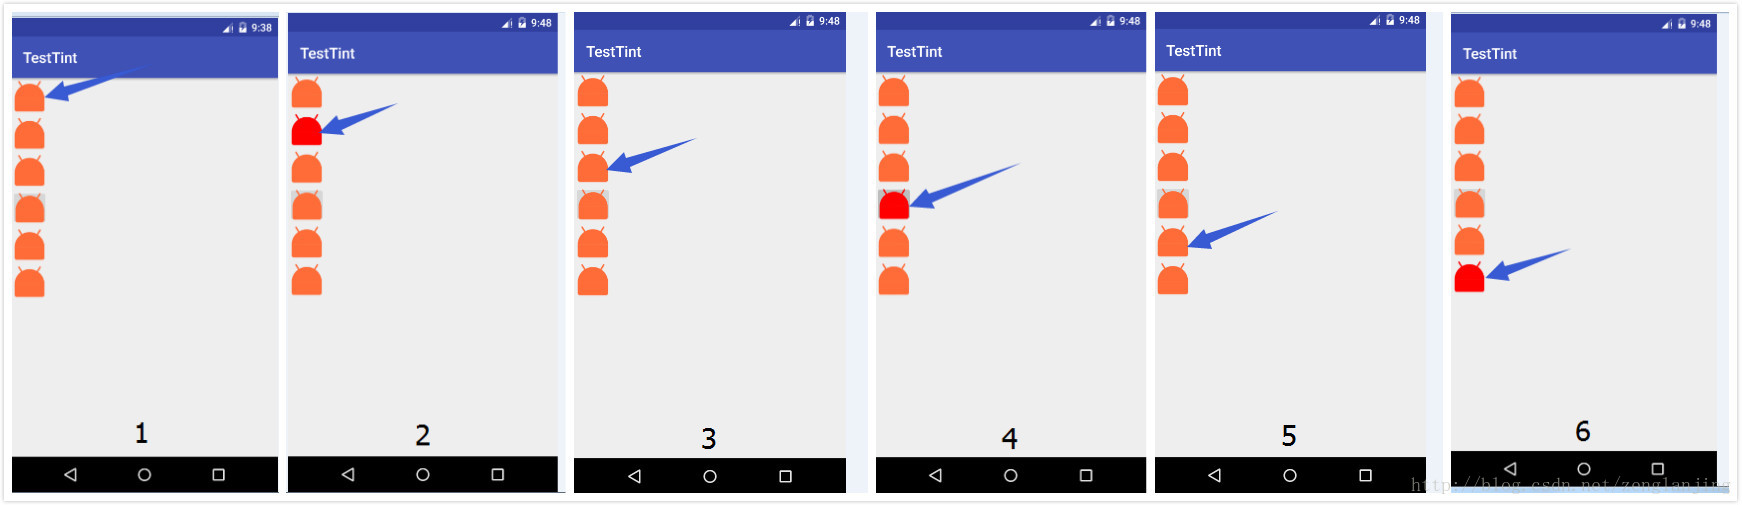
</selector>结果如下(加粗的表示能实现效果):
1.xml文件 使用ImageView BitmapDrawable
2.xml文件 使用ImageView StateListDrawable
3.xml文件 使用ImageButton background和backgroundTint
4.xml文件 使用ImageButton BitmapDrawable
5.java代码 使用ImageView BitmapDrawable
6.java代码 使用ImageView StateListDrawable


 1101
1101

 被折叠的 条评论
为什么被折叠?
被折叠的 条评论
为什么被折叠?
 到【灌水乐园】发言


