


文章目录
Vue全家桶各部分核心知识详解
构建vue项目的利器—脚手架vue-cli3详解
安装node
vue-cli3全⽅方位对⽐比vue-cli2
参考地址:https://cli.vuejs.org/zh/config/#vue-config-js
安装node
- 选择对应系统进行行下载,下载完成后直接安装即可:下载地址
- 安装完成后,使用node -v,有输出即为安装成功
安装vue-cli
// 安装vue到全局中
npm install -g @vue/cli
npm install -g yarn
// 输出版本号即为安装成功
vue -V
![> [外链图片转存失败,源站可能有防盗链机制,建议将图片保存下来直接上传(img-YTsJ2YPK-1599479791555)(F7CB43DD51BF4E519CBD8D11E9702603)]](https://img-blog.csdnimg.cn/20200907195727126.png#pic_center)
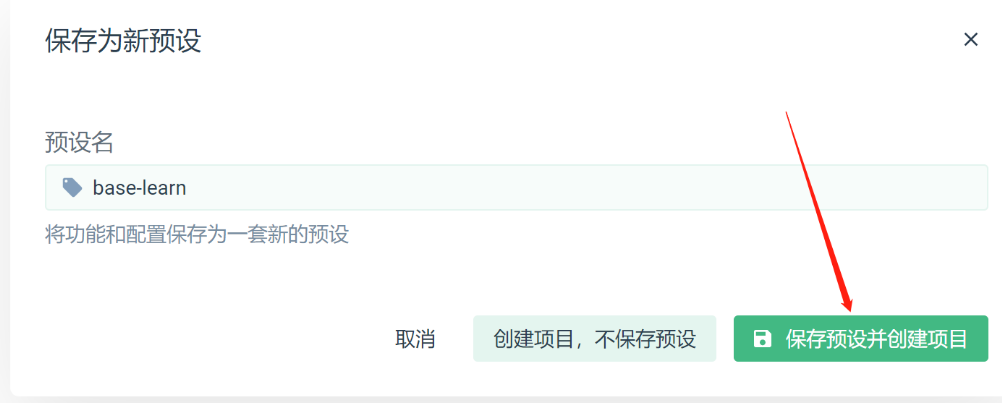
创建项目
- vue create project 或 可视化创建 vue ui
- vue init webpack project
在项目文件夹中输入vue ui,会显示如图
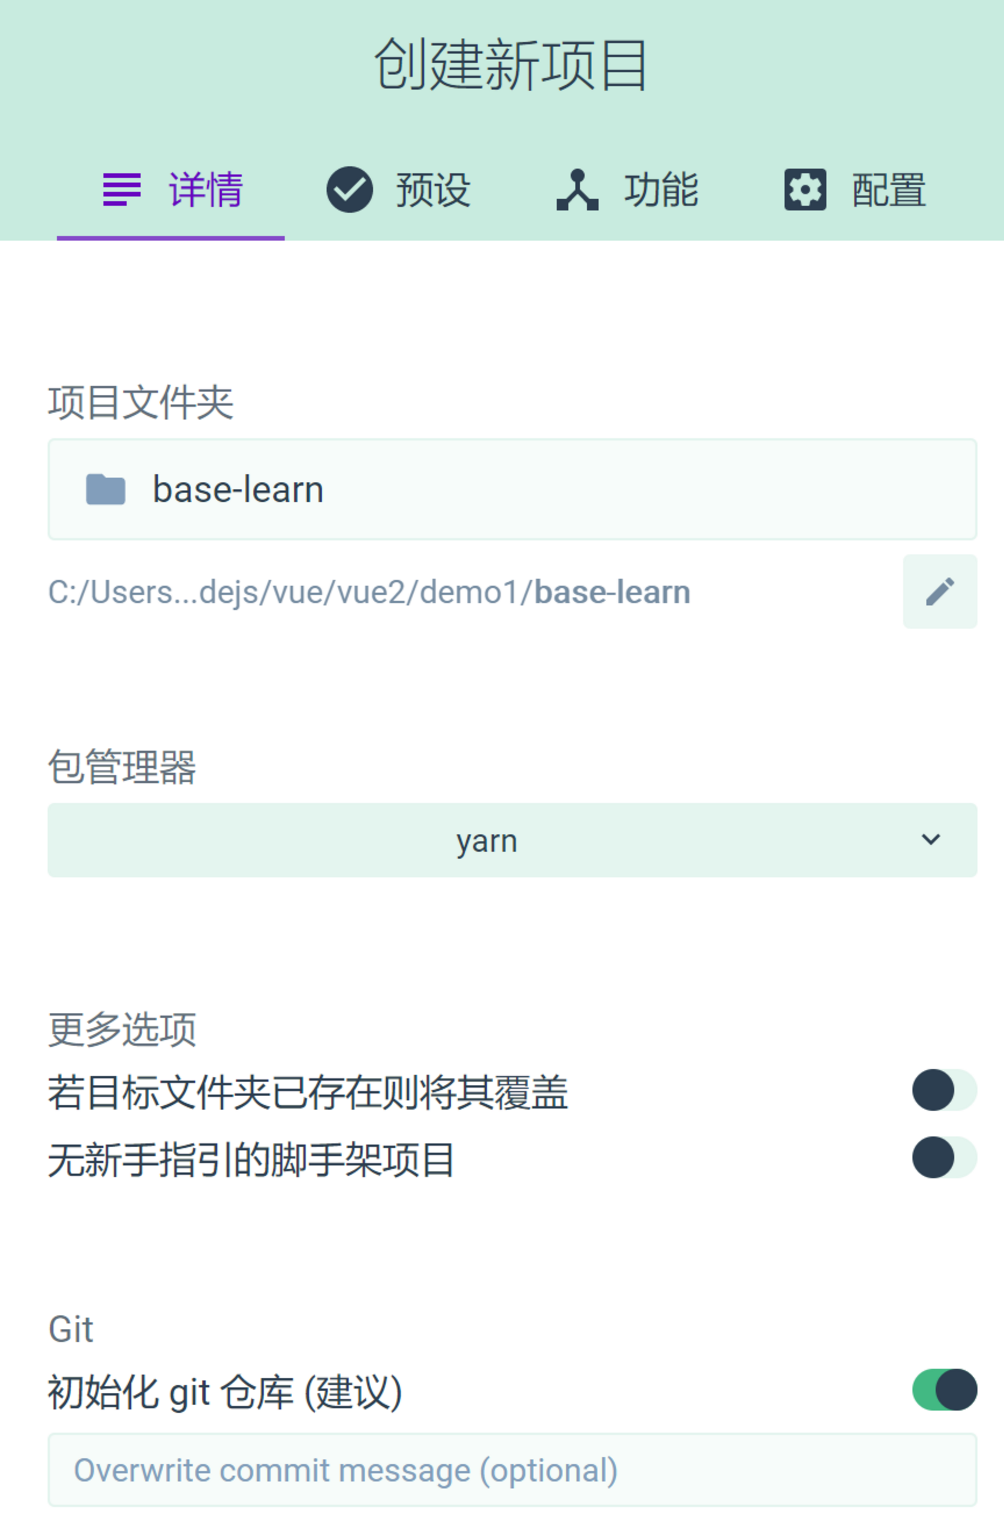
配置如下
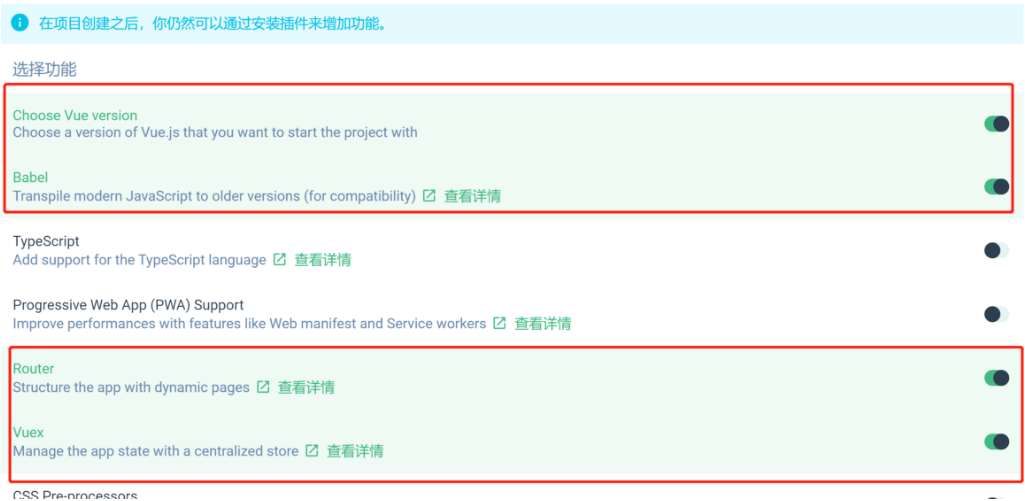
保存方便下次使用
CLI服务
- 脚本名更改
- 启动服务的依赖更改
- CLi3启动方式是vue-cli-service serve
- CLi2启动方式是webpack-dev-server --inline --progress --config
生成的目录结构介绍
3.0的目录简单了很多,少了build、config两个目录。需要对webpack进行配置的话,要手动在根目录新建一个vue.config.js文件
vue.config.js常用配置
// vue.config.js 常用配置
module.exports = {
    // 基本路径, vue.cli 3.3以前请使用baseUrl
    publicPath: '/',
    // 输出文件目录
    outputDir: 'dist',
    // 用于嵌套生成的静态资产(js,css,img,fonts)的目录。
    assetsDir: '',
    // 生产环境sourceMap
    productionSourceMap: true,
    // webpack配置
    configureWebpack: () => {},
    chainWebpack: () => {},
    // css相关配置
    css: {
        // 启用 CSS modules
        modules: false,
        // 是否使用css分离插件
        extract: true,
        // 开启 CSS source maps?
        sourceMap: false,
        // css预设器配置项
        loaderOptions: {},
    },
    // webpack-dev-server 相关配置
    devServer: {
        host: '0.0.0.0',
        port: 8080,
        proxy: {}, // 设置代理
    },
    // 第三方插件配置
    pluginOptions: {
        // ...
    }
}
启动项目测试
在base-learn根目录中新建一个vue.config.js,内容如下
module.exports = {
  devServer: {
    port: 8088,
    open: true
  }
}
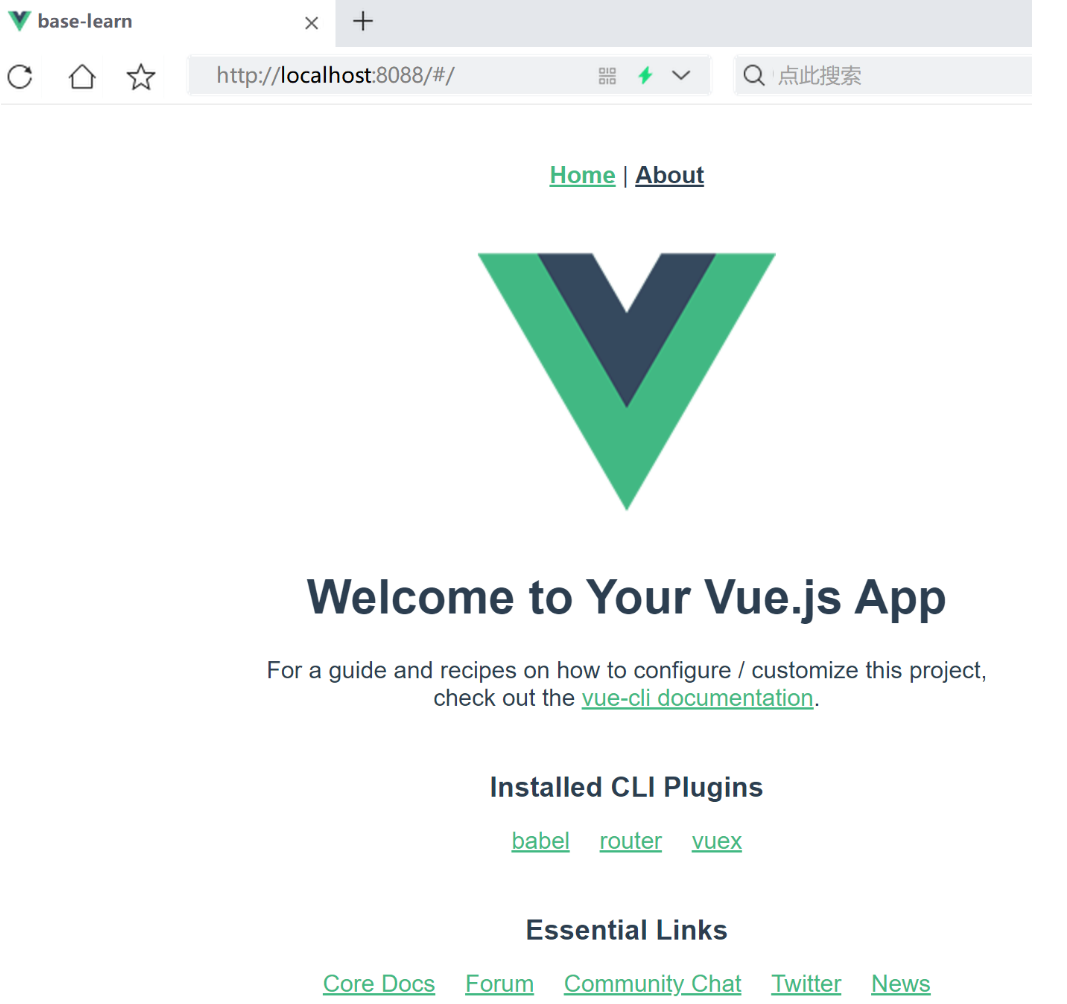
进入文件夹中,启动项目,自动在浏览器中打开网页
cd .\base-learn\
npm run serve
显示的网页内容如下
精简项目
删除views下的.vue文件
app.vue只留下如下代码
<template>
  <div id="app">
    <router-view/>
  </div>
</template>
<style>
</style>
router下的index.js内容如下
import Vue from 'vue'
import VueRouter from 'vue-router'

Vue.use(VueRouter)

  const routes = [
  {
    path: '/',
    name: 'Home',
    // component: Home
  },
  {
    // path: '/about',
    // name: 'About',
    // // route level code-splitting
    // // this generates a separate chunk (about.[hash].js) for this route
    // // which is lazy-loaded when the route is visited.
    // component: () => import(/* webpackChunkName: "about" */ '../views/About.vue')
  }
]

const router = new VueRouter({
  // routes
})

export default router
vue中组件间传值常用的几种方式(上)
写代码之前先安装vscode的一个插件Vue VSCode Snippets,能快速帮我们生成vue代码,官网如下:https://marketplace.visualstudio.com/items?itemName=sdras.vue-vscode-snippets
在页面中使用vb+tab快速生成代码
父子组件传值
- props / $emit(参考示例一代码)
- 子组件中通过定义props接收父组件中通过v-bind绑定的数据
- 父组件中通过监听子组件中$emit的自定义事件接收数据
- $parent / children(参考示例二代码)
- 子组件中通过this.$parent这个对象获取父组件中的数据
- 父组件中通过this.$children这个数组获取子组件中的数据
- $ref(参考示例二代码,合并在一块了)
- 父组件中定义子组件中的ref属性后,通过this.$refs.定义的属性名获取子组件数据
示例一代码
Parent.vue代码
<template>
    <div>
        <h1>Parent</h1>
        <h3>{{msg}}</h3>
        <!-- <h4>三种父组件向子组件传值的形式,可以稍微简写</h4>
        <MChild v-bind:msg="'from parent value'"></MChild>
        <MChild :msg="'from parent value'"></MChild>
        <MChild msg="from parent value"></MChild> -->
        <MChild msg="子组件向父组件传值" @showMsg="showMsg"></MChild>
    </div>
</template>

<script>
    import MChild from './Child'
    export default {
        components: {
            MChild
        },
        data(){
            return {
                msg:""
            }
        },
        methods:{
            showMsg(val) {
                this.msg = val;
            }
        }
    }
</script>

<style scoped>
</style>
Child.vue代码
<template>
    <div>
        <h1>Child</h1>
        <h5>{{msg}}</h5>
        <button @click="passMsg">走你!</button>
    </div>
</template>

<script>
    export default {
        props:{
            msg: {
                type: String,
                default: ''
            },
        },
        methods:{
            passMsg() {
                this.$emit('showMsg', 'i am from Child')
            }
        }
    }
</script>

<style scoped>
</style>
示例二代码
Parent.vue代码
<template>
    <div>
        <h1>Parent</h1>
        <h3>{{msg}}</h3>
        <!-- <h4>三种父组件向子组件传值的形式,可以稍微简写</h4>
        <MChild v-bind:msg="'from parent value'"></MChild>
        <MChild :msg="'from parent value'"></MChild>
        <MChild msg="from parent value"></MChild> -->
        <MChild msg="子组件向父组件传值" @showMsg="showMsg"></MChild>
        <MChild msg="子组件向父组件传值" @showMsg="showMsg" ref="child"></MChild>
    </div>
</template>

<script>
    import MChild from './2Child'
    export default {
        components: {
            MChild
        },
        data(){
            return {
                msg:"zengraoli"
            }
        },
        methods:{
            showMsg(val) {
                this.msg = val;
            }
        },
        mounted () {
            // console.log(this.$children[0]); // []为子组件的索引;暂时执行不成功,先跳过
            console.log('ref', this.$refs.child) // 需要和ref="child"组件属性对应上
        },
    }
</script>
<style scoped>
</style>
Child.vue代码
<template>
    <div>
        <h1>Child</h1>
        <h5>{{msg}}</h5>
        <button @click="passMsg">走你!</button>
    </div>
</template>

<script>
    export default {
        props:{
            msg: {
                type: String,
                default: ''
            },
        },
        methods:{
            passMsg() {
                this.$emit('showMsg', 'i am from Child')
            }
        },
        mounted () {
            console.log(this.$parent.msg); // []为子组件的索引,这里只有一个子组件
        },
    }
</script>
<style scoped>
</style>
vue中组件间传值常用的几种方式(下)
非父子间传值
事件总线
// 原理上就是建立一个公共的js文件,专门用来传递消息
// bus.js
import Vue from 'vue'
export default new Vue;

// 在需要传递消息的地方引入
import bus from './bus.js'
// 传递消息
bus.$emit('msg', val)
// 接受消息
bus.$on('msg', val => {
    this.childMsg = val
})
示例代码,完成通过app.vue传给child.vue数据
首先在项目中新建一个util文件夹,存放bus.js,内容如下
在app.vue中触发vue的方法
<template>
  <div id="app">
    <MParent></MParent>
    <button @click="passMsg">传你</button>
  </div>
</template>

<script>
    import bus from './util/bus'
    import MParent from './views/3Parent'
    export default {
        components: {
          MParent
        },
        methods:{
          passMsg () {
            bus.$emit('msg', 'i am from app')
          },
        },
    }
</script>
<style scoped>
</style>
在child.vue中写入监听事件
<template>
    <div>
        <h1>Child</h1>
        <h2>{{childMsg}}</h2>
    </div>
</template>

<script>
    import bus from '../util/bus'
    export default {
        props:{
            msg: {
                type: String,
                default: ''
            },
        },
        data() {
            return {
                childMsg: 'child msg'
            }
        },
        mounted(){
            bus.$on('msg', val => {
                this.childMsg = val
            })
        }
    }
</script>
<style scoped>
</style>
$attrs / $listeners
// 解决多级组件间传值的问题
// $attr 将父组件中不包含props的属性传⼊子组件,通常配合 interitAttrs 选项一起使用。
// 如果不想在dom上出现属性,可设置interitAttrs: false
// $listeners监听子组件中数据变化,传递给父组件
演示一个$attrs的例子,在app.vue中通过v-bind传给child.vue
app.vue的内容如下,把要传给child的msg通过父组件传入
<template>
  <div id="app">
    <MParent :msg="a" :msgb="b" :msgc="c"></MParent>
  </div>
</template>
<script>
    import bus from './util/bus'
    import MParent from './views/4Parent'
    export default {
        components: {
          MParent
        },
        data () {
          return {
            a: 'msga',
            b: 'msga',
            c: 'msga',
          }
        },
    }
</script>
<style scoped>
</style>
父组件通过$attrs转一下转给子组件
<template>
    <div>
        <h1>Parent</h1>
        <MChild v-bind="$attrs"></MChild>
    </div>
</template>
<script>
    import MChild from './4Child'
    export default {
        components: {
            MChild
        },
    }
</script>
<style scoped>
</style>
子组件得到这个$attrs,内容就是app.vue传过来的内容
<template>
    <div>
        <h1>Child</h1>
    </div>
</template>

<script>
    export default {
        mounted () {
            console.log('attrs',this.$attrs)
        },
    }
</script>
<style scoped>
</style>
玩转单页面应用的控制中心—vue-router
路由的基本配置
基本参数
- path
- 路由的访问路径。即url
- component
- 访问路径对应的组件
- 扩展参数
- name
路由指定命名,设置后可用params传参及使用name进行路由跳转
- name
路由的跳转
views文件夹下新加一个Home.vue
<template>
  <div>
    this is home
    <router-view></router-view>
  </div>
</template>
<script>
  export default {
  }
</script>
<style lang="scss" scoped>
</style>
router-link标签跳转,这个很简单,只需要在router/index.js中进行配置
import Vue from 'vue'
import VueRouter from 'vue-router'

Vue.use(VueRouter)
  const routes = [
  {
    path: '/home',
    name: 'Home',
    // 使用路由懒加载的形式
    component: () => import('../views/Home.vue'),
  },
]

const router = new VueRouter({
  routes
})

export default router
在app.vue中进行使用
<template>
  <div id="app">
    <router-link to="/home">home</router-link>
    <router-view></router-view>
  </div>
</template>

<script>
    export default {
    }
</script>
<style scoped>
</style>
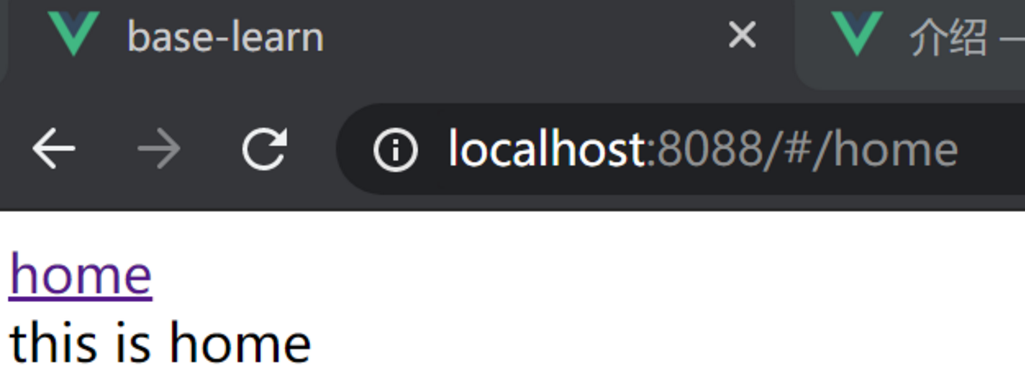
访问http://localhost:8088/#/,点击页面的home超链接,就会在页面中渲染home的内容
编程式导航
// route可以是对象,或者是字符串
// 对象的时候可通过路由的path或者name进行跳转
// 字符串的话只能是路由的path
this.$router.push(route)

// 路由传递参数, query和path配合, params和name配合
query: this.$router.push({path: '/', query: {id: 2}})
params: this.$router.push({name: 'home', params: {id: 2}})
一个按钮跳转的例子
<template>
  <div id="app">
    <button @click="goHome">goHome</button>
    <button @click="back">back</button>
  </div>
</template>

<script>
    export default {
      methods:{
        goHome() {
          this.$router.push({ path: '/home'})
        },
        back() {
          this.$router.go(-1)
        }
      }
    }
</script>
<style scoped>
</style>
动态路由
什么是动态路由
- 组件是同一个,只是通过不同的url参数渲染不同的数据
- 路径参数"使用冒号" : 标记
{
    path: '/home/:id',
    component: home
}
- 在path⾥里里显式声明后,通过params传参后,参数不不丢失同时参数被设置成必传参数
一个例子app.vue内容如下
<template>
  <div id="app">
    <button @click="goHome">goHome</button>
    <router-view></router-view>
  </div>
</template>
<script>
    export default {
      methods:{
        goHome() {
          // this.$router.push({ path: '/home'})
          // this.$router.push({ name: 'Home', params: {name: 'zengraoli'} }) // 对应<h1>{{$route.params.name}}</h1>、path: '/home/:name'
          this.$router.push({ path: '/home', query: {name: 'Jack'}}) // 对应<h1>{{$route.query.name}}</h1>、path: '/home',
        },
      }
    }
</script>
<style scoped>
</style>
Home.vue,展示出传过来的参数的值,内容如下
<template>
  <div>
    this is home
    <!-- <h1>{{$route.params.name}}</h1> -->
    <h1>{{$route.query.name}}</h1>
  </div>
</template>
<script>
  export default {
  }
</script>
<style lang="scss" scoped>
</style>
index.js主要是配置路由
import Vue from 'vue'
import VueRouter from 'vue-router'

Vue.use(VueRouter)
  const routes = [
  {
    path: '/home', // 进入的是一个需要传递参数的页面
    // path: '/home/:name',
    name: 'Home',
    // 使用路由懒加载的形式
    component: () => import('../views/Home.vue'),
  },
]
const router = new VueRouter({
  routes
})

export default router
嵌套路路由
⽬目的:组件中嵌套不同组件,一般用来实现头部和尾部
实现
// 在需要嵌套的路由中补充children字段
{
    path: '/home/:id',
    component: home,
    children: []
}
修改Home.vue只需要加入
<router-view></router-view>
即可完成占坑
<template>
  <div>
    this is home
    <!-- <h1>{{$route.params.name}}</h1> -->
    <h1>{{$route.query.name}}</h1>
    <router-view></router-view>
  </div>
</template>
<script>
  export default {
  }
</script>
<style lang="scss" scoped>
</style>
在router/index.js中,对路由/home指定一个children
import Vue from 'vue'
import VueRouter from 'vue-router'

Vue.use(VueRouter)
  const routes = [
  {
    path: '/home', // 进入的是一个需要传递参数的页面
    // path: '/home/:name',
    name: 'Home',

    // 使用路由懒加载的形式
    component: () => import('../views/Home.vue'),
    children: [{
      path: 'child',
      component: () => import('../views/1Child.vue')
    }],
  },
]
const router = new VueRouter({
  routes
})

export default router
这样我们访问http://localhost:8088/#/home/child,坑就渲染出来了

导航守卫
通过router中的beforeEach注册全局守卫,每次切换路由时触发,常用来做权限判断
// to, from是路由对象,我们在路由里定义的参数都可以在这里取到,例如to.path或
from.name
router.beforeEach((to, from, next) => {
    // ...
    next()
})
参数
- to: 将进入的路由对象
- from: 将离开的路由对象
- next() 确认完成操作,最后一定要调用,不然路由就不会进行切换
在main.js中加入以下代码,每次访问链接都会输出路径
router.beforeEach((to, from, next) => {
  console.log(to.path)
  next()
})
路由懒加载
提高页面加载速度
避免进入项目后加载全部组件
在路由中的component中设置函数,用import方式进行使用
状态管理中心—vuex的基础用法
State
数据,存放一些公用部分的数据
Mutations
数据怎么改变,定义改变state的一些方法(主要是定义一些同步的方法)
Actions
异步改变, 如果需要异步改变state,则在这书写(主要是定义一些异步的方法,当然也可以定义一些同步的方法)
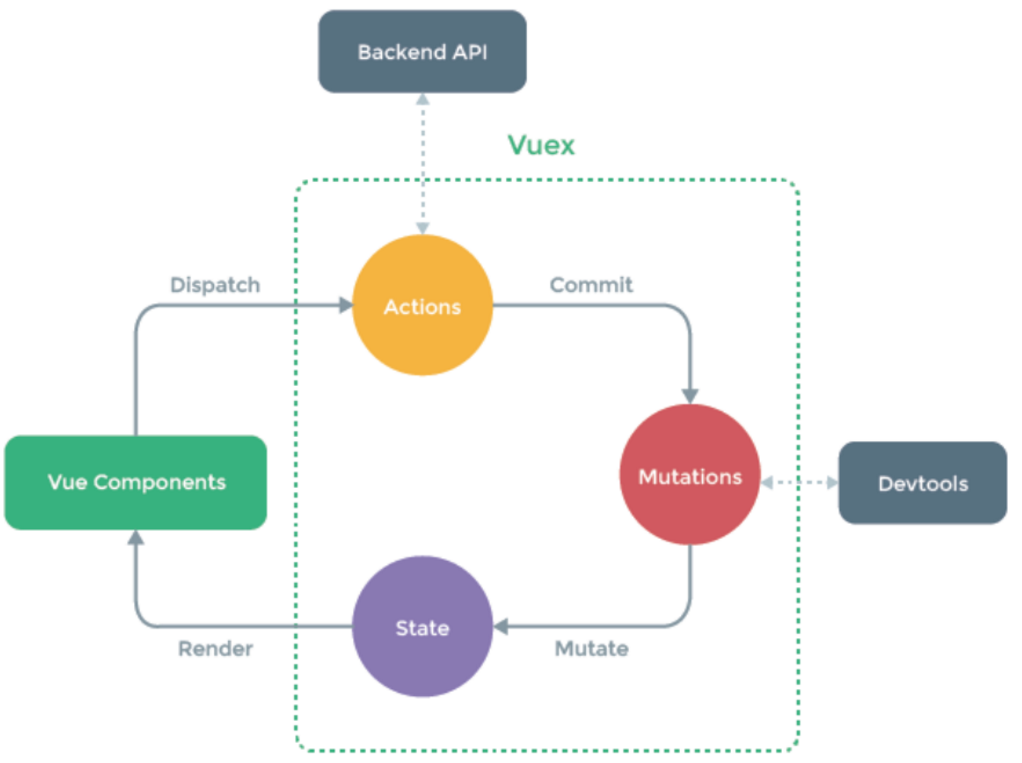
vuex里包含的基本参数
export default {
    // 组件间公共数据部分
    state: {},
    // 需要改变state中的数据时,要在mutation里定义改变的方法
    mutations: {},
    // 当改变state中的数据是异步操作时,在action里里定义
    actions: {}
}
示例代码
在store/index.js添加如下函数的代码
import Vue from 'vue'
import Vuex from 'vuex'

Vue.use(Vuex)

export default new Vuex.Store({
  state: {
    count:0,
  },
  mutations: { // 简单理解成组件的methods,一般是同步的方法
    add (state) {
      state.count++
    },
    decrease (state) {
      state.count--
    }
  },
  actions: { // 可以定义同步和异步的方法,一般是异步的方法
    delayAdd (context) {
      setTimeout(() => {
        context.commit('add')
      }, 1000);
    }
  },
  modules: {
  }
})
在router/index.js中添加测试的vue页面
import Vue from 'vue'
import VueRouter from 'vue-router'

Vue.use(VueRouter)
  const routes = [
  {
    path: '/', // 进入的是一个需要传递参数的页面
    // 使用路由懒加载的形式
    component: () => import('../views/5Parent.vue'),
  }
]
const router = new VueRouter({
  routes
})

export default router
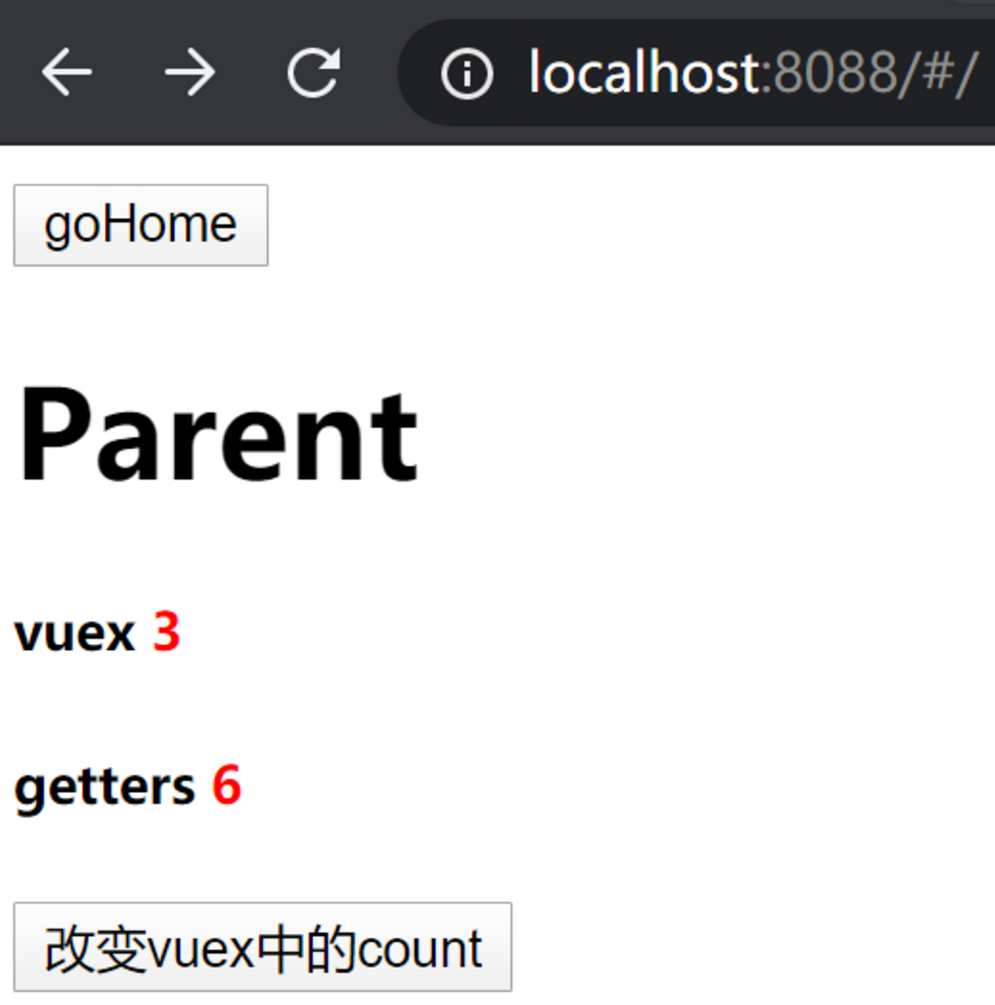
5Parent.vue内容如下,测试改变vuex中的数据
<template>
    <div>
        <h1>Parent</h1>
        <h5>vuex <span style="color: red">{{count}}</span></h5>
        <button @click="add">改变vuex中的count</button>
    </div>
</template>
<script>
    import { mapState } from 'vuex'
    import { mapMutations } from 'vuex'
    export default {
        // // 第一种使用vuex中数据的方式
        // computed: { // 在计算属性中取出来state中的数据
        //     count() {
        //         return this.$store.state.count
        //     }
        // }
        // // 第二种使用mapState辅助函数的方式,当一个组件需要获取多个状态的时候,将这些状态都声明为计算属性会有些重复和冗余时使用
        // computed: mapState({
        //     // // 箭头函数可使代码更简练
        //     // count: state => state.count,
        //     // 传字符串参数 'count' 等同于 `state => state.count`
        //     count: 'count',
        //     // // 为了能够使用 `this` 获取局部状态,必须使用常规函数
        //     // countPlusLocalState (state) {
        //     //     return state.count + this.localCount
        //     // }
        // })
        // 当我们想使用计算属性,又想使用vuex中数据的时候,需要加上...
        computed: {
            ...mapState({ // 带上了...相当于把对象展开了
                count: 'count',
            }),
        },
        methods: {
            add() {
                // $store可以理解成vuex了
                // this.$store.commit('add')
                // 触发action操作
                this.$store.dispatch('delayAdd')
            },
            // // 另外一个方式触发add,使用函数的形式
            // ...mapMutations({
            //     add: 'add' // 将 `this.add()` 映射为 `this.$store.commit('add')`,this.add()为按钮事件
            // })
        }
    }
</script>
<style scoped>
</style>
更多使用方法参考官网:https://vuex.vuejs.org/zh/guide
状态管理中心—vuex的高级用法
vuex中的计算属性—Getters
- 当你需要依赖vuex里的state中的数据,做进一步处理时使用
state: {
    count: 0,
    },
    // 根据state中的count进⼀一步处理理,计算双倍值
    getters: {
    doubleCount (state) {
    return state.count * 2
    }
},
示例代码,在store/index.js下添加getters
import Vue from 'vue'
import Vuex from 'vuex'

Vue.use(Vuex)

export default new Vuex.Store({
  state: {
    count:0,
  },
  getters: {
    doubleCount (state) {
      return state.count * 2
    }
  },
  mutations: { // 简单理解成组件的methods,一般是同步的方法
    add (state) {
      state.count++
    },
    decrease (state) {
      state.count--
    }
  },
  actions: { // 可以定义同步和异步的方法,一般是异步的方法
    delayAdd (context) {
      setTimeout(() => {
        context.commit('add')
      }, 1000);
    }
  },
  modules: {
  }
})
在5Parent.vue去使用这个getters
<template>
    <div>
        <h1>Parent</h1>
        <h5>vuex <span style="color: red">{{count}}</span></h5>
        <h5>getters <span style="color: red">{{showDoneCount}}</span></h5>
        <button @click="add">改变vuex中的count</button>
    </div>
</template>
<script>
    import { mapState } from 'vuex'
    import { mapMutations } from 'vuex'
    import { mapGetters } from 'vuex'
    export default {
        // 当我们想使用计算属性,又想使用vuex中数据的时候,需要加上...
        computed: {
            ...mapState({ // 带上了...相当于把对象展开了
                count: 'count',
            }),
            // 使用getters的第一种形式
            // doubleCount() {
            //     return this.$store.getters.doubleCount
            // },
            // 使用辅助函数来引入getters
            ...mapGetters({
                showDoneCount: 'doubleCount'
            })
        },
        methods: {
            add() {
                // $store可以理解成vuex了
                this.$store.commit('add')
                // 触发action操作
                // this.$store.dispatch('delayAdd')
            },
        }
    }
</script>
<style scoped>
</style>
可以看到showDoneCount的值是跟着count改变的
模块化概念—Modules
- 如果把所有页面的数据都放在同一个store中会很乱;如果我们想要每个模块各自维护自己的数据,就可以根据存放的数据所属模块对store进行划分
import Vue from 'vue'
import Vuex from 'vuex'
// 第一步 引⼊入模块
import text from './text'
Vue.use(Vuex)
// 第二步 在初始化store时,加载模块
export default new Vuex.Store({
    modules: {
    text
    }
})
在store文件夹下创建一个text.js,把之前index.js定义的内容移动过去
export default {
    state: {
        count:0,
    },
    getters: {
        doubleCount (state) {
            return state.count * 2
        }
    },
    mutations: { // 简单理解成组件的methods,一般是同步的方法
        add (state) {
            state.count++
        },
        decrease (state) {
            state.count--
        }
    },
    actions: { // 可以定义同步和异步的方法,一般是异步的方法
        delayAdd (context) {
        setTimeout(() => {
            context.commit('add')
        }, 1000);
        }
    },
}
现在index.js的内容就比较少了
import Vue from 'vue'
import Vuex from 'vuex'
import text from './text'

Vue.use(Vuex)

export default new Vuex.Store({
  modules:{
    text
  }
})
我们在5Parent.vue使用的,只需要修改变量信息,方法和getters都不需要改
<template>
    <div>
        <h1>Parent</h1>
        <h5>vuex <span style="color: red">{{count}}</span></h5>
        <h5>getters <span style="color: red">{{showDoneCount}}</span></h5>
        <button @click="add">改变vuex中的count</button>
    </div>
</template>
<script>
    import { mapState } from 'vuex'
    import { mapMutations } from 'vuex'
    import { mapGetters } from 'vuex'
    export default {
        // 当我们想使用计算属性,又想使用vuex中数据的时候,需要加上...
        computed: {
            ...mapState({ // 带上了...相当于把对象展开了
                count: state => state.text.count, // count是text种存放的,而text现在是state下的一个模块
                // count:'count'
            }),
            // 使用辅助函数来引入getters
            ...mapGetters({
                showDoneCount: 'doubleCount' // 虽然移动了doubleCount这些getters属性与add这些methods但是在这里依旧不需要使用state.text
            })
        },
        methods: {
            add() {
                // $store可以理解成vuex了
                this.$store.commit('add')
                // 触发action操作
                // this.$store.dispatch('delayAdd')
            },
        }
    }
</script>
<style scoped>
</style>
打开页面,同样可以看到和上面没修改之前一样的效果
参考链接
- vue this.$refs 获取的值为undefined?
- vue-router “path” is required in a route configuration
- Vue进阶(二十六):router.push()讲解


 7902
7902


 被折叠的 条评论
为什么被折叠?
被折叠的 条评论
为什么被折叠?
 到【灌水乐园】发言


