github项目工程搭建步骤

1:申请github账号
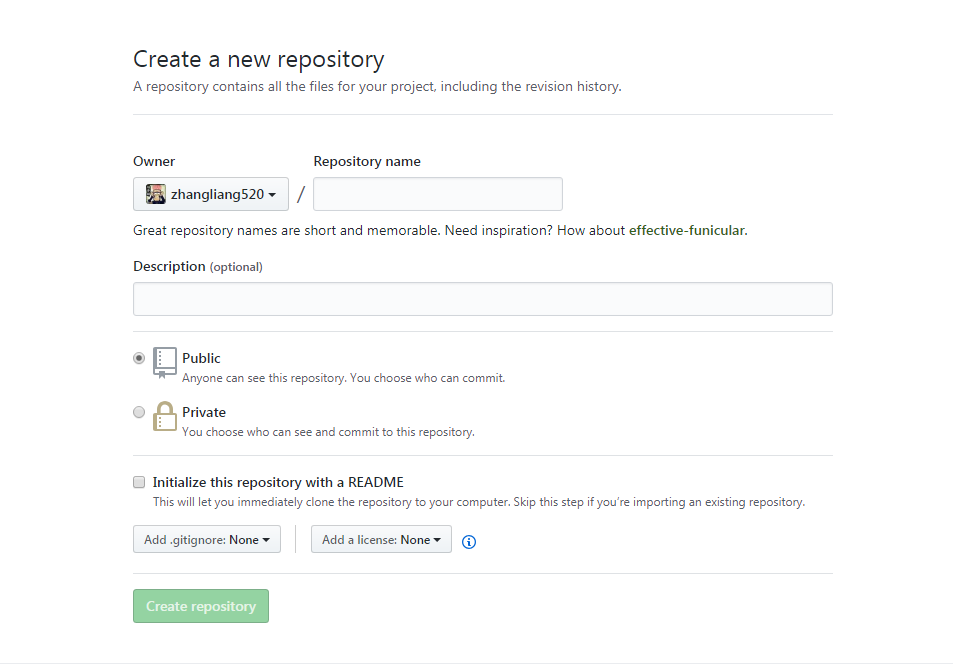
2:创建新工程(选择repositories添加工程,选择公开或私有)


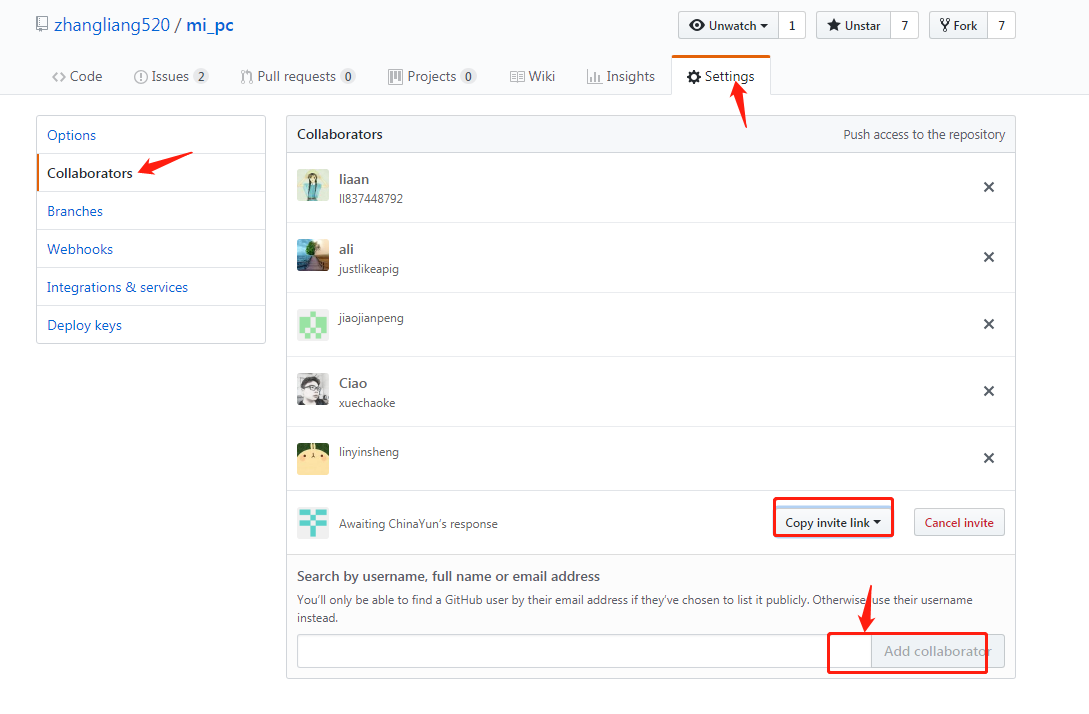
3:邀请项目成员(进入新建的项目,选择settings-collaborators,在输入框中输入被邀请的项目成员,添加成功后让被邀请人点击邀请链接)
注意事项:
1:被邀请的成员账号非github的注册邮箱,而是github主页访问域名后的字符串;
2:被邀请链接都是统一地址: https://github.com/zhangliang520/项目名/invitations ,未被邀请的人员点击链接会报404
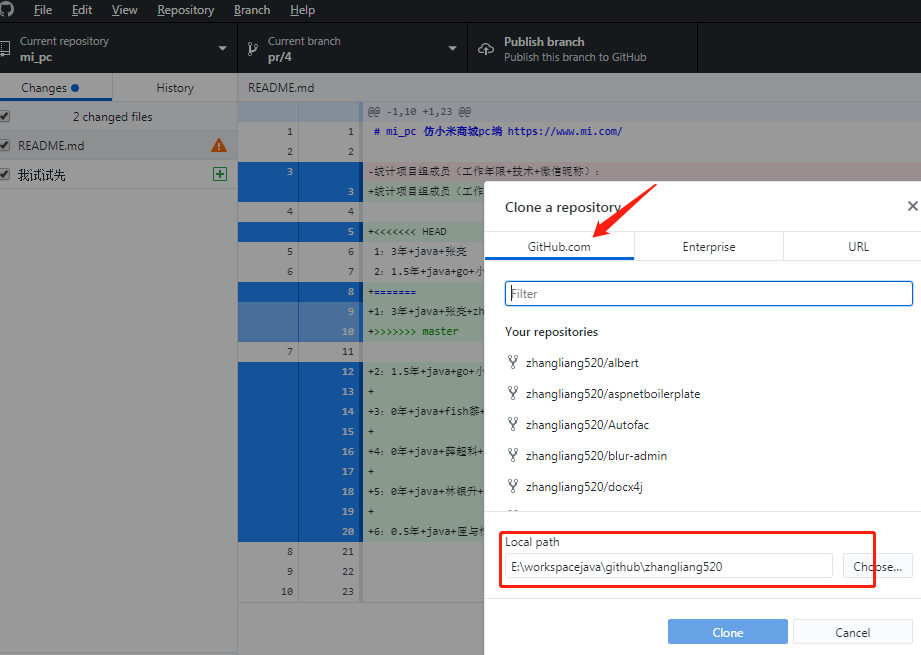
4:工具同步(使用github官方的同步工具,官网下载github desktop软件,进入软件选择clone a repository,选择克隆到本地项目)
注意事项:
1:若clone项目在你自己的github仓库,直接选github.com中的项目,若是被邀请的项目,选择url地址来clone项目


5:同步代码到github(打开本地clone文件夹地址,新建文件或用开发工具关联项目,创建或更新文件,使用github desktop软件更新或上传代码文件)
注意事项:
1:选择要更新的文件,填写备注后提交(commit to master),最后要点击push origin提交到github仓库;
2:提交的分支要选择正确


6:宣传
微信群讨论组,吹水者T,失效请联系13128600812,备注:mi

知识星球id:10569620,收费(50),所得将购买编程类资料提供给大家
加入者将会获得一套架构师教程,共同学习成功一名合格的架构师

  • 1
    点赞
  • 0
    收藏
    觉得还不错? 一键收藏
  • 打赏
    打赏
  • 0
    评论
Spring Cloud是一个基于Spring Boot的开发工具,它为开发人员提供了一整套微服务开发解决方案,包括服务注册与发现、配置管理、断路器、网关等。 下面是搭建一个简单的Spring Cloud项目步骤: 1. 创建一个父工程 在你的IDE中创建一个Maven项目,作为父工程。在pom.xml文件中添加以下内容: ``` <groupId>com.example</groupId> <artifactId>springcloud-project</artifactId> <version>0.0.1-SNAPSHOT</version> <packaging>pom</packaging> <modules> <module>registry-server</module> <module>config-server</module> <module>gateway-server</module> <module>user-service</module> <module>product-service</module> </modules> ``` 2. 创建服务注册中心 在父工程下创建一个registry-server模块,用于服务注册和发现。在pom.xml文件中添加以下依赖: ``` <dependency> <groupId>org.springframework.cloud</groupId> <artifactId>spring-cloud-starter-netflix-eureka-server</artifactId> <version>2.2.5.RELEASE</version> </dependency> ``` 在启动类中添加@EnableEurekaServer注解,表示该模块是服务注册中心。配置文件application.yml如下: ``` server: port: 8761 eureka: instance: hostname: localhost client: register-with-eureka: false fetch-registry: false ``` 3. 创建配置中心 在父工程下创建一个config-server模块,用于配置管理。在pom.xml文件中添加以下依赖: ``` <dependency> <groupId>org.springframework.cloud</groupId> <artifactId>spring-cloud-config-server</artifactId> <version>2.2.5.RELEASE</version> </dependency> ``` 在启动类中添加@EnableConfigServer注解,表示该模块是配置中心。配置文件application.yml如下: ``` server: port: 8888 spring: cloud: config: server: git: uri: https://github.com/your-git-repo/springcloud-config.git search-paths: '{application}' username: your-git-username password: your-git-password ``` 4. 创建网关 在父工程下创建一个gateway-server模块,用于网关管理。在pom.xml文件中添加以下依赖: ``` <dependency> <groupId>org.springframework.cloud</groupId> <artifactId>spring-cloud-starter-gateway</artifactId> <version>2.2.5.RELEASE</version> </dependency> ``` 在启动类中添加@EnableDiscoveryClient和@EnableGateway注解,表示该模块是网关。配置文件application.yml如下: ``` server: port: 8000 spring: cloud: gateway: routes: - id: user-service uri: lb://user-service predicates: - Path=/users/** - id: product-service uri: lb://product-service predicates: - Path=/products/** ``` 5. 创建业务服务 在父工程下创建user-service和product-service模块,用于业务处理。在pom.xml文件中添加以下依赖: ``` <dependency> <groupId>org.springframework.cloud</groupId> <artifactId>spring-cloud-starter-netflix-eureka-client</artifactId> <version>2.2.5.RELEASE</version> </dependency> ``` 在启动类中添加@EnableDiscoveryClient注解,表示该模块是服务提供者。配置文件application.yml如下: ``` server: port: 8080 spring: application: name: user-service eureka: client: service-url: defaultZone: http://localhost:8761/eureka/ ``` 以上就是Spring Cloud项目搭建步骤。你可以通过启动registry-server、config-server、gateway-server和业务服务模块来启动整个项目。当然,还需要在GitHub上创建一个springcloud-config.git的配置仓库,用于存储配置文件。

“相关推荐”对你有帮助么?

  • 非常没帮助
  • 没帮助
  • 一般
  • 有帮助
  • 非常有帮助
提交
评论
添加红包

请填写红包祝福语或标题

红包个数最小为10个

红包金额最低5元

当前余额3.43前往充值 >
需支付:10.00
成就一亿技术人!
领取后你会自动成为博主和红包主的粉丝 规则
hope_wisdom
发出的红包

打赏作者

张先生程序猿

谢谢您的打赏,我会持续创作下去

¥1 ¥2 ¥4 ¥6 ¥10 ¥20
扫码支付:¥1
获取中
扫码支付

您的余额不足,请更换扫码支付或充值

打赏作者

实付
使用余额支付
点击重新获取
扫码支付
钱包余额 0

抵扣说明:

1.余额是钱包充值的虚拟货币,按照1:1的比例进行支付金额的抵扣。
2.余额无法直接购买下载,可以购买VIP、付费专栏及课程。

余额充值