


来来来我们先看一个效果:
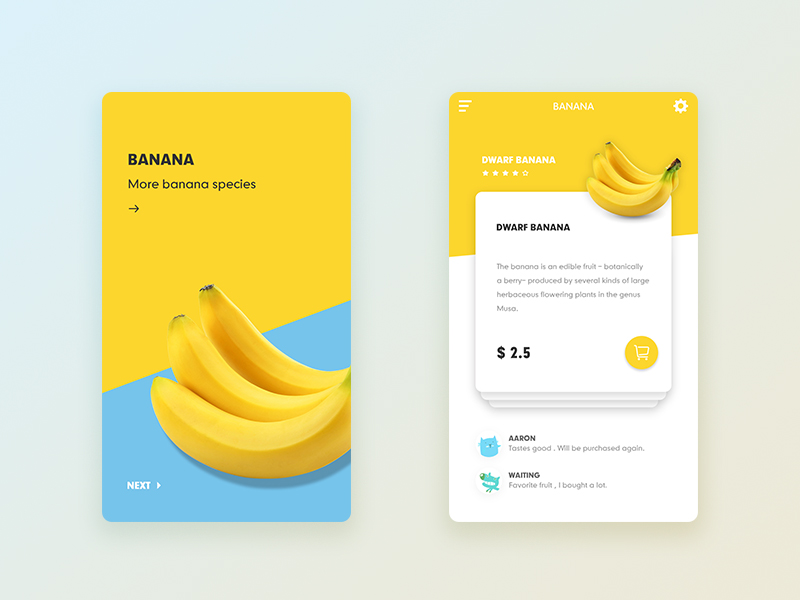 别的我们不关注呀,我们就看一下这个布局的背景,这个背景是斜切面的一个背景,如果要你去写这个布局你是不是得去到美工妹妹去作图呀。 现在我们不需要去找美工妹妹了(哎,少了一次接触的机会),我们可以使用自定义ShapeDrawable的方式来实现这个效果。 我做这个东西的启发就是下面的这个开源库: https://github.com/amulyakhare/TextDrawable 这个开源库很简单但也很好用,大家可以看看,学习一下。 我们先来看一下我这个自定义ShapeDrawable的效果吧,省的大家没兴趣看,效果图如下:


别的我们不关注呀,我们就看一下这个布局的背景,这个背景是斜切面的一个背景,如果要你去写这个布局你是不是得去到美工妹妹去作图呀。 现在我们不需要去找美工妹妹了(哎,少了一次接触的机会),我们可以使用自定义ShapeDrawable的方式来实现这个效果。 我做这个东西的启发就是下面的这个开源库: https://github.com/amulyakhare/TextDrawable 这个开源库很简单但也很好用,大家可以看看,学习一下。 我们先来看一下我这个自定义ShapeDrawable的效果吧,省的大家没兴趣看,效果图如下:
大家看到这种效果了吧,这个可不是美工给切的图,这个就是使用ShapeDrawable类来绘制的,这个也很简单,大家看一下代码:
package com.background.zl.backgroundlibrary;

import android.graphics.Canvas;
import android.graphics.Color;
import android.graphics.Paint;
import android.graphics.Path;
import android.graphics.PixelFormat;
import android.graphics.Rect;
import android.graphics.drawable.ShapeDrawable;
import android.graphics.drawable.shapes.RectShape;
import android.text.Layout;
import android.text.StaticLayout;
import android.text.TextPaint;

/**
 * Created by zhanglei on 2017/6/16.
 */

public class BackgroundDrawable extends ShapeDrawable {

    private int topColor;
    private int bottomColor;
    private int leftPercent;
    private int rightPercent;
    private Paint topPaint;
    private Paint bottomPaint;

    private BackgroundDrawable(Builder builder) {
        super(builder.shape);

        topColor = builder.topColor;
        bottomColor = builder.bottomColor;
        leftPercent = builder.leftPercent;
        rightPercent = builder.rightPercent;

        topPaint = new Paint();
        topPaint.setStyle(Paint.Style.FILL);
        topPaint.setAntiAlias(true);
        topPaint.setColor(topColor);

        bottomPaint = new Paint();
        bottomPaint.setStyle(Paint.Style.FILL);
        bottomPaint.setAntiAlias(true);
        bottomPaint.setColor(bottomColor);

    }

    @Override
    public void draw(Canvas canvas) {
        super.draw(canvas);
        Rect r = getBounds();
        canvas.drawRect(r, topPaint);

        /** 噔噔噔。。。
         *  重头戏来了,下面是绘制斜切背景图的逻辑注意看
         * */

        //背景左侧的bottom值
        int lBottom;
        //背景右侧的bottom值
        int rBottom;
        if (leftPercent > 0 && rightPercent > 0 && leftPercent < 100 && rightPercent < 100) {

            lBottom = (int) (r.bottom * leftPercent * 0.01);
            rBottom = (int) (r.bottom * rightPercent * 0.01);
            //使用path类来绘制不规则图形,形成斜切的效果
            Path path = new Path();
            path.lineTo(r.left, r.top);
            path.lineTo(r.left, lBottom);
            path.lineTo(r.right, rBottom);
            path.lineTo(r.right, r.top);

            //背景下半部分的rect
            Rect bRect = new Rect(r.left, r.top, r.right, r.bottom);

            //开始绘制
            canvas.drawRect(bRect, bottomPaint);
            canvas.drawPath(path, topPaint);


        } else {
            //用户输入的参数有误,我们要给他错误提示
            topPaint.setColor(Color.WHITE);
            canvas.drawRect(r, topPaint);

            TextPaint textPaint = new TextPaint();
            textPaint.setARGB(0xFF, 0xFF, 0, 0);
            textPaint.setColor(Color.BLACK);
            textPaint.setTextSize(40);
            textPaint.setStrokeWidth(5);
            StaticLayout layout = new StaticLayout("大兄弟,你敢不敢把参数给我设置对了呀,不要瞎搞好吗?\n left和right的值是一定要设置的,并且left和right的值要大于0小于100,懂了吧大兄弟。", textPaint, r.right,
                    Layout.Alignment.ALIGN_NORMAL, 1.0F, 0.0F, true);
            canvas.translate(20, r.bottom / 3);//从20,r.bottom / 3开始画
            layout.draw(canvas);
        }

    }

    @Override
    public int getOpacity() {
        return PixelFormat.TRANSLUCENT;
    }

    public static Builder builder() {
        return new Builder();
    }

    public static class Builder implements IShapeDrawableBuilder {

        private RectShape shape;
        private int topColor;
        private int bottomColor;
        private int leftPercent;
        private int rightPercent;

        private Builder() {
            shape = new RectShape();
            topColor = Color.WHITE;
            bottomColor = Color.WHITE;
            leftPercent = 0;
            rightPercent = 0;
        }

        @Override
        public IShapeDrawableBuilder left(int percent) {
            leftPercent = percent;
            return this;
        }

        @Override
        public IShapeDrawableBuilder right(int percent) {
            rightPercent = percent;
            return this;
        }

        @Override
        public IShapeDrawableBuilder topColor(int topColor) {
            this.topColor = topColor;
            return this;
        }

        @Override
        public IShapeDrawableBuilder bottomColor(int bottomColor) {
            this.bottomColor = bottomColor;
            return this;
        }

        @Override
        public BackgroundDrawable build() {
            return new BackgroundDrawable(this);
        }
    }

    public interface IShapeDrawableBuilder {
        public IShapeDrawableBuilder left(int percent);

        public IShapeDrawableBuilder right(int percent);

        public IShapeDrawableBuilder topColor(int topColor);

        public IShapeDrawableBuilder bottomColor(int bottomColor);

        public BackgroundDrawable build();
    }

}
我们的这个自定义ShapeDrawable叫做BackgroundDrawable,我们使用Builder的方式来创建一个BackgroundDrawable(我也是初学Builder方式有什么不好的地方大家见谅)。
使用方法如下:
 BackgroundDrawable drawable = BackgroundDrawable.builder()
                .left(50)//设置左侧斜切点的高度(取值范围是大于0,小于100)
                .right(70)//设置右侧侧斜切点的高度(取值范围是大于0,小于100)
                .topColor(Color.parseColor("#FCD62D"))//设置上半部分的颜色(默认是白色)
                .bottomColor(Color.parseColor("#76C4EB"))//设置下半部分的颜色(默认是白色)
                .build();//调用build进行创建。

//将这个drawable设置给View
view.setBackground(drawable);
使用方法很简单,有需要的小伙伴快来使用吧,解放美工妹妹从现在开始。


 616
616

 被折叠的 条评论
为什么被折叠?
被折叠的 条评论
为什么被折叠?
 到【灌水乐园】发言


