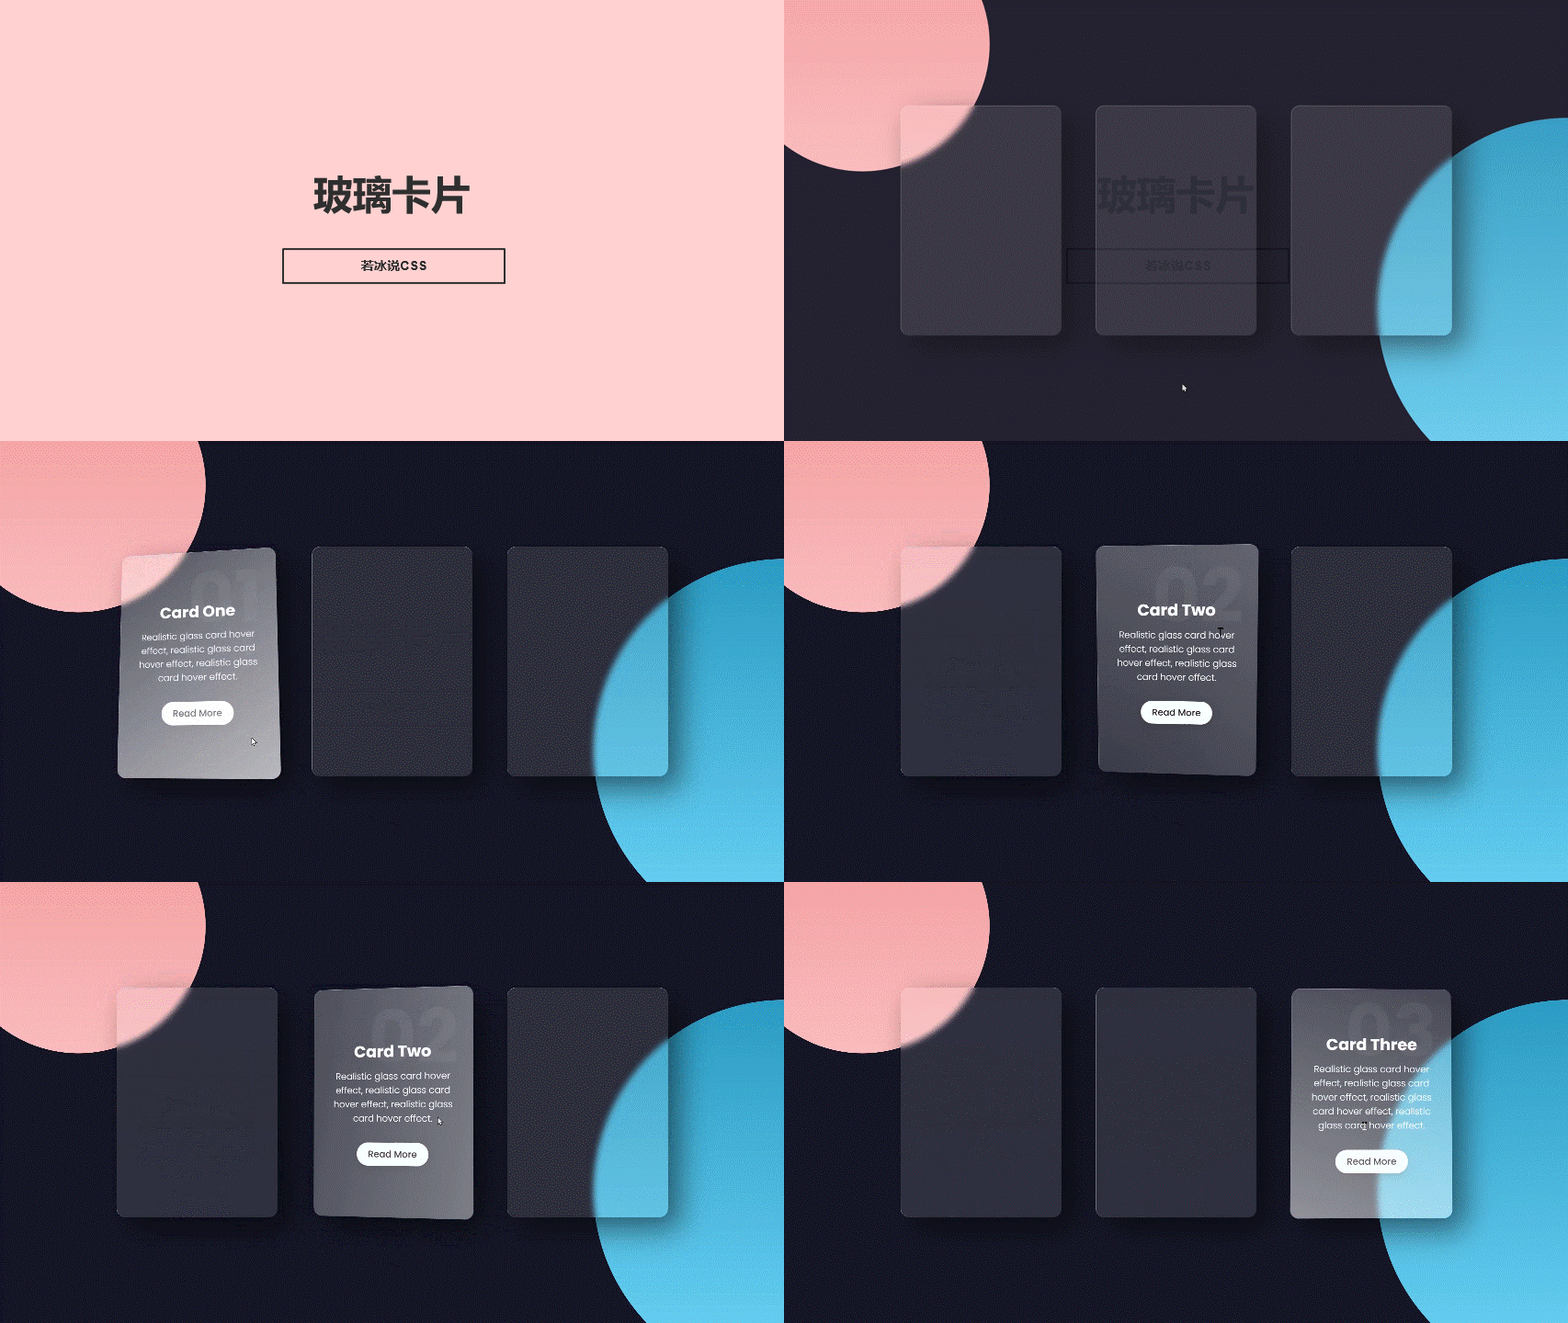
效果演示

实现了一个名为“卡片翻转”的效果,它是一个响应式的卡片布局,每个卡片都有一个标题、一张图片和一些描述信息。当鼠标悬停在卡片上时,卡片会翻转并显示更多的信息。这个效果可以用于展示产品、服务或其他内容,以吸引用户的注意力并提供更多的信息。它还可以用于创建一个动态的网站布局,增加用户的互动性和参与感。
Code
HTML
<!DOCTYPE html>
<html lang="en">

<head>
    <meta charset="UTF-8">
    <meta name="viewport" content="width=device-width, initial-scale=1.0">
    <title>玻璃卡片</title>
    <link rel="stylesheet" href="./28-玻璃卡片.css">
</head>

<body>
    <div class="container">
        <div class="card">
            <div class="content">
                <h2>01</h2>
                <h3>Card One</h3>
                <p>Realistic glass card hover effect, realistic glass card hover effect, realistic glass card hover
                    effect.</p>
                <a href="#">Read More</a>
            </div>
        </div>
        <div class="card">
            <div class="content">
                <h2>02</h2>
                <h3>Card Two</h3>
                <p>Realistic glass card hover effect, realistic glass card hover effect, realistic glass card hover
                    effect.</p>
                <a href="#">Read More</a>
            </div>
        </div>
        <div class="card">
            <div class="content">
                <h2>03</h2>
                <h3>Card Three</h3>
                <p>Realistic glass card hover effect, realistic glass card hover effect, realistic glass card hover
                    effect, realistic glass card hover effect.</p>
                <a href="#">Read More</a>
            </div>
        </div>
    </div>
</body>
<script src="../js/vanilla-tilt.js"></script>
<script src="./28-玻璃卡片.js"></script>
</html>
CSS
@import url("http://fonts.googleapis.com/css?family=Poppins:200,300,400,500,600,700,800,900&display=swap");

* {
    margin: 0;
    padding: 0;
    box-sizing: border-box;
    font-family: "Poppins";
}

body {
    min-height: 100vh;
    display: flex;
    justify-content: center;
    align-items: center;
    background-color: #161626;
}

body::before {
    content: "";
    position: absolute;
    top: 0;
    left: 0;
    width: 100%;
    height: 100%;
    background: linear-gradient(#2193b0, #6dd5ed);
    clip-path: circle(30% at right 70%);
}

body::after {
    content: "";
    position: absolute;
    top: 0;
    left: 0;
    width: 100%;
    height: 100%;
    background: linear-gradient(#ee9ca7, #ffdde1);
    clip-path: circle(20% at 10% 10%);
}

.container {
    position: relative;
    display: flex;
    justify-content: center;
    align-items: center;
    flex-wrap: wrap;
    z-index: 1;
}

.container .card {
    position: relative;
    width: 280px;
    height: 400px;
    background-color: rgba(255, 255, 255, 0.1);
    margin: 30px;
    border-radius: 15px;
    box-shadow: 20px 20px 50px rgba(0, 0, 0, 0.5);
    overflow: hidden;
    display: flex;
    justify-content: center;
    align-items: center;
    border-top: 1px solid rgba(255, 255, 255, 0.5);
    border-left: 1px solid rgba(255, 255, 255, 0.5);
    backdrop-filter: blur(5px);
}

.container .card .content {
    padding: 20px;
    text-align: center;
    transform: translateY(100px);
    opacity: 0;
    transition: 0.5s;
}

.container .card:hover .content {
    transform: translateY(0);
    opacity: 1;
}

.container .card .content h2 {
    position: absolute;
    top: -80px;
    right: 25px;
    font-size: 128px;
    color: rgba(255, 255, 255, 0.05);
}

.container .card .content h3 {
    font-size: 28px;
    color: #fff;
}

.container .card .content p {
    font-size: 16px;
    color: #fff;
    font-weight: 300;
    margin: 10px 0 15px 0;
}

.container .card .content a {
    position: relative;
    display: inline-block;
    padding: 8px 20px;
    margin-top: 15px;
    background-color: #fff;
    color: #000;
    text-decoration: none;
    border-radius: 20px;
    font-weight: 500;
    box-shadow: 0 5px 15px rgba(0, 0, 0, 0.2);
}
JavaScript
VanillaTilt.init(document.querySelectorAll(".card"), {
    max: 15,
    speed: 400,
    glare: true,
    "max-glare": 1
})
实现思路拆分
@import url("http://fonts.googleapis.com/css?family=Poppins:200,300,400,500,600,700,800,900&display=swap");
这段代码导入了 Google Fonts 上的 Poppins 字体,用于整个页面的字体显示。
*{
  margin: 0;
  padding: 0;
  box-sizing: border-box;
  font-family: "Poppins";
}
这段代码设置了全局样式,将所有元素的外边距、内边距和盒模型设置为边框盒模型,并将字体设置为 Poppins。
body{
  min-height: 100vh;
  display: flex;
  justify-content: center;
  align-items: center;
  background-color: #161626;
}
这段代码设置了 body 元素的最小高度为 100vh,使用 Flexbox 布局,使得页面内容能够水平和垂直居中对齐,并将页面背景颜色设置为 #161626。
body::before{
  content: "";
  position: absolute;
  top: 0;
  left: 0;
  width: 100%;
  height: 100%;
  background: linear-gradient(#2193b0,#6dd5ed);
  clip-path: circle(30% at right 70%);
}
这段代码定义了一个名为 ::before 的伪元素,设置了其定位为绝对定位,使得它能够相对于 body 元素进行定位。该元素的宽度和高度都为 100%,背景颜色为一个从 #2193b0 到 #6dd5ed 的线性渐变。使用 clip-path 属性将该元素裁剪成一个圆形,位置在右侧 70% 处,半径为 30%。
body::after{
  content: "";
  position: absolute;
  top: 0;
  left: 0;
  width: 100%;
  height: 100%;
  background: linear-gradient(#ee9ca7,#ffdde1);
  clip-path: circle(20% at 10% 10%);
}
这段代码定义了一个名为 ::after 的伪元素,设置了其定位为绝对定位,使得它能够相对于 body 元素进行定位。该元素的宽度和高度都为 100%,背景颜色为一个从 #ee9ca7 到 #ffdde1 的线性渐变。使用 clip-path 属性将该元素裁剪成一个圆形,位置在左上角,半径为 20%。
.container{
  position: relative;
  display: flex;
  justify-content: center;
  align-items: center;
  flex-wrap: wrap;
  z-index: 1;
}
这段代码定义了一个名为 container 的元素,设置了其定位为相对定位,使用了 Flexbox 布局,使得该元素的子元素能够水平和垂直居中对齐,并且能够自动换行。同时,将该元素的 z-index 属性设置为 1,使得它能够在其他元素之上显示。
.container .card{
  position: relative;
  width: 280px;
  height: 400px;
  background-color: rgba(255,255,255,0.1);
  margin: 30px;
  border-radius: 15px;
  box-shadow: 20px 20px 50px rgba(0,0,0,0.5);
  overflow: hidden;
  display: flex;
  justify-content: center;
  align-items: center;
  border-top: 1px solid rgba(255,255,255,0.5);
  border-left: 1px solid rgba(255,255,255,0.5);
  backdrop-filter: blur(5px);
}
这段代码定义了一个名为 card 的元素,设置了其定位为相对定位,宽度为 280 像素,高度为 400 像素,背景颜色为一个带有透明度的白色,外边距为 30 像素,圆角边框为 15 像素,阴影效果为 20px 20px 50px rgba(0,0,0,0.5),溢出内容隐藏,使用 Flexbox 布局,使得该元素的子元素能够水平和垂直居中对齐。同时,设置了该元素的上边框和左边框为一个带有透明度的白色,使用了 backdrop-filter 属性,使得该元素的背景模糊。
.container .card .content{
  padding: 20px;
  text-align: center;
  transform: translateY(100px);
  opacity: 0;
  transition: 0.5s;
}
这段代码定义了一个名为 content 的元素,设置了该元素的内边距为 20 像素,文本对齐方式为居中对齐,使用了 transform 和 opacity 属性,使得该元素在鼠标悬停时能够平滑地显示出来。同时,设置了该元素的过渡效果为 0.5 秒。
.container .card:hover .content{
  transform: translateY(0);
  opacity: 1;
}
这段代码设置了当鼠标悬停在 card 元素上时,其子元素 content 的 transform 和 opacity 属性都会变化,使得内容能够平滑地显示出来。
.container .card .content h2{
  position: absolute;
  top: -80px;
  right: 25px;
  font-size: 128px;
  color: rgba(255,255,255,0.05);
}
这段代码定义了一个名为 h2 的元素,设置了该元素的定位为绝对定位,使得它能够相对于 card 元素进行定位。该元素的顶部位置设置为 -80 像素,右侧位置设置为 25 像素,字体大小为 128 像素,颜色为一个带有透明度的白色。
.container .card .content h3{
  font-size: 28px;
  color: #fff;
}
这段代码定义了一个名为 h3 的元素,设置了该元素的字体大小为 28 像素,颜色为白色。
.container .card .content p{
  font-size: 16px;
  color: #fff;
  font-weight: 300;
  margin: 10px 0 15px 0;
}
这段代码定义了一个名为 p 的元素,设置了该元素的字体大小为 16 像素,颜色为白色,字体粗细为 300,上下外边距为 10 像素,下外边距为 15 像素。
.container .card .content a{
  position: relative;
  display: inline-block;
  padding: 8px 20px;
  margin-top: 15px;
  background-color: #fff;
  color: #000;
  text-decoration: none;
  border-radius: 20px;
  font-weight: 500;
  box-shadow: 0 5px 15px rgba(0,0,0,0.2);
}
这段代码定义了一个名为 a 的元素,设置了该元素的定位为相对定位,使用了 inline-block 布局,使得该元素能够在一行内显示。同时,设置了该元素的内边距、上外边距、背景颜色、文本颜色、文本装饰、圆角边框、字体粗细和阴影效果。


 4万+
4万+

 被折叠的 条评论
为什么被折叠?


