


The Target Finder tool
in Acunetix WVS is a port scanner which can be used to discover running web servers on a givenIP or within a specified range of IP’s. The list of ports on which theweb servers are listening can also be configured. The default ports thescanner will scan are port 80 for HTTP and port 443 for SSL.
To Start a scan enter a single IP or arange of IP’s to be scanned, e.g. 192.168.0.1-100. If the web servers tobe scanned are listening on non default ports add the port numbers to the ‘Listof Ports’ entry field.
Discovered web server/s is/aredisplayed in real time mode, as soon as they are discovered. The servertype, hostname and server banner are also retrieved. HTTPS web serversare identified by a padlock icon .
You can right-click the discovered webserver to launch a scan against it, or send custom requests using the HTTPEditor. You can also export the list of discovered web servers to atext-file to be imported into the scan wizard, or else export the list ofservers to a CSV file. 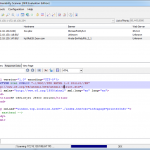
目标查找工具 是一个能被用来对特定IP或IP段扫描的端口扫描器。网站服务器的端口列表也能被配置。默认的扫描端口是HTTP的80端口和HTTPS的443端口。
开始一个扫描首先输入一个IP或IP段,例如:192.128.0.1-100.如果被扫描的网站服务器的监听端口不在列表中就添加进去。被找到的网站服务器会实时的显示出来。服务器类型,主机名和服务器标题会被检索出来。HTTPS网站服务器还被一个挂锁图标标明。
你可以右击发现的网站服务器发动一个扫描,或用HTTP Editor发送一个请求。你也可以输出发现的服务器到一个能被扫描器导入的文件,或导出服务器列表到CSV文件中。
Subdomain Scanner
The Subdomain Scanner in Acunetix WVS scans a top-level domain to discover subdomains configured in its hierarchy, by using the target domain’s DNS server, or any other DNS server specified by the user. While scanning, this tool will also automatically identify and inform the user if the domain being scanned is using some kind of wildcard characters, such as *.domain.com.
Scanning a domain for Subdomains
Enter the Top Level Domain Name in the ‘Domain’ input field, e.g. acunetix.com. Then select the DNS Server to use from the drop down menu; or use the target’s DNS server i.e. the authoritative name servers for the domain, or specify a DNS server of your choice.
The default timeout specified is an optimal setting; 10 seconds. Increase the timeout value if requests are timing out. Once the scan is finished you can right-click the discovered subdomains to launch a scan against them, or send custom requests using the HTTP Editor. You can also export the list of subdomains to a text-file to be imported into the scan wizard, or export the results to a CSV file.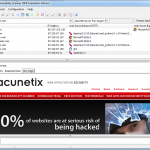
子域名扫描器 是通过目标域名的DNS服务器或其他被用户指定的DNS服务器,扫描一个顶级域名去发现等级上配置的子域名。当扫描时,这个工具会自动的识别和提醒用户被扫描的域名正在用一些通配符,例如 *.domain.com.
扫描一个域名找子域名
输入顶级域名在输入框里,然后用下拉菜单选择DNS服务器或使用目标DNS服务器,例如权威的域名服务器或指出你选择的DNS服务器。
默认的超时时间是可选的:10s。增加超时时间如果请求超时。一旦扫描完成你可以右击发现的子域名去发动一个对它们的扫描,或用HTTP Editor发送用户请求。你也可以输出扫描结果或保存为CSV文件。
HTTP Fuzzer Tool
With the HTTP Fuzzer tool in Acunetix WVS you can automatically send a large number / volume of HTTP Requests including invalid, unexpected and random data to a website, to test its input validation capabilities. You would also be testing the web application’s also handling of unexpected data.
Creating a rule to automatically test a series of inputs

As an example, a rule will be created to test the products section of the Acunetix test website using a range of values to find out what products are listed in the database. The scanner will be set to automatically replace the variable part of a URL with a series of values. In the URL, the last part?cat=1 is the variable part.
http://testphp.vulnweb.com/listproducts.php?cat=1
Note: The example in this manual is only meant to show the capabilities of the HTTP Fuzzer. With this tool much more advanced tests can be done.
Gathering a HTTP Request
If a valid HTTP request is known, paste it in the ‘Request’ tab in the HTTP Fuzzer. Else, load a saved scan or crawl, right click one of the files in the results tree and select ‘Export to HTTP Fuzzer’.
Creating data generators
First you must determine which part of the request will be used for fuzzing. This value will be replaced by a data generator. Below is a step by step procedure how to create a data generator;
1. Click on the ‘Add Generator’ button on the right part of the HTTP Fuzzer window.
2. Select the appropriate generator type from the drop-down list, which can be any of the below;
- Number generator – This will generate all range of numbers from a start number variable to a stop number variable, using the specified increment.
- Character generator - This will generate all the ASCII characters contained between a Start character variable and a Stop character variable using the specified increment.
- File generator – This will feed all the strings from a specified text file. In the file, each variable string should be entered on a new line.
- String generator – This will generate string combinations with the characters specified in the ‘Character set’ option and with the length specified in the ‘String Length’ option.
- Random string generator - This will generate a specified number of random strings with the characters specified in the ‘Character set’ option with the length configured in the option ‘String length’.
- Character repeater - This will repeat a specified character/string for a given number of times (commonly used for buffer overflow testing).
3. Once a generator is selected, set the parameters according to the test from the window underneath the generators list.
4. After configuring the generator(s), place the text cursor in the specific part of the HTTP Request where the generator will replace the static value. Highlight the static value (e.g. /artists.php?artist=1), and click on ‘Insert into Request’. The static value will be replaced with the generator variable, e.g. /artists.php?artist=${artists_id}.
Creating Fuzzer Filters

Click on image to enlarge
To create a Fuzzer filter, click on the ‘Fuzzer Filters’ button in the toolbar to open the filters dialog. To use a predefined filter template, select the rule template from the dropdown list; otherwise custom filters can be created by defining the following parameters:
- Rule description – A name to describe the rule
- Rule Type – Select if the rule will be used to Include or Exclude the result returned because of the filter, or if it has to be logged in the ‘Activity Window’
- Apply To – Indicate where to search for the matching expression, if in the HTTP response headers, body or status code
- Regular expression – The regular expression or text which will be searched to match the rule.
Note: Ensure that the relevant checkboxes are ticked to enable the created filters.
使用HTTP Fuzzer 工具,你可以自动的发送大量的HTTP请求包括无效,不期望和随机的数据给一个站点,去测试它的输入确认容量。你可以测试万展应用处理大量突如其来的数据。建立一个个规则自动测试一系列输入
举例,建立一个规则用一系列值去测试产品部分来找出数据库中列出的部分。扫描器能自动替换一部分URL的变量用一系列值。在URL中,最后的部分?cat=1是变量部分。
http://testphp.vulnweb.com/listproducts.php?cat=1
注意:例子只是来展示HTTP Fuzzer的容量,用这个工具做更多测试
搜集一个HTTP 请求
如果一个可用的HTTP请求,把它放在HTTP Fuzzer的请求格里。或则加载一个扫描抓取结果,右击结果树中的一个文件并选择导出到HTTP Fuzzer。
建立一个数据产生器
首先确定那部分被用来模糊测试。这个值将会被数据产生器替换。下面是穿件数据产生器的步骤。
1.点击“add Generator”按钮 在右边的窗口。
2.选择合适的产生器类型从下拉菜单里。
。数据产生器 (产生一个数据范围,从开始数据到结束,递增)。字符产生器(产生一系列ASCII字符在始末变量之间)。文件产生器(找到所有的文本文件的字符串。在文件里,每个变量字符都应该输入一个新行) 。字符串产生器(产生字符串,能制定字符和长度).随机字符串产生器(产生指定字符和长度的随机字符串)。字符重复器(由指定的次数产生特定字符或字符串)
3.一旦一个产生器被选中,根据窗口下面的产生器列表设置参数。
4.在配置好产生器后,把文本光标放在产生器替换静态值的HTTP Request的地方。高亮静态值(/artists.php?artist=1),并点击“Insert into Request",静态值就会被产生变量替换。例如/artists.php?artist=${artists_id}.
创建模糊查询过滤器
创建一个查询过滤,点击工具条的”Fuzzer Filters“按钮打开对话框。用一个预先定义好的过滤模板,选择规则模板从下拉列表中。否则普通过滤会被下列变量定义。
Rule Description -描述规则的名字 。规则类型-选择如果规则能被用来加入或排除一些返回的结果或如果它需要登录到活动窗口
Apply To- 指出哪里找到匹配表达式,如果在HTTP返回头,体或状态码
Regular expression- 正则表达式用来匹配规则
注意:确保相关的框被选中来启用建立过滤。
Blind SQL Injector Tool
Ideal for penetration testers, the Blind SQL injector is an automated database data extraction tool. By importing SQL injections discovered when scanning a website, you can see what a serious impact an SQL injection can have on the website. You will also be able to enumerate (枚举)databases, tables, dump data and also read specific files on the file system of the web server, depending on the seriousness of the vulnerability. Using this tool, you can also run custom SQL select queries against the database. 用来测试SQL注入攻击
Importing and Writing HTTP Requests
The Blind SQL injector needs to know the exact HTTP request from where the remote user can inject data into the database. You can import a HTTP request from a reported SQL injection in a website scan or else write a HTTP request yourself and add an SQL injection point anywhere you would like in the request.需要你输入一个可以注入的点
Importing the HTTP Request
From the scan results of a website, right click a reported SQL Injection and select ‘Import to Blind SQL Injector’. This will import the HTTP request used to discover the SQL Injection in the tool, including the injection point for further analyzes.导入到SQL Injector.
Writing the HTTP Request
The HTTP request can be written manually as plain text in the HTTP Request tab. 人工的写HTTP请求
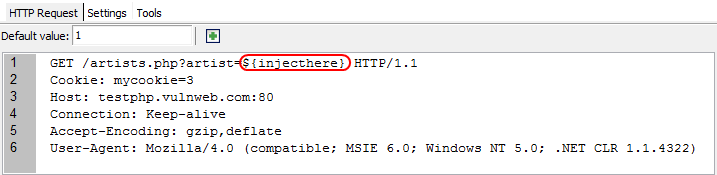
Injection Point 注入点
Specify the exact point where the injection point should be placed by placing the cursor at the insertion point and click on the ‘+’ icon from the toolbar. This will insert the ‘${InjectHere}’ token, which will be replaced dynamically by the injection engine using various injection techniques.
Blind SQL Injector Tools
1. File Extraction Tool 文件抽取工具
With this tool you can extract files from the web server by exploiting the discovered SQL Injection. This is possible if the injection is already validated. Configure the following options to extract files:
- File Name – Specify the exact remote path and filename of the file to extract
- Offset – Specify the character index from where you want to extract data
- Length – Specify how many bytes to extract from such file. Set it to 0 for no limit, i.e. extract all file
- Text File – Tick this option if file is a text file. In this case the extraction algorithm knows it is a text file, making the extraction process much faster.
Note: Once ‘Extract’ is clicked, if the file extraction is successful you will be prompted to specify a location and filename where to save the extracted file.
2. Execute SQL Query Tool
This tool lets you execute arbitrary SQL queries on remote SQL server. The query can only return 1 row and 1 column, therefore the SQL query has to be limited.
- SQL query – Write down the SQL query in this text box
- Offset - Specify the character index from where you want to extract data 挖掘
- Length – Specify how many bytes to extract from the result returned from the SQL query. Set it to 0 for no limit, i.e. extract all result.
Note: Once ‘Extract’ is clicked and the SQL query results are successful, you will be prompted to specify a location and filename where to save the results.
Configuring the Blind SQL Injector
Configuration of the Blind SQL Injector can be accessed from the ‘Settings’ tab in the ‘Blind SQL Injector’ node.
Settings > General Tab
- Database Type – Select ‘Automatic’ if the database server is unknown and the blind SQL Injector will try to guess it. Else, if the SQL server is known, select it from the drop down menu.数据库类型
- Extraction Method – Select ‘Automatic’ and the tool will try to use the best method possible. ‘Condition based’ extraction method is the most reliable but slowest. Using ‘Union Select’, in some limited cases when the SQL query and injection point permits, the tool will inject in the existing queries other queries but in a direct way, so this method is up to 8 times faster than the previous one. 挖掘模式
- Minimum HTTP Retry – The number or retries the application will take before reporting a connection error.
- Encode SQL Spaces with /**/ - Tick this to encode SQL spaces with /**/. This is a basic way to fool anti SQL injection algorithms. 基本愚弄反SQL注入的算法
- Force HTTP encoding of the SQL string – Tick this option to automatically encode SQL strings used in a GET parameter.
- Encode all characters – Tick this option to encode all characters not just the special characters.
- Encode spaces with plus – Tick this option to encode spaces with a ‘+’ sign instead of %20.
- Show debug information – Enable this option to enable debug logging in the application log.
Settings > Condition Based Extractor node 基于条件的采掘点
- Injection SQL string > Automatic Detection – Tick this option if you want that the injection string to be injected in the SQL is determined automatically by the tool.
- Injection SQL String > provided by user -. Select this option to manually specify the Injection SQL string. The condition place is given by the ${condition} token, e.g. 1 AND ${condition}/*.
- True / False condition detector > Automatic – Select automatic for automatic detection. It may not work if more subtle changes occur in the server response, between consecutive requests.
- True / False condition detector > Provided by Regex – Specify the regular expression which must match the response data on true condition.
- Inverse Regex – Enable this option when you want that the true condition is triggered when the condition of the above stated regex is false.
- Character Extractor
- Bit Method – Select this option to quantize the characters directly to bits and do test on the bits.
- Half Method – If this method is selected, the application will try to find out the numerical value of the character by using the half method, i.e. it will try to find a value in a given interval always splitting the interval in half and testing in which of them the value is, and do this recursively.
- Try Parallel request – Tick this option to request all bits in parallel.
Settings > Union Select based extractor tab
- Start Column number – Specify the minimum number of columns expected in a database.
- Max column number – Specify the maximum number of columns expected in a database.
- Visible column index – Specify a column which the Blind SQL injector can already extract. This setting is used as a reference from the tool. Leave as 0 to set as auto.
Note: If a database you are scanning may include more than 20 columns per table, increase the value in ‘Max Column Number’.
Authentication Tester Tool
就是一个暴力破解工具,含有字典
The Authentication Tester tool in Acunetix WVS is used to test the strength of both usernames and passwords within HTTP and web forms authentication environments via a dictionary attack.

Testing HTTP Authentication
HTTP authentication is part of the HTTP specification. If a site performs HTTP authentication, then the browser will display a username and password pop-up dialog. With HTTP authentication, the web server validates the logon against a database of users (with IIS these are local Windows user accounts and with Apache these are stored in a file).
Testing the Username and Password Strength for HTTP Authentication
1. the target URL e.g. www.test.com/login/ in the ‘Target URL to test’ edit box and select ‘HTTP’ as the authentication method to be used for the attack.
2. The default dictionaries will be used. You can also specify your own Username and Password dictionaries by specifying the full path to a plain text file containing the list of usernames or passwords to attempt to login with. Click ‘Start’ to start the Authentication tester.
Note: By default the Authentication tester will classify a failed logon if the server returns a HTTP response value of 401. However, if custom failed login page is used, a matching string or regular expression must be specified in the ‘Logon has failed if’ field.
Testing form based authentication
A login sequence that uses web forms authentication asks for the username and password via a web form, which is then validated on the server via a custom script, rather than by the web server itself.
Testing Username and Password Strength for web forms
1. From the Tools Explorer, select the ‘Authentication Tester’ node and in the ‘Target URL to test’ edit box and specify the target URL e.g. www.test.com/login/
2. Select ‘HTML form based’ as the authentication method to be used for the attack and click on ‘Select user/password form fields to use’.
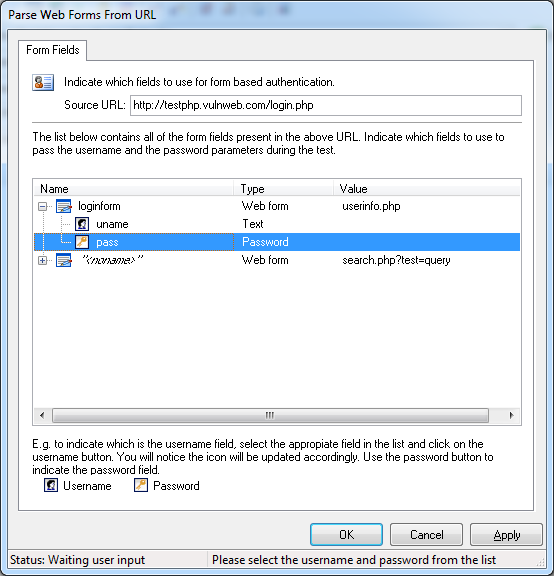
3. In the ‘Parse Web Forms from URL’ screen, the application will display all the available fields contained in the target page, as shown in the screen shot above. Indicate the form field that represents the username, by clicking on the field and clicking on ‘Username’ button. You have to also indicate the form field that represents the Password by clicking on the field, and clicking on the ‘Password’ button at the bottom of the window.
4. Acunetix WVS must be instructed what constitutes a failed login page so the application realizes the appropriate behavior upon successful login. Using a web browser, attempt to log in to the page to generate a login error and note down the text that indicates a login failure. Set ‘Logon has failed if’ to ‘Result contains’ and copy the text that indicates a login failure in the input text box. Regular expressions can also be specified by choosing ‘Result matches regular expression’. Click ‘Start’ to launch the dictionary attack against the web form.
Note: If there are multiple forms on the page, they will be parsed and shown in this dialog. Select the form which contains the relevant authentication fields.
HTTP Editor Tool
 The HTTP Editor tool allows you to create, analyze and edit client HTTP requests and server responses. This allows you to further fine tune attacks and check if vulnerabilities were solved.
You can start the HTTP Editor from the ‘Tools’ node within the Tools Explorer window pane.
The Top pane in the HTTP editor displays the HTTP request data and headers. The bottom pane displays the HTTP response headers data.
Editing a HTTP Request
1. From a Scan or crawl, right click a file and select ‘Edit with HTTP Editor’.
2. From the HTTP Editor Toolbar, the following options can be edited:
- Method – Select one of the standard HTTP methods such as GET, POST and HEAD. You can also specify a custom method by typing it in the ‘Method’ input field, such as OPTIONS, TRACE or DELETE.
- Protocol – Select the HTTP Protocol (HTTP/1.0 or HTTP/1.1) version to be used for the request.
- URL – Specify the URL, including the hostname of target object that you want to request (e.g. http://192.168.0.28/). You can specify a relative URL without hostname and request the hostname via the request headers.
3. The Request tab shows the headers of the HTTP request. You can edit any of the headers by specifying the Header name e.g. Cookie or User-Agent and assigning the header value associated to it, e.g. ID=1.
4. To craft a HTTP request with request data apart from the headers (e.g. a POST request with variables), enter the data in the ‘Request Data’ window. Variables’ data can also be edited by the Variable Editor.

The Variable Editor can be launched by clicking on the ‘Edit query Variables’ button. Query variables are separated from the URL by a “?” and are encoded in the URL-Encode standard. With the variable editor you can edit query variables, cookies and other request data. You can add, remove, URL-encode and URL-decode variables using the buttons in the small toolbar at the bottom of the variable editor window. Click ‘OK’ to store the changes and close the Variable Editor.
You can supply data other than the URL encoded variables, such as XML documents for PROPFIND request. Specify the content length and the content type through the appropriate (‘content length’ and ‘content type’) headers. In the case that no content length or type is specified, the HTTP Editor will use “application/x-www-form-urlencoded” as the default content type, whilst the content length is automatically calculated.
5. Use the toolbar at the top of the request page to add and remove request headers, add cookie variables, open the encoder-decoder tool and to toggle between HTTP and HTTPS.
6. Click the ‘Encoder Tool’ button to encode-decode any text data that you want to send with a HTTP request or that you got back in response. This tool makes use of Base64 and URL-encoding techniques to convert plain text data to send in a request. Click ‘Start’ to request to URL.
Note: For websites with AcuSensor Technology enabled, you can manually add AcuSensor Technology headers to the HTTP request. To do this, right click the ‘Request Headers’ window pane and select ‘Add AcuSensor headers’. If AcuSensor Technology is enabled, you can view specific AcuSensor Technology related data in the response tab ‘AcuSensor Data’.
Text Only Tab
This tab displays the request in plain text. You can make changes to the request by editing the text directly on display.
Analyzing HTTP Responses
After the HTTP request is sent to the web server, the server response in the bottom pane of the HTTP Editor can be analyzed. The server response is shown in the tabs ‘Response headers’, ‘Response data’, ‘View Page’, and ‘HTML structure analysis’.
Response Tabs
Once a HTTP response is received from the target server, you can analyze the request details using the response tabs below:
- Response Headers – Displays HTTP response headers.
- Response Data – Displays the HTTP response data received from the web server (similar to web browsers’ option view source).
- View Page – Displays the web page without relevant images or CSS. Clicking on any of the links will display the request of that link in the ‘Request Headers’ tab and will update the URL in the HTTP Editor toolbar.
- HTML Structure Analyses – Displays a list of links, commencts, client scripts, web forms and META tages found in the HTTP response. 结构分析
- AcuSensor Data – Displays a list of AcuSensor Technology parameters if AcuSensor headers are added in the HTTP request and AcuSensor is Enabled. 数据


 5579
5579

 被折叠的 条评论
为什么被折叠?
被折叠的 条评论
为什么被折叠?
 到【灌水乐园】发言


