


一、读写分离介绍
Sharding-JDBC读写分离则是根据SQL语义的分析,将读操作和写操作分别路由至主库与从库。它提供透明化读写分离,让使用方尽量像使用一个数据库一样使用主从数据库集群。
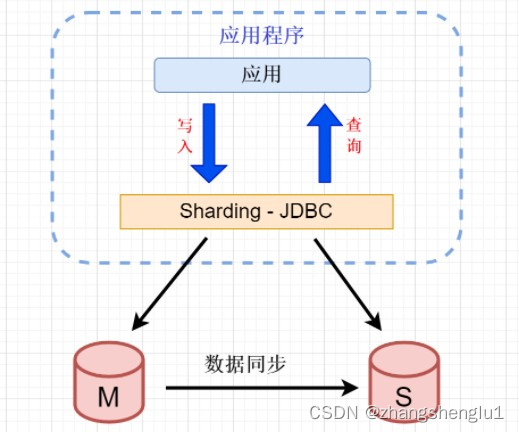
为了实现Sharding-JDBC的读写分离,首先,要进行mysql的主从同步配置。mysql的主从同步配置请参考mysql主从同步搭建
在主数据库的course_db1库中建立如下表:
CREATE TABLE `products` (
`pid` bigint(32) NOT NULL AUTO_INCREMENT,
`pname` varchar(50) DEFAULT NULL,
`price` int(11) DEFAULT NULL,
`flag` varchar(2) DEFAULT NULL,
PRIMARY KEY (`pid`)
) ENGINE=InnoDB DEFAULT CHARSET=utf8
由于已经搭建好主从同步,那么会在从库中同步创建好products表。
二、创建springboot项目
环境说明:
SpringBoot2.3.7+MyBatisPlus+ShardingSphere-JDBC 5.1+Hikari+MySQL 5.7
1) 创建项目
项目名称: sharding-jdbc-write-read
2)引入以下POM文件
<?xml version="1.0" encoding="UTF-8"?>
<project xmlns="http://maven.apache.org/POM/4.0.0" xmlns:xsi="http://www.w3.org/2001/XMLSchema-instance"
xsi:schemaLocation="http://maven.apache.org/POM/4.0.0 https://maven.apache.org/xsd/maven-4.0.0.xsd">
<modelVersion>4.0.0</modelVersion>
<groupId>top.hdsw</groupId>
<artifactId>sharding-jdbc-write-read</artifactId>
<version>0.0.1-SNAPSHOT</version>
<name>sharding-jdbc-write-read</name>
<description>sharding-jdbc-write-read</description>
<properties>
<java.version>1.8</java.version>
<project.build.sourceEncoding>UTF-8</project.build.sourceEncoding>
<project.reporting.outputEncoding>UTF-8</project.reporting.outputEncoding>
<spring-boot.version>2.3.7.RELEASE</spring-boot.version>
</properties>
<dependencies>
<dependency>
<groupId>org.springframework.boot</groupId>
<artifactId>spring-boot-starter-web</artifactId>
</dependency>
<dependency>
<groupId>org.apache.shardingsphere</groupId>
<artifactId>shardingsphere-jdbc-core-spring-boot-starter</artifactId>
<version>5.1.1</version>
</dependency>
<dependency>
<groupId>com.baomidou</groupId>
<artifactId>mybatis-plus-boot-starter</artifactId>
<version>3.3.1</version>
</dependency>
<dependency>
<groupId>mysql</groupId>
<artifactId>mysql-connector-java</artifactId>
<scope>runtime</scope>
</dependency>
<dependency>
<groupId>org.projectlombok</groupId>
<artifactId>lombok</artifactId>
</dependency>
<dependency>
<groupId>org.springframework.boot</groupId>
<artifactId>spring-boot-starter-test</artifactId>
<scope>test</scope>
<exclusions>
<exclusion>
<groupId>org.junit.vintage</groupId>
<artifactId>junit-vintage-engine</artifactId>
</exclusion>
</exclusions>
</dependency>
</dependencies>
<dependencyManagement>
<dependencies>
<dependency>
<groupId>org.springframework.boot</groupId>
<artifactId>spring-boot-dependencies</artifactId>
<version>${spring-boot.version}</version>
<type>pom</type>
<scope>import</scope>
</dependency>
</dependencies>
</dependencyManagement>
<build>
<plugins>
<plugin>
<groupId>org.apache.maven.plugins</groupId>
<artifactId>maven-compiler-plugin</artifactId>
<version>3.8.1</version>
<configuration>
<source>1.8</source>
<target>1.8</target>
<encoding>UTF-8</encoding>
</configuration>
</plugin>
<plugin>
<groupId>org.springframework.boot</groupId>
<artifactId>spring-boot-maven-plugin</artifactId>
<version>2.3.7.RELEASE</version>
<configuration>
<mainClass>com.mashibing.shardingjdbc.ShardingjdbcWriteReadApplication</mainClass>
</configuration>
<executions>
<execution>
<id>repackage</id>
<goals>
<goal>repackage</goal>
</goals>
</execution>
</executions>
</plugin>
</plugins>
</build>
</project>
3)、创建实体类
@TableName("products")
@Data
public class Products {

    @TableId(value = "pid",type = IdType.AUTO)
    private Long pid;

    private String pname;

    private int  price;

    private String flag;

}
4) 创建Mapper
@Mapper
public interface ProductsMapper extends BaseMapper<Products> {
}
三、配置读写分离
application.properties
# 应用名称
spring.application.name=shardingjdbc-write-read
# 打印SQl
spring.shardingsphere.props.sql-show=true
# 定义读写分离的数据源
spring.shardingsphere.datasource.names = master,slave
#数据源1
spring.shardingsphere.datasource.master.type=com.zaxxer.hikari.HikariDataSource
spring.shardingsphere.datasource.master.driver-class-name=com.mysql.jdbc.Driver
spring.shardingsphere.datasource.master.jdbc-url=jdbc:mysql://192.168.19.3:3306/course_db1?useUnicode=true&characterEncoding=utf-8&useSSL=false&allowPublicKeyRetrieval=true
spring.shardingsphere.datasource.master.username=root
spring.shardingsphere.datasource.master.password=MyNewPass4!
#数据源2
spring.shardingsphere.datasource.slave.type=com.zaxxer.hikari.HikariDataSource
spring.shardingsphere.datasource.slave.driver-class-name=com.mysql.jdbc.Driver
spring.shardingsphere.datasource.slave.jdbc-url=jdbc:mysql://192.168.19.4:3306/course_db1?useUnicode=true&characterEncoding=utf-8&useSSL=false&allowPublicKeyRetrieval=true
spring.shardingsphere.datasource.slave.username=root
spring.shardingsphere.datasource.slave.password=MyNewPass4!
#读写分离 主从关系
# 读写分离类型,如: Static,Dynamic, ms1 包含了 m1 和 s1
spring.shardingsphere.rules.readwrite-splitting.data-sources.ms1.type=Static
# 写数据源名称
spring.shardingsphere.rules.readwrite-splitting.data-sources.ms1.props.write-data-source-name=master
# 读数据源名称,多个从数据源用逗号分隔
spring.shardingsphere.rules.readwrite-splitting.data-sources.ms1.props.read-data-source-names=slave
四、读写分离测试
写操作:
@Test
public void testInsert(){
Products products = new Products();
products.setPname("电视机");
products.setPrice(2000);
products.setFlag("1");
productsMapper.insert(products);
}
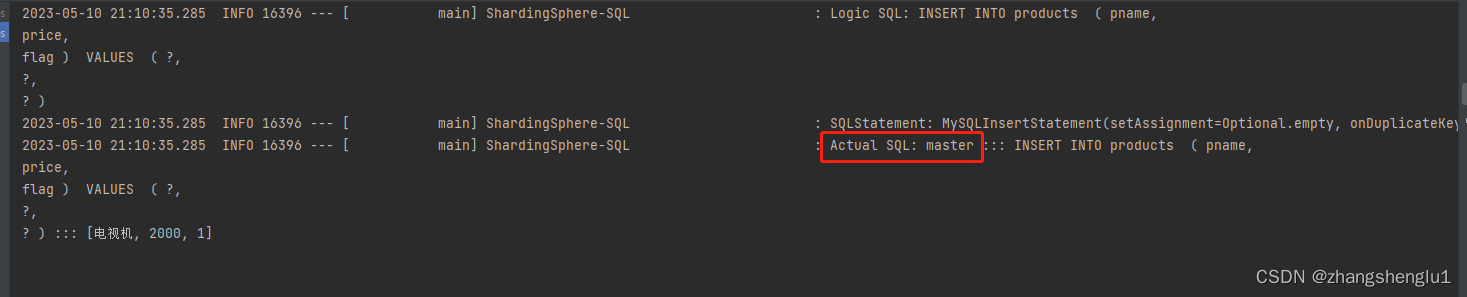
可以看到,执行插入的是主数据库
读操作:
@Test
public void testQuery(){
QueryWrapper<Products> wrapper = new QueryWrapper<>();
wrapper.eq("pname","洗碗机");
List<Products> list = productsMapper.selectList(wrapper);
list.forEach(System.out::println);
}

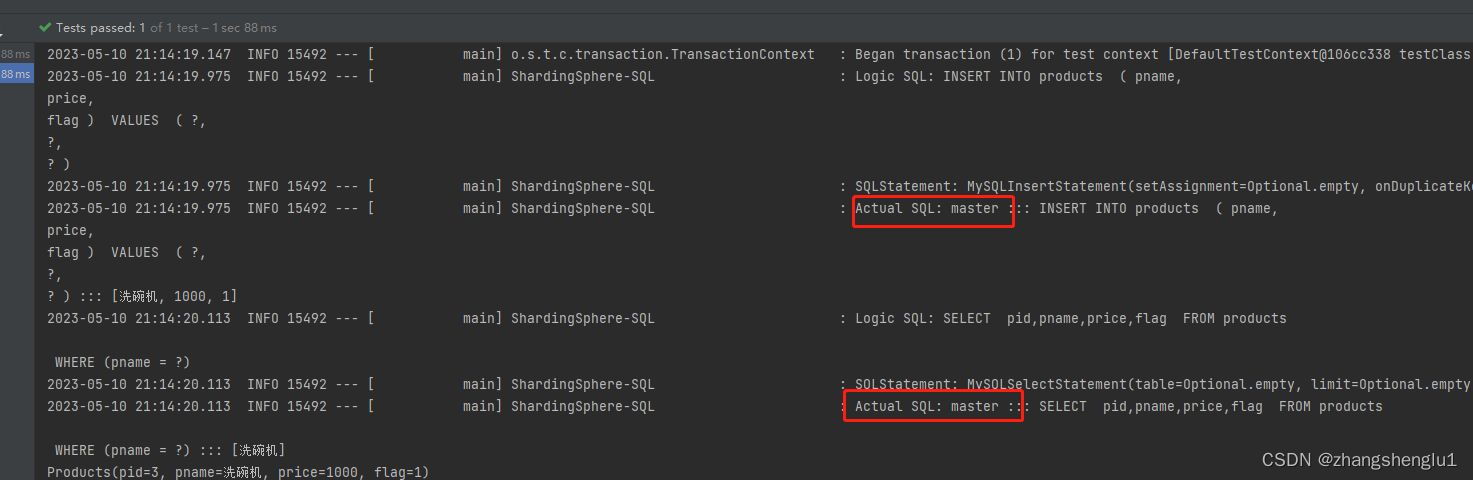
为了保证主从库间的事务一致性,避免跨服务的分布式事务,ShardingSphere-JDBC的主从模型中,事务中的数据读写均用主库。
-
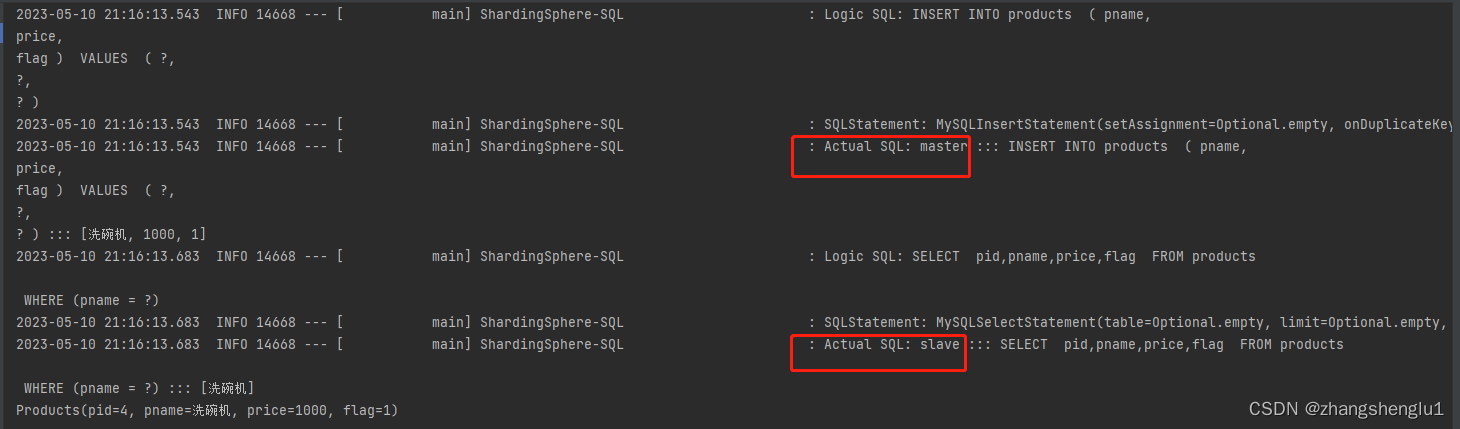
不添加@Transactional:insert对主库操作,select对从库操作
-
添加@Transactional:则insert和select均对主库操作
添加Transactional
@Transactional
@Test
public void testTrans(){
Products products = new Products();
products.setPname("洗碗机");
products.setPrice(1000);
products.setFlag("1");
productsMapper.insert(products);
QueryWrapper<Products> wrapper = new QueryWrapper<>();
wrapper.eq("pname","洗碗机");
List<Products> list = productsMapper.selectList(wrapper);
list.forEach(System.out::println);
}
将testTrans方法的注解注释掉,进行非事务测试


 469
469

 被折叠的 条评论
为什么被折叠?
被折叠的 条评论
为什么被折叠?
 到【灌水乐园】发言


