


ngx_list_t是nginx封装链表的容器,其源码位于:
声明:~/nginx/src/core/ngx_list.h
定义:~/nginx/src/core/ngx_list.c
在Nginx中使用频繁,例如HTTP头部就是用ngx_list_t存储的。
(一)数据结构
nginx的链表(头)结构为ngx_list_t,链表节点结构为ngx_list_part_t,定义如下。
typedef struct ngx_list_part_s  ngx_list_part_t;

struct ngx_list_part_s {
    void             *elts;//数组起始地址
    ngx_uint_t        nelts;//已经使用的元素个数
    ngx_list_part_t  *next;//下一个地址
};


typedef struct {
    ngx_list_part_t  *last;//指向最后一个节点
    ngx_list_part_t   part;//第一个节点
    size_t            size;//数组中存储的元素的数据结构大小
    ngx_uint_t        nalloc;//数组存储元素个数
    ngx_pool_t       *pool;//管理的内存池对象
} ngx_list_t;
ngx_list_t的结构示意如下:
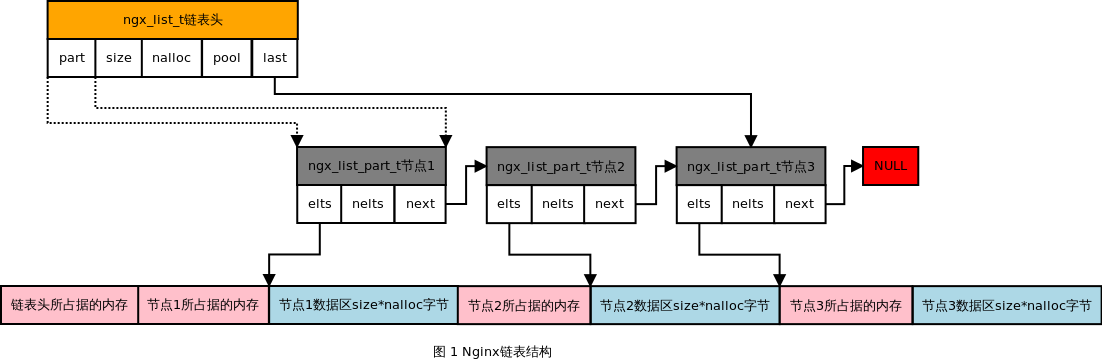
可以看到这种设计非常巧妙。ngx_list_t是一个链表容器,而链表中的元素又是一个数组。事实上,ngx_list_part_t数组中的元素才是用户想要存储的东西,ngx_list_t能够容纳的元素数量由ngx_list_part_t数组元素的个数与每个数组所能容纳的元素相乘得到。这样设计的好处在于:
1.链表中存储的元素是灵活的,可以是任意一种数据结构。
2.链表占用的内存由ngx_list_t管理,他已经分配好了(由图可知是一块连续内存)。
3.元素访问高效(数组下标即可访问)。
(二)链表操作与示例
主要有三个操作,创建、初始化和插入元素,对应下述三个函数:
//创建链表
ngx_list_t*ngx_list_create(ngx_pool_t *pool, ngx_uint_t n, size_t size);

//初始化链表
static ngx_inline ngx_int_t ngx_list_init(ngx_list_t *list, ngx_pool_t *pool,
    ngx_uint_tn, size_t size);

//添加元素
void*ngx_list_push(ngx_list_t *l)
他们的实现都很简单,本文只分析创建链表和添加元素操作。
| 2.1创建链表 |
创建链表的操作实现如下,首先分配链表头(28B),然后分配头节点(即链表头中包含的part)数据区,两次分配均在传入的内存池(pool指向的内存池)中进行。然后简单初始化链表头并返回链表头的起始位置。
ngx_list_t *
ngx_list_create(ngx_pool_t*pool, ngx_uint_t n, size_t size)
{
    ngx_list_t *list;

    list = ngx_palloc(pool,sizeof(ngx_list_t));  //从内存池中分配链表头
    if (list == NULL) {
        return NULL;
    }

    list->part.elts =ngx_palloc(pool, n * size); //接着分配n*size大小的区域作为链表数据区
    if (list->part.elts == NULL) {
        return NULL;
    }

    list->part.nelts = 0;     //初始化
    list->part.next = NULL;
    list->last = &list->part;
    list->size = size;
    list->nalloc = n;
    list->pool = pool;

    return list;    //返回链表头的起始位置
} | 2.2插入元素 |
添加元素操作实现如下,同nginx数组实现类似,其实际的添加操作并不在该函数中完成。函数ngx_list_push返回可以在该链表数据区中放置元素(元素可以是1个或多个)的位置,而添加操作即在获得添加位置之后进行,如后文的例子。
也就是说,push操作返回待插入元素在list分配的内存区的地址。
void *
ngx_list_push(ngx_list_t*l)
{
    void             *elt;
    ngx_list_part_t  *last;

    last = l->last;

    if (last->nelts ==l->nalloc) {  //链表数据区满

        /* the last part is full, allocate anew list part */

        last =ngx_palloc(l->pool, sizeof(ngx_list_part_t));  //分配节点(list part)
        if (last == NULL) {
            return NULL;
        }

        last->elts =ngx_palloc(l->pool, l->nalloc * l->size);//分配该节点(part)的数据区
        if (last->elts == NULL) {
            return NULL;
        }

        last->nelts = 0;
        last->next = NULL;

        l->last->next =last;  //将分配的list part插入链表
        l->last = last;        //并修改list头的last指针
    }

   //last->elts为首地址
    elt = (char *)last->elts + l->size * last->nelts; //计算下一个数据在链表数据区中的位置
    last->nelts++;  //实际存放的数据个数加1

    return elt;  //返回该位置
}
(三)测试
#include <stdio.h>
#include <string.h>
#include "ngx_config.h"
#include "nginx.h"
#include "ngx_conf_file.h"
#include "ngx_core.h"
#include "ngx_string.h"
#include "ngx_palloc.h"
#include "ngx_list.h"
#define N 5
volatile ngx_cycle_t *ngx_cycle;
#if 1
void ngx_log_error_core(ngx_uint_t level, ngx_log_t *log,
ngx_err_t err, const char *fmt, ...)
{
}
void print_list(ngx_list_t *l)
{
ngx_list_part_t *p = &(l->part);
ngx_str_t *pstr=p->elts;
size_t i, n_part=0;
while(p)
{
i=0;
printf("------------part %d---------------\n", ++n_part);
ngx_str_t *pstr=p->elts;
for(; i<p->nelts; ++i)
{
printf("%s\n", pstr[i].data );
}
p = p->next;
if(p)
pstr=p->elts;
}
printf("-------------------------------\n");
}
#endif
int main()
{
#if 1
ngx_pool_t *pool;
int i;
char str[] = "hello NGX!";
ngx_list_t *l;
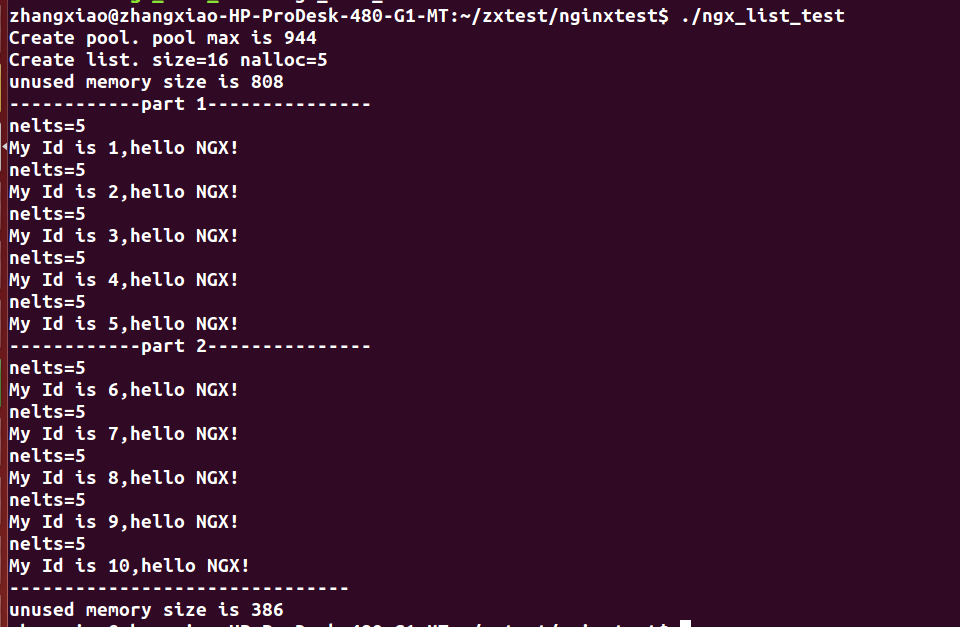
pool = ngx_create_pool(1024, NULL);
printf("Create pool. pool max is %d\n", pool->max);
l = ngx_list_create(pool, N, sizeof(ngx_str_t));
printf("Create list. size=%d nalloc=%d\n", l->size, l->nalloc);
printf("unused memory size is %d\n", (ngx_uint_t)(pool->d.end - pool->d.last) );
for(i=0; i<10; ++i)
{
ngx_str_t *pstr = ngx_list_push(l);
char *buf = ngx_palloc(pool, 6*N);
sprintf(buf, "My Id is %d,%s", i+1, str);
pstr->len = strlen(buf);
pstr->data = buf;
}
print_list(l);
printf("unused memory size is %d\n", (ngx_uint_t)(pool->d.end -
pool->d.last) );
ngx_destroy_pool(pool);
#endif
return 0;
} #Makefile
CC=gcc
CFLAGS = -g -Wall -Wextra
TARGETS=ngx_list_test
TARGETS_FILE=ngx_list_test.c
DIR=${HOME}/nginx/nginx-1.0.15
all:$(TARGETS)
clean:
rm -f $(TARGETS) *.o
INCLUDE=-I ${DIR}/src/core/ -I $(DIR)/objs/ -I $(DIR)/src/event -I $(DIR)/src/event/modules -I $(DIR)/src/os/unix
NGX_OBJ = $(DIR)/objs/src/core/ngx_palloc.o $(DIR)/objs/src/core/ngx_string.o $(DIR)/objs/src/os/unix/ngx_alloc.o $(DIR)/objs/src/core/ngx_list.o
$(TARGETS):${TARGETS_FILE}
$(CC) $(CFLAGS) ${TARGETS_FILE} $(INCLUDE) $(NGX_OBJ) -o $@测试结果
(四)参考
1.http://blog.csdn.net/yusiguyuan/article/details/20856021
2.http://blog.csdn.net/daniel_ustc/article/details/19177879
3.http://blog.csdn.net/daniel_ustc/article/details/19177879
4.https://www.kancloud.cn/digest/understandingnginx/202591


 1759
1759


 被折叠的 条评论
为什么被折叠?
被折叠的 条评论
为什么被折叠?
 到【灌水乐园】发言


