


android IPC通信(上)-sharedUserId&&Messenger
android IPC通信(中)-ContentProvider&&Socket
这篇我们将会着重介绍AIDL的使用方式和原理,要介绍AIDL先要简单介绍一下 Binder,而且 Messenger,ContentProvider 和 AIDL 的最底层都是使用的 Binder。
相关博客介绍:
android 不能在子线程中更新ui的讨论和分析:Activity 打开的过程分析;
java/android 设计模式学习笔记(9)—代理模式:AMS 的相关类图和介绍;
android WindowManager解析与骗取QQ密码案例分析:界面 window 的创建过程;
java/android 设计模式学习笔记(8)—桥接模式:WMS 的相关类图和介绍;
android IPC通信(下)-AIDL:AIDL 以及 Binder 的相关介绍;
Android 动态代理以及利用动态代理实现 ServiceHook:ServiceHook 的相关介绍;
Android TransactionTooLargeException 解析,思考与监控方案:TransactionTooLargeException 的解析以及监控方案。
Binder
直观来说,Binder 是 Android 中的一个类,它实现了 IBinder 接口。从 IPC 角度来说,Binder 是 Android 中的一种跨进程通信方式,Binder 还可以理解为一种虚拟的物理设备,它的设备驱动是 /dev/binder,该通信方式在Linux中没有;从Android Framework 角度来说,Binder 是 ServiceManager 连接各种Manager (ActivityManager,WindowManager,等等)和相应 ManagerService 的桥梁;从Android 应用层来说,Binder 是客户端和服务端进行通信的媒介,当 bindService 的时候,服务端会返回一个包含了服务端业务调用的 IBinder 对象(注意这个地方不能换成 Binder 对象,只能是 IBinder 对象,因为 IBinder 的实现类有两个,具体的区别我下面会讲到),通过这个 IBinder 对象,客户端就可以获取服务端提供的服务或者数据,这里的服务包括普通服务和基于AIDL的服务。
还有两点需要提到,第一点就是当客户端发起远程请求时,由于当前线程会被挂起直至服务端进程返回数据,所以如果一个远程方法是耗时的,那么不能在UI线程中发起此远程请求;其次,由于服务端的Binder方法运行在Binder的线程池中,所以Binder方法不管是否耗时都应该采用同步的方法去实现,因为他已经运行在一个线程中了。下图为Binder的工作机制图:
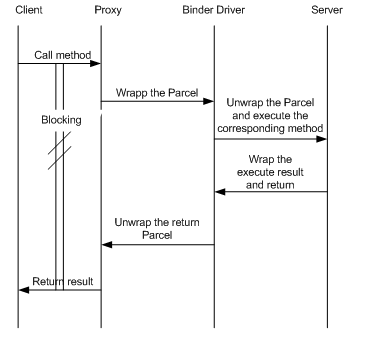
可以看到Client客户端会block直到方法返回,从图中我们可以看到 Binder 的调用中有四个角色:Client, Proxy, Binder Driver 和 Server ,他们的关系如下图所示:
这四者的关系类似于网络访问,
- Binder Client 只需要知道自己要使用的 Binder 的名字及其在 ServiceManager 中的引用即可获取该 Binder 的引用,得到引用后就可以像普通方法调用一样调用 Binder 实体的方法;
- Binder Server 在生成一个 IBinder 实体时会为其绑定一个名称并传递给 Binder Driver,Binder Driver 会在内核空间中创建相应的 Binder 实体节点和节点引用,并将引用传递给 ServiceManager。ServiceManager 会将该 Binder 的名字和引用插入一张数据表中,这样 Binder Client 就能够获取该 Binder 实体的引用,并调用上面的方法;
- ServiceManager 相当于 DNS服务器,负责映射 Binder 名称及其引用,其本质同样是一个标准的 Binder Server;
- Binder Driver 则相当于一个路由器。
ServiceManager 既然是一个标准的 Binder Server,那么它应该对外公布其可用的接口方法,这里你可以将它看作一个联想服务器,既然能让客户端访问,总得给客户端可访问的接口和数据吧,以博客 java/android 设计模式学习笔记(9)—代理模式 中的 ActivityManagerNative 为例来分析(强烈推荐看一下博客: Android 利用 ServiceHook 实现特殊功能,针对 hook ClipboardService 可以对 ServiceManager 的使用有更全面的了解),在 ActivityManagerNative 的 gDefault 对象中,有这样一行代码:
IBinder b = ServiceManager.getService("activity");通过 ServiceManager 去获取 AMS 的 IBinder 对象,ServiceManager 类的代码很简单:
public final class ServiceManager {
    private static final String TAG = "ServiceManager";

    private static IServiceManager sServiceManager;
    private static HashMap<String, IBinder> sCache = new HashMap<String, IBinder>();

    private static IServiceManager getIServiceManager() {
        if (sServiceManager != null) {
            return sServiceManager;
        }

        // Find the service manager
        sServiceManager = ServiceManagerNative.asInterface(BinderInternal.getContextObject());
        return sServiceManager;
    }

    /**
     * Returns a reference to a service with the given name.
     *
     * @param name the name of the service to get
     * @return a reference to the service, or <code>null</code> if the service doesn't exist
     */
    public static IBinder getService(String name) {
        try {
            IBinder service = sCache.get(name);
            if (service != null) {
                return service;
            } else {
                return getIServiceManager().getService(name);
            }
        } catch (RemoteException e) {
            Log.e(TAG, "error in getService", e);
        }
        return null;
    }

    public static void addService(String name, IBinder service) {
    ...
    }
    ....
}- 每次通过 ServiceManager 的 getService() 方法取得一个 SystemService 的引用,实际上只是通过 getIServiceManager() 取回一个 Proxy 对象,然后再调用这个 Proxy对象的 getService() 方法;
- getIServiceManager(),实际上在跨进程通信当中是返回一个 Proxy 对象,而这个 Proxy 其实是 ServiceManagerProxy ,访问到一个 ServiceManagerNative 对象。
public interface IServiceManager extends IInterface
{
    /**
     * Retrieve an existing service called @a name from the
     * service manager.  Blocks for a few seconds waiting for it to be
     * published if it does not already exist.
     */
    public IBinder getService(String name) throws RemoteException;

    /**
     * Retrieve an existing service called @a name from the
     * service manager.  Non-blocking.
     */
    public IBinder checkService(String name) throws RemoteException;

    /**
     * Place a new @a service called @a name into the service
     * manager.
     */
    public void addService(String name, IBinder service, boolean allowIsolated)
                throws RemoteException;

    /**
     * Return a list of all currently running services.
     */
    public String[] listServices() throws RemoteException;

    /**
     * Assign a permission controller to the service manager.  After set, this
     * interface is checked before any services are added.
     */
    public void setPermissionController(IPermissionController controller)
            throws RemoteException;

    static final String descriptor = "android.os.IServiceManager";

    int GET_SERVICE_TRANSACTION = IBinder.FIRST_CALL_TRANSACTION;
    int CHECK_SERVICE_TRANSACTION = IBinder.FIRST_CALL_TRANSACTION+1;
    int ADD_SERVICE_TRANSACTION = IBinder.FIRST_CALL_TRANSACTION+2;
    int LIST_SERVICES_TRANSACTION = IBinder.FIRST_CALL_TRANSACTION+3;
    int CHECK_SERVICES_TRANSACTION = IBinder.FIRST_CALL_TRANSACTION+4;
    int SET_PERMISSION_CONTROLLER_TRANSACTION = IBinder.FIRST_CALL_TRANSACTION+5;
}
它的具体实现类是 ServiceManagerNative 和 ServiceManagerProxy 类(和 ActivityManagerNative, ActivityManagerProxy 与 IActivityManager 的关系一样: java/android 设计模式学习笔记(9)—代理模式):
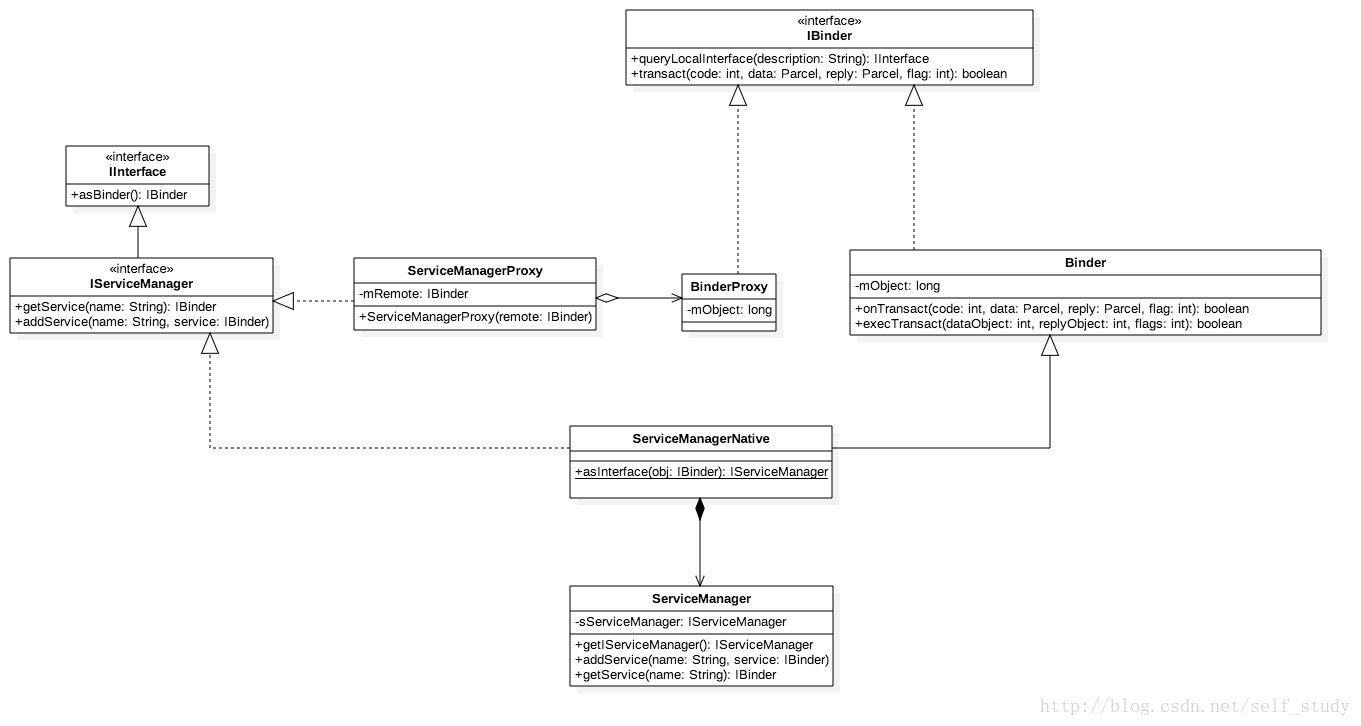
ServiceManagerNative 和 ServiceManagerProxy 类都属于 Binder Client 端, ServiceManager 和 Binder Driver 在 Android 平台中已经实现。这里要提到的一点是 ServiceManager 在 Java 和 Native 环境里各有其实现,但在 Java 端实际上只有 Proxy端,而 Native 环境里实现的 Servicemanager 才具有完整的 Proxy 与 Stub 实现,这也就是为什么 ServiceManagerNative 和 ServiceManagerProxy 相对于 ServiceManager 这个 BinderServer 角色来说都是属于 BinderClient 了。
继续来介绍一下上面提到的 Binder 对象与 IBinder 对象的区别,为什么上面不能说是 Binder 对象,因为 IBinder 有两个实现的子类,第一个是我们熟知的 Binder.class,第二个是 BindlerProxy.class,这两个都是继承自 IBinder 接口的(其实还有一个 ApplicationTest.NullBinder,这个子类什么都没实现,应该是使用 NullPattern 来进行相关的单元测试的类),上面我们提到的 Binder Client 通过 ServiceManager 获取到的 IBinder 对象其实是 BinderProxy 对象,我们来跟踪一下 ServiceManager 的 getService 方法,上面贴出的 ServiceManager 的源码中,我们主要看的是 getIServiceManager 函数:
private static IServiceManager getIServiceManager() {
    if (sServiceManager != null) {
        return sServiceManager;
    }

    // Find the service manager
    sServiceManager = ServiceManagerNative.asInterface(BinderInternal.getContextObject());
    return sServiceManager;
}
asInterface 函数的作用我在博客java/android 设计模式学习笔记(9)—代理模式中已经介绍到了,这里就不介绍了,简单来说,跨进程通信当中,asInterface 方法会将一个 IBinder 对象转换成 Proxy 对象,所以我们继续跟踪一下 BinderInternal.getContextObject() 这句话,看看这个 getContextObject 这个函数:
/**
 * Return the global "context object" of the system.  This is usually
 * an implementation of IServiceManager, which you can use to find
 * other services.
 */
public static final native IBinder getContextObject();
是一个 native 的函数,我们接着根据名字 android_os_BinderInternal_getContextObject 去全局搜索,最终实现是在 android_util_Binder.cpp 文件中,我们看一下这个函数:
static jobject android_os_BinderInternal_getContextObject(JNIEnv* env, jobject clazz)
{
    sp<IBinder> b = ProcessState::self()->getContextObject(NULL);
    return javaObjectForIBinder(env, b);
}
......
jobject javaObjectForIBinder(JNIEnv* env, const sp<IBinder>& val)
{
    if (val == NULL) return NULL;

    if (val->checkSubclass(&gBinderOffsets)) {
        // One of our own!
        jobject object = static_cast<JavaBBinder*>(val.get())->object();
        LOGDEATH("objectForBinder %p: it's our own %p!\n", val.get(), object);
        return object;
    }

    // For the rest of the function we will hold this lock, to serialize
    // looking/creation/destruction of Java proxies for native Binder proxies.
    AutoMutex _l(mProxyLock);

    // Someone else's...  do we know about it?
    jobject object = (jobject)val->findObject(&gBinderProxyOffsets);
    if (object != NULL) {
        jobject res = jniGetReferent(env, object);
        if (res != NULL) {
            ALOGV("objectForBinder %p: found existing %p!\n", val.get(), res);
            return res;
        }
        LOGDEATH("Proxy object %p of IBinder %p no longer in working set!!!", object, val.get());
        android_atomic_dec(&gNumProxyRefs);
        val->detachObject(&gBinderProxyOffsets);
        env->DeleteGlobalRef(object);
    }

    object = env->NewObject(gBinderProxyOffsets.mClass, gBinderProxyOffsets.mConstructor);
    if (object != NULL) {
        LOGDEATH("objectForBinder %p: created new proxy %p !\n", val.get(), object);
        // The proxy holds a reference to the native object.
        env->SetLongField(object, gBinderProxyOffsets.mObject, (jlong)val.get());
        val->incStrong((void*)javaObjectForIBinder);

        // The native object needs to hold a weak reference back to the
        // proxy, so we can retrieve the same proxy if it is still active.
        jobject refObject = env->NewGlobalRef(
                env->GetObjectField(object, gBinderProxyOffsets.mSelf));
        val->attachObject(&gBinderProxyOffsets, refObject,
                jnienv_to_javavm(env), proxy_cleanup);

        // Also remember the death recipients registered on this proxy
        sp<DeathRecipientList> drl = new DeathRecipientList;
        drl->incStrong((void*)javaObjectForIBinder);
        env->SetLongField(object, gBinderProxyOffsets.mOrgue, reinterpret_cast<jlong>(drl.get()));

        // Note that a new object reference has been created.
        android_atomic_inc(&gNumProxyRefs);
        incRefsCreated(env);
    }

    return object;
}
这个函数其实最后返回的是一个 BinderProxy 类的对象,通过 ServiceManager 获取到的仍然是 BinderProxy 对象,真正的 Binder 类其实是 Stub 根类的父类,这也就是为什么上面要说 IBinder 对象,而不是 Binder 对象。
Binder 的介绍就到此为止了,毕竟太复杂,需要更加详细了解 Binder 的可以看看老罗的文章:http://blog.csdn.net/luoshengyang/article/details/6642463
或者这篇博客也讲的很清楚:http://blog.csdn.net/21cnbao/article/details/8087304
AIDL
AIDL的全称是Android Interface definition language,一看就明白,它是一种android内部进程通信接口的描述语言,通过它我们可以定义进程间的通信接口,用处当然就是用来进程间的通信和方法调用了(我在IPC通信上篇中介绍过也可以使用Messenger加上反射机制来进行跨应用的方法调用,但是前提是让两个应用在一个进程中,局限性比AIDL大)。先介绍一下 AIDL 进程间通信的流程:
- AIDL接口的创建
- AIDL文件中,并不是所有的数据类型都是可以使用的,它支持的数据类型有:
- 基本数据类型(int,long,char,boolean,double等)
- String和CharSequence
- List:只支持ArrayList,而且list中的元素也必须是 AIDL 支持的类型
- Map:只支持HashMap,里面的key和value也必须是AIDL支持的类型
- Parceable:所有实现了 Parceable 接口的对象
- AIDL:所有的 AIDL 接口本身也可以在 AIDL 文件中使用,所以 IBinder 类型也是支持的。
- 服务端
- 服务端首先要创建一个 Service 用来监听客户端的请求,然后将在对应AIDL文件中声明的接口实现,并且通过onbind函数返回相应 IBinder 对象即可。
- 客户端
- 客户端所要做的事情就稍微简单一些,首先需要绑定服务端的Service,绑定成功后,将服务端返回的 IBinder 对象转成AIDL接口所属的类型,接着就可以调用AIDL中的方法了。
aidl文件
第一步创建几个相关的AIDL文件,特别需要注意的是在AS中,先要在app_name/src/main/文件夹下创建一个aidl文件夹,接下来在该文件夹下去创建相关的package用来放置这些AIDL文件,基本结构如下图所示:
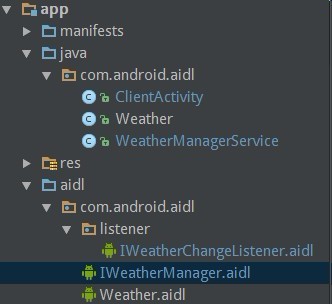
不这么做是无法使用的。接着我们就来仔细分析这几个AIDL文件:
// IWeatherManager.aidl
package com.android.aidl;
import com.android.aidl.Weather;
import com.android.aidl.listener.IWeatherChangeListener;

interface IWeatherManager {
    List<Weather> getWeather();
    void addWeather(in Weather weather);
    void addListener(in IWeatherChangeListener listener);
    void removeListener(in IWeatherChangeListener listener);
}
这个IWeatherManager.aidl文件是连接客户端和服务端的核心文件,我们可以看到这个aidl文件中需要引用两个类:Weather和IWeatherChangeListener,看看这两个aidl文件的代码:
//Weather.aidl
package com.android.aidl;
parcelable Weather;
// IWeatherChangeListener.aidl
package com.android.aidl.listener;
import com.android.aidl.Weather;
interface IWeatherChangeListener {
void onWeatherChange(in Weather newWeather);
} 详细介绍一下这几个文件的要点:第一点是如果AIDL文件中用到了自定义的Parcelable对象,那么必须新建一个和它同名的AIDL文件,并在其中声明它为Parcelable类型。在IWeatherManager.aidl文件中用到了Weather这个Parcelable类,所以我们必须要创建Weather.aidl文件,要不然只有一个Weather.java文件是无法识别的,并且非常重要的是Weather.aidl和Weather.java两个文件的包名必须要一致,比如demo中的都为com.android.aidl,不一致也会导致Weather类无法识别;第二点是AIDL中除了基本数据类型,其他类型的参数必须标上方向:in,out或者inout, in表示输入型参数,out表示输出型参数,inout表示输入输出型参数。我们要根据实际需要去指定参数类型,不能一概使用out或者inout,因为这在底层实现是有开销的;第三点是AIDL接口中只支持方法,不支持声明静态常量,这一点区别于传统的接口。
在这个demo中,我们仍然是在一个应用中创建两个进程进行通信,和在两个应用中的两个进程之间进行通信是很类似的,差异方面就以这个demo来说第一个需要在两个应用中的app_name/src/main/文件夹下都创建一个aidl文件夹,然后将三个aidl文件整体拷贝进来,当然要保证两个应用的package名字com.android.aidl一样;第二个还有Weather.java文件也必须在两个应用中的com.android.aidl(就是要和Weather.aidl的package名字一致)包下面,做到这两点就可以了。一个工程和两个工程的多进程本质是一样的,有兴趣的可以自己试试。
java文件
Parcelable实体类
我们来看看demo中Weather.java类的代码:
public class Weather implements Parcelable{
    public String cityName;
    public double temperature;
    public double humidity;
    public AllWeather weather;

    protected Weather(Parcel in) {
        temperature = in.readDouble();
        humidity = in.readDouble();
        //使用该方式来写入枚举
        weather = AllWeather.values()[in.readInt()];
        cityName = in.readString();
    }

    public Weather() {

    }

    public static final Creator<Weather> CREATOR = new Creator<Weather>() {
        @Override
        public Weather createFromParcel(Parcel in) {
            return new Weather(in);
        }

        @Override
        public Weather[] newArray(int size) {
            return new Weather[size];
        }
    };

    @Override
    public int describeContents() {
        return 0;
    }

    @Override
    public void writeToParcel(Parcel dest, int flags) {
        dest.writeDouble(temperature);
        dest.writeDouble(humidity);
        dest.writeInt(weather.ordinal());
        dest.writeString(cityName);
    }

    public enum AllWeather{
        sunny,cloudy,rain,snowy
    }
}
代码很简单,就是实现Parcelable接口即可,唯一的难点就是enum枚举在多客户端之间的处理了,处理方法就是使用ordinal()函数将枚举转换成int类型,通着这个int值,就可以找到枚举变量在枚举类中的位置,也就可以知道原始值了。
服务端
接着就是服务端的代码实现了:
public class WeatherManagerService extends Service{

    //支持并发读写的list
    public CopyOnWriteArrayList<Weather> weathers = new CopyOnWriteArrayList<>();
    public RemoteCallbackList<IWeatherChangeListener> listeners = new RemoteCallbackList<>();

    @Override
    public void onCreate() {
        super.onCreate();
        Weather nanshan = new Weather();
        nanshan.cityName = "南山";
        nanshan.temperature = 20.5;
        nanshan.humidity = 45;
        nanshan.weather = Weather.AllWeather.cloudy;

        Weather futian = new Weather();
        futian.cityName = "福田";
        futian.temperature = 21.5;
        futian.humidity = 48;
        futian.weather = Weather.AllWeather.rain;

        weathers.add(nanshan);
        weathers.add(futian);
    }

    private Binder mBinder = new IWeatherManager.Stub() {
        @Override
        public List<Weather> getWeather() throws RemoteException {
            L.i("server returns all of the weathers");
            return weathers;
        }

        @Override
        public void addWeather(Weather weather) throws RemoteException {
            weathers.add(weather);
            L.i("server add new Weather:" + weather.cityName);

            int N = listeners.beginBroadcast();
            for (int i=0; i<N; i++){
                IWeatherChangeListener listener = listeners.getBroadcastItem(i);
                listener.onWeatherChange(weather);
            }
            L.i("server notify the listener that weathers have been changed");
            listeners.finishBroadcast();
        }

        @Override
        public void addListener(IWeatherChangeListener listener) throws RemoteException {
            L.i("server adding listener");
            listeners.register(listener);
        }

        @Override
        public void removeListener(IWeatherChangeListener listener) throws RemoteException {
            L.i("server removing listener");
            listeners.unregister(listener);
        }

        @Override
        public boolean onTransact(int code, Parcel data, Parcel reply, int flags) throws RemoteException {
            int permission = checkCallingPermission("com.android.permission.WRITEWEATHERPERMISSION");
            //检测客户端是否声明权限
            if (permission == PackageManager.PERMISSION_DENIED){
                L.e("permission denied");
                return false;
            }
            L.i("permission granted");

            String[] packages = getPackageManager().getPackagesForUid(getCallingUid());
            if (packages != null && packages.length > 0){
                String packageName = packages[0];
                if (!packageName.startsWith("com.android")){
                    L.e("package name not accept");
                    return false;
                }
                L.i("package name accept");
            }
            return super.onTransact(code, data, reply, flags);
        }
    };

    @Override
    public IBinder onBind(Intent intent) {
//        int permission = checkCallingPermission("com.android.permission.WRITEWEATHERPERMISSION");
//        //检测客户端是否声明权限
//        if (permission == PackageManager.PERMISSION_DENIED){
//            L.e("permission denied");
//            return null;
//        }
        return mBinder;
    }
}
服务端的实现比较复杂,我们一步步来分析:
- 服务端当然是个 Service,在该 Service 中我们需要新建一个 IBinder 对象,这个 IBinder 对象是一个由 IWeatherManager.aidl 生成的 IWeatherManager 接口中的内部 Stub 类的对象,该对象需要实现 4 个接口中的方法。然后在 onBind 函数返回这个 IBinder 对象即可。
- 为了支持多进程的并发读写,我们需要使用CopyOnWriteArrayList而不是普通list,类似的还有ConcurrentHashMap。
- 如果需要为这个Service增加访问的权限,有三个方法来实现:
- 先使用permission标签定义一个permission(详情看博客 android permission权限与安全机制解析(上)),然后在manifest文件中的服务端 service 标签中添加 android:permission=”yourPermissionName” 即可。
- 同样的先声明一个permission,接着在Service的onBind函数中,通过 checkCallingPermission 函数检测调用者是否使用了该声明的权限,如果没有就直接返回null。
- 在onTransact函数中进行检测,和onBind中的检测一样,不通过返回 false,而且在该函数中还可以检测调用者的 package name,在 demo 中如果调用者应用的包名不是以com.android开头,就会拒绝访问。简单介绍一下onTransact函数,该函数运行在服务端中的 Binder 线程池中,当客户端发起跨进程请求时,远程请求会通过系统底层封装后交由此方法来处理,如果此方法返回false,那么客户端的请求会失败,所以在这个方法中检测权限也是可以的。
- 如何为服务端添加监听器?我们知道客户端的listener对象经过parcelable之后到服务端的对象并不是同一个对象,所以如果客户端想要解注册一个listener,调用服务端removeListener函数并传入一个listener参数,但是这个listener对象经过parcelable之后并不是原来的那个对象,服务端无法处理,所以为了应对这种情况,系统专门提供了用于跨进程删除listener的接口RemoteCallbackList。RemoteCallbackList是一个泛型,因为继承自IInterface接口,所以支持管理任意的AIDL接口。为什么RemoteCallbackList类就可以识别parcelable之后的对象呢?先来看看RemoteCallbackList的实现,在它的内部有一个Map结构专门用来保存所有的AIDL回调,这个 Map 的 key 是 IBinder 类型,value是Callback类型:
ArrayMap<IBinder, Callback> mCallbacks = new ArrayMap<IBinder, Callback>()其中Callback中封装了真正的远程listener。当客户端注册listener的时候,他会把这个listener的信息存入mCallbacks中,其中的key和value分别通过下面的方式获得:
IBinder binder = callback.asBinder();Callback cb = new Callback(callback, cookie);虽然说多次跨进程传输客户端的同一个对象在服务端生成不同的对象,但是这些新生成的对象有一个共同点,那就是它们底层的 IBinder 对象是同一个,所以使用RemoteCallbackList就能够成功的删除指定listener。
客户端
看看客户端的代码:
public class ClientActivity extends BaseActivity implements View.OnClickListener{

    private ServiceConnection serviceConnection = null;
    private IBinder.DeathRecipient deathRecipient = null;
    private IWeatherChangeListener listener = null;
    private IWeatherManager weatherManager;
    private TextView tv_content;
    private TextView tv_add;

    @Override
    protected void onCreate(Bundle savedInstanceState) {
        super.onCreate(savedInstanceState);
        setContentView(R.layout.activity_client);
        findViewById(R.id.btn_add).setOnClickListener(this);
        findViewById(R.id.btn_query).setOnClickListener(this);
        findViewById(R.id.btn_remove_listener).setOnClickListener(this);
        tv_content = (TextView) findViewById(R.id.tv_content);
        tv_add = (TextView) findViewById(R.id.tv_add);
        listener = new IWeatherChangeListener.Stub(){

            @Override
            public void onWeatherChange(Weather newWeather) throws RemoteException {
                L.i("client has been notified that "+newWeather.cityName+" has been added");
                tv_add.setText(newWeather.cityName + "has been added");
            }
        };
        serviceConnection = new ServiceConnection() {
            @Override
            public void onServiceConnected(ComponentName name, IBinder service) {
                weatherManager = IWeatherManager.Stub.asInterface(service);
                try {
                    weatherManager.asBinder().linkToDeath(deathRecipient, 0);
                    weatherManager.addListener(listener);
                } catch (RemoteException e) {
                    e.printStackTrace();
                }
            }

            @Override
            public void onServiceDisconnected(ComponentName name) {
                weatherManager = null;
            }
        };

        deathRecipient = new IBinder.DeathRecipient() {
            @Override
            public void binderDied() {
                //移出之前的死亡容器
                weatherManager.asBinder().unlinkToDeath(deathRecipient, 0);
                weatherManager = null;

                //重新连接
                bindServer();
            }
        };
        bindServer();
    }

    private void bindServer(){
        Intent intent = new Intent(this, WeatherManagerService.class);
        bindService(intent, serviceConnection, Context.BIND_AUTO_CREATE);
    }

    @Override
    public void onClick(View v) {
        if (v.getId() == R.id.btn_query){
            try {
                //调用远程服务端接口时,客户端进程会挂起,勿在主线程中调用耗时远程操作
                L.i("client is getting weather");
                List<Weather> weathers = weatherManager.getWeather();
                L.i("client has gotten weather");
                StringBuilder sb = new StringBuilder();
                for (Weather weather : weathers){
                    sb.append(weather.cityName).append("\n");
                    sb.append("humidity:").append(weather.humidity)
                        .append("temperature").append(weather.temperature)
                        .append("weather").append(weather.weather).append("\n");
                }
                tv_content.setText(sb);
            } catch (RemoteException e) {
                e.printStackTrace();
            }
        }else if (v.getId() == R.id.btn_add){
            Weather weather = new Weather();
            weather.weather = Weather.AllWeather.cloudy;
            weather.humidity = 25.5;
            weather.temperature = 19.5;
            weather.cityName = "罗湖";
            try {
                //调用远程服务端接口时,客户端进程会挂起,勿在主线程中调用耗时远程操作
                L.i("client is adding weather " + weather.cityName);
                weatherManager.addWeather(weather);
                L.i("client has added weather " + weather.cityName);
            } catch (RemoteException e) {
                e.printStackTrace();
            }
        }else if (v.getId() == R.id.btn_remove_listener){
            try {
                weatherManager.removeListener(listener);
            } catch (RemoteException e) {
                e.printStackTrace();
            }
        }
    }

    @Override
    protected void onDestroy() {
        super.onDestroy();
        unbindService(serviceConnection);
        try {
            weatherManager.asBinder().linkToDeath(deathRecipient, 0);
        } catch (RemoteException e) {
            e.printStackTrace();
        }
    }
客户端逻辑很简单,bindService绑定服务端之后,将服务端传过来的 IBinder 对象通过 asInterface 方法转换成 AIDL 接口,然后就能通过这个接口去调用服务端的远程方法了。而且在客户端还能够注册死亡代理,新建一个 DeathRecipient 对象,并且使用Binder的linkToDeath注册该对象,当 Binder 死亡时,我们就会收到通知,unlinkToDeath 函数可以解注册该死亡代理。
还有非常重要的几点需要说明:客户端调用服务端方法,被调用的方法运行在服务端的 Binder 线程池中,同时客户端线程会被挂起,这个时候如果服务端方法执行比较耗时,就会导致客户端线程长时间阻塞,而如果这个客户端线程是UI线程的话,就会导致客户端 ANR ,所以如果知道服务端的一个方法是耗时的,就要避免在客户端的UI线程中去调用该远程方法。由于 onServiceConnected 和 onServiceDisconnected 方法都运行在 UI 线程中,所以也不可以在这两个函数中调用耗时方法。另外,由于服务端的方法本身就运行在服务端的 Binder 线程池中,所以服务端方法可以执行大量的耗时操作,这个时候切记不要在服务端方法中开线程去进行异步任务,除非你明确知道自己在干什么,否则不建议这么做。但是有一种方法可以发起非阻塞式的远程调用,Messager 就是采用的非阻塞式的方式通讯,其关键就在于 IMessager.aidl 的实现:
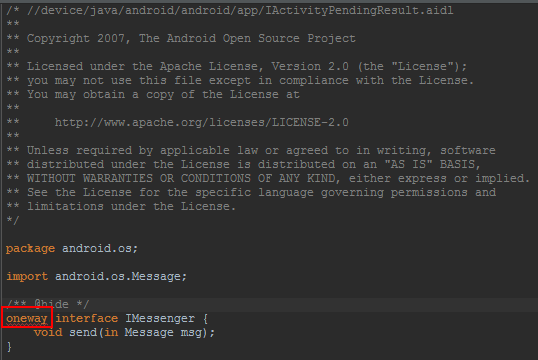
相比平常自定义的 aidl,多了 oneway 的关键字,声明和不声明 oneway 关键字的在于生成 Java 类中一个参数:
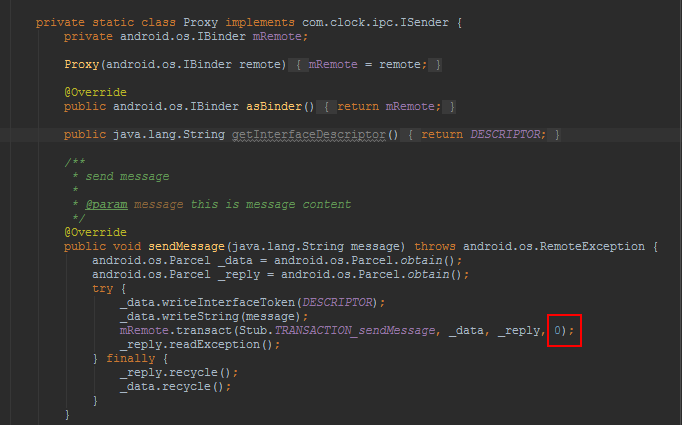
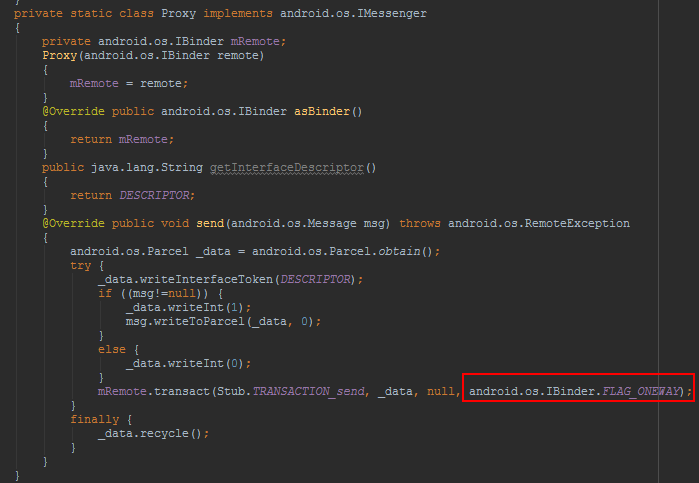
不声明 oneway 时,mRemote.transact 传入的最后一个参数是 0;声明 oneway 时,mRemote.transact 传入的最后一个参数是 android.os.IBinder.FLAG_ONEWAY 。
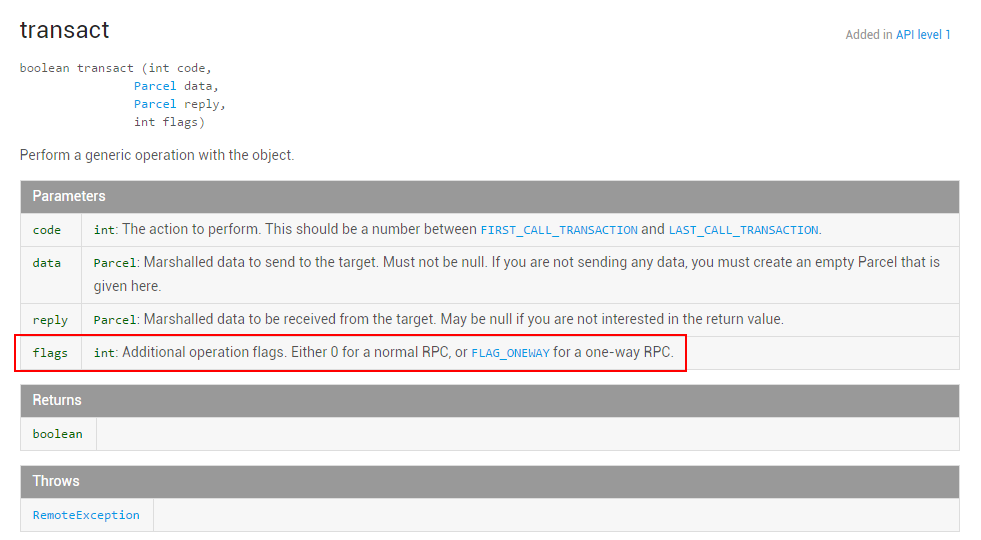

查看 API 文档即可以看到 FLAG_ONEWAY 的作用就是让客户端能够非阻塞的调用远程方法,至此真相大白,如果我们自定义的 aidl 也想实现非阻塞的调用,只需声明 oneway 关键字即可。
关于服务端和客户端的方法分别执行在那个进程和线程中以及它们执行的先后顺序,我们先来看看log日志的输出:
I/[PID:28533](28533): [TID:7035] 1.onTransact(line:90): permission granted
I/[PID:28533](28533): [TID:7035] 1.onTransact(line:99): package name accept
I/[PID:28533](28533): [TID:7035] 1.addListener(line:72): server adding listener

//***client add click
I/[PID:28502](28502): [TID:1] ClientActivity.onClick(line:115): client is adding weather 罗湖
I/[PID:28533](28533): [TID:7036] 1.onTransact(line:90): permission granted
I/[PID:28533](28533): [TID:7036] 1.onTransact(line:99): package name accept
I/[PID:28533](28533): [TID:7036] 1.addWeather(line:59): server add new Weather:罗湖
I/[PID:28502](28502): [TID:1] 1.onWeatherChange(line:47): client has been notified that 罗湖 has been added
I/[PID:28533](28533): [TID:7036] 1.addWeather(line:66): server has notified the listener that weathers have been changed
I/[PID:28502](28502): [TID:1] ClientActivity.onClick(line:117): client has added weather 罗湖

//***client remove listener click
I/[PID:28533](28533): [TID:7035] 1.onTransact(line:90): permission granted
I/[PID:28533](28533): [TID:7035] 1.onTransact(line:99): package name accept
I/[PID:28533](28533): [TID:7035] 1.removeListener(line:78): server removing listener

//***client get click
I/[PID:28502](28502): [TID:1] ClientActivity.onClick(line:93): client is getting weather
I/[PID:28533](28533): [TID:7036] 1.onTransact(line:90): permission granted
I/[PID:28533](28533): [TID:7036] 1.onTransact(line:99): package name accept
I/[PID:28533](28533): [TID:7036] 1.getWeather(line:52): server returns all of the weathers
I/[PID:28502](28502): [TID:1] ClientActivity.onClick(line:95): client has gotten weather
PID:28502为客户端进程,PID:28533为服务端进程,TID:1为UI主线程,TID:7036为 Binder 线程。看看log打印的顺序基本就能够明白方法的执行进程,线程和客户端的阻塞情况了。
源码下载:https://github.com/zhaozepeng/IPC-demo/tree/master/AIDL
BinderPool
上面差不多就把AIDL的用法详细介绍完了,但是有的时候我们可能需要不止一个业务模块,也就是不单单需要一个天气模块,我们还需要一个计算温度平均值的模块(虽然可以写在一个模块中,但是我们还是假设要用两个模块吧~),是不是需要为每个模块都单独建立一个Service呢?当然不是,会很耗资源的好吗,解决方法就是先为每一个模块建立一个单独的aidl文件,最后再建立一个整体的aidl文件用来管理这些单独的aidl。
看看这三个文件,IWeatherManager.aidl,IComputerManager.aidl和IBinderPoolManager.aidl:
// IWeatherManager.aidl
package com.android.binderpool;
import com.android.binderpool.Weather;

interface IWeatherManager {
    List<Weather> getWeather();
    void addWeather(in Weather weather);
}
// IComputerManager.aidl
package com.android.binderpool;
import com.android.binderpool.Weather;
interface IComputerManager {
double computeAverageTemperature(in List<Weather> weathers);
}// IBinderPoolManager.aidl
package com.android.binderpool;
interface IBinderPoolManager {
IBinder queryCode(int code);
}IBinderPoolManager.aidl文件用来统一管理所有的AIDL接口,queryCode函数通过code值来确定需要返回给客户端的IBinder对象。
来看看服务端的代码的变动:
public class BinderPoolService extends Service{
    public static final int CODE_WEATHER = 1;
    public static final int CODE_COMPUTER = 2;

    private IBinderPoolManager iBinderPoolManager;

    //支持并发读写的list
    public CopyOnWriteArrayList<Weather> weathers = new CopyOnWriteArrayList<>();

    @Override
    public void onCreate() {
        super.onCreate();
        Weather nanshan = new Weather();
        nanshan.cityName = "南山";
        nanshan.temperature = 20.5;
        nanshan.humidity = 45;
        nanshan.weather = Weather.AllWeather.cloudy;

        Weather futian = new Weather();
        futian.cityName = "福田";
        futian.temperature = 21.5;
        futian.humidity = 48;
        futian.weather = Weather.AllWeather.rain;

        weathers.add(nanshan);
        weathers.add(futian);
        iBinderPoolManager = new IBinderPoolManager.Stub(){
            @Override
            public IBinder queryCode(int code) throws RemoteException {
                switch (code){
                    case CODE_WEATHER:
                        return new IWeatherManager.Stub(){

                            @Override
                            public List<Weather> getWeather() throws RemoteException {
                                return weathers;
                            }

                            @Override
                            public void addWeather(Weather weather) throws RemoteException {
                                weathers.add(weather);
                            }
                        };
                    case CODE_COMPUTER:
                        return new IComputerManager.Stub() {
                            @Override
                            public double computeAverageTemperature(List<Weather> weathers) throws RemoteException {
                                double sum = 0;
                                for (int i=0; i<weathers.size(); i++){
                                    sum += weathers.get(i).temperature;
                                }
                                return sum/weathers.size();
                            }
                        };
                    default:
                        return null;
                }
            }
        };
    }

    @Override
    public IBinder onBind(Intent intent) {
        return iBinderPoolManager.asBinder();
    }
}
根据code的不同返回不同的 IBinder 对象,这样在客户端中就能够获取对应 AIDL 接口的 IBinder 对象,最终就能在客户端调用不同 AIDL 模块中的方法。客户端代码很简单,在这里就不介绍了,感兴趣的可以去看看源码:
https://github.com/zhaozepeng/IPC-demo/tree/master/BinderPool
关于IPC相关知识的介绍就到这了,如果有什么疑问,大家可以多多交流啊,谢谢~


 1483
1483

 被折叠的 条评论
为什么被折叠?
被折叠的 条评论
为什么被折叠?
 到【灌水乐园】发言


