一、安装setup项目环境:Visual Studio Installer项目扩展
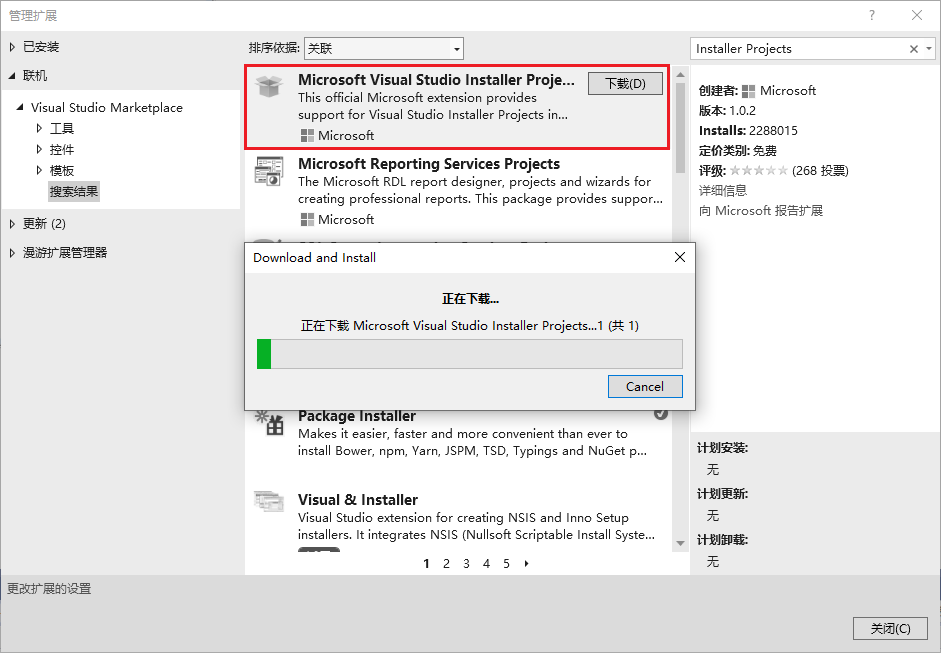
打开Visual Studio 2019,工具 --> 扩展和更新 --> 联机 --> 搜索 --> Microsoft Visual Studio Installer Projects -->下载
![](https://img-blog.csdnimg.cn/img_convert/2dd7caf8b2227311f8a5e133efd2bfdd.png)
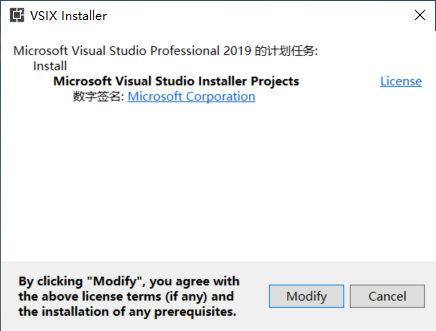
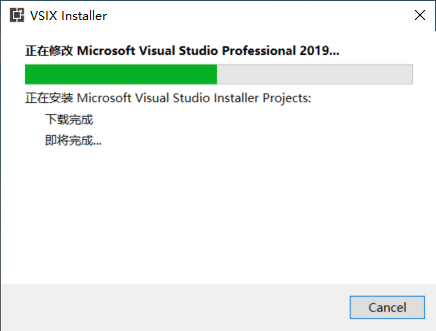
关闭Microsoft Visual Studio,弹出VSIX Installer窗口中,点击“修改”或“Modify”后进行安装
注意:这里Microsoft Visual Studio若还在运行,则会提示关掉后才可以修改(若找不到对应的,在进程管理器中对应的进程ID kill杀掉即可)。
![](https://img-blog.csdnimg.cn/img_convert/57e303f20f50c3380fed590bbe7d4443.png)
![](https://img-blog.csdnimg.cn/img_convert/7faa06e7455cca5534abe61394778509.png)
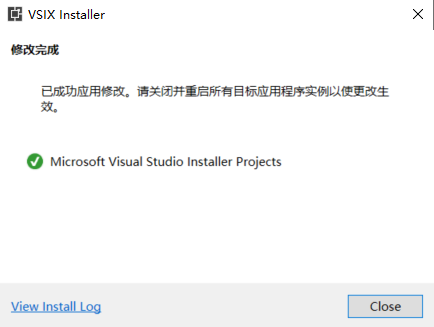
安装完成,点击“关闭”或“Close”即可。
![](https://img-blog.csdnimg.cn/img_convert/b58a25893d689370ca1345fdabbbc32e.png)
二、打包安装程序和卸载程序
2.1安装程序
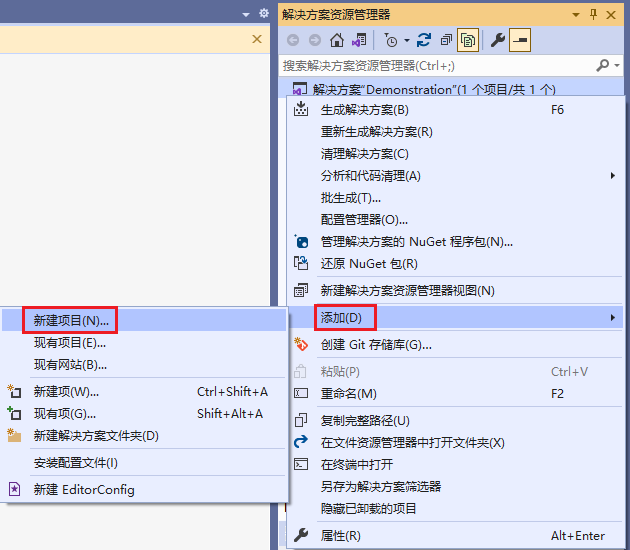
点击“解决方案”,右键“添加”,点击“新建项目”
![](https://img-blog.csdnimg.cn/img_convert/9930ce7b6bcc8b8d83bd54e247b66458.png)
索引关键词“setup”,选择“Setup Project”,点击“下一步”
![](https://img-blog.csdnimg.cn/img_convert/1d84f447fe24e35af37b72de47c6303c.png)
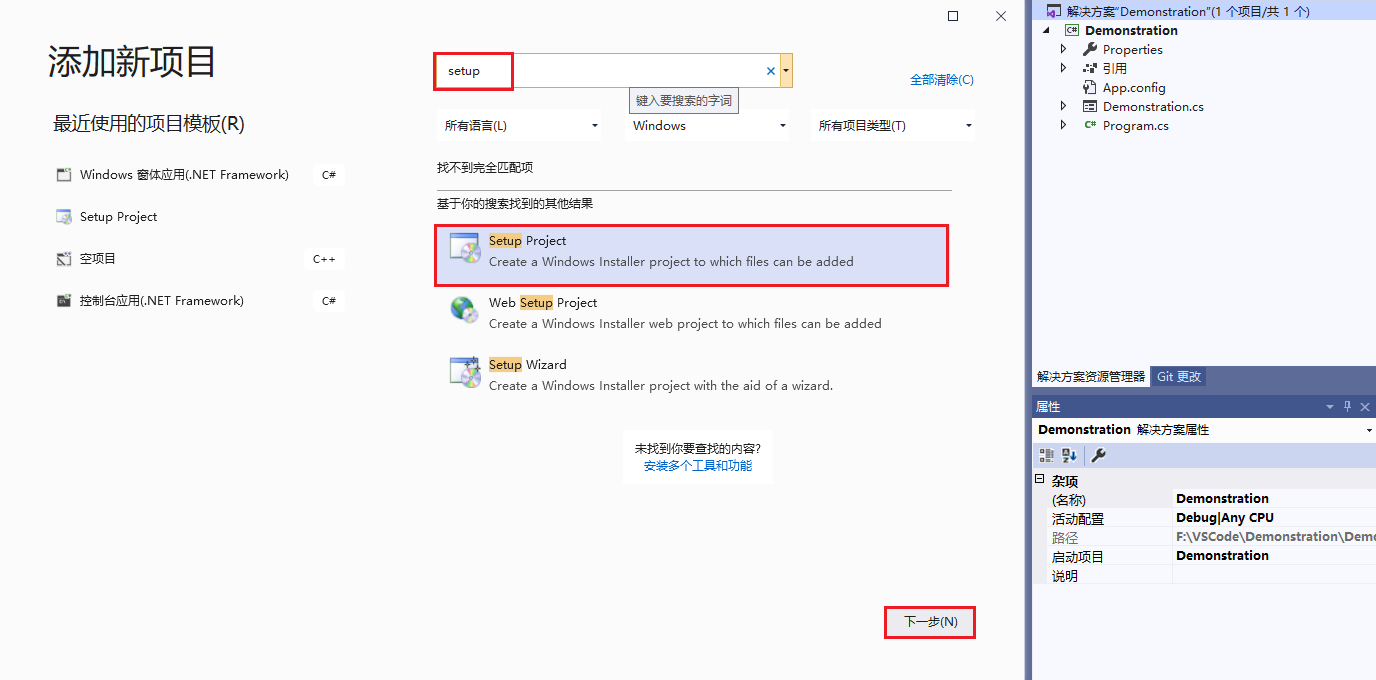
填写项目名称,修改位置,点击“创建”(本文主程序名“Demonstration”,打包安装程序名“Demonstration_Setup”)
![](https://img-blog.csdnimg.cn/img_convert/8c32cf5defc2f6bbc947a896f883fc64.png)
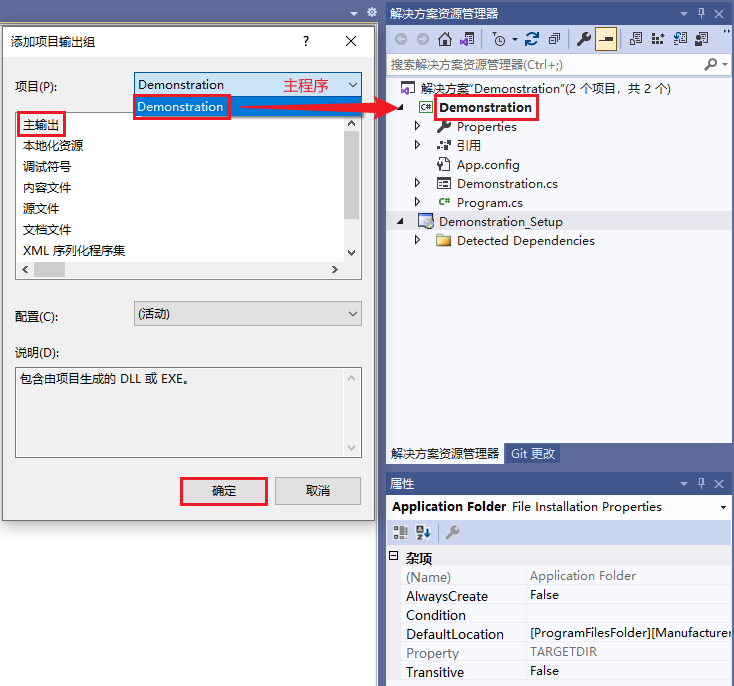
解决方案管理器中,选择打包安装程序,选中“Application Folder”文件夹-->“Add”-->“项目输出”
![](https://img-blog.csdnimg.cn/img_convert/8614d6585ef423b5ef73349766922069.png)
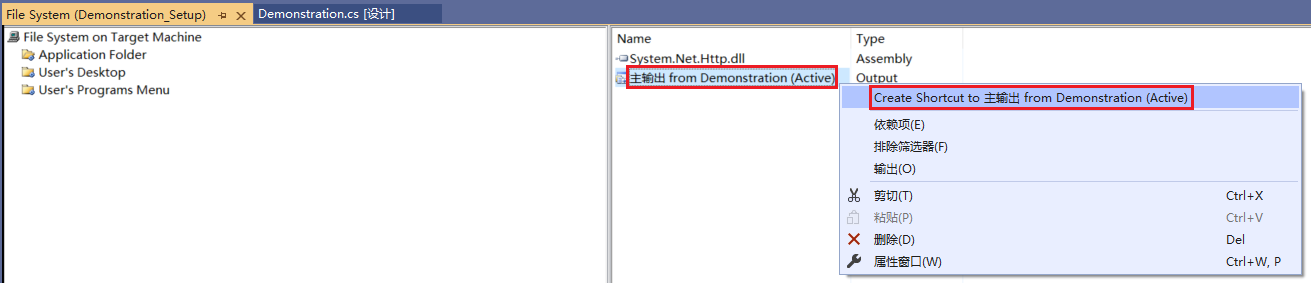
添加项目输出组中项目选择主程序,选中“主输出”,点击确定
![](https://img-blog.csdnimg.cn/img_convert/a694b6eff0bd9fe2f09dde3319078b85.png)
右键选中项目主输出,选择“Create Shortcut to form 主程序名(Active)”创建项目主程序输出快捷方式(个人理解为程序的快捷方式,并在后续文中以某某程序的快捷方式表达)
![](https://img-blog.csdnimg.cn/img_convert/50c48b1e92e9048fdfd3facaf8cf5ab4.png)
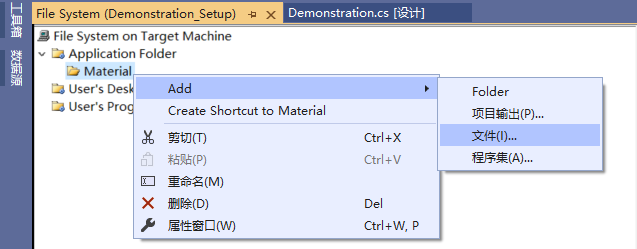
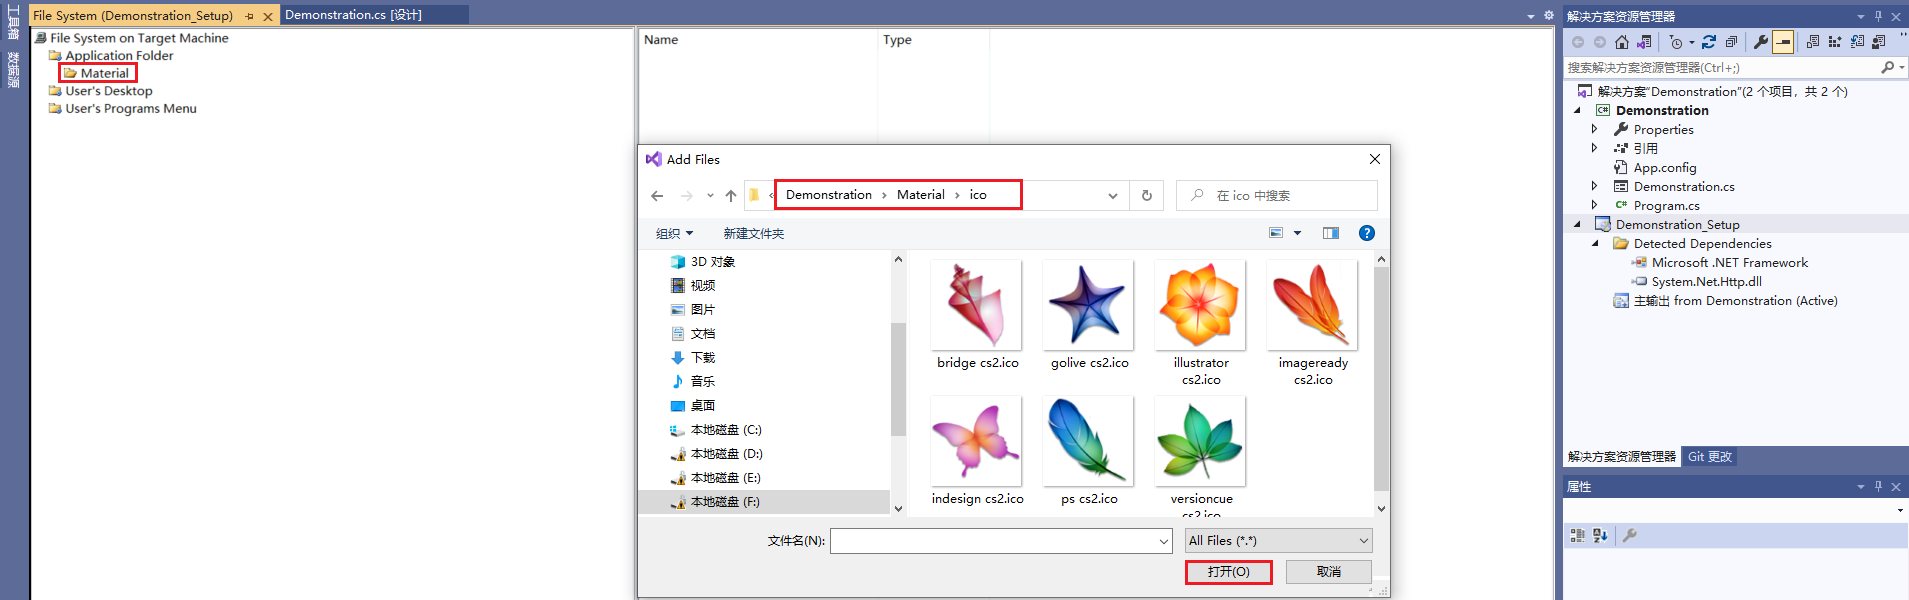
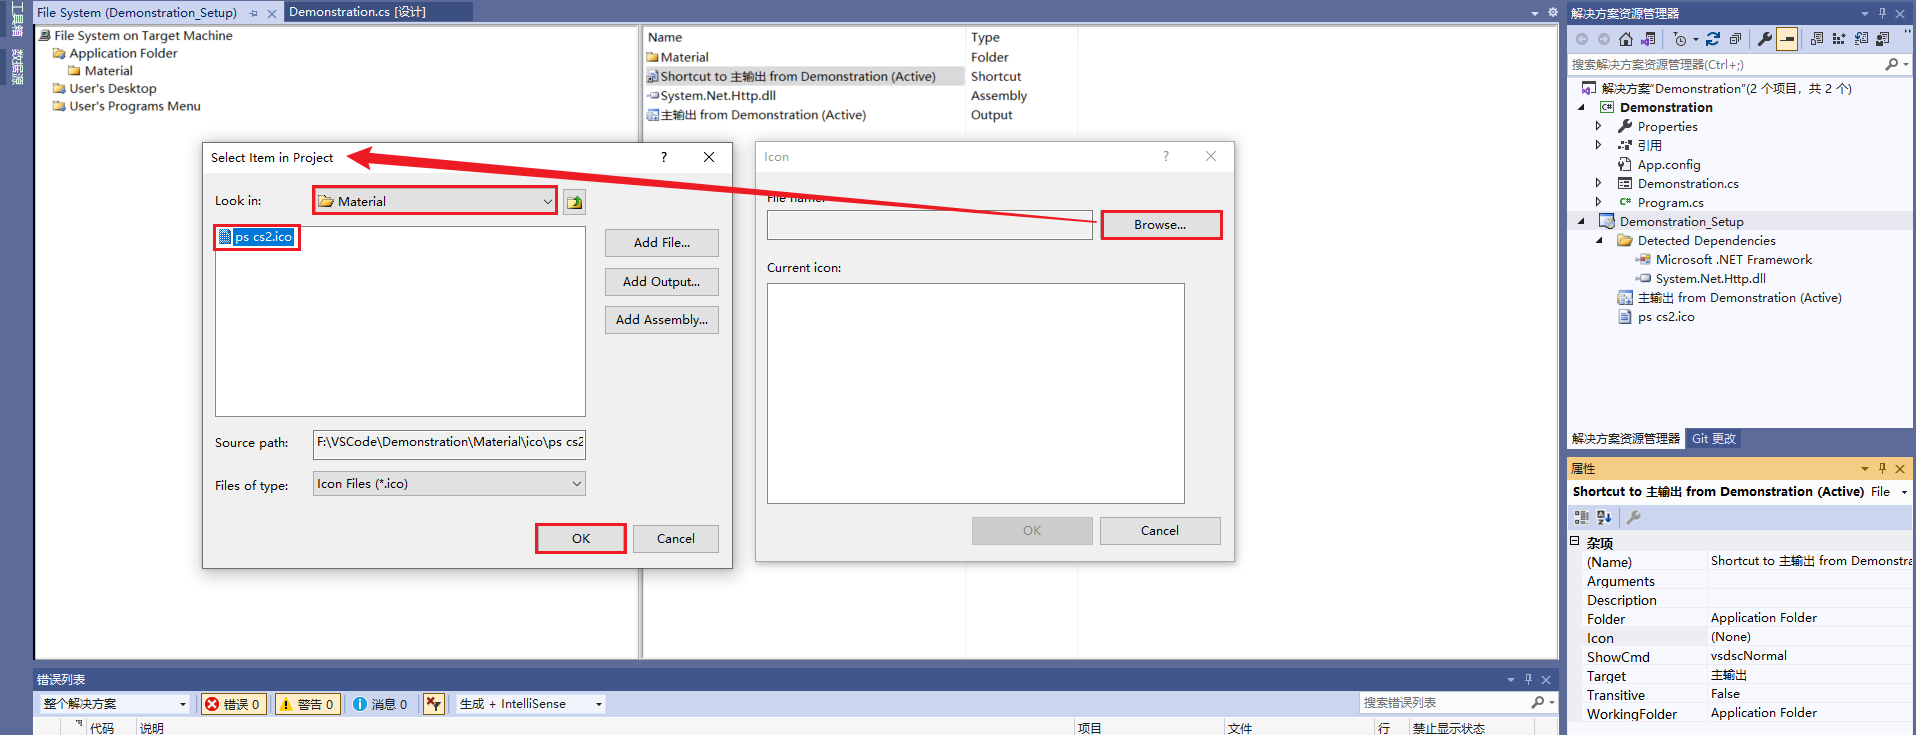
添加程序图标ico文件(本文在“Application Folder”文件夹创建Material文件夹)
![](https://img-blog.csdnimg.cn/img_convert/e96a9f52f8643ae4b9e0688de0049bb1.png)
![](https://img-blog.csdnimg.cn/img_convert/c672d76ca014f592dd68c3ee322e603a.png)
![](https://img-blog.csdnimg.cn/img_convert/8b4b9cd33200bf0ec0b2076284c2f6f1.png)
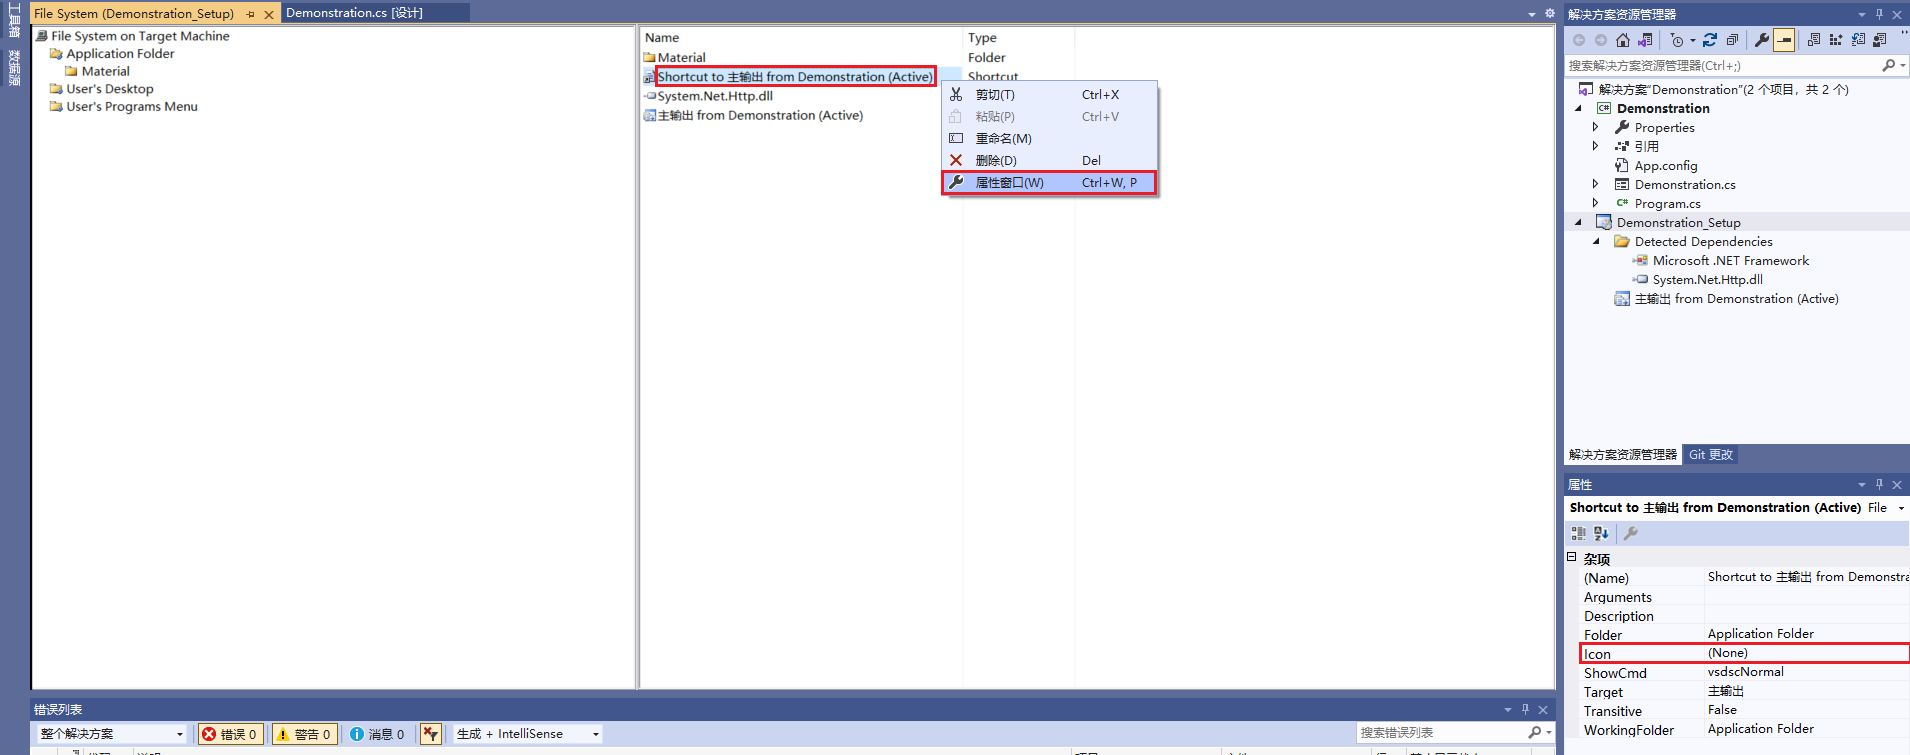
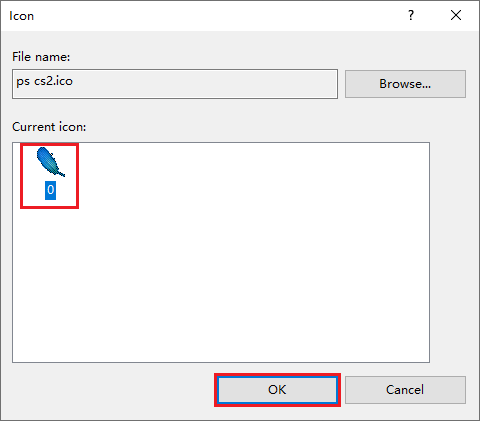
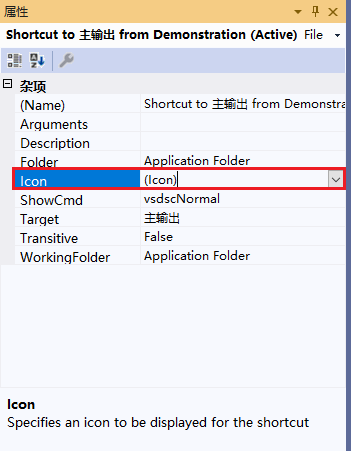
右键选中主程序的快捷方式,点击“属性窗口”,并在右下角属性栏“Icon”选择“(Browse...)”中添加程序图标
![](https://img-blog.csdnimg.cn/img_convert/11bba02022e6b3b7134aa3057e1fffee.png)
![](https://img-blog.csdnimg.cn/img_convert/9b8a12a4cbb5deb3ace9d6944681b00c.png)
![](https://img-blog.csdnimg.cn/img_convert/42b529ef54f4d27f1d6b5ea027ed1a9d.png)
![](https://img-blog.csdnimg.cn/img_convert/31c062c93ebf318c8afd784e79afabee.png)
![](https://img-blog.csdnimg.cn/img_convert/e5398fadf5ccd7e347e1fd330f010720.png)
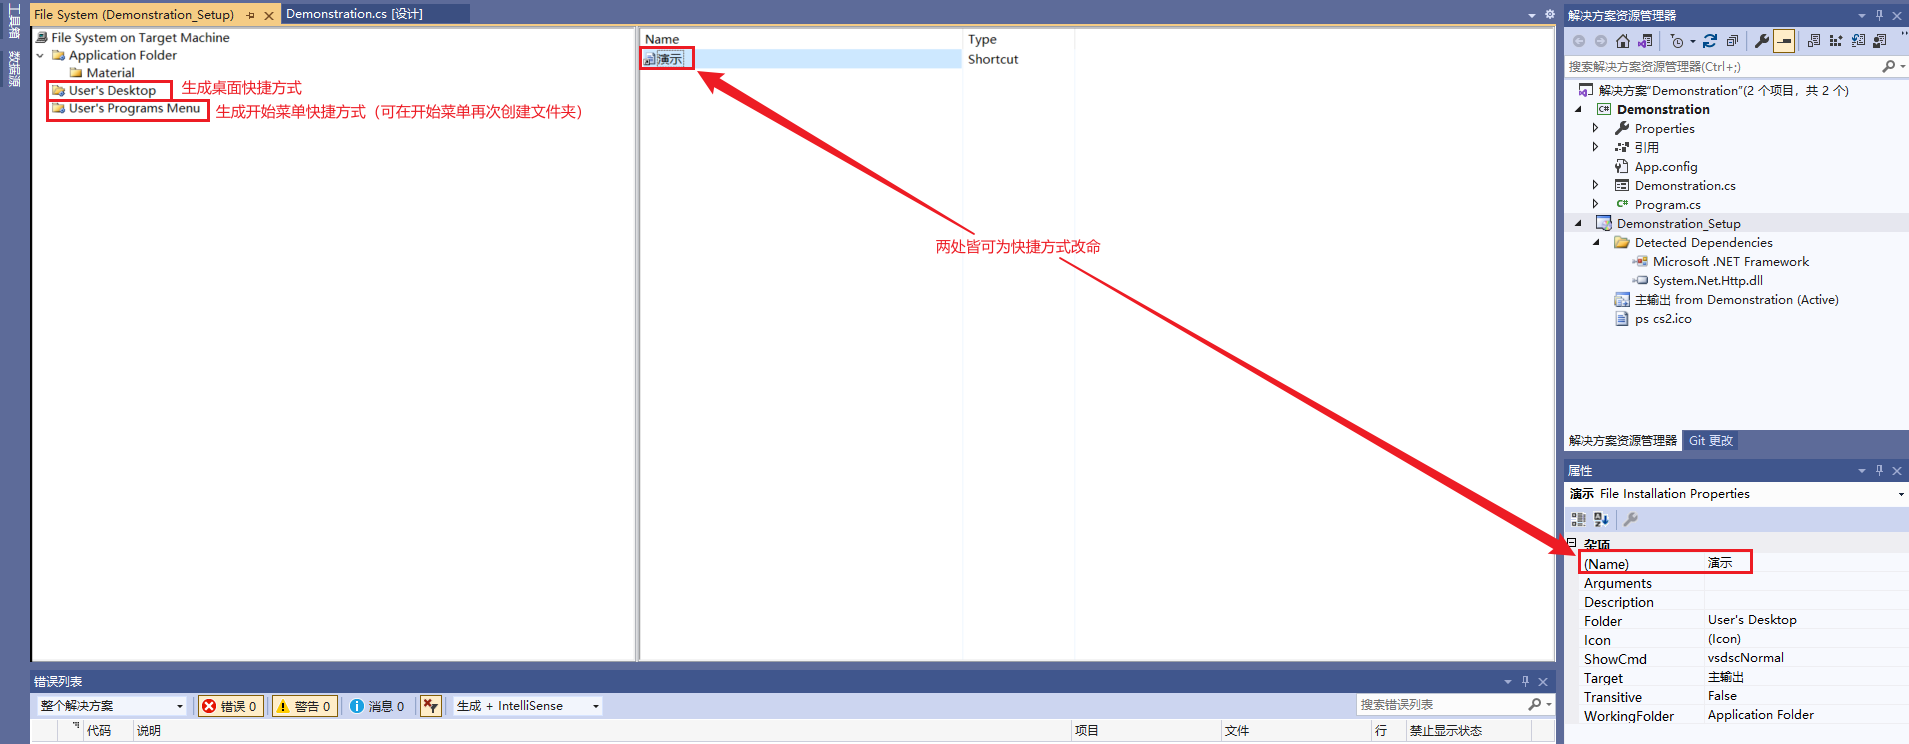
复制主程序快捷方式到“User's Desktop”文件夹和“User's Programs Menu”文件夹,生成桌面快捷方式和开始菜单快捷方式(可根据自己喜好创建文件夹和改名,本文以“演示”为名,一般在“User's Programs Menu”目录新建一个文件夹放置安装程序和卸载程序)。
![](https://img-blog.csdnimg.cn/img_convert/da9af9dd28e95cf903ea31e22ffc8b37.png)
2.2卸载程序
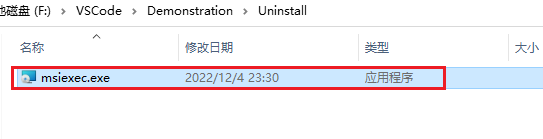
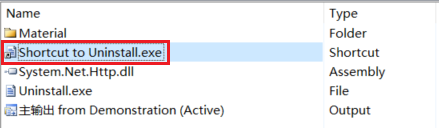
在"C:\WINDOWS\system32"路径下,找到“msiexec.exe”添加到应用程序文件夹中(本文将“msiexec.exe”放置名为“Uninstall”的文件夹中)
![](https://img-blog.csdnimg.cn/img_convert/6cdfe7b516bc7e8db5c480ee0313a2c1.png)
![](https://img-blog.csdnimg.cn/img_convert/ec8a0f03a9dad7cd307d079f155510bb.png)
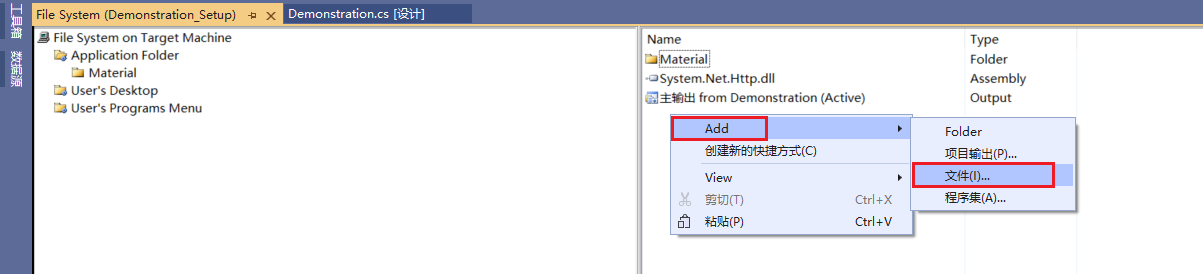
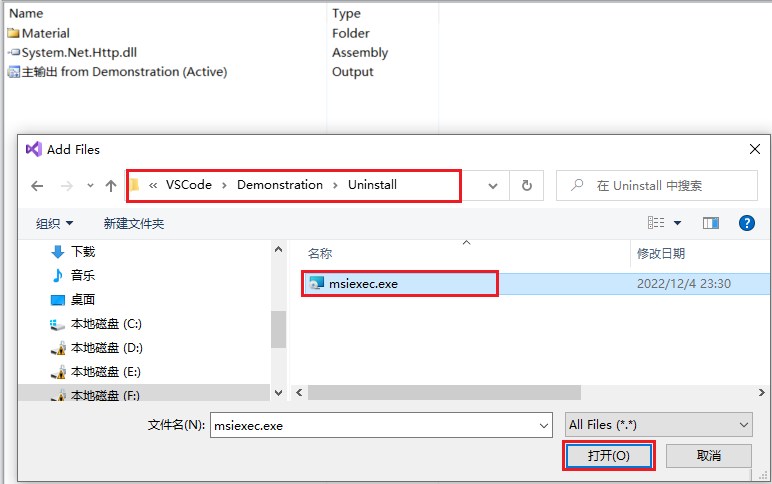
将“msiexec.exe”添加到Setup工程的“Application Folder”文件夹中,右键“Add”-->“文件”-->选择“msiexec.exe”-->点击“打开”
![](https://img-blog.csdnimg.cn/img_convert/68f36823b928bc4b8108226fda8b8653.png)
![](https://img-blog.csdnimg.cn/img_convert/63ddaab6612f27d1763d9499b7764991.png)
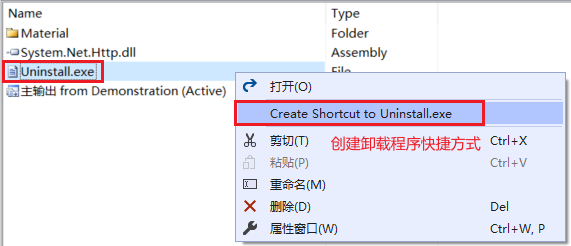
“Application Folder”文件夹中“msiexec.exe”重命名为"卸载.exe"或"Uninstall.exe"(注意:此步骤根据自己喜好或程序计划来进行操作,不过本文后续使用“Uninstall.exe”命名来取代“msiexec.exe”)
![](https://img-blog.csdnimg.cn/img_convert/3c8ab0d52578a6f3160e4f28ad70d21d.png)
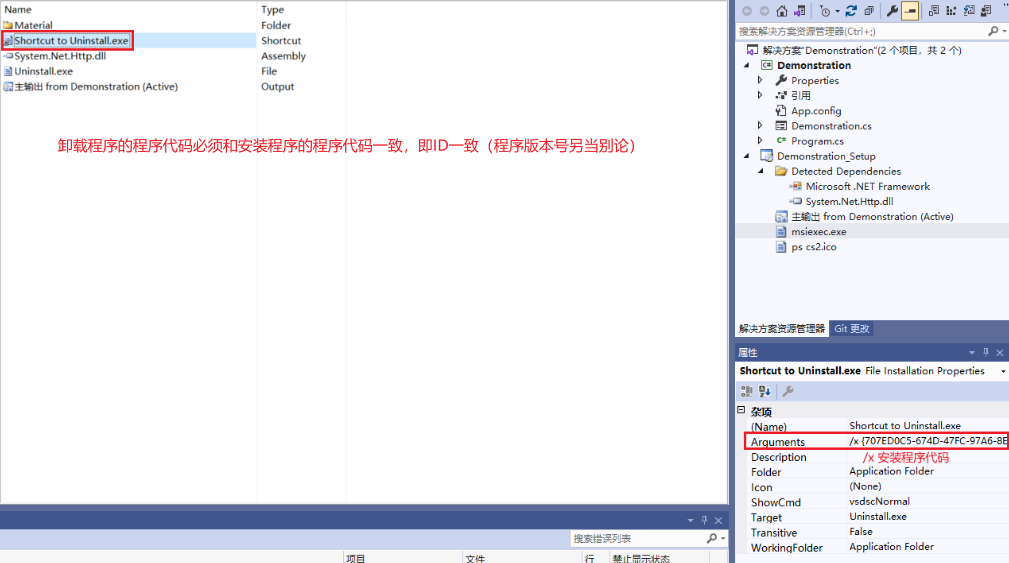
创建"Uninstall.exe"或“msiexec.exe”的快捷方式
![](https://img-blog.csdnimg.cn/img_convert/371973a3a34f64323eab7c37526bde04.png)
![](https://img-blog.csdnimg.cn/img_convert/296dc119d56a224180f5be24824b6063.png)
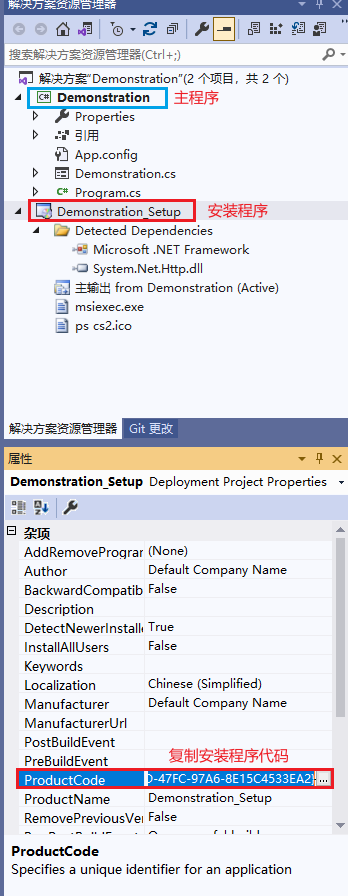
在解决方案资源管理器中,选择Setup安装程序,复制ProductCode代码,也就是记录安装程序代码,这一步在卸载配置中很重要,非常重要。
![](https://img-blog.csdnimg.cn/img_convert/e174fec3c8ba5e94e07beafa64af9f31.png)
在刚才创建的"Uninstall.exe"或“msiexec.exe”的快捷方式上进入属性页面(注意是快捷方式),在“Arguments”选项中 输入“/x 【记录的ProductCode】”。例如:/x {707ED0C5-674D-47FC-97A6-8E15C4533EA2}
注意卸载程序的代码必须和安装程序的程序代码一致,即程序ID一致(程序版本号另当别论)
![](https://img-blog.csdnimg.cn/img_convert/725881c4115de70affd54f10cb37be35.png)
重命名"卸载"或"Uninstall",将其复制到“User's Programs Menu”文件夹中,检查“User's Desktop”文件夹和“User's Programs Menu”文件夹,安装程序和卸载程序一般需要放置于新建文件夹下,便于安装程序和卸载程序一一对应(本文目的以演示打包安装程序的方法为笔记,所以使用“演示打包安装程序”命名新建的文件夹)
![](https://img-blog.csdnimg.cn/img_convert/153c193191ce172fe5437a0197f71a79.png)
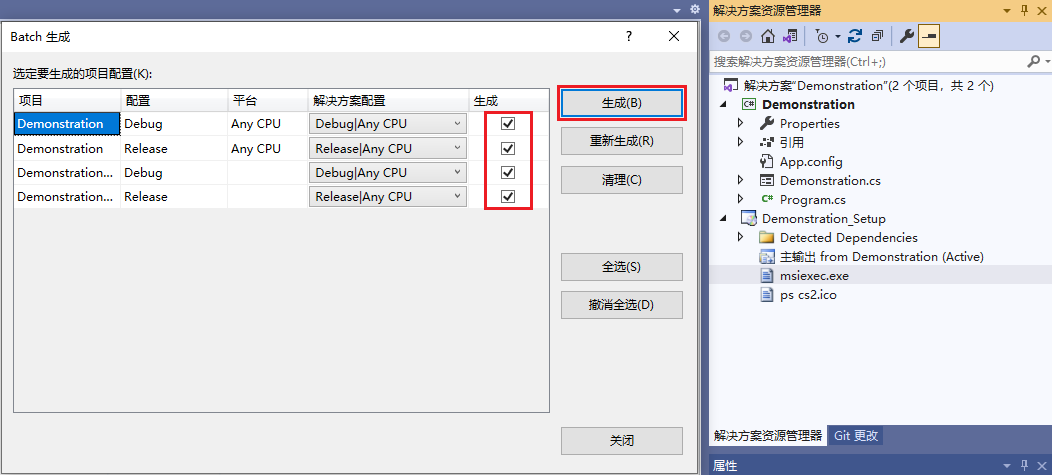
Visual Studio 最上侧菜单栏点击“生成”-->“批生成”,Batch 生成中生成即可完成
![](https://img-blog.csdnimg.cn/img_convert/8690fe9e55b216e85730ee9d1c666a48.png)
至此完成!