


5 App窗口视图管理
WindowManagerGlobal负责管理App所有要添加到WMS的窗口,接口即为上头的addView
首先,对于App本地窗口来说,其最核心的数据无非就两个,一个是Window Parameters,另一个就是窗口的DécorView,一个负责描述窗口属性,另外一个描述窗口视图
窗口有很多种类型,比如Activity关联Window,PopupWindow, Dialog等等,它们主要通过
Window.LayoutParam.Type字段做类型区分,Window.LayoutParam.Token字段则保存窗口关联
Parent Window的Token,这三个窗口类型的区别后面会做介绍
窗口跟WMS建立连接,其实就是将Window Parameters发送到WMS并对应建立
WindowState, 接着连接SurfaceFlinger创建Surface,最后将Surface返回到App端供窗口Décor View绘制图形界面的过程, 这一切都被封装到了ViewRootImpl中
当WindowManagerGlobal.addView被调用时,传入Décor View和WindowParameters,其内部会对应创建ViewRootImpl,然后WindowManagerGlobal内部会对三者绑定关联
接下去看下简单的关系图:
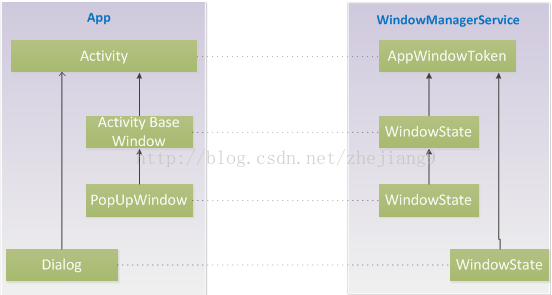
从图中可以看出,PopUpWindow是Activity Base Window的子窗口,Dialog在默认情况下,它跟Activity Base Window是同级的
Activity在WMS中对应的AppWindowToken之前已经介绍过,是AMS在创建ActivityRecord后然后通知WMS创建的,剩下WindowState的对应关系,跟App这边一致
三个窗口大体流程都差不多,所以接下去先基于ActivityBase Window来做介绍,最后再简单介绍PopupWindow和Dialog与其存在的差异点
5.1 Activity Base Window介绍
Activity Base Window的创建上头已经介绍过,是在Activity.attach时被创建的,所以我们接着4.3 Activity启动之Activity和窗口的创建的wm.addView来继续介绍
| r.window = r.activity.getWindow(); View decor = r.window.getDecorView(); decor.setVisibility(View.INVISIBLE); ViewManager wm = a.getWindowManager(); WindowManager.LayoutParams l = r.window.getAttributes(); a.mDecor = decor; l.type = WindowManager.LayoutParams.TYPE_BASE_APPLICATION; l.softInputMode |= forwardBit; if (a.mVisibleFromClient) { a.mWindowAdded = true; wm.addView(decor, l); } |
Window type为TYPE_BASE_APPLICATION,这意味这个窗口在WMS对应的Parent 为
AppWindowToken,所以LayoutParams.token必须被设置为Activity对应的AppToken
wm对应的是WindowManagerImpl实例:
| //WindowManagerImpl.java public void addView(@NonNull View view, @NonNull ViewGroup.LayoutParams params) { applyDefaultToken(params); mGlobal.addView(view, params, mDisplay, mParentWindow); } |
上头说过,Activity basewindow在设置WindowManager时会创建本地窗口管理对象,即ParentWindow是Activity BaseWindow的WindowManagerImpl对象实例,所以这边直接调用WindowManagerGlobal.addView,传入的mParentWindow即为Activity BaseWindow,接着看代码:
| //ViewRootImpl.java public void addView(View view, ViewGroup.LayoutParams params, Display display, Window parentWindow) { …… Final WindowManager.LayoutParams wparams = (WindowManager.LayoutParams)params; if (parentWindow != null) { parentWindow.adjustLayoutParamsForSubWindow(wparams); } else { …… }
ViewRootImpl root; View panelParentView = null;
…… // If this is a panel window, then find the window it is being // attached to for future reference. if (wparams.type >= WindowManager.LayoutParams.FIRST_SUB_WINDOW && wparams.type <= WindowManager.LayoutParams.LAST_SUB_WINDOW) { final int count = mViews.size(); for (int i = 0; i < count; i++) { if (mRoots.get(i).mWindow.asBinder() == wparams.token) { panelParentView = mViews.get(i); } } }
root = new ViewRootImpl(view.getContext(), display);
view.setLayoutParams(wparams);
mViews.add(view); mRoots.add(root); mParams.add(wparams); }
// do this last because it fires off messages to start doing things try { root.setView(view, wparams, panelParentView); } catch (RuntimeException e) { …… } } |
parentWindow肯定不为空,调用adjustLayoutParamsForSubWindow调整参数,接着创建
ViewRootImpl,然后再将三者对应的添加到mViews,mRoots,mParams数组中,最后调用
setView添加窗口视图
先来看adjustLayoutParamsForSubWindow的实现:
| void adjustLayoutParamsForSubWindow(WindowManager.LayoutParams wp) { CharSequence curTitle = wp.getTitle(); if (wp.type >= WindowManager.LayoutParams.FIRST_SUB_WINDOW && wp.type <= WindowManager.LayoutParams.LAST_SUB_WINDOW) { …… } else { if (wp.token == null) { wp.token = mContainer == null ? mAppToken : mContainer.mAppToken; } if ((curTitle == null || curTitle.length() == 0) && mAppName != null) { wp.setTitle(mAppName); } } if (wp.packageName == null) { wp.packageName = mContext.getPackageName(); } if (mHardwareAccelerated) { wp.flags |= WindowManager.LayoutParams.FLAG_HARDWARE_ACCELERATED; } } |
wp.type为TYPE_BASE_APPLICATION,再加上mContainer为空,所以wp.token最终被设置为
mAppToken
ViewRootImpl在核心控制类,所以他除了保存设置的View以及对应的LayoutParams数据外,最重要的,就是跟WMS建立数据通讯。
接着看其构造函数:
| public ViewRootImpl(Context context, Display display) { mContext = context;
// These can be accessed by any thread, must be protected with a lock. // Surface can never be reassigned or cleared (use Surface.clear()). Surface mSurface = new Surface(); mThread = Thread.currentThread(); mWindowSession = WindowManagerGlobal.getWindowSession(); …… mWindow = new W(this); …… mFirst = true; // true for the first time the view is added mAdded = false; mAttachInfo = new View.AttachInfo(mWindowSession, mWindow, display, this, mHandler, this); …… } |
创建Surface保存到mSurface,不过目前这个Surface是空的,还未与SurfaceControl绑定,还有Surface本身是不限制访问线程的;接着将当前线程信息保存到mThread,这个才是用于对UI操作进行线程限制的
接着与WMS建立会话并保存到mWindowSession,接着创建mWindow对象,对应类为W:
| static class W extends IWindow.Stub |
可以看出,它是一个native binder,用来跟当前添加的视图在WMS进行绑定,供WMS向App端进行窗口的相关操作
最后是mAttachInfo,这个类保存了很多全局数据,它会在View被成功添加到WMS后,在view.dispatchAttachedToWindow(mAttachInfo, 0)被调用时作为参数传到View
接着看setView的代码:
| * We have one child */ public void setView(View view, WindowManager.LayoutParams attrs, View panelParentView) { synchronized (this) { if (mView == null) { mView = view;
mAttachInfo.mDisplayState = mDisplay.getState(); mDisplayManager.registerDisplayListener(mDisplayListener, mHandler);
mViewLayoutDirectionInitial = mView.getRawLayoutDirection(); mFallbackEventHandler.setView(view); mWindowAttributes.copyFrom(attrs); if (mWindowAttributes.packageName == null) { mWindowAttributes.packageName = mBasePackageName; } attrs = mWindowAttributes; // Keep track of the actual window flags supplied by the client. mClientWindowLayoutFlags = attrs.flags;
setAccessibilityFocus(null, null); ……
mSoftInputMode = attrs.softInputMode; mWindowAttributesChanged = true; mWindowAttributesChangesFlag = WindowManager.LayoutParams.EVERYTHING_CHANGED; mAttachInfo.mRootView = view; mAttachInfo.mScalingRequired = mTranslator != null; mAttachInfo.mApplicationScale = mTranslator == null ? 1.0f : mTranslator.applicationScale; if (panelParentView != null) { mAttachInfo.mPanelParentWindowToken = panelParentView.getApplicationWindowToken(); } mAdded = true; int res; /* = WindowManagerImpl.ADD_OKAY; */
// Schedule the first layout -before- adding to the window // manager, to make sure we do the relayout before receiving // any other events from the system. requestLayout(); if ((mWindowAttributes.inputFeatures & WindowManager.LayoutParams.INPUT_FEATURE_NO_INPUT_CHANNEL) == 0) { mInputChannel = new InputChannel(); } try { mOrigWindowType = mWindowAttributes.type; mAttachInfo.mRecomputeGlobalAttributes = true; collectViewAttributes(); res = mWindowSession.addToDisplay(mWindow, mSeq, mWindowAttributes, getHostVisibility(), mDisplay.getDisplayId(), mAttachInfo.mContentInsets, mAttachInfo.mStableInsets, mInputChannel); } …… } |
先requestLayout,由于这个调用是异步的,而mWindowSession.addToDisplay同步调用后,如果requestLayout在mWindowSession.addToDisplay之后被调用,由于线程调度的原因,就有可能会导致WMS通过binder往mWindow发送的事件会先于requestLayout被执行,因为UI操作都会被post到主线程执行,这就导致,谁先入列,谁就先被执行
所以,为了能够按照注释说的,确保requestLayout操作在收到所有系统事件之前被执行,其必须在mWindowSession.addToDisplay之前被调用
先看requestLayout的代码:
|
public void requestLayout() { if (!mHandlingLayoutInLayoutRequest) { checkThread(); mLayoutRequested = true; scheduleTraversals(); } } |
先调用checkThread确保操作在主线程进行:
| void checkThread() { if (mThread != Thread.currentThread()) { throw new CalledFromWrongThreadException( "Only the original thread that created a view hierarchy can touch its views."); } } |
接着调用scheduleTraversals:
| void scheduleTraversals() { if (!mTraversalScheduled) { mTraversalScheduled = true; mTraversalBarrier = mHandler.getLooper().postSyncBarrier(); mChoreographer.postCallback( Choreographer.CALLBACK_TRAVERSAL, mTraversalRunnable, null); if (!mUnbufferedInputDispatch) { scheduleConsumeBatchedInput(); } notifyRendererOfFramePending(); } } |
最终mTraversalRunnable这个runnable 被post,它稍后会被立即运行
回过头继续看mWindowSession.addToDisplay,这个是一个RPC调用,主要传入三个参数,一个是mWindow ,作为WMS向本地窗口发送事件的入口,第二个是窗口参数,还有就是InputChannel,用于从WMS接收窗口事件
接着将代码运行环境切到WMS
| //Session.java public int addToDisplay(IWindow window, int seq, WindowManager.LayoutParams attrs, int viewVisibility, int displayId, Rect outContentInsets, Rect outStableInsets, InputChannel outInputChannel) { return mService.addWindow(this, window, seq, attrs, viewVisibility, displayId, outContentInsets, outStableInsets, outInputChannel); } |
接着看WMS.addWindow:
| public int addWindow(Session session, IWindow client, int seq, WindowManager.LayoutParams attrs, int viewVisibility, int displayId, Rect outContentInsets, Rect outStableInsets, InputChannel outInputChannel) { int[] appOp = new int[1]; int res = mPolicy.checkAddPermission(attrs, appOp); if (res != WindowManagerGlobal.ADD_OKAY) { return res; }
boolean reportNewConfig = false; WindowState attachedWindow = null; WindowState win = null; long origId; final int type = attrs.type;
synchronized(mWindowMap) { …… if (mWindowMap.containsKey(client.asBinder())) { Slog.w(TAG, "Window " + client + " is already added"); return WindowManagerGlobal.ADD_DUPLICATE_ADD; }
if (type >= FIRST_SUB_WINDOW && type <= LAST_SUB_WINDOW) { …… } …… boolean addToken = false; WindowToken token = mTokenMap.get(attrs.token); if (token == null) { …… } else if (type >= FIRST_APPLICATION_WINDOW && type <= LAST_APPLICATION_WINDOW) { AppWindowToken atoken = token.appWindowToken; …… } …… win = new WindowState(this, session, client, token, attachedWindow, appOp[0], seq, attrs, viewVisibility, displayContent); …… mPolicy.adjustWindowParamsLw(win.mAttrs); win.setShowToOwnerOnlyLocked(mPolicy.checkShowToOwnerOnly(attrs));
res = mPolicy.prepareAddWindowLw(win, attrs); if (res != WindowManagerGlobal.ADD_OKAY) { return res; } …… res = WindowManagerGlobal.ADD_OKAY; …… win.attach(); mWindowMap.put(client.asBinder(), win); …… final WindowStateAnimator winAnimator = win.mWinAnimator; winAnimator.mEnterAnimationPending = true; winAnimator.mEnteringAnimation = true; …… return res; } |
在这里又看到了mPolicy,在WMS端,其实它对应的是PhoneWindowManager,跟App端的
PhoneWindow一样,它也是通过Policy来创建的,PhoneWindow负责App端窗口一些默认事件或操作的处理,PhoneWindowManager则负责在WMS端对窗口的类似操作和处理
这里调用mPolicy.checkAddPermission(attrs,appOp)进行权限检查,其实这个主要是针对一些系统窗口和特殊窗口类型进行权限检查,对于TYPE_BASE_APPLICATION这些app的窗口类型,检查肯定是OK的
接着调用mWindowMap.containsKey(client.asBinder())检查窗口是否已经被添加过,如果添加过,则返回重复添加错误
attrs.token保存的是ActivityRecord对应的AppWindowToken,通过attrs.token从mTokenMap拿到对应的AppWindowToken对象保存到token
TYPE_BASE_APPLICATION的值为1,位于FIRST_APPLICATION_WINDOW和
LAST_APPLICATION_WINDOW之间,接着创建WindowState保存到win,然后调用win.attach,
最后将win添加到mWindowMap
WindowState是窗口在WMS对应的实例,它跟ViewRootImpl的mWindow是一对一绑定的,先看其构造函数:
| WindowState(WindowManagerService service, Session s, IWindow c, WindowToken token, WindowState attachedWindow, int appOp, int seq, WindowManager.LayoutParams a, int viewVisibility, final DisplayContent displayContent) { mService = service; mSession = s; mClient = c; mAppOp = appOp; mToken = token; mOwnerUid = s.mUid; mWindowId = new IWindowId.Stub() { @Override public void registerFocusObserver(IWindowFocusObserver observer) { WindowState.this.registerFocusObserver(observer); } @Override public void unregisterFocusObserver(IWindowFocusObserver observer) { WindowState.this.unregisterFocusObserver(observer); } @Override public boolean isFocused() { return WindowState.this.isFocused(); } }; mAttrs.copyFrom(a); …… if ((mAttrs.type >= FIRST_SUB_WINDOW && mAttrs.type <= LAST_SUB_WINDOW)) { …… } else { // The multiplier here is to reserve space for multiple // windows in the same type layer. mBaseLayer = mPolicy.windowTypeToLayerLw(a.type) * WindowManagerService.TYPE_LAYER_MULTIPLIER + WindowManagerService.TYPE_LAYER_OFFSET; mSubLayer = 0; mAttachedWindow = null; mLayoutAttached = false; mIsImWindow = mAttrs.type == TYPE_INPUT_METHOD || mAttrs.type == TYPE_INPUT_METHOD_DIALOG; mIsWallpaper = mAttrs.type == TYPE_WALLPAPER; mIsFloatingLayer = mIsImWindow || mIsWallpaper; }
WindowState appWin = this; while (appWin.mAttachedWindow != null) { appWin = appWin.mAttachedWindow; } WindowToken appToken = appWin.mToken; while (appToken.appWindowToken == null) { WindowToken parent = mService.mTokenMap.get(appToken.token); if (parent == null || appToken == parent) { break; } appToken = parent; } mRootToken = appToken; mAppToken = appToken.appWindowToken; if (mAppToken != null) { final DisplayContent appDisplay = getDisplayContent(); mNotOnAppsDisplay = displayContent != appDisplay; }
mWinAnimator = new WindowStateAnimator(this); mWinAnimator.mAlpha = a.alpha;
mRequestedWidth = 0; mRequestedHeight = 0; mLastRequestedWidth = 0; mLastRequestedHeight = 0; mXOffset = 0; mYOffset = 0; mLayer = 0; mInputWindowHandle = new InputWindowHandle( mAppToken != null ? mAppToken.mInputApplicationHandle : null, this, displayContent.getDisplayId()); } |
保存关联的IWindow(即ViewRootImpl.mWindow)到mClient,将parent token保存到mToken,对于App Top Level WindowState来说,mToken就对应AppWindowToken,对于很多sub window
则需要通过:
| WindowState appWin = this; while (appWin.mAttachedWindow != null) { appWin = appWin.mAttachedWindow; |
用循环根据层级关系往上爬,直到找到TopLevel WindowState,循环结束后,将其保存到appWin,最后将其保存到mRootToken和mAppToken中,最后创建WindowState关联的
WindowStateAnimator
WindowState创建结束后,接着其attach函数被调用:
| void attach() { if (WindowManagerService.localLOGV) Slog.v( TAG, "Attaching " + this + " token=" + mToken + ", list=" + mToken.windows); mSession.windowAddedLocked(); } |
接着看mSession.windowAddedLocked:
| void windowAddedLocked() { if (mSurfaceSession == null) { …… mSurfaceSession = new SurfaceSession(); …… mService.mSessions.add(this); if (mLastReportedAnimatorScale != mService.getCurrentAnimatorScale()) { mService.dispatchNewAnimatorScaleLocked(this); } } mNumWindow++; } |
这个函数负责创建了SurfaceSession并保存到mSurfaceSession
从这里可以看出,WMS为每一个Window Session对应创建了一个SurfaceSession
SurfaceSession创建好了,剩下唯一要做的就是为窗口创建SurfaceControl了
WMS.addWindow结束后,代码运行环境重新切回到App ViewRootImpl
接着mTraversalRunnable被调用:
| //ViewRootImpl.java final class TraversalRunnable implements Runnable { @Override public void run() { doTraversal(); } } |
doTraversal:
| void doTraversal() { if (mTraversalScheduled) { mTraversalScheduled = false; …… try { performTraversals(); } finally { Trace.traceEnd(Trace.TRACE_TAG_VIEW); } …… } } |
performTraversals:
| private void performTraversals() { // cache mView since it is used so much below... final View host = mView; …… if (host == null || !mAdded) return;
mIsInTraversal = true; mWillDrawSoon = true; boolean windowSizeMayChange = false; boolean newSurface = false; boolean surfaceChanged = false; WindowManager.LayoutParams lp = mWindowAttributes; …… final int viewVisibility = getHostVisibility(); boolean viewVisibilityChanged = mViewVisibility != viewVisibility || mNewSurfaceNeeded;
WindowManager.LayoutParams params = null; if (mWindowAttributesChanged) { mWindowAttributesChanged = false; surfaceChanged = true; params = lp; } …… if (mFirst) { mFullRedrawNeeded = true; mLayoutRequested = true; …… host.dispatchAttachedToWindow(mAttachInfo, 0); …… } else { …… } …… if (mApplyInsetsRequested) { mApplyInsetsRequested = false; mLastOverscanRequested = mAttachInfo.mOverscanRequested; dispatchApplyInsets(host); if (mLayoutRequested) { // Short-circuit catching a new layout request here, so // we don't need to go through two layout passes when things // change due to fitting system windows, which can happen a lot. windowSizeMayChange |= measureHierarchy(host, lp, mView.getContext().getResources(), desiredWindowWidth, desiredWindowHeight); } }
if (layoutRequested) { // Clear this now, so that if anything requests a layout in the // rest of this function we will catch it and re-run a full // layout pass. mLayoutRequested = false; } …… try { …… relayoutResult = relayoutWindow(params, viewVisibility, insetsPending); }catch{ …… } …… final boolean didLayout = layoutRequested && !mStopped; boolean triggerGlobalLayoutListener = didLayout || mAttachInfo.mRecomputeGlobalAttributes; if (didLayout) { performLayout(lp, desiredWindowWidth, desiredWindowHeight); …… } …… boolean cancelDraw = mAttachInfo.mTreeObserver.dispatchOnPreDraw() || viewVisibility != View.VISIBLE;
if (!cancelDraw && !newSurface) { if (!skipDraw || mReportNextDraw) { if (mPendingTransitions != null && mPendingTransitions.size() > 0) { for (int i = 0; i < mPendingTransitions.size(); ++i) { mPendingTransitions.get(i).startChangingAnimations(); } mPendingTransitions.clear(); }
performDraw(); } } else { …… }
mIsInTraversal = false; } |
这个函数巨长无比,大约有700多行代码,简单介绍如下:
1) 如果是第一次执行,也就是mFirst为true,会调用
host.dispatchAttachedToWindow(mAttachInfo,0)将mAttachInfo dispatch给host décor view以及其所有的child views
2) 调用measureHierarchy()->performMeasure基于屏幕真实宽高来测量décor view的大小
3) 调用relayoutWindow-> mWindowSession.relayout,传入第二步获取的décor view大小,向WMS说明你期望的窗口大小,然后WMS会根据当前状况窗口情况,比如是否有弹出输入法界面,以及是否显示状态栏等等,返回窗口真正被分配到的大小
4) 如果WMS给当前窗口分配的大小和第二步期望的不一致,则需再次调用
performMeasure基于新分配的窗口大小来对décor view重新测量
5) 接着调用performLayout-> mView.layout开始对décor view进行重新布局
6) 最后调用performDraw->draw-> drawSoftware->mView.draw(canvas)对View进行重新绘制
继续看drawSoftware函数代码:
| private boolean drawSoftware(Surface surface, AttachInfo attachInfo, int xoff, int yoff, boolean scalingRequired, Rect dirty) { // Draw with software renderer. final Canvas canvas; try { final int left = dirty.left; final int top = dirty.top; final int right = dirty.right; final int bottom = dirty.bottom;
canvas = mSurface.lockCanvas(dirty); …… try { canvas.translate(-xoff, -yoff); if (mTranslator != null) { mTranslator.translateCanvas(canvas); } canvas.setScreenDensity(scalingRequired ? mNoncompatDensity : 0); attachInfo.mSetIgnoreDirtyState = false;
mView.draw(canvas);
drawAccessibilityFocusedDrawableIfNeeded(canvas); } finally { if (!attachInfo.mSetIgnoreDirtyState) { // Only clear the flag if it was not set during the mView.draw() call attachInfo.mIgnoreDirtyState = false; } } } finally { try { surface.unlockCanvasAndPost(canvas); } …… } return true; } |
先通过mSurface.lockCanvas拿到画布,然后调用mView.draw将view图形数据绘制到画布上,接着调用surface.unlockCanvasAndPost(canvas)将图形数据post到SurfaceFlinger
看到这里很多人会有疑问,mSurface不是空的吗?怎么直接就用了,它在哪初始化的?回过头来看第三步mWindowSession.relayout的调用,最后一个参数就是mSurface,不出意外的话,肯定是这次调用在WMS端被初始化的,接下去把代码运行环境切到WMS:
| //Session.java public int relayout(IWindow window, int seq, WindowManager.LayoutParams attrs, int requestedWidth, int requestedHeight, int viewFlags, int flags, Rect outFrame, Rect outOverscanInsets, Rect outContentInsets, Rect outVisibleInsets, Rect outStableInsets, Configuration outConfig, Surface outSurface) { int res = mService.relayoutWindow(this, window, seq, attrs, requestedWidth, requestedHeight, viewFlags, flags, outFrame, outOverscanInsets, outContentInsets, outVisibleInsets, outStableInsets, outConfig, outSurface); return res; } |
继续看mService.relayoutWindow:
| public int relayoutWindow(Session session, IWindow client, int seq, WindowManager.LayoutParams attrs, int requestedWidth, int requestedHeight, int viewVisibility, int flags, Rect outFrame, Rect outOverscanInsets, Rect outContentInsets, Rect outVisibleInsets, Rect outStableInsets, Configuration outConfig, Surface outSurface) { …… synchronized(mWindowMap) { WindowState win = windowForClientLocked(session, client, false); if (win == null) { return 0; } WindowStateAnimator winAnimator = win.mWinAnimator; if (viewVisibility != View.GONE && (win.mRequestedWidth != requestedWidth || win.mRequestedHeight != requestedHeight)) { win.mLayoutNeeded = true; win.mRequestedWidth = requestedWidth; win.mRequestedHeight = requestedHeight; }
if (attrs != null) { mPolicy.adjustWindowParamsLw(attrs); } …… if ((attrChanges&WindowManager.LayoutParams.FORMAT_CHANGED) != 0) { // To change the format, we need to re-build the surface. winAnimator.destroySurfaceLocked(); toBeDisplayed = true; surfaceChanged = true; } try { if (!win.mHasSurface) { surfaceChanged = true; } SurfaceControl surfaceControl = winAnimator.createSurfaceLocked(); if (surfaceControl != null) { outSurface.copyFrom(surfaceControl); } else { // For some reason there isn't a surface. Clear the // caller's object so they see the same state. outSurface.release(); } } catch (Exception e) { …… return 0; } …… } else { …… } …… } |
先通过client拿到对应的WindowState, 然后获取其内部关联的WindowStateAnimator对象,由于WindowState还未创建过Surface,所以这里mHasSurface肯定为false,接着调用
winAnimator.createSurfaceLocked()创建SurfaceControl, 最后调用
outSurface.copyFrom(surfaceControl)初始化outSurface,也就是App端传过来的mSurface
接着看winAnimator.createSurfaceLocked()的内部实现:
| SurfaceControl createSurfaceLocked() { final WindowState w = mWin; if (mSurfaceControl == null) { …… // Set up surface control with initial size. try { mSurfaceW = width; mSurfaceH = height;
final boolean isHwAccelerated = (attrs.flags & WindowManager.LayoutParams.FLAG_HARDWARE_ACCELERATED) != 0; final int format = isHwAccelerated ? PixelFormat.TRANSLUCENT : attrs.format; if (!PixelFormat.formatHasAlpha(attrs.format) && attrs.surfaceInsets.left == 0 && attrs.surfaceInsets.top == 0 && attrs.surfaceInsets.right == 0 && attrs.surfaceInsets.bottom == 0) { flags |= SurfaceControl.OPAQUE; }
if (DEBUG_SURFACE_TRACE) { mSurfaceControl = new SurfaceTrace( mSession.mSurfaceSession, attrs.getTitle().toString(), width, height, format, flags); } else { mSurfaceControl = new SurfaceControl( mSession.mSurfaceSession, attrs.getTitle().toString(), width, height, format, flags); }
w.mHasSurface = true; …… } ……
// Start a new transaction and apply position & offset. SurfaceControl.openTransaction(); try { mSurfaceX = left; mSurfaceY = top;
try { mSurfaceControl.setPosition(left, top); mSurfaceLayer = mAnimLayer; final DisplayContent displayContent = w.getDisplayContent(); if (displayContent != null) { mSurfaceControl.setLayerStack(displayContent.getDisplay().getLayerStack()); } mSurfaceControl.setLayer(mAnimLayer); mSurfaceControl.setAlpha(0); mSurfaceShown = false; } catch (RuntimeException e) { Slog.w(TAG, "Error creating surface in " + w, e); mService.reclaimSomeSurfaceMemoryLocked(this, "create-init", true); } mLastHidden = true; } finally { SurfaceControl.closeTransaction(); if (SHOW_LIGHT_TRANSACTIONS) Slog.i(TAG, "<<< CLOSE TRANSACTION createSurfaceLocked"); } if (WindowManagerService.localLOGV) Slog.v( TAG, "Created surface " + this); } return mSurfaceControl; } |
如果mSurfaceControl为null,则调用new SurfaceControl并传入关联SurfaceSession创建后保存到mSurfaceControl,最后通过SurfaceControl.openTransaction()和closeTransaction()修改配置数据
对SurfaceControl相关不熟悉的,建议先阅读第三章节
至此,Activity的整个创建流程跑步跑完,View已经成功被show出来了^_^
5.2 Dialog和PopupWindow介绍
不管Activity Base Window,PopupWindow还是Dialog,其最终都是通过调用
WindowManageGlobal.addView添加到WMS,所以,它们三个调用addView之后的流程都是一样的
这里主要对它们的创建,以及对应的窗口类型和parenttoken做下简单介绍
Dialog:
Dialog我们都知道,它构造的时候,传入的Context必须是Activity对象实例,这是为什么?
先看其构造函数:
| Dialog(Context context, int theme, boolean createContextThemeWrapper) { if (createContextThemeWrapper) { if (theme == 0) { TypedValue outValue = new TypedValue(); context.getTheme().resolveAttribute(com.android.internal.R.attr.dialogTheme, outValue, true); theme = outValue.resourceId; } mContext = new ContextThemeWrapper(context, theme); } else { mContext = context; }
mWindowManager = (WindowManager)context.getSystemService(Context.WINDOW_SERVICE); Window w = PolicyManager.makeNewWindow(mContext); mWindow = w; w.setCallback(this); w.setOnWindowDismissedCallback(this); w.setWindowManager(mWindowManager, null, null); w.setGravity(Gravity.CENTER); mListenersHandler = new ListenersHandler(this); } |
先调用context.getSystemService获取WindowManager实例保存到mWindowManager,接着创建Window对象保存到mWindow,这里有点注意下,这里虽然调用w.setWindowManager创建了Window关联的本地窗口管理实例,但是最终Dialog show的时候,并没有用Window内部关联的WindowManager,而是用的mWindowManager
那构造时,传入的Context是Activity还是非Activity,唯一不同的,就是getSystemService的实现了,所以没猜错的话,Activity肯定也实现了这个函数:
| //Activity.java public Object getSystemService(@ServiceName @NonNull String name) { if (getBaseContext() == null) { throw new IllegalStateException( "System services not available to Activities before onCreate()"); }
if (WINDOW_SERVICE.equals(name)) { return mWindowManager; } else if (SEARCH_SERVICE.equals(name)) { ensureSearchManager(); return mSearchManager; } return super.getSystemService(name); } |
看到了吗?如果传入的是Activity,那Dialog使用的窗口管理其实就是Activity basewindow关联是本地窗口管理。
那Context如果是非Activity为什么又不行?
继续看Dialog.show:
| public void show() { …… WindowManager.LayoutParams l = mWindow.getAttributes(); …… try { mWindowManager.addView(mDecor, l); mShowing = true;
sendShowMessage(); } finally { } } |
直接获取默认的窗口属性,WindowManager.LayoutParams默认构造函数:
| public LayoutParams() { super(LayoutParams.MATCH_PARENT, LayoutParams.MATCH_PARENT); type = TYPE_APPLICATION; format = PixelFormat.OPAQUE; } |
也就是说,Dialog默认的窗口类型就是TYPE_APPLICATION,那它的parent token就必须要被设置成Activity的app token
这就是Dialog构造时要传入Activity的原因,要不启动会报无法找到token的错误
如果你想要脱离Activity,在后台通过Context启动Dialog,唯一的办法就是修改Dialog的窗口类型,当然这么做太暴力,需要有对应的权限.
PopupWindow:
先看构造函数:
| public PopupWindow(Context context, AttributeSet attrs, int defStyleAttr, int defStyleRes) { mContext = context; mWindowManager = (WindowManager)context.getSystemService(Context.WINDOW_SERVICE); …… } |
初始化mWindowManager,这里对Context对应实例没要求,只要是Context就行
接着看showAsDropDown,PopupWindow显示的时候,必须指定anchorview, 用于设置其显示位置:
| public void showAsDropDown(View anchor, int xoff, int yoff, int gravity) { if (isShowing() || mContentView == null) { return; }
registerForScrollChanged(anchor, xoff, yoff, gravity);
mIsShowing = true; mIsDropdown = true;
WindowManager.LayoutParams p = createPopupLayout(anchor.getWindowToken()); preparePopup(p);
updateAboveAnchor(findDropDownPosition(anchor, p, xoff, yoff, gravity));
if (mHeightMode < 0) p.height = mLastHeight = mHeightMode; if (mWidthMode < 0) p.width = mLastWidth = mWidthMode;
p.windowAnimations = computeAnimationResource();
invokePopup(p); } |
先调用createPopupLayout并传入anchor.getWindowToken()的值创建窗口属性:
| private WindowManager.LayoutParams createPopupLayout(IBinder token) { WindowManager.LayoutParams p = new WindowManager.LayoutParams();
p.gravity = Gravity.START | Gravity.TOP; p.width = mLastWidth = mWidth; p.height = mLastHeight = mHeight; if (mBackground != null) { p.format = mBackground.getOpacity(); } else { p.format = PixelFormat.TRANSLUCENT; } p.flags = computeFlags(p.flags); p.type = mWindowLayoutType; p.token = token; p.softInputMode = mSoftInputMode; p.setTitle("PopupWindow:" + Integer.toHexString(hashCode()));
return p; } |
设置窗口属性类型为mWindowLayoutType,mWindowLayoutType默认的值为:
| WindowManager.LayoutParams.TYPE_APPLICATION_PANEL 对应定义为: public static final int TYPE_APPLICATION_PANEL = FIRST_SUB_WINDOW; |
也就是说,PopupWindow对应的窗口类型为sub window,那p.token就必须设置为其父窗口的token,也就是anchor.getWindowToken拿到的值。
接着看invokePopup的代码:
| private void invokePopup(WindowManager.LayoutParams p) { if (mContext != null) { p.packageName = mContext.getPackageName(); } mPopupView.setFitsSystemWindows(mLayoutInsetDecor); setLayoutDirectionFromAnchor(); mWindowManager.addView(mPopupView, p); } |
很简单,就是调用mWindowManager将mPopupView和对应LayoutParams添加到
WindowManagerGlobal。


 1156
1156


 被折叠的 条评论
为什么被折叠?
被折叠的 条评论
为什么被折叠?
 到【灌水乐园】发言


