1 转载自:https://wizardforcel.gitbooks.io/qt-beginning/content/22.html
导语
在前面一节中,讲述了如何实现简单的涂鸦板,这一次我们将实现在涂鸦板上绘制图形,这里以矩形为例进行讲解。在后面还会提出双缓冲绘图的概念。
环境:Windows Xp + Qt 4.8.4+QtCreator 2.6.2
目录
- 一、绘制矩形
- 二、双缓冲绘图
正文
一、绘制矩形
1.我们仍然在前面程序的基础上进行修改,先更改painEvent()函数:
void Dialog::paintEvent(QPaintEvent *)
{
    QPainter painter(this);
    int x,y,w,h;
    x = lastPoint.x();
    y = lastPoint.y();
    w = endPoint.x() - x;
    h = endPoint.y() - y;
    painter.drawRect(x, y, w, h);
}
这里就是通过lastPoint和endPoint两个点来确定要绘制的矩形的起点、宽和高的。运行程序,用鼠标拖出一个矩形,效果如下图所示。

2.上面已经可以拖出一个矩形了,但是这样直接在窗口上绘图,以前画的矩形是不能保存下来的。所以我们下面加入画布,在画布上进行绘图。将paintEvent()函数更改如下:
void Dialog::paintEvent(QPaintEvent *)
{
    int x,y,w,h;
    x = lastPoint.x();
    y = lastPoint.y();
    w = endPoint.x() - x;
    h = endPoint.y() - y;
    QPainter pp(&pix);
    pp.drawRect(x, y, w, h);
    QPainter painter(this);
    painter.drawPixmap(0, 0, pix);
}
这里就是将图形先绘制在了画布上,然后将画布绘制到窗口上。我们运行程序,然后使用鼠标拖出一个矩形,发现出现了很多重影,效果如下图所示。

为什么会出现这种现象呢?大家可以尝试分别快速拖动鼠标和慢速拖动鼠标来绘制矩形,结果会发现,拖动速度越快,重影越少。其实,在我们拖动鼠标的过程中,屏幕已经刷新了很多次,也可以理解为paintEvent()函数执行了多次,每执行一次就会绘制一个矩形。知道了原因,就有方法来避免这个问题发生了。
二、双缓冲绘图
1.我们再添加一个辅助画布,如果正在绘图,也就是鼠标按键还没有释放的时候,就在这个辅助画布上绘图,只有当鼠标按键释放的时候,才在真正的画布上绘图。
首先在dialog.h文件中添加两个私有变量:
QPixmap tempPix; //辅助画布
bool isDrawing;   //标志是否正在绘图
然后到dialog.cpp的构造函数中对变量进行初始化:
isDrawing = false;
下面再更改paintEvent()函数:
void Dialog::paintEvent(QPaintEvent *)
{
    int x,y,w,h;
    x = lastPoint.x();
    y = lastPoint.y();
    w = endPoint.x() - x;
    h = endPoint.y() - y;
    QPainter painter(this);
    if(isDrawing) //如果正在绘图,就在辅助画布上绘制
    {
       //将以前pix中的内容复制到tempPix中,保证以前的内容不消失
       tempPix = pix;
       QPainter pp(&tempPix);
       pp.drawRect(x,y,w,h);
       painter.drawPixmap(0, 0, tempPix);
    } else {
       QPainter pp(&pix);
       pp.drawRect(x,y,w,h);
       painter.drawPixmap(0,0,pix);
    }
}
下面还需要更改鼠标按下事件处理函数和鼠标释放事件处理函数的内容:
void Dialog::mousePressEvent(QMouseEvent *event)
{
    if(event->button()==Qt::LeftButton) //鼠标左键按下
    {
       lastPoint = event->pos();
       isDrawing = true;   //正在绘图
    }
}
void Dialog::mouseReleaseEvent(QMouseEvent *event)
{
    if(event->button() == Qt::LeftButton) //鼠标左键释放
    {
       endPoint = event->pos();
       isDrawing = false;    //结束绘图
       update();
    }
}
当鼠标左键按下时我们开始标记正在绘图,当按键释放时我们取消正在绘图的标记。现在运行程序,已经可以实现正常的绘图了。效果如下图所示。

2.双缓冲绘图
根据这个例子所使用的技巧,我们引出所谓的双缓冲绘图的概念。双缓冲(double-buffers)绘图,就是在进行绘制时,先将所有内容都绘制到一个绘图设备(如QPixmap)上,然后再将整个图像绘制到部件上显示出来。使用双缓冲绘图可以避免显示时的闪烁现象。从Qt 4.0开始,QWidget部件的所有绘制都自动使用了双缓冲,所以一般没有必要在paintEvent()函数中使用双缓冲代码来避免闪烁。
虽然在一般的绘图中无需手动使用双缓冲绘图,不过要想实现一些绘图效果,还是要借助于双缓冲的概念。比如这个程序里,我们要实现使用鼠标在界面上绘制一个任意大小的矩形。这里需要两张画布,它们都是QPixmap实例,其中一个tempPix用来作为临时缓冲区,当鼠标正在拖动矩形进行绘制时,将内容先绘制到tempPix上,然后将tempPix绘制到界面上;而另一个pix作为缓冲区,用来保存已经完成的绘制。当松开鼠标完成矩形的绘制后,则将tempPix的内容复制到pix上。为了绘制时不显示拖影,而且保证以前绘制的内容不消失,那么在移动鼠标过程中,每绘制一次,都要在绘制这个矩形的原来的图像上进行绘制,所以需要在每次绘制tempPix之前,先将pix的内容复制到tempPix上。因为这里有两个QPixmap对象,也可以说有两个缓冲区,所以称之为双缓冲绘图。
结语
对于Qt基本绘图的内容,我们就讲到这里,如果大家还想更加系统深入的学习这些基础知识,可以参考《Qt Creator快速入门》的第10章。从下一节开始,我们将简单介绍一下Qt中得图形视图框架。
2 https://blog.csdn.net/rl529014/article/details/51658350
知识准备:
双缓冲机制:
在绘制控件时,首先将要绘制的内容绘制在一张图片中,再将图片一次性绘制到控件上。
在Qt的早期版本中,为了用户界面更加清爽,经常用这个技术来消除闪烁。
自Qt5版本后,QWidget能够自动处理闪烁,因此我们不用再担心这个问题。
双缓冲机制的使用场合:
- 所需绘制的内容较复杂,并且需频繁刷新。
- 每次只需刷新整个控件的一小部分。
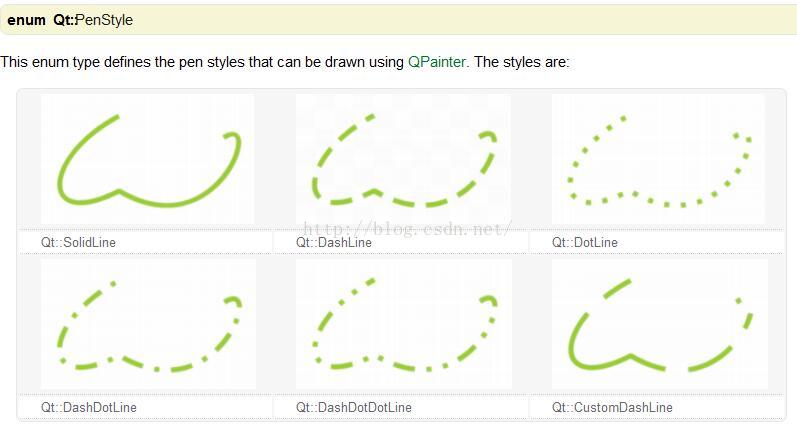
笔的样式:Qt::PenStyle


实例:

实现步骤:
1、新建Qt GUI应用。
项目名称为“DrawWidget”,基类选择“QMainWindow”,类名默认即可,取消“创建界面”复选框,完成项目工程的建立。
2、为工程添加提供实现绘图区的函数所在的文件。
在项目名上右击,选择“添加新文件 ...”,基类选择“QWidget”,类名为“DrawWidget”。

3、编辑“drawwidget.h”文件
添加如下代码:(主要定义需要用到的函数和变量)
- #ifndef DRAWWIDGET_H
- #define DRAWWIDGET_H
- #include <QWidget>
- #include <QtGui>
- #include <QMouseEvent>
- #include <QPaintEvent>
- #include <QResizeEvent>
- #include <QColor>
- #include <QPixmap>
- #include <QPoint>
- #include <QPainter>
- #include <QPalette>
- class DrawWidget : public QWidget
- {
- Q_OBJECT
- public:
- explicit DrawWidget(QWidget *parent = 0);
- void mousePressEvent(QMouseEvent *);
- void mouseMoveEvent(QMouseEvent *);
- void paintEvent(QPaintEvent *);
- void resizeEvent(QResizeEvent *);
- signals:
- public slots:
- void setStyle(int );
- void setWidth(int );
- void setColor(QColor );
- void clear();
- private:
- QPixmap *pix;
- QPoint startPos; //记录鼠标的当前位置
- QPoint endPos;
- int style;
- int weight;
- QColor color;
- };
- #endif // DRAWWIDGET_H
4、编辑“drawwidget.cpp”文件
在构造函数中完成窗体参数及部分功能初始化工作。
代码如下:
- #include "drawwidget.h"
- DrawWidget::DrawWidget(QWidget *parent) : QWidget(parent)
- {
- setAutoFillBackground(true); //允许调整控件背景颜色
- setPalette(QPalette(Qt::white));
- pix = new QPixmap(size());
- pix->fill(Qt::white);
- setMinimumSize(600,400); //设置窗体最小大小
- }
- void DrawWidget::setStyle(int s)
- {
- style = s;
- }
- void DrawWidget::setWidth(int w)
- {
- weight = w;
- }
- void DrawWidget::setColor(QColor c)
- {
- color = c;
- }
- void DrawWidget::mousePressEvent(QMouseEvent *e)
- {
- startPos = e->pos();
- }
- void DrawWidget::mouseMoveEvent(QMouseEvent *e)
- {
- QPainter *painter = new QPainter;
- QPen pen;
- pen.setStyle((Qt::PenStyle)style);
- pen.setWidth(weight);
- pen.setColor(color);
- painter->begin(pix);
- painter->setPen(pen);
- painter->drawLine(startPos, e->pos());
- painter->end();
- startPos = e->pos();
- update();
- }
- void DrawWidget::paintEvent(QPaintEvent *)
- {
- QPainter painter(this);
- painter.drawPixmap(QPoint(0,0), *pix);
- }
- void DrawWidget::resizeEvent(QResizeEvent *event)
- {
- if(height() > pix->height() || width() > pix->width())
- {
- QPixmap *newPix = new QPixmap(size());
- newPix->fill(Qt::white);
- QPainter p(newPix);
- p.drawPixmap(QPoint(0,0), *pix);
- pix = newPix;
- }
- QWidget::resizeEvent(event);
- }
- void DrawWidget::clear()
- {
- QPixmap *clearPix = new QPixmap(size());
- clearPix->fill(Qt::white);
- pix = clearPix;
- update();
- }
5、编辑“mainwindow.h”文件
此文件主要用于申明创建工具栏的函数createToolBar( )和选择线型样式线型颜色的餐函数showStyle( )、showColor( ) 。以及定义需要用到的变量。
代码如下:
- #ifndef MAINWINDOW_H
- #define MAINWINDOW_H
- #include <QMainWindow>
- #include <QLabel>
- #include <QComboBox>
- #include <QSpinBox>
- #include <QToolButton>
- #include "drawwidget.h"
- class MainWindow : public QMainWindow
- {
- Q_OBJECT
- public:
- MainWindow(QWidget *parent = 0);
- ~MainWindow();
- void createToolBar();
- public slots:
- void showStyle();
- void showColor();
- private:
- DrawWidget *drawWidget;
- QLabel *styleLabel;
- QComboBox *styleComboBox;
- QLabel *widthLabel;
- QSpinBox *widthSpinBox;
- QToolButton *colorBtn;
- QToolButton *clearBtn;
- };
- #endif // MAINWINDOW_H
6、编辑“mainwindow.cpp”文件
添加如下代码:
- #include "mainwindow.h"
- #include <QColorDialog>
- #include <QToolBar>
- MainWindow::MainWindow(QWidget *parent)
- : QMainWindow(parent)
- {
- drawWidget = new DrawWidget;
- setCentralWidget(drawWidget);
- createToolBar();
- setMinimumSize(600, 400);
- showStyle();
- drawWidget->setWidth(widthSpinBox->value());
- drawWidget->setColor(Qt::black);
- }
- MainWindow::~MainWindow()
- {
- }
- void MainWindow::createToolBar()
- {
- QToolBar *toolBar = addToolBar("Tool");
- styleLabel = new QLabel(tr("线型风格: ")); //线型风格
- styleComboBox = new QComboBox;
- styleComboBox->addItem(tr("SolodLine") , static_cast<int>(Qt::SolidLine));
- styleComboBox->addItem(tr("DashLine") , static_cast<int>(Qt::DashLine));
- styleComboBox->addItem(tr("DotLine") , static_cast<int>(Qt::DotLine));
- styleComboBox->addItem(tr("DashDotLine") , static_cast<int>(Qt::DashDotLine));
- styleComboBox->addItem(tr("DashDotDotLine") , static_cast<int>(Qt::DashDotDotLine));
- connect(styleComboBox,SIGNAL(activated(int)),this,SLOT(showStyle()));
- widthLabel = new QLabel(tr("线宽:")); //设置笔的线宽
- widthSpinBox = new QSpinBox;
- connect(widthSpinBox,SIGNAL(valueChanged(int)),drawWidget,SLOT(setWidth(int)));
- colorBtn = new QToolButton; //设置按钮的格式
- QPixmap pixmap(30,30);
- pixmap.fill(Qt::red);
- colorBtn->setIcon(QIcon(pixmap));
- connect(colorBtn,SIGNAL(clicked(bool)),this,SLOT(showColor()));
- clearBtn = new QToolButton;
- clearBtn->setText(tr("清除"));
- connect(clearBtn,SIGNAL(clicked(bool)),drawWidget,SLOT(clear()));
- toolBar->addWidget(styleLabel);
- toolBar->addWidget(styleComboBox);
- toolBar->addWidget(widthLabel);
- toolBar->addWidget(widthSpinBox);
- toolBar->addWidget(colorBtn);
- toolBar->addWidget(clearBtn);
- toolBar->setMovable(false); //设置工具条不可拖动
- }
- void MainWindow::showStyle()
- {
- drawWidget->setStyle(styleComboBox->itemData(styleComboBox->currentIndex(),Qt::UserRole).toInt());
- }
- void MainWindow::showColor()
- {
- QColor color = QColorDialog::getColor(static_cast<int>(Qt::black) ,this);
- if(color.isValid())
- {
- drawWidget->setColor(color);
- QPixmap p(20,20);
- p.fill(color);
- colorBtn->setIcon(QIcon(p));
- }
- }
7、编辑“main.cpp”文件
设置一下程序界面中出现的文字的字体和颜色
代码如下:
- #include "mainwindow.h"
- #include "drawwidget.h"
- #include <QApplication>
- int main(int argc, char *argv[])
- {
- QApplication a(argc, argv);
- QFont font("楷体", 15);
- a.setFont(font);
- MainWindow w;
- w.show();
- return a.exec();
- }
至此,整个程序的编码工作便完成了。


 565
565

 被折叠的 条评论
为什么被折叠?


