


Kotlin
Kotlin 是一个基于 JVM 的编程语言,它的简洁、便利早已不言而喻。Kotlin 能够胜任 Java 做的所有事。Kotlin已经普遍应用于安卓客户端的开发,提供了各种语法糖和判空机制,算是一款抓住了Java目前存在的弊端重拳出击的语言。这篇文章使用Kotlin整合SpringBoot进行简单的MySQL与Redis操作
新建项目
1.新建Maven项目,main目录代码文件夹名称默认是java,可以改成kotlin,也可以不改

2.新建对应的包和Application.kt启动文件,idea会自动检测是否需要配置成kotlin编译,选择对应的选项idea会在pom.xml文件中加入编译相关的代码

3.导入相关的依赖SpringBoot,MyBatis,Redis等等
<?xml version="1.0" encoding="UTF-8"?>
<project xmlns="http://maven.apache.org/POM/4.0.0"
         xmlns:xsi="http://www.w3.org/2001/XMLSchema-instance"
         xsi:schemaLocation="http://maven.apache.org/POM/4.0.0 http://maven.apache.org/xsd/maven-4.0.0.xsd">
    <modelVersion>4.0.0</modelVersion>
    <parent>
        <groupId>org.springframework.boot</groupId>
        <artifactId>spring-boot-starter-parent</artifactId>
        <version>2.1.6.RELEASE</version>
        <relativePath/> <!-- lookup parent from repository -->
    </parent>
    <groupId>com.tarcy.ktSpringBoot</groupId>
    <artifactId>com-tarcy-ktSpringBoot</artifactId>
    <version>1.0-SNAPSHOT</version>

    <properties>
        <kotlin.version>1.3.72</kotlin.version>
    </properties>

    <dependencies>
        <dependency>
            <groupId>org.jetbrains.kotlin</groupId>
            <artifactId>kotlin-stdlib-jdk8</artifactId>
            <version>${kotlin.version}</version>
        </dependency>
        <dependency>
            <groupId>org.jetbrains.kotlin</groupId>
            <artifactId>kotlin-test</artifactId>
            <version>${kotlin.version}</version>
            <scope>test</scope>
        </dependency>
        <dependency>
            <groupId>org.springframework.boot</groupId>
            <artifactId>spring-boot-starter</artifactId>
        </dependency>
        <dependency>
            <groupId>org.springframework.boot</groupId>
            <artifactId>spring-boot-starter-web</artifactId>
        </dependency>
        <dependency>
            <groupId>mysql</groupId>
            <artifactId>mysql-connector-java</artifactId>
            <version>8.0.16</version>
        </dependency>
        <dependency>
            <groupId>org.mybatis.spring.boot</groupId>
            <artifactId>mybatis-spring-boot-starter</artifactId>
        </dependency>
        <dependency>
            <groupId>org.springframework.boot</groupId>
            <artifactId>spring-boot-starter-data-redis</artifactId>
        </dependency>
    </dependencies>

    <build>
        <sourceDirectory>src/main/kotlin</sourceDirectory>
        <plugins>
            <plugin>
                <groupId>org.jetbrains.kotlin</groupId>
                <artifactId>kotlin-maven-plugin</artifactId>
                <version>${kotlin.version}</version>
                <executions>
                    <execution>
                        <id>compile</id>
                        <phase>compile</phase>
                        <goals>
                            <goal>compile</goal>
                        </goals>
                    </execution>
                    <execution>
                        <id>test-compile</id>
                        <phase>test-compile</phase>
                        <goals>
                            <goal>test-compile</goal>
                        </goals>
                    </execution>
                </executions>
                <configuration>
                    <jvmTarget>1.8</jvmTarget>
                </configuration>
            </plugin>
        </plugins>
    </build>


</project>
4.在Resources文件夹新建application.yml,填写相关的配置信息
server:
  port: 8080
spring:
  application:
    name: KotlinSpringBoot
  #数据库连接信息
  datasource:
    url: jdbc:mysql:///test?characterEncoding=UTF-8&serverTimezone=UTC&useSSL=false
    username: root
    password: 123456
    driver-class-name: com.mysql.cj.jdbc.Driver
  #Redis连接信息
  redis:
    host: 192.168..
    port: 6479
5.编写Controller测试

@Controller
@RequestMapping("/api/users")
open class UserApi {

    @RequestMapping("/{id}")
    @ResponseBody
    open fun test1(@PathVariable id: Long): String{
        return "你好,用户$id"
    }

}
6.测试结果如下

数据库连接
1.新建一张简单的用户表,并添加数据


2.编写User实体类,可以选择以构造方法的方式编写实体,也可以写在类里面
data class User(var id: Long? = -1, var username: String = "", val age: Int? = 0)
3.在Mapper包内编写SQL相关的语句与代码
@Mapper
interface UserMapper {

    @Select("SELECT * FROM USER WHERE USERNAME = #{username}")
    fun findByUserName(@Param("username") username: String): List<User>

    @Select("SELECT * FROM USER WHERE ID = #{id}")
    fun findUserById(@Param("id") id: Long): User

    @Insert("INSERT INTO USER(USERNAME, PASSWORD) VALUES(#{username}, #{password})")
    fun insert(@Param("username") username: String, @Param("password") password: String): Int
}
4.在Service包里编写接口UserService,实现对应方法
interface UserService{

    fun findUserById(id: Long):User

}
@Service
class UserServiceImpl : UserService{

	/* kotlin中建议以lateinit var修饰依赖注入的属性,表示延迟初始化。当无法在构造函数提供非空初始器,并避免属性的空检查时加入lateinit关键字修饰对应属性
	*/
    @Resource
    lateinit var userMapper: UserMapper
	/*当然,类似java开发常用的写法也是可行的。kotlin对于空对象的判定非常严格,记得加上空检查并赋予初始值。在调用属性方法前都需做判空处理,例如userMapper?.findUserById
	@Autowired
    private val userMapper: UserMapper? = null
	*/
    override fun findUserById(id: Long): User {
        return userMapper.findUserById(id)
    }
}
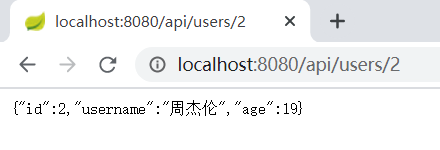
5.在controller中编写方法并测试
  	@Resource
    lateinit var userService: UserService

    @RequestMapping("/{id}")
    @ResponseBody
    open fun findUserById(@PathVariable id: Long): User {
        return userService.findUserById(id)
    }
整合Redis
1.加入对应依赖,前面的pom.xml里已经加入
2.编写对应Service方法,模拟生成验证码与检验验证码的业务
	@Resource
    lateinit var redisTemplate: RedisTemplate<Int,String>
	 override fun setCode(id: Int):String{
        //生成验证码
        val code = generateCode(6)
        //把验证码保存到Redis中,两分钟过期
        this.redisTemplate.opsForValue().set(id, code, 2, TimeUnit.MINUTES)
        return code
    }

    override fun verifyCode(id: Int, code: String): Boolean {
        var codeFromRedis = redisTemplate.opsForValue().get(id).toString()
        return codeFromRedis == code
    }
	//生成n位数的随机数
    fun generateCode(len: Int): String{
        var bit = Math.pow(10,len)
        var res = (Math.random()*9+1)*bit
        return num.toString()
    }
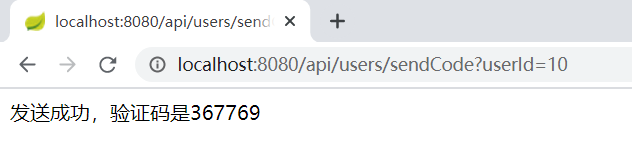
3.编写对应controller方法
@RequestMapping("/sendCode")
@ResponseBody
open fun sendCode(@RequestParam("userId") id: Int): String{
return "发送成功,验证码是${userService.setCode(id)}"
}
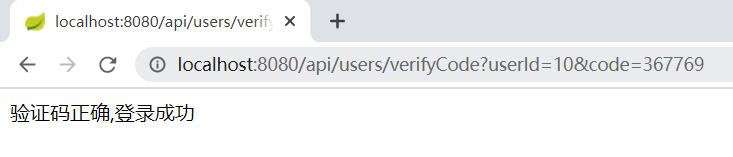
@RequestMapping("/verifyCode")
@ResponseBody
open fun verifyCode(@RequestParam("userId") id: Int,@RequestParam("code") code: String): String{
return if(userService.verifyCode(id, code)) "验证码正确,登录成功" else "验证码错误,请重试"
}
4.测试

总结
刚开始入门kotlin几天时间,花了两三天的时间学语法,两三天的时间用kotlin做了一些leecode题目,这两天尝试后端开发,尝试写一个小项目,写的不好的地方还请多多指教。


 859
859


 被折叠的 条评论
为什么被折叠?
被折叠的 条评论
为什么被折叠?
 到【灌水乐园】发言


