


原型的是一种创建的设计模式,主用来创建的复杂的对象和构建耗时的实例。通过克隆已有的对象来创建的新的对象,从而节省时间和内存。
感谢
原型的模式介绍
原型模式的uml图
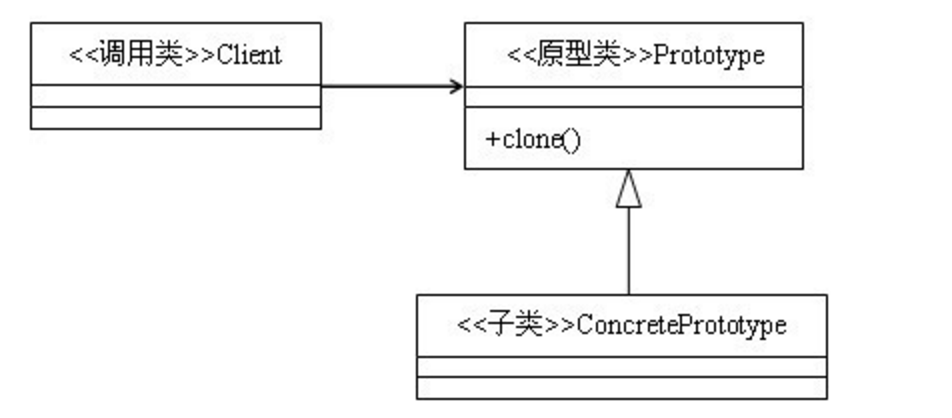
- Client 客户端类调用的类
- Prototype 提供clone()等方法的原型抽象接口
- ConcretePrototype 具体的原型的函数
原型的栗子
案例分析:多账号系统管理
我们需要做一个的类似的多用户登陆的简单系统,我们只能够在我的里面去创建的用户,并修改用户的属性,再其他的地方我们只能使用的这个的用户,不能够去修改这个用户的属性,但是随着的代码的迭代,可能在后期的维护过程中,有人会修改用户的信息,从而造成整体的问题。所以我们需要在其他的地方去使用的这个对象的副本。所以在这里我们可以使用原型模式。
package的截图
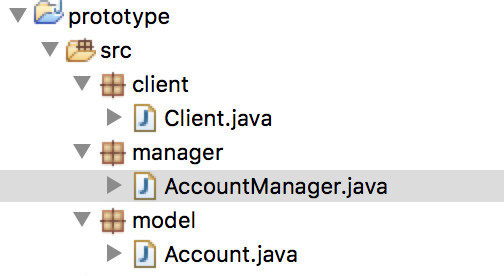
- AccountManager :管理的Account, 负责的生成的Account,返回root Account,以及提供副本的Account 对象。
- Account : ConcretePrototype
- Client : 客户端调用的Account的类。
- Cloneable : Prototype
Account model 类的代码
典型的model类,实现的Cloneable
public class Account implements Cloneable{
    private int id;
    private String name;
    private int age;
    private String desc;

    public Account(int id,int age,String name,String desc){
        this.id = id;
        this.age = age;
        this.name = name;
        this.desc = desc;
    }

    public Account clone(){
        Account clone = null;
        try {
            clone = (Account) super.clone();
        } catch (CloneNotSupportedException e) {
            e.printStackTrace();
        }

        return clone;
    }

    public int getId(){
        return id;
    }

    public String getName(){
        return name;
    }

    public int getAge(){
        return age;
    }

    public String getDesc(){
        return desc;
    }
}
AccountManager
管理的Account,提供最原始的以及生成新的副本的Account。
public class AccountManager {
    public static AccountManager sAccountManager;

    private AccountManager(){}

    public static AccountManager getAccountManager(){
        if(sAccountManager==null){
            synchronized(AccountManager.class){
                if(sAccountManager==null){
                    sAccountManager = new AccountManager();
                }
            }
        }
        return sAccountManager;
    }


    private Map<Integer,Account> accountMap = new HashMap<Integer,Account>();

    public synchronized Account newAccount(int id,int age,String name,String desc){
        Account account = accountMap.containsKey(id) ? accountMap.get(id) : new Account(id,age,name,desc);
        accountMap.put(id, account);
        return account;
    }

    public Account getAccountById(int id) throws Exception{
        if(!accountMap.containsKey(id)){
            throw new Exception("没有当前的id的帐号");
        }

        return (Account) accountMap.get(id).clone();
    }

    public Account getRootAccountById(int id) throws Exception{
        if(!accountMap.containsKey(id)){
            throw new Exception("没有当前的id的帐号");
        }

        return accountMap.get(id);
    }
}
Client 调用Account的客户端类
public class Client {
    public static void main(String[] args) {
        //我的界面,生成新的Account
        AccountManager.getAccountManager().newAccount(1, 13, "Rrtoyewx", "Rrtoyewx是一个长不大的孩子");

        //其他的界面中客户端去获取的account,不允许修改的account的属性。即使修改了也不能去的改变最原始的
        try {
            Account accountClone = AccountManager.getAccountManager().getAccountById(1);
            Account accountRoot = AccountManager.getAccountManager().getRootAccountById(1);

            System.out.println("age:"+accountClone.getAge());
            System.out.println("id:"+accountClone.getId());
            System.out.println("name:"+accountClone.getName());
            System.out.println("desc:"+accountClone.getDesc());
            System.out.println("accountClone==accountRoot是:"+(accountClone==accountRoot));

        } catch (Exception e) {
            e.printStackTrace();
        }
    }
}
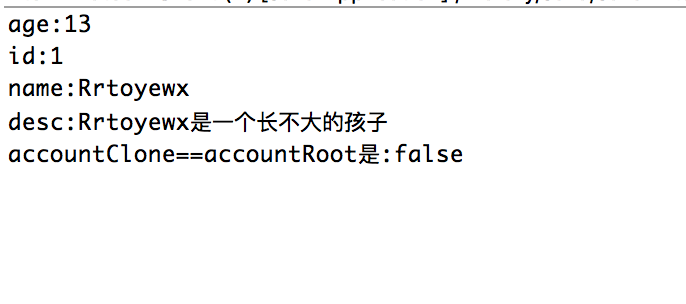
从上面就可以看出的,当我们在其他的地方去得到clone的Account ,即使我们去修改其属性的的话,对我们的AccountManager管理的Account并没有产生影响。
原型模式的注意点
- 原型的模式必须要的又个提供克隆的主体。不然没办法进行clone的。
- clone产生的副本,不会走构造器的方法。
- cloned的效率要比通过构造器生成的对象的效率要高。所以在尝试多次生成数据结构复杂的对象的时候,考虑好情况下,尽量使用原型模式去创建的对象。
- 深度拷贝和浅拷贝。
深度拷贝和浅拷贝
- 浅拷贝实际是对成员变量所有的字段进行一次拷贝,对于8中常见的包装类,string类型
- 引用类型的拷贝
上述的栗子是一个典型浅拷贝,上面的Account类成员变量都是8中常见的包装类以及string类,完全的浅拷贝
如果对于上述的Account的类,我们多了一个成员字段Address,Address是一个引用的类型
Account 类
public class Account implements Cloneable{
    private int id;
    private String name;
    private int age;
    private String desc;
    private Address address;

    public Account(int id,int age,String name,String desc){
        this.id = id;
        this.age = age;
        this.name = name;
        this.desc = desc;
    }

    public Account(int id,int age,String name,String desc,Address address){
        this.id = id;
        this.age = age;
        this.name = name;
        this.desc = desc;
        this.address = address;
    }


    public int getId(){
        return id;
    }

    public String getName(){
        return name;
    }

    public int getAge(){
        return age;
    }

    public String getDesc(){
        return desc;
    }

    public Address getAddress(){
        return address;
    }

    public Account clone(){
        Account clone = null;

        try {
            clone = (Account) super.clone();
            clone.address = this.address.clone();
        } catch (CloneNotSupportedException e) {
            e.printStackTrace();
        }

        return clone;
    }
}
Address 类
public class Address implements Cloneable {
    private String name;
    private String location;

    public Address(){}

    public Address(String name,String location){
        this.name = name;
        this.location = location;
    }
}
Client类
public class Client {
public static void main(String[] args) {
//我的界面,生成新的Account
AccountManager.getAccountManager().newAccount(1, 13, "Rrtoyewx", "Rrtoyewx是一个长不大的孩子",new Address("北京","昌平"));
//其他的界面中客户端去获取的account,不允许修改的account的属性。即使修改了也不能去的改变最原始的
try {
Account accountClone = AccountManager.getAccountManager().getAccountById(1);
Account accountRoot = AccountManager.getAccountManager().getRootAccountById(1);
System.out.println("clone age:"+accountClone.getAge());
System.out.println("clone id:"+accountClone.getId());
System.out.println("clone name:"+accountClone.getName());
System.out.println("clone desc:"+accountClone.getDesc());
System.out.println("clone address:"+accountClone.getAddress());
System.out.println("address:"+accountRoot.getAddress());
System.out.println("accountClone==accountRoot是:"+(accountClone==accountRoot));
} catch (Exception e) {
e.printStackTrace();
}
}
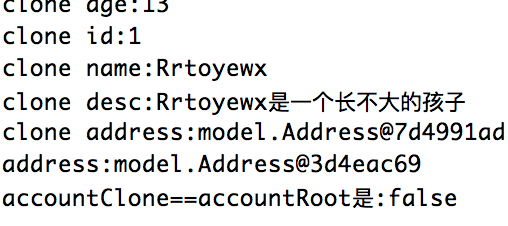
}这个Account 类中有个Address引用类型的address成员变量,这个时候还是采用软拷贝的方式,我们会看到打印的log
log图:
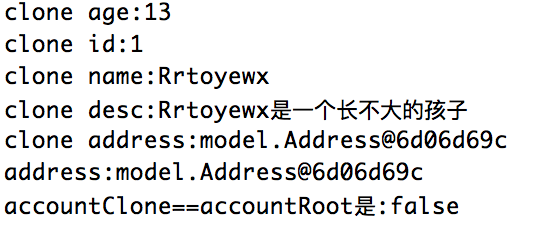
我们可以看到new Account对象Address对象的地址和Clone Account是一样,所以在从某种的意义上来说,还并没有保护好Account对象。因为我们修改了Clone Account的Address的地址,那么原生的Account的Address对象地址也同样会被修改了。所以我们这个时候需要采用了深度拷贝。我们对Address的类要做修改。
深拷贝的第一种方式,实现clone的方法
Address 实现Cloneable的接口,并重写clone()的方法。
public Address clone(){
        Address clone = null;
        try {
            clone = (Address) super.clone();
            clone.location = this.location;
            clone.name = this.name;
        } catch (CloneNotSupportedException e) {
            e.printStackTrace();
        }

        return clone;
    }
Account类clone()的方法。
public Account clone(){
        Account clone = null;

        try {
            clone = (Account) super.clone();
            clone.address = this.address.clone();
        } catch (CloneNotSupportedException e) {
            e.printStackTrace();
        }

        return clone;
    }
深拷贝的第二种方式,序列化的方式
Address 定义的deepclone的方法,并通过对象流写入和读出的操作实现的复制的功能。
public Address deepClone() throws IOException, ClassNotFoundException{
        ByteArrayOutputStream baos = new ByteArrayOutputStream();
        ObjectOutputStream oos =  new ObjectOutputStream(baos);
        oos.writeObject(this);

        ByteArrayInputStream bais = new ByteArrayInputStream(baos.toByteArray());
        ObjectInputStream ois = new ObjectInputStream(bais);

        return (Address) ois.readObject();
    }
Account类的修改
public Account clone(){
        Account clone = null;

        try {
            clone = (Account) super.clone();
            clone.address = this.address.deepClone();
        } catch (CloneNotSupportedException e) {
            e.printStackTrace();
        } catch(IOException e){
            e.printStackTrace();
        } catch(ClassNotFoundException e){
            e.printStackTrace();
        }

        return clone;
    }
无论是第一种clone深度拷贝还是第二种的序列化的深度拷贝打印的log都为下图
原型模式的一些简单的封装
上面我们知道原型模式存在深拷贝和浅拷贝,所以对于model包下的类,我们不能简单概括为一个clone的方法,我们区分深拷贝和浅拷贝的。
所以在实际的使用情况,我们可以自定义一个PrototypeAble的接口。
PrototypeAbled接口:
public interface PrototypeAble extends Cloneable,Serializable{

    PrototypeAble lightClone() throws CloneNotSupportedException;

    PrototypeAble deepClone() throws CloneNotSupportedException, ClassNotFoundException, IOException;

    PrototypeAble root();
}
当我们定义好这样的一个接口后,我们对上面的栗子进行修改如下,
AccountPrototype类
public class AccountPrototype implements PrototypeAble{
    private int id;
    private String name;
    private int age;
    private String desc;
    private Address address;

    public AccountPrototype(int id,int age,String name,String desc,Address address){
        this.id = id;
        this.age = age;
        this.name = name;
        this.desc = desc;
        this.address = address;
    }

    @Override
    public PrototypeAble lightClone() throws CloneNotSupportedException {
        return (PrototypeAble) super.clone();
    }

    @Override
    public PrototypeAble deepClone() throws CloneNotSupportedException, ClassNotFoundException, IOException {
        AccountPrototype clone = null;

        clone = (AccountPrototype) super.clone();
        clone.address = this.address.deepClone();

        return clone;
    }

    @Override
    public PrototypeAble root() {
        return this;
    }

    @Override
    public String toString() {
        return "AccountPrototype [id=" + id + ", name=" + name + ", age=" + age + ", desc=" + desc + ", address="
                + address + "]";
    }
}
AddressPrototype类
public class AddressPrototype implements PrototypeAble {
    private String name;
    private String location;

    @Override
    public PrototypeAble lightClone() throws CloneNotSupportedException {
        return (PrototypeAble) super.clone();
    }

    @Override
    public PrototypeAble deepClone() throws CloneNotSupportedException {
        return (PrototypeAble) super.clone();
    }

    @Override
    public PrototypeAble root() {
        return this;
    }
}
AccountManager类
public class AccountManager {
    public static AccountManager sAccountManager;

    private Map<Integer,AccountPrototype> accountMap = new HashMap<Integer,AccountPrototype>();

    private AccountManager(){}

    public static AccountManager getAccountManager(){
        if(sAccountManager==null){
            synchronized(AccountManager.class){
                if(sAccountManager==null){
                    sAccountManager = new AccountManager();
                }
            }
        }
        return sAccountManager;
    }

    public synchronized AccountPrototype newAccount(int id,int age,String name,String desc,Address address){
        AccountPrototype account = accountMap.containsKey(id) ? accountMap.get(id) : new AccountPrototype(id,age,name,desc,address);
        accountMap.put(id, account);
        return account;
    }

    public AccountPrototype getDeepCloneAccountById(int id) throws Exception{
        if(!accountMap.containsKey(id)){
            throw new Exception("没有当前的id的帐号");
        }

        return (AccountPrototype) accountMap.get(id).deepClone();
    }

    public AccountPrototype getLightCloneAccountById(int id) throws Exception{
        if(!accountMap.containsKey(id)){
            throw new Exception("没有当前的id的帐号");
        }

        return (AccountPrototype) accountMap.get(id).lightClone();
    }

    public AccountPrototype getRootAccountById(int id) throws Exception{
        if(!accountMap.containsKey(id)){
            throw new Exception("没有当前的id的帐号");
        }

        return (AccountPrototype) accountMap.get(id).root();
    }
}
client类
public class Client {
    public static void main(String[] args) {
        //我的界面,生成新的Account
        AccountManager.getAccountManager().newAccount(1, 13, "Rrtoyewx", "Rrtoyewx是一个长不大的孩子",new Address("北京","昌平"));

        //其他的界面中客户端去获取的account,不允许修改的account的属性。即使修改了也不能去的改变最原始的
        try {
            AccountPrototype deepCloneAccount = AccountManager.getAccountManager().getDeepCloneAccountById(1);
            AccountPrototype lightCloneAccount = AccountManager.getAccountManager().getLightCloneAccountById(1);
            AccountPrototype rootAccount = AccountManager.getAccountManager().getRootAccountById(1);

            System.out.println("deepCloneAccount: "+deepCloneAccount.toString());
            System.out.println("lightCloneAccount: "+lightCloneAccount.toString());
            System.out.println("rootAccount: "+rootAccount.toString());

        } catch (Exception e) {
            e.printStackTrace();
        }
    }
}
这个时候类的结构图已经正如我们一开始uml的图表示那样的,
- Client 客户端类调用的类,如我们此时的Client的类
- Prototype 提供clone()等方法的原型抽象接口,相当于我们的PrototypeAble的接口
- ConcretePrototype 具体的原型的函数,如栗子种的AccountPrototype和AddressPrototype类
- AccountManager Account的管理类
打印的结果也如下图

打印的结果也正如我们前面说的那样。
总结
至此我们已经将原型模式说完。记住
1. 原型模式是一种创建模式
2. 原型模式适用于构建较复杂,耗时较长的对象
3. 原型模式不经过构造方法
4. 使用原型模式区分好深拷贝和浅拷贝
5. 对于简单的对象,不建议使用的原型模式


 406
406

 被折叠的 条评论
为什么被折叠?
被折叠的 条评论
为什么被折叠?
 到【灌水乐园】发言


