


 本文详细解释了DjangoRESTFramework(DRF)中的身份验证机制,包括request.user和request.auth的作用,认证方案的设置方法,单视图和全局设置的区别,以及如何处理多个认证来源。同时探讨了认证组件的实现和错误处理策略。
概念:request.user、request.auth、认证方案authentication_classes
官网原文:
验证始终在视图的最开始进行,在执行权限和限制检查之前以及允许任何其他代码继续执行之前。
request.user 属性通常被设置为contrib.auth 包中 User 类的一个实例。
request.auth 属性用于任何其他身份验证信息,例如,它可以用于表示请求签名的身份验证令牌。
注意: 不要忘了认证本身不会允许或拒绝传入的请求,它只是简单识别请求携带的凭证。所以即使认证不通过,也会执行视图函数,只不过request.user和request.auth为None。这种叫允许匿名访问。如果想要设置不允许,请见后面的设置方案 > 不允许匿名访问。
认证方案authentication_classes总是被定义为一个类的列表。DRF将尝试使用列表中的每个类进行身份验证,并使用成功完成验证的第一个类的返回值设置 request.user 和request.auth。
如果没有类进行验证,request.user 将被设置成 django.contrib.auth.models.AnonymousUser的实例(也就是匿名用户),request.auth 将被设置成None。
未认证请求的request.user 和 request.auth 的值可以使用 UNAUTHENTICATED_USER和UNAUTHENTICATED_TOKEN 设置进行修改。
设置认证方案
单视图设置优先度更高,会覆盖全局设置。
源码分析请见本篇博客最后的更多 > 全局和局部设置认证方案的继承源码
认证方案不能写在views中,因为会出现循环引用的问题。
全局设置
可以使用 DEFAULT_AUTHENTICATION_CLASSES 设置全局的默认身份验证方案。比如:
REST_FRAMEWORK = {
    'DEFAULT_AUTHENTICATION_CLASSES': (
        'rest_framework.authentication.BasicAuthentication',
        'rest_framework.authentication.SessionAuthentication',
        'app01.tools.auth.MyAuthentication'
        # 自定义认证类
    )
}
单视图设置
你还可以使用基于APIView类视图的方式,在每个view或每个viewset基础上设置身份验证方案。
譬如如下:
toosl/auth.py
from rest_framework.authentication import BaseAuthentication
from rest_framework.exceptions import AuthenticationFailed


class MyAuthentication(BaseAuthentication):
    def authenticate(self, request):
        token = request.query_params.get("token")
        # drf获得路径上的参数都是用query_params.get()方法获得
        if token:
            return ("shanshan", token)
            # 实际上这里返回的是一个元组,元组中的第一个元素为request.user,第二个元素为request.auth
        else:
            raise AuthenticationFailed({"code": 2000, "error": "token is not exist"})
views.py
from rest_framework.response import Response
from rest_framework.views import APIView
from app01.tools.auth import MyAuthentication


class LoginView(APIView):
    authentication_classes = []

    def get(self, request):
        return Response("LoginView")


class UserView(APIView):
    authentication_classes = [MyAuthentication, ]

    def get(self, request):
        return Response("UserView")
urls.py
from django.contrib import admin
from django.urls import path
from app01 import views


urlpatterns = [
    path(r'admin/', admin.site.urls),
    path(r'user/', views.UserView.as_view()),
    path(r'login/', views.LoginView.as_view())
]
或者,如果你使用基于函数的视图,那就使用@authentication_classes装饰器。
@api_view(['GET'])
@authentication_classes((SessionAuthentication, BasicAuthentication))
def example_view(request, format=None):
    content = {
        'user': unicode(request.user),  # `django.contrib.auth.User` 实例。
        'auth': unicode(request.auth),  # None
    }
    return Response(content)
多个认证方案
可能存在以下应用场景就是,token可能从url中获取,可能从请求头中获取,可能从请求体中获取。那么我们就不可能只写一个认证方案了,而且也不可以直接在认证方案中抛出错误,因为即使这个认证没有通过,它可能在下个认证中通过了。
此时代码如下:
tools/auth.py:
from rest_framework.authentication import BaseAuthentication


class UrlAuthentication(BaseAuthentication):
    def authenticate(self, request):
        token = request.query_params.get("token")
        # drf获得路径上的参数都是用query_params.get()方法获得
        if token:
            return ("shanshan", token)
            # 实际上这里返回的是一个元组,元组中的第一个元素为request.user,第二个元素为request.auth
        else:
            return None


class HeaderAuthentication(BaseAuthentication):
    def authenticate(self, request):
        # drf获得请求头上的参数都是用META.get()方法获得
        # 注意这里虽然获取用的是HTTP_AUTHORIZATION,但是实际用apifox等测试,传给apifox的参数是Authorization
        token = request.META.get("HTTP_AUTHORIZATION")
        if token:
            return ("shanshan", token)
        else:
            return None


class BodyAuthentication(BaseAuthentication):
    def authenticate(self, request):
        # drf获得请求体上的参数都是用data.get()方法获得
        token = request.data.get("token")
        if token:
            return ("shanshan", token)
        else:
            return None
views.py
from rest_framework.response import Response
from rest_framework.views import APIView

from app01.tools.auth import UrlAuthentication, HeaderAuthentication, BodyAuthentication, NoAnonymousAuthentication


class LoginView(APIView):
    authentication_classes = []

    def get(self, request):
        return Response("LoginView")


class UserView(APIView):
    authentication_classes = [UrlAuthentication, HeaderAuthentication, BodyAuthentication, NoAnonymousAuthentication]

    def get(self, request):
        return Response("UserView")

    def post(self, request):
        re
不允许匿名访问
需要再多加一个认证方案,如下:
from rest_framework.exceptions import AuthenticationFailed

class NoAnonymousAuthentication(BaseAuthentication):
    def authenticate(self, request):
        raise AuthenticationFailed({"code": 2000, "error": "token is not exist and reject anonymous user"})
能走到这个认证方案,说明前面的方案都没有通过,返回了None,所以直接在这个方案里面抛出异常即可。
更多
全局和局部设置认证方案的继承源码
首先来看一段继承的代码
class Base(object):
    a = 123

    def f1(self):
        self.f2()
        print(self.a)

    def f2(self):
        print("base.f2")


class Son(Base):
    a = 456

    def f2(self):
        print("son.f2")


obj = Son()
obj.f1()
执行这段代码,实际打印结果是
son.f2
456
调用链如下:
obj.f1() -> Base.f1() -> self.f2()
那么关键来了,这里的self.f2()究竟调用的是Base的f2,还是Son的f2。
答案就是Son的f2,因为obj是Son的实例,所以self也是Son。
同样的,打印的self.a,也是打印的Son中的a
那么将上述的代码的f2去掉,只看类变量a,再修改一下,其实就是DRF中全局和局部设置认证方案的继承源码
from django.conf import settings
from app01.tools.auth import MyAuthentication


class APIView(object):
    authentication_classes = settings.AUTHENTICATION_CLASSES

    def dispatch(self):
        print(self.authentication_classes)


class UserView(APIView):
    authentication_classes = [MyAuthentication, ]


obj = UserView()
obj.dispatch()
这也就是为什么局部优先度更高的原因。
DRF完整认证源码分析
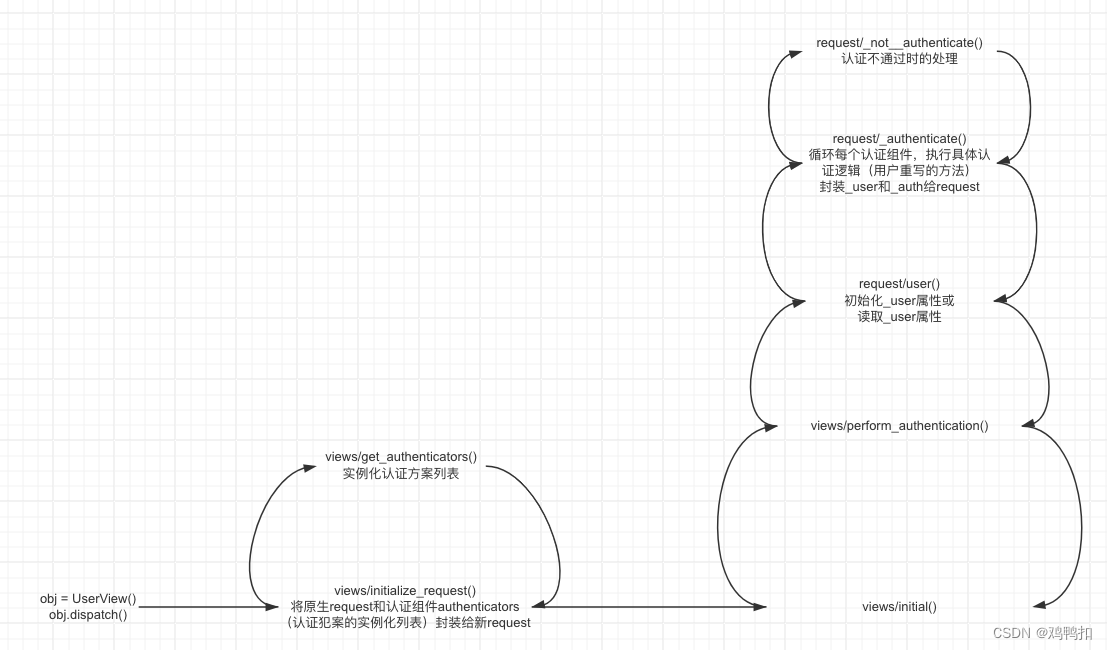
rest_framework/views.py
    def dispatch(self, request, *args, **kwargs):
        self.args = args
        self.kwargs = kwargs
        # 以上为处理参数

        request = self.initialize_request(request, *args, **kwargs)
        # 以上为封装请求,现在的request=原生request+认证组件authenticators(认证方案列表的实例化列表)

        self.request = request
        self.initial(request, *args, **kwargs)

		handler = getattr(self, request.method.lower(), self.http_method_not_allowed)
        # 以上为正式执行视图函数的语句

    def initialize_request(self, request, *args, **kwargs):
        return Request(
            request,
            authenticators=self.get_authenticators()
            # 认证方案列表的实例化列表
        )

    def get_authenticators(self):
        return [auth() for auth in self.authentication_classes]
        # 读取自己的认证方案列表并且实例化,随后返回

    def initial(self, request, *args, **kwargs):
        self.perform_authentication(request)

    def perform_authentication(self, request):
        request.user
rest_framework/request.py
def __init__(self, request, authenticators=None):
        self._request = request
        self.authenticators = authenticators or ()

    @property
    def user(self):
    # 整个函数主要是为了初始化_user属性或者读取_user属性
        if not hasattr(self, '_user'):
            with wrap_attributeerrors():
                self._authenticate()
        return self._user

    def _authenticate(self):
        for authenticator in self.authenticators:
            try:
                user_auth_tuple = authenticator.authenticate(self)
                # 由自定义或者默认的认证方案的authenticate方法,得到元组赋给user和auth
            except exceptions.APIException:
                self._not_authenticated()
                # 认证不通过
                raise

            if user_auth_tuple is not None:
                self._authenticator = authenticator
                self.user, self.auth = user_auth_tuple
                return
		# 说明前面的认证方案都没有通过,都返回了None
        self._not_authenticated()

    def _not_authenticated(self):
        self._authenticator = None

        if api_settings.UNAUTHENTICATED_USER:
            self.user = api_settings.UNAUTHENTICATED_USER()
        else:
            self.user = None

        if api_settings.UNAUTHENTICATED_TOKEN:
            self.auth = api_settings.UNAUTHENTICATED_TOKEN()
        else:
            self.auth = None

    @property
    def auth(self):
        if not hasattr(self, '_auth'):
            with wrap_attributeerrors():
                self._authenticate()
        return self._auth

    @auth.setter
    def auth(self, value):
        self._auth = value
        self._request.auth = value
具体调用链就是
认证码不一致的问题
def dispatch(self, request, *args, **kwargs):
    try:
        self.initial(request, *args, **kwargs)
        handler = getattr(self, request.method.lower(),self.http_method_not_allowed)
        response = handler(request, *args, **kwargs)
    except Exception as exc:
        response = self.handle_exception(exc)
    self.response = self.finalize_response(request, response, *args, **kwargs)
    return self.response

def initial(self, request, *args, **kwargs):
    self.perform_authentication(request)
    self.check_permissions(request)

def check_permissions(self, request):
    for permission in self.get_permissions():
        if not permission.has_permission(request, self):
            self.permission_denied(
                request,
                message=getattr(permission, 'message', None),
                code=getattr(permission, 'code', None)
            )
def permission_denied(self, request, message=None, code=None):
    if request.authenticators and not request.successful_authenticator:
        raise exceptions.NotAuthenticated()
    raise exceptions.PermissionDenied(detail=message, code=code)

class NotAuthenticated(APIException):
    status_code = status.HTTP_401_UNAUTHORIZED
    default_detail = _('Authentication credentials were not provided.')
    default_code = 'not_authenticated'
具体调用链就是:

那么为什么最终抛出来的异常明明状态码是401,但是发送请求如果认证没有通过,却是403呢?
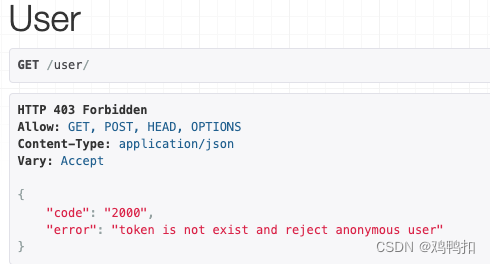
这是因为这个异常在dispatch()里面才捕获,而且走的是self.handle_exception(exc),函数源码如下:
def handle_exception(self, exc):
    if isinstance(exc, (exceptions.NotAuthenticated,
                        exceptions.AuthenticationFailed)):
        # WWW-Authenticate header for 401 responses, else coerce to 403
        auth_header = self.get_authenticate_header(self.request)

        if auth_header:
            exc.auth_header = auth_header
        else:
            exc.status_code = status.HTTP_403_FORBIDDEN

    exception_handler = self.get_exception_handler()

    context = self.get_exception_handler_context()
    response = exception_handler(exc, context)

    if response is None:
        self.raise_uncaught_exception(exc)

    response.exception = True
    return response
可以看到,如果有auth_header,那么状态码不会变,但是如果没有,状态码就会变为403。
那么auth_header哪里来的呢?可以看到是由,函数源码如下:
def get_authenticate_header(self, request):
    authenticators = self.get_authenticators()
    if authenticators:
        return authenticators[0].authenticate_header(request)

def authenticate_header(self, request):
    return 'Basic realm="%s"' % self.www_authenticate_realm
意思就是如果有认证组件列表,那么调用该列表的第一个认证组件的authenticate_header方法,里面组装,之后返回了auth_header。
也就是核心是要重写authenticate_header方法。那么我们来试试吧
class UrlAuthentication(BaseAuthentication):
    def authenticate(self, request):
        token = request.query_params.get("token")
        # drf获得路径上的参数都是用query_params.get()方法获得
        if token:
            return ("shanshan", token)
            # 实际上这里返回的是一个元组,元组中的第一个元素为request.user,第二个元素为request.auth
        else:
            return None

    def authenticate_header(self, request):
        return "API"
        # 一般都默认返回API即可
此时再认证不通过的话,会变为
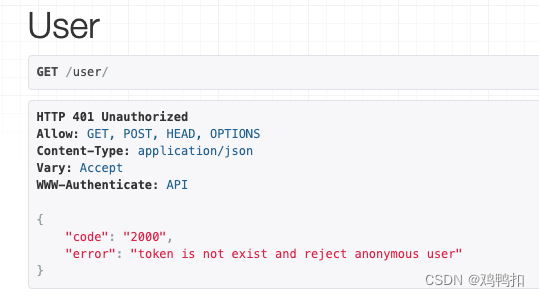
可以看到认证码变为了401。而且自动加上WWW-Authenticate:API。
而且要注意,因为调用的是该列表的第一个认证组件==的authenticate_header方法,而且我们的UserView的第一个认证组件就是UrlAuthentication。那么我们此时如果我们不重写UrlAuthentication,而是去重写HeaderAuthentication,如下:
class UrlAuthentication(BaseAuthentication):
    def authenticate(self, request):
        token = request.query_params.get("token")
        # drf获得路径上的参数都是用query_params.get()方法获得
        if token:
            return ("shanshan", token)
            # 实际上这里返回的是一个元组,元组中的第一个元素为request.user,第二个元素为request.auth
        else:
            return None


class HeaderAuthentication(BaseAuthentication):
    def authenticate(self, request):
        # drf获得请求头上的参数都是用META.get()方法获得
        # 注意这里虽然获取用的是HTTP_AUTHORIZATION,但是实际用apifox等测试,传给apifox的参数是Authorization
        token = request.META.get("HTTP_AUTHORIZATION")
        if token:
            return ("shanshan", token)
        else:
            return None

        def authenticate_header(self, request):
            return "API"
可以首先就看到在pycharm里HeaderAuthentication的authenticate_header是灰色的,表示没有被调用。测试也会发现状态码还是403,而且没有WWW-Authenticate:API
绕开authenticate实现认证组件的方法
答案是:当然没有啦。哈哈。
因为认证组件都继承了BaseAuthentication,而后者源码如下:
class BaseAuthentication:
    """
    All authentication classes should extend BaseAuthentication.
    """

    def authenticate(self, request):
        """
        raise NotImplementedError(".authenticate() must be overridden.")

    def authenticate_header(self, request):
        pass
可以看到官方在BaseAuthentication下的注释就是所有认证组件都应该继承BaseAuthentication
然后都应该重写authenticate方法,否则会报错NotImplementedError。


 3万+
3万+


 被折叠的 条评论
为什么被折叠?
被折叠的 条评论
为什么被折叠?
 到【灌水乐园】发言


