


Android studio中AIDL的使用
1 AIDL介绍
AIDL是Android Interface Defination Language的缩写,AIDL是Android中不同进程间进行通信的一种定义性的语言。但是由于跨进程间的通信往往需要较大的资源消耗,所以AIDL最好不要滥用。对于AIDL的使用,Google在官方文档中也给出了相应的使用情形。
Note: Using AIDL is necessary only if you allow clients from different applications to access your service for IPC and want to handle multithreading in your service. If you do not need to perform concurrent IPC across different applications, you should create your interface by implementing a Binder or, if you want to perform IPC, but do not need to handle multithreading, implement your interface using a Messenger. Regardless, be sure that you understand Bound Services before implementing an AIDL.
也就是说要同时满足IPC(Inter-Process Communication,进程间通信)和多线程。其他的情形的话,如广播(应用A在AndroidManifest.xml中注册指定Action的广播)应用B发送指定Action的广播,A就能收到信息,这样也能看成不同应用之间完成了通讯(但是这种通讯是单向的);还如ContentProvider,通过URI接口暴露数据给其他应用访问;
2 Android studio中使用AIDL
因为,AIDL是Android为了满足多个进程间的通信的一种定义性语言,所以在这里我们先在Android studio下创建两个工程项目,AIDLServer以及AIDLClient。
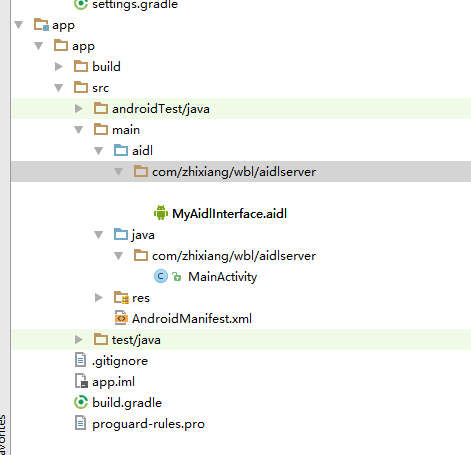
第一步 在AIDLServer项目的java同级目录下,单击鼠标右键然后依次new->AIDL->AIDL File,输入文件名称,点击确定后,自动会在java同级目录下创建一个aidl的文件夹,以及生成一个和项目同包名的的目录结构,以及我们创建的AIDL文件。如下图所示:
接下来,我们进入创建的MyAidlInterface.aidl这样的一个文件,Android studio自动给我们生成的代码如下
// MyAidlInterface.aidl
package com.zhixiang.wbl.aidlserver;

// Declare any non-default types here with import statements

interface MyAidlInterface {
    /**
     * Demonstrates some basic types that you can use as parameters
     * and return values in AIDL.
     */
    void basicTypes(int anInt, long aLong, boolean aBoolean, float aFloat,
            double aDouble, String aString);
}从这里可以看出AIDL支持的基本数据类型有哪些,具体支持的数据类型可以参考博客AIDL 服务只支持有限的数据类型,因为此篇文章只是介绍一下AIDL如何使用,所以我们只实现一个简单的客户进程使用服务进程进行简单的求和运算。
第二步 在AIDL文件中声明下面的求和函数,并且重新编译一下项目后就能在build-generated/source-aidl/debug-项目包名下生成一个和AIDL同文件名的java文件,至此我们就创建好了AIDL文件。
package com.zhixiang.wbl.aidlserver;
interface MyAidlInterface {
     int sum(int num1,int num2);
}
第三步 新建一个Service的类MyRemoteService,接下来通过MyAidlInterface.Stub这样一种方式创建一个IBinder对象,然后在MyRemoteService中重写onBind的方法,具体代码如下
public class MyRemoteService extends Service
{

    private IBinder iBinder = new  MyAidlInterface.Stub()
    {
        @Override
        public int sum(int num1, int num2) throws RemoteException {
            return num1+num2;
        }
    };
    @Nullable
    @Override
    public IBinder onBind(Intent intent) {
        return iBinder;
    }
}
第四步 为了使客户端进程能够访问到MyRemoteService提供的服务,所以需要在项目AndroidManifest文件下进行声明。
 <service android:name=".MyRemoteService">
     <intent-filter>
        <action android:name="com.zhixiang.wbl.aidlserver.MyRemoteService"></action>
     </intent-filter>
 </service>
第五步 接下来就可以在客户端项目java同目录下创建一个和AIDLServer项目相同的目录结构,包名也应该与服务端保持一致。然后将服务端的MyAidlInterface.aidl文件复制并且粘贴过来。编译一下工程。
第六步 接下里客户端就能正常使用服务端AIDL提供的服务了,下面先给出客户端MainActivity及其布局文件的代码
MainActivity.java
public class MainActivity extends AppCompatActivity
{
    EditText et1;
    EditText et2;
    TextView tvResult;
    MyFirstAidlInterface myFirstAidlInterface;
    private final String TAG="MainActivity";
    private ServiceConnection con = new ServiceConnection() {
        @Override
        public void onServiceConnected(ComponentName name, IBinder service)
        {
          myFirstAidlInterface = MyFirstAidlInterface.Stub.asInterface(service);
            Log.e(TAG, "onServiceConnected: ");
        }

        @Override
        public void onServiceDisconnected(ComponentName name) {
          myFirstAidlInterface = null;
        }
    };

    @Override
    protected void onCreate(Bundle savedInstanceState)
    {
        super.onCreate(savedInstanceState);
        setContentView(R.layout.activity_main);
        et1 = (EditText) findViewById(R.id.id_et_num1);
        et2 = (EditText)findViewById(R.id.id_et_num2);
        tvResult = (TextView) findViewById(R.id.id_tv_result);
        bindMyService();
    }

    private void bindMyService()
    {
        Intent intent = new Intent();
        intent.setAction("com.zhixiang.wbl.aidltest.MyRemoteService");
        bindService(intent,con, Context.BIND_AUTO_CREATE);
    }

    public void sum(View view)
    {
        int num1 = Integer.parseInt(et1.getText().toString().trim());
        int num2 = Integer.parseInt(et2.getText().toString().trim());
        try {
            if (myFirstAidlInterface!=null)
            {
                int result =     myFirstAidlInterface.add(num1,num2);
                tvResult.setText(result+"");
            }
            else
            {
                tvResult.setText("连接失败");
            }

        } catch (RemoteException e) {
            tvResult.setText("Error");
            e.printStackTrace();
        }
    }

    @Override
    protected void onDestroy() {
        super.onDestroy();
        unbindService(con);
    }
}
activity_main.xml
<?xml version="1.0" encoding="utf-8"?>
<LinearLayout xmlns:android="http://schemas.android.com/apk/res/android"
android:layout_width="match_parent"
android:layout_height="match_parent"
android:orientation="vertical"
android:layout_marginLeft="20dp"
>
<EditText
android:id="@+id/id_et_num1"
android:layout_width="40dp"
android:layout_height="wrap_content" />
<TextView
android:layout_width="wrap_content"
android:layout_height="wrap_content"
android:text="+"
/>
<EditText
android:id="@+id/id_et_num2"
android:layout_width="40dp"
android:layout_height="wrap_content" />
<TextView
android:layout_width="wrap_content"
android:layout_height="wrap_content"
android:text="="
/>
<TextView
android:id="@+id/id_tv_result"
android:layout_width="wrap_content"
android:layout_height="wrap_content"
android:text="点击求和按钮求和"
/>
<Button
android:onClick="sum"
android:layout_width="wrap_content"
android:layout_height="wrap_content"
android:text="AIDL求和"
/>
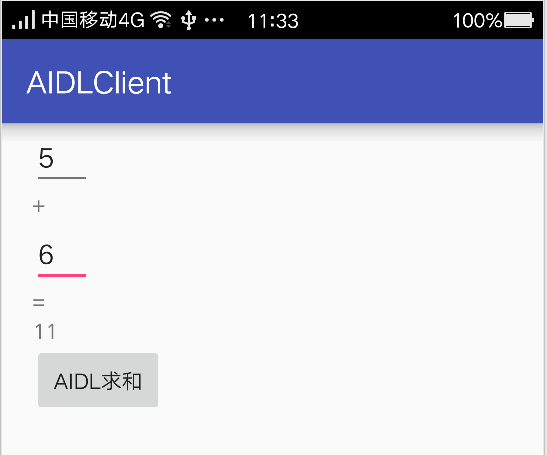
</LinearLayout>至此,就完成了客户端进程通过AIDL实现和服务端进程的通信。下面给出客户端求和的界面:
特别说明:为了避免系统资源的浪费,unbindservice和bindservice一定要成对出现。


 1万+
1万+

 被折叠的 条评论
为什么被折叠?
被折叠的 条评论
为什么被折叠?
 到【灌水乐园】发言


