


概述:
1、在完成4台设备ip配置后默认路由有
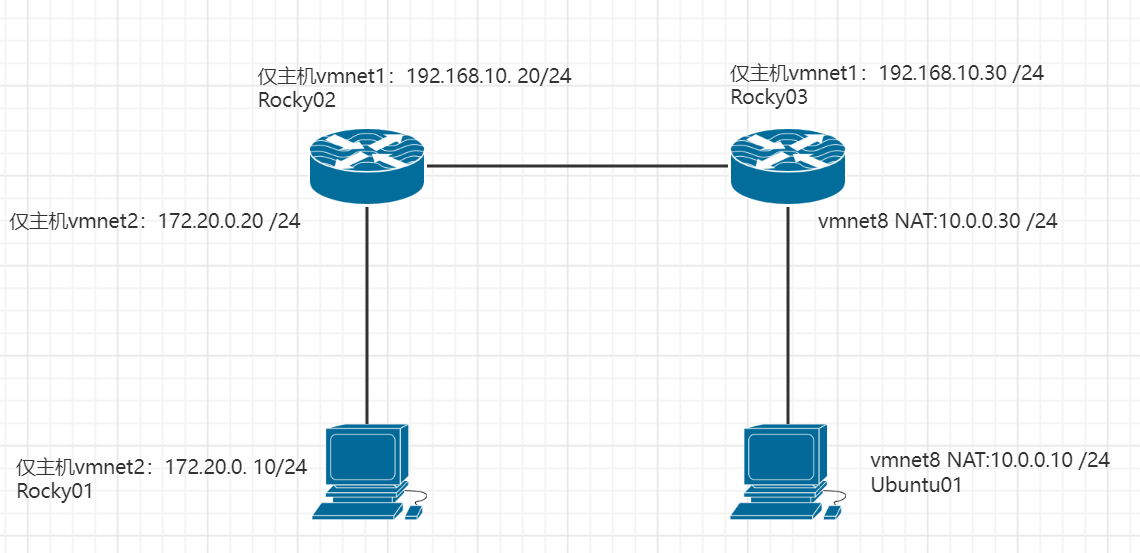
路由器Rocky02上默认有:
-
192.168.10.0
-
172.20.0.0
路由器Rocky03上默认有:
-
192.168.10.0
-
10.0.0.0
主机Rocky01默认有:
-
172.20.0.0
-
0.0.0.0默认路由,配置网关后默认生成
主机Ubuntu01默认有:
-
10.0.0.0
-
0.0.0.0默认路由,配置网关后默认生成
所以:
-
如果主机Rocky01要访问路由器Rocky03的地址192.168.10.30,则需在路由器上配置一条返回路径的路由,否则虽然在Rocky02上有直连路由到Rocky03,但是无返回的路径
#Rocky03新增路由配置
[root@Rocky03 ~]# route add -net 172.20.0.0/24 gw 192.168.10.20 dev eth0
-
如果主机ubuntu01要访问路由器Rocky02的地址172.20.0.20,则需在路由器Rocky02上配置一条返回路径的路由,否则虽然在Rocky03上有直连路由到Rocky02,但是无返回的路径
#Rocky02新增路由配置
[root@Rocky02_v7 ipv4]$ route add -net 10.0.0.0/24 gw 192.168.10.30 dev eth0
-
如果两台主机需互访,则需在两台路由器上均配置各自到两台主机的路由,则为如上两条路由
配置两台主机
1、Rock01,配置一张仅主机网卡,vmnet2
#配置IP [root@Rocky01 network-scripts]$ cat ifcfg-eth0 TYPE=Ethernet BOOTPROTO=static NAME=eth0 DEVICE=eth0 IPADDR=172.20.0.10 GATEWAY=172.20.0.20 PREFIX=24 ONBOOT=yes #查看IP [root@Rocky01 ~]$ ip a show eth0 2: eth0: <BROADCAST,MULTICAST,UP,LOWER_UP> mtu 1500 qdisc mq state UP group default qlen 1000 link/ether 00:0c:29:6c:4b:c9 brd ff:ff:ff:ff:ff:ff inet 172.20.0.10/24 brd 172.20.0.255 scope global noprefixroute eth0 valid_lft forever preferred_lft forever inet6 fe80::20c:29ff:fe6c:4bc9/64 scope link valid_lft forever preferred_lft forever #查看路由 [root@Rocky01 network-scripts]$ route -n Kernel IP routing table Destination Gateway Genmask Flags Metric Ref Use Iface 0.0.0.0 172.20.0.20 0.0.0.0 UG 100 0 0 eth0 172.20.0.0 0.0.0.0 255.255.255.0 U 100 0 0 eth0 192.168.122.0 0.0.0.0 255.255.255.0 U 0 0 0 virbr0
2、Ubuntu01,配置一张NAT网卡,vmnet8
#配置IP root@ubuntu2204-1:/etc/netplan# cat 00-installer-config.yaml # This is the network config written by 'subiquity' network: renderer: NetworkManager renderer: networkd ethernets: ens33: addresses: [10.0.0.10/24] gateway4: 10.0.0.2 dhcp4: false nameservers: addresses: [10.0.0.2] version: 2 #查看IP root@ubuntu2204-1:/etc/netplan# ip a show eth0 2: eth0: <BROADCAST,MULTICAST,UP,LOWER_UP> mtu 1500 qdisc fq_codel state UP group default qlen 1000 link/ether 00:0c:29:8c:86:cb brd ff:ff:ff:ff:ff:ff altname enp2s1 altname ens33 inet 10.0.0.10/24 brd 10.0.0.255 scope global eth0 valid_lft forever preferred_lft forever inet6 fe80::20c:29ff:fe8c:86cb/64 scope link valid_lft forever preferred_lft forever
配置路由器01
3、Rock02作为路由器01,设置仅主机网卡vmnet1,vmnet2
网卡1(eth0) vmnet1与另一路由器相连
网卡2(eth1) vmnet2与主机相连
#网卡1(eth0) vmnet1 [root@Rocky02_v7 network-scripts]$ cat ifcfg-eth0 BOOTPROTO=static NAME=eth0 DEVICE=eth0 IPADDR=192.168.10.20 PREFIX=24 ONBOOT=yes #网卡2(eth1) vmnet2 [root@Rocky02_v7 network-scripts]$ cat ifcfg-eth1 BOOTPROTO=static NAME=eth1 DEVICE=eth1 IPADDR=172.20.0.20 PREFIX=24 ONBOOT=yes #查看IP [root@Rocky02_v7 network-scripts]$ ip a show 2: eth0: <BROADCAST,MULTICAST,UP,LOWER_UP> mtu 1500 qdisc mq state UP group default qlen 1000 link/ether 00:0c:29:9c:01:da brd ff:ff:ff:ff:ff:ff inet 192.168.10.20/24 brd 192.168.10.255 scope global noprefixroute eth0 valid_lft forever preferred_lft forever 4: eth1: <BROADCAST,MULTICAST,UP,LOWER_UP> mtu 1500 qdisc mq state UP group default qlen 1000 link/ether 00:0c:29:9c:01:e4 brd ff:ff:ff:ff:ff:ff inet 172.20.0.20/24 brd 172.20.0.255 scope global noprefixroute eth1 valid_lft forever preferred_lft forever
配置路由器02
3、Rock03作为路由器02,设置仅主机网卡vmnet1,vmnet8
网卡1(eth0) vmnet1与另一路由器相连
网卡2(eth1) vmnet8与主机相连
#网卡1(eth0) vmnet1 [root@Rocky03 network-scripts]# cat ifcfg-eth0 BOOTPROTO=static NAME=eth0 DEVICE=eth0 IPADDR=192.168.10.30 PREFIX=24 ONBOOT=yes #网卡2(eth1) vmnet8 [root@Rocky03 network-scripts]# cat ifcfg-eth1 BOOTPROTO=static NAME=eth1 DEVICE=eth1 IPADDR=10.0.0.30 PREFIX=24 DNS=10.0.0.2 ONBOOT=yes #查看IP [root@Rocky03 network-scripts]# ip a show 2: eth0: <BROADCAST,MULTICAST,UP,LOWER_UP> mtu 1500 qdisc mq state UP group default qlen 1000 link/ether 00:0c:29:44:13:14 brd ff:ff:ff:ff:ff:ff inet 192.168.10.30/24 brd 192.168.10.255 scope global noprefixroute eth0 valid_lft forever preferred_lft forever 4: eth1: <BROADCAST,MULTICAST,UP,LOWER_UP> mtu 1500 qdisc mq state UP group default qlen 1000 link/ether 00:0c:29:44:13:1e brd ff:ff:ff:ff:ff:ff inet 10.0.0.30/24 brd 10.0.0.255 scope global noprefixroute eth1 valid_lft forever preferred_lft forever inet6 fe80::20c:29ff:fe44:131e/64 scope link valid_lft forever preferred_lft foreve
在路由器上添加路由
#两台路由器添加路由前,两台主机均无法互访 root@ubuntu2204-1:/etc/netplan# ping 172.20.0.10 PING 172.20.0.10 (172.20.0.10) 56(84) bytes of data. From 10.0.0.30 icmp_seq=1 Destination Net Unreachable From 10.0.0.30 icmp_seq=2 Destination Net Unreachable [root@Rocky01 network-scripts]$ ping 10.0.0.10 PING 10.0.0.10 (10.0.0.10) 56(84) bytes of data. From 172.20.0.20 icmp_seq=1 Destination Net Unreachable #查看路由 1、主机Rocky01,默认路由为配置IP时如有配置网关,则会生成 [root@Rocky01 network-scripts]$ route -n Kernel IP routing table Destination Gateway Genmask Flags Metric Ref Use Iface 0.0.0.0 172.20.0.20 0.0.0.0 UG 100 0 0 eth0 172.20.0.0 0.0.0.0 255.255.255.0 U 100 0 0 eth0 192.168.122.0 0.0.0.0 255.255.255.0 U 0 0 0 virbr0 2、主机ubuntu01 root@ubuntu2204-1:/etc/netplan# route -n Kernel IP routing table Destination Gateway Genmask Flags Metric Ref Use Iface 0.0.0.0 10.0.0.30 0.0.0.0 UG 0 0 0 eth0 10.0.0.0 0.0.0.0 255.255.255.0 U 0 0 0 eth0 10.0.0.0 0.0.0.0 255.255.255.0 U 0 0 0 eth1 3、路由器Rocky02 [root@Rocky02_v7 network-scripts]$ route -n Kernel IP routing table Destination Gateway Genmask Flags Metric Ref Use Iface 172.20.0.0 0.0.0.0 255.255.255.0 U 101 0 0 eth1 192.168.10.0 0.0.0.0 255.255.255.0 U 102 0 0 eth0 4、路由器Rock03 [root@Rocky03 ~]# route -n Kernel IP routing table Destination Gateway Genmask Flags Metric Ref Use Iface 10.0.0.0 0.0.0.0 255.255.255.0 U 101 0 0 eth1 192.168.10.0 0.0.0.0 255.255.255.0 U 102 0 0 eth0
在两台路由器分别添加路由
#Rocky02 添加路由前的路由表 [root@Rocky02_v7 ipv4]$ route -n Kernel IP routing table Destination Gateway Genmask Flags Metric Ref Use Iface 172.20.0.0 0.0.0.0 255.255.255.0 U 101 0 0 eth1 192.168.10.0 0.0.0.0 255.255.255.0 U 102 0 0 eth0 添加路由 [root@Rocky02_v7 ipv4]$ route add -net 10.0.0.0/24 gw 192.168.10.30 dev eth0 查看添加路由后的路由表 [root@Rocky02_v7 ipv4]$ route -n Kernel IP routing table Destination Gateway Genmask Flags Metric Ref Use Iface 10.0.0.0 192.168.10.30 255.255.255.0 UG 0 0 0 eth0 172.20.0.0 0.0.0.0 255.255.255.0 U 101 0 0 eth1 192.168.10.0 0.0.0.0 255.255.255.0 U 102 0 0 eth0 #Rocky03 添加路由前的路由表 [root@Rocky03 ~]# route -n Kernel IP routing table Destination Gateway Genmask Flags Metric Ref Use Iface 10.0.0.0 0.0.0.0 255.255.255.0 U 101 0 0 eth1 192.168.10.0 0.0.0.0 255.255.255.0 U 102 0 0 eth0 添加路由 [root@Rocky03 ~]# route add -net 172.20.0.0/24 gw 192.168.10.20 dev eth0 查看添加路由后的路由表 [root@Rocky03 ~]# route -n Kernel IP routing table Destination Gateway Genmask Flags Metric Ref Use Iface 10.0.0.0 0.0.0.0 255.255.255.0 U 101 0 0 eth1 172.20.0.0 192.168.10.20 255.255.255.0 UG 0 0 0 eth0 192.168.10.0 0.0.0.0 255.255.255.0 U 102 0 0 eth0
测试:
[root@Rocky01 network-scripts]$ ping 10.0.0.10 PING 10.0.0.10 (10.0.0.10) 56(84) bytes of data. 64 bytes from 10.0.0.10: icmp_seq=1 ttl=62 time=1.08 ms 64 bytes from 10.0.0.10: icmp_seq=2 ttl=62 time=3.79 ms root@ubuntu2204-1:/etc/netplan# ping 172.20.0.10 PING 172.20.0.10 (172.20.0.10) 56(84) bytes of data. 64 bytes from 172.20.0.10: icmp_seq=1 ttl=62 time=1.56 ms 64 bytes from 172.20.0.10: icmp_seq=2 ttl=62 time=3.30 ms


 1万+
1万+


 被折叠的 条评论
为什么被折叠?
被折叠的 条评论
为什么被折叠?
 到【灌水乐园】发言


