


记录方便下次查找,有用的点个赞吧,哈哈,无所谓的,有用就行了,哈哈
Win注册表/bat脚本
rmdir /s /q build
ssh-server
sshpass -p password ssh name@ip  # "set path=C:\Program Files\Git\bin;%path% && bash.exe -i"

sc stop sshd
sc start sshd
延时启动
timeout /T 10 /NOBREAK
start cmd /C x.bat
命令行代理
export http_proxy=socks5://127.0.0.1:1080
export https_proxy=socks5://127.0.0.1:1080
curl --proxy socks5://127.0.0.1:1080 www.google.com
reg delete "HKEY_CURRENT_USER\Software\Scooter Software\Beyond Compare 4" /v CacheID /f
右键打开命令窗口/管理员打开cmd
Windows Registry Editor Version 5.00

[HKEY_CLASSES_ROOT\Directory\shell\OpenCmdHere]
@="在此处打开命令窗口"
"Icon"="cmd.exe"

[HKEY_CLASSES_ROOT\Directory\shell\OpenCmdHere\command]
@="cmd.exe /s /k pushd \"%V\""

[HKEY_CLASSES_ROOT\Directory\Background\shell\OpenCmdHere]
@="在此处打开命令窗口"
"Icon"="cmd.exe"

[HKEY_CLASSES_ROOT\Directory\Background\shell\OpenCmdHere\command]
@="cmd.exe /s /k pushd \"%V\""

[HKEY_CLASSES_ROOT\Drive\shell\OpenCmdHere]
@="在此处打开命令窗口"
"Icon"="cmd.exe"

[HKEY_CLASSES_ROOT\Drive\shell\OpenCmdHere\command]
@="cmd.exe /s /k pushd \"%V\""

[HKEY_CLASSES_ROOT\LibraryFolder\background\shell\OpenCmdHere]
@="在此处打开命令窗口"
"Icon"="cmd.exe"

[HKEY_CLASSES_ROOT\LibraryFolder\background\shell\OpenCmdHere\command]
@="cmd.exe /s /k pushd \"%V\""


[HKEY_CLASSES_ROOT\Directory\Background\shell\runas]
@="以管理员身份运行CMD"
"Icon"="C:\\Users\\xxx\\Downloads\\app\\ico\\t.ico"

[HKEY_CLASSES_ROOT\Directory\Background\shell\runas\command]
"ShowBasedOnVelocityId"=dword:00639bc8
@="cmd.exe /s /k pushd \"%V\""
防火墙阻止出入站
@echo off

:: setlocal ENABLEDELAYEDEXPANSION
:: mode con: cols=65 lines=25
:: color 0a
:: rem 批处理获取管理员权限
:: :-------------------------------------
:: %1 mshta vbscript:createobject("shell.application").shellexecute("""%~0""","::",,"runas",1)(window.close)&&exit /b
:: CD /D "%~dp0"
:: :-------------------------------------


:begin

rem 接收输入

set name=
set Fpath=
set /p name=Input software name:
set /p Fpath=software path (C:Program FilesWinRAR):

rem 输出得到的输入信息
echo Input software name: %name%
echo software path: %Fpath%


echo "Please cancel: Ctrl+C"
pause

setlocal enabledelayedexpansion
set /a n=0
for /r "%Fpath%" %%i in (*.exe) do (
    set /a n+=1
    echo "%name%_!n!","%%i"
    netsh advfirewall firewall del rule name="a_user_%name%_!n!">nul 2>nul
    netsh advfirewall firewall add rule name="a_user_%name%_!n!" program="%%i" action=block dir=out>null
    netsh advfirewall firewall add rule name="a_user_%name%_!n!" program="%%i" action=block dir=in>null
    echo block %name%_!n! ok ~~~
)

rem pause>null

echo.

rem 从begin标签出,再次运行
goto begin


::如果要禁止入站规则,将 action=block dir=out>null,中的out改为in,其他照旧
office/word/ppt/excel显示图标,DefaultIcon
计算机\HKEY_CLASSES_ROOT\Excel.Sheet.12
计算机\HKEY_CLASSES_ROOT\Excel.Sheet.8

计算机\HKEY_CLASSES_ROOT\Word.Document.8\DefaultIcon
计算机\HKEY_CLASSES_ROOT\Word.Document.12\DefaultIcon
计算机\HKEY_CLASSES_ROOT\PowerPoint.Show.8\DefaultIcon
计算机\HKEY_CLASSES_ROOT\PowerPoint.Show.12\DefaultIcon
cmd设置ip地址
netsh interface ip set address name="以太网 5" static 192.168.1.10 255.255.255.0
netsh interface ip set address name="以太网 5" dhcp
bat 获取时分秒
set /a n=0
for /f "tokens=1-8 delims=.: " %%a in ("%etime%:%stime%") do (
set /a n+=10%%a%%100*360000+10%%b%%100*6000+10%%c%%100*100+10%%d%%100
set /a n-=10%%e%%100*360000+10%%f%%100*6000+10%%g%%100*100+10%%h%%100)
set /a s=n/360000,n=n%%360000,f=n/6000,n=n%%6000,m=n/100,n=n%%100

echo time:%s%:%f%:%m%
计划任务/杀掉任务/停止服务
@echo off

setlocal enabledelayedexpansion

%1 mshta vbscript:createobject("shell.application").shellexecute("""%~0""","::",,"runas",1)(window.close)&&exit /b
CD /D "%~dp0"
::::::::::::::::::::::::::::::::::::::::::::::::::::::::::::::::::::::::::::::::::::::::::::::::::::::::::::::::::::::

echo %cd%

@REM schtasks /Delete /TN "xx1" /F

schtasks /Change /TN "xx1" /DISABLE

schtasks /query /TN "xx1"

taskkill /F /IM xx1.exe

:: 停止服务
net stop "xx"

pause

exit 0
自动上报win ip地址
@echo off
setlocal enabledelayedexpansion

:: 初始化变量
set "ip_str=test_123  %DATE% %TIME%          ip: "

:: 使用 for /f 命令循环解析 ipconfig 输出,只取IPv4地址行的第二个字段(即IP地址)
for /f "tokens=2 delims=:" %%a in ('ipconfig ^| findstr /i "IPv4"') do (
    set "ip=%%a"
    :: 删除前导和尾随空格
    set "ip=!ip:~1!"
    :: 将找到的IP地址添加到ip_str,以空格分隔
    if defined ip_str (
        set "ip_str=!ip_str! !ip!"
    ) else (
        set "ip_str=!ip!"
    )
)

:: 输出所有拼接的IPv4地址
echo !ip_str!

ssh -p 22 user@xxxx "echo !ip_str! > /home/test/ip.txt"
win优化
- 关闭应用自动启动
- 关闭任务计划程序无用的启动配置
关闭windows defender实时保护
- 关闭实时保护(通过策略组修改关闭)
1.按win+R,输入gpedit.msc -> 2.选择计算机配置–>管理模板–>Windows组件–>Microsoft Defender防病毒–>实时保护 -> 3.双击关闭实时保护,选择已启用
1.进入“Window安全中心” ->2. 进入“病毒和威胁防护” ->3. 进入“管理设置” -> 4.点击关闭即可
- 关闭自动提交样本
- 关闭篡改防护
https://blog.csdn.net/azxc98765/article/details/120094030
正则表达式
文件头尾部空格
  find ./  -name "*.[c|h]" -exec sed -i '/./,$!d' {} +
  find ./  -name "*.[c|h]" -exec sed -i -e :a -e '/^\n*$/{$d;N;ba' -e '}' -e '$a\' {} \;
文件编码改为utf8
  find ./ -name "*.[c|h]" -exec sh -c 'file "$0" | grep 8859 && iconv -f gbk -t utf-8 "$0" | sponge "$0"' {} \;
tab转空格
  find ./ -name "*.[c|h]" ! -type d -exec bash -c 'expand -t 4 "$0"  | sponge "$0"' {} \;
1.正则表达式基本点:
| \ | 将下一个字符标记为一个特殊字符、或一个原义字符、或一个 向后引用、或一个八进制转义符。例如,‘n’ 匹配字符 “n”。‘\n’ 匹配一个换行符。序列 ‘\\’ 匹配 “\” 而 “\(” 则匹配 “(”。 |
|---|---|
| ^ | 匹配输入字符串的开始位置。如果设置了 RegExp 对象的 Multiline 属性,^ 也匹配 ‘\n’ 或 ‘\r’ 之后的位置。 |
| $ | 匹配输入字符串的结束位置。如果设置了RegExp 对象的 Multiline 属性,$ 也匹配 ‘\n’ 或 ‘\r’ 之前的位置。 |
| * | 匹配前面的子表达式零次或多次。例如,zo* 能匹配 “z” 以及 “zoo”。* 等价于{0,}。 |
| + | 匹配前面的子表达式一次或多次。例如,‘zo+’ 能匹配 “zo” 以及 “zoo”,但不能匹配 “z”。+ 等价于 {1,}。 |
| ? | 匹配前面的子表达式零次或一次。例如,“do(es)?” 可以匹配 “do” 或 “does” 。? 等价于 {0,1}。 |
| {n} | n 是一个非负整数。匹配确定的 n 次。例如,‘o{2}’ 不能匹配 “Bob” 中的 ‘o’,但是能匹配 “food” 中的两个 o。 |
| {n,} | n 是一个非负整数。至少匹配n 次。例如,‘o{2,}’ 不能匹配 “Bob” 中的 ‘o’,但能匹配 “foooood” 中的所有 o。‘o{1,}’ 等价于 ‘o+’。‘o{0,}’ 则等价于 ‘o*’。 |
| {n,m} | m 和 n 均为非负整数,其中n <= m。最少匹配 n 次且最多匹配 m 次。例如,“o{1,3}” 将匹配 “fooooood” 中的前三个 o。‘o{0,1}’ 等价于 ‘o?’。请注意在逗号和两个数之间不能有空格。 |
| ? | 当该字符紧跟在任何一个其他限制符 (*, +, ?, {n}, {n,}, {n,m}) 后面时,匹配模式是非贪婪的。非贪婪模式尽可能少的匹配所搜索的字符串,而默认的贪婪模式则尽可能多的匹配所搜索的字符串。例如,对于字符串 “oooo”,‘o+?’ 将匹配单个 “o”,而 ‘o+’ 将匹配所有 ‘o’。 |
| . | 匹配除换行符(\n、\r)之外的任何单个字符。要匹配包括 ‘\n’ 在内的任何字符,请使用像"(.|\n)"的模式。 |
| \s | 匹配任何空白字符,包括空格、制表符、换页符等等。等价于 [ \f\n\r\t\v]。 |
| \S | 匹配任何非空白字符。等价于 [^ \f\n\r\t\v]。 |
| \w | 匹配字母、数字、下划线。等价于’[A-Za-z0-9_]'。 |
| (pattern) | 匹配 pattern 并获取这一匹配。所获取的匹配可以从产生的 Matches 集合得到,在VBScript 中使用 SubMatches 集合,在JScript 中则使用 $0…$9 属性。要匹配圆括号字符,请使用 ‘\(’ 或 ‘\)’。 |
| x|y | 匹配 x 或 y。例如,‘z|food’ 能匹配 “z” 或 “food”。‘(z|f)ood’ 则匹配 “zood” 或 “food”。 |
| [xyz] | 字符集合。匹配所包含的任意一个字符。例如, ‘[abc]’ 可以匹配 “plain” 中的 ‘a’。 |
| [^xyz] | 负值字符集合。匹配未包含的任意字符。例如, ‘[^abc]’ 可以匹配 “plain” 中的’p’、‘l’、‘i’、‘n’。 |
| \x20 | 匹配空格字符 |
| 中文 | [\u4e00-\u9fa5] |
详细可参考:正则表达式 – 教程 | 菜鸟教程
python
python2.7安装
ubuntu24用apt install python2有问题,然后下载2.7.16源码编译安装,好像也有点问题,就直接从ubuntu软件包下载deb,然后安装,deb压缩包(不知道为啥上传的默认vip才能下载,其二按照下面方式下载,其三留言发?)
wget --no-check-certificate http://security.ubuntu.com/ubuntu/pool/universe/p/python2.7/python2.7_2.7.18-13ubuntu1.1_amd64.deb
wget --no-check-certificate http://security.ubuntu.com/ubuntu/pool/universe/p/python2.7/python2.7-minimal_2.7.18-13ubuntu1.1_amd64.deb
wget --no-check-certificate http://security.ubuntu.com/ubuntu/pool/universe/p/python2.7/libpython2.7-stdlib_2.7.18-13ubuntu1.1_amd64.deb
wget --no-check-certificate http://security.ubuntu.com/ubuntu/pool/universe/p/python2.7/libpython2.7-minimal_2.7.18-13ubuntu1.1_amd64.deb
wget --no-check-certificate http://security.ubuntu.com/ubuntu/pool/main/libn/libnsl/libnsl2_1.3.0-3build3_amd64.deb
wget --no-check-certificate http://security.ubuntu.com/ubuntu/pool/universe/p/python2.7/libpython2.7_2.7.18-13ubuntu1.1_amd64.deb

# 安装所有包,如有报错下载所需依赖
sudo dpkg -i *.deb
安装源:
pip安装镜像源: -i https://pypi.tuna.tsinghua.edu.cn/simple
python3 -m pip install pyelftools
# http://mirrors.aliyun.com/pypi/simple/
# python3 -m pip install -i https://pypi.tuna.tsinghua.edu.cn/simple pyelftools

# 永久配置 ~/.pip/pip.conf
[global]
index-url = https://pypi.tuna.tsinghua.edu.cn/simple
trusted-host = pypi.tuna.tsinghua.edu.cn  # 可信主机,要不然可能报错
disable-pip-version-check = true          # 取消pip版本检查,排除每次都报最新的pip
timeout = 120
ignore-installed = true 				  # 忽略任何已经安装的系统包,强制安装指定的包,即使它可能与系统包冲突

# 最新python12执行pip3 install 有异常 error: externally-managed-environment
# 可添加后缀 pip3 install xx --break-system-packages
# 在上述global配置 ignore-installed = true
pip安装
# python3
curl https://bootstrap.pypa.io/get-pip.py -o get-pip.py
# python2
https://bootstrap.pypa.io/pip/2.7/get-pip.py
python get-pip.py
删除Pdf密码
import fitz  # pip install PyMuPDF

input_pdf_path = 'xxx.pdf'
output_pdf_path = 'xxx_1.pdf'
pdf_password = 'test123'

# 打开受密码保护的PDF文件
pdf_document = fitz.open(input_pdf_path)

# 检查PDF是否加密
if pdf_document.is_encrypted:
    # 尝试使用密码解密
    if not pdf_document.authenticate(pdf_password):
        print("Invalid password. Cannot remove password from PDF.")
        pdf_document.close()
        exit(1)

# 保存一个新的无密码PDF文件
pdf_document.save(output_pdf_path, encryption=fitz.PDF_ENCRYPT_NONE)
pdf_document.close()

print('PDF password has been removed.')
Cmake
debug信息
message(FATAL_ERROR  xxxxxx )
// FATAL_ERROR SEND_ERROR WARNING AUTHOR_WARNING STATUS DEBUG TRACE
生成中间文件
set(CMAKE_C_FLAGS "${CMAKE_C_FLAGS} -save-temps=obj")
将保存中间文件,以对象文件(.obj)的形式 分析源文件宏展开之后的代码,生成的中间文件example.c.i
Git
仓库代码同步上传异常
git config receive.denyCurrentBranch ignore
#实际.git/config 文件中添加
#[receive]
#    denyCurrentBranch =ignore
Git命令自动补全
参考:https://www.cnblogs.com/kinwing/p/11670577.html
下载配置文件 git clone git://git.kernel.org/pub/scm/git/git.git
// linux可能自带无需下载
2.cp  git/contrib/completion/git-completion.bash  ~/.git-completion.bash
3.在.bashrc中添加  source ~/.git-completion.bash
4.source ~/.bashrc
.gitconfig
git config --global core.filemode false
git config --global core.autocrlf false
git config --unset-all core.filemode
git config--global --list
git config--local --list

# git config --global alias.gc 'auto = 256'
[core]
    autocrlf = false
    filemode = true
    preloadindex = true
    fscache = true
[alias]
    co = checkout
    br = branch
    ci = commit
    st = status
    lg = log
    df = diff
    dfst = diff --stat
    dfcst = diff --cached --stat
    dfc = diff --cached
    ss = stash
    sl = stash list
    sp = stash pop
    cino = commit --amend --no-edit
    # pushx = "!f() { git push \"$@\" && .git/hooks/post-push; }; f"
[color]
    ui = auto
.ssh/config配置
若是win安装git后不能使用pull,可以先进行如下配置
在秘钥路径中 如 C:\Users\xxx.ssh 添加 config 文件,如下配置
Host xxxx.com
HostkeyAlgorithms +ssh-rsa
PubkeyAcceptedAlgorithms +ssh-rsa

# StrictHostKeyChecking no
# UserKnownHostsFile /dev/null

# 特定key配置,没有配置默认使用 id_rsa
Host xxx1.com
    IdentityFile ~/.ssh/id_rsa
    IdentityFile ~/.ssh/id_rsa_1
Host xxx2.com
    IdentityFile ~/.ssh/id_rsa_2
github私钥配置
# 测试链接
ssh -T -vvv git@github.com
# 配置 config 文件
# 添加 Host github.com IdentityFile ~/.ssh/id_ed25519

# 测试 git clone 链接详情
GIT_SSH_COMMAND="ssh -v" git clone git@github.com:Genymobile/scrcpy.git
github同一主机多用户配置
# ~/.ssh/config 文件新增如下内容
Host user1.github.com
    HostName github.com
    IdentityFile ~/.ssh/user1_ed25519

Host user2.github.com
    HostName github.com
    IdentityFile ~/.ssh/user2_ed25519

# 上面的配置可能由于22断开被封,出现错误:Connection closed by remote host
# 参考 https://paugram.com/tech/github-ssh-connection-closed-problem-with-proxy.html
Host user1.github.com
    HostName ssh.github.com
    User git
    Port 443
	PreferredAuthentications publickey
    IdentityFile ~/.ssh/user1_ed25519

Host user2.github.com
    HostName ssh.github.com
    User git
    Port 443
	PreferredAuthentications publickey
    IdentityFile ~/.ssh/user2_ed25519
clone 代码时候稍稍调整
比如 : git clone git@github.com:Genymobile/scrcpy.git
实际是:git clone git@user1.github.com:Genymobile/scrcpy.git
多个用户可能会配置多个用户名和邮箱,在每个仓库单独配置即可
git config user.name “your_name”
git config user.email “your_eamil”
和直接编辑.git/config文件效果是一致的
github查看仓库大小
登录之后直接访问链接即可看到仓库大小:https://github.com/settings/repositories
github修改远程分支名
# 先切换所在分支
git checkout -b oldname origin/oldname
# 修改分支名
git branch -m newname
# 删除远程分支
git push origin --delete oldname
# 推送新分支,如果不进行这一步,相当于删除远程分支
git push origin newname

# 强制更新修改网页提交记录
# 本地修改 git log 之后,git push -f origin master
git 搜索某次提交记录
git log --grep="xxx"
# 搜索特定作者
git log --author="作者名字" --grep="关键字"
# 限定时间段
git log --after="YYYY-MM-DD" --before="YYYY-MM-DD" --grep="关键字"

# 查看对应的文件变化
git show commitId
git whatchanged commitId

# 切换到某次 commitId
git checkout commitId

# 根据 commitId 定位前后的提交记录,  --oneline 简短显示log
# 前面的一次记录
git log -1 commitId
# 后面一次的提交记录
git log --reverse --oneline commitId..HEAD | head -n 1
vscode
https://code.visualstudio.com/api/references/contribution-points
gtags -i 搜索索引
tab四个空格
code->首选项-> 设置。
搜索 tab size’即将值改为「4」。(设置如果不起作用,往后看。如果起作用,往下面也没有什么坏处)

注意:
将 Detect Indentation 设置去掉,否则 vscode 会跟进文件内容自动推测tab 的空格数。就是说计算结果可能不是你设置的值。

(这个很坑人,搞了好久才发现是这个问题。)
tab与空格相互转换
ctrl+shift+p 输入:convert indentation to spaces tab转空格
convert indentation to tab 空格转tab
文本换行
Ctrl+Shift+P 输入:Toggle World Wrap
代码折叠
-
要操作光标所在文件中的所有代码块:
- 折叠所有 Ctrl+K+0
- 展开所有 Ctrl+K+J
-
仅仅操作光标所处代码块内的代码:
- 折叠 Ctrl+Shift+[
- 展开 Ctrl+Shift+]
更多操作:Ctrl+Shift+P搜索fold和unfold
VSCode 的 #ifdef 区域变灰
可以在 C/C++ 插件里打开设置,将下面这个选项勾选上:

或者可以在 setting 中添加:
“C_Cpp.dimInactiveRegions”: true
配置文件
settings.json
/home/bob/.vscode-server/data/Machine/settings.json

{
    "C_Cpp.intelliSenseCacheSize": 512,
    "C_Cpp.intelliSenseMemoryLimit": 512,
    "C_Cpp.files.exclude": {
        "**/build": true,
    },
    "debug.allowBreakpointsEverywhere": true,
    "git.ignoredRepositories": [
        "/home/xxx/"
    ],
    "git.scanRepositories": [
    ],
    "todo-tree.filtering.excludeGlobs": [
    ],
    "python.analysis.exclude": [
    ]
}

{
    "files.associations": {
        "CMakeLists.txt": "cmake",
    },

    "files.exclude": {
        "**/.cache": true
    },
    "search.exclude": {
        "**/build/*": true
    },

    // "C_Cpp.intelliSenseEngine": "disabled",
    "C_Cpp.intelliSenseCacheSize": 512,
    "C_Cpp.intelliSenseMemoryLimit": 512,
    // "C_Cpp.workspaceSymbols": "Just My Code",
    "search.followSymlinks": false,
    "C_Cpp.errorSquiggles": "disabled",
}
c_cpp_properties.json
{
    "configurations": [
        {
            "name": "Win32",
            "includePath": [
                "${workspaceFolder}/xx/**"
            ],
            "defines": [
                "TEST_MARCO=1"
            ],
            "compilerPath": "C:\\MinGW\\bin\\gcc.exe",
            "cStandard": "gnu17",
            "cppStandard": "gnu++14",
            "intelliSenseMode": "windows-gcc-x86",
            "configurationProvider": "ms-vscode.makefile-tools"
        }
    ],
    "version": 4
}

{
    "configurations": [
        {
            "name": "Linux",
            "includePath": [
                "${workspaceFolder}/**"
            ],
            "defines": [
                "TEST_MARCO=1"
            ],
            "compilerPath": "/usr/bin/gcc",
            "cStandard": "gnu11",
            "cppStandard": "c++17",
            "intelliSenseMode": "gcc-x64"
        }
    ],
    "version": 4
}
tasks.json
{
    // See https://go.microsoft.com/fwlink/?LinkId=733558
    // for the documentation about the tasks.json format
    "version": "2.0.0",
    "tasks": [
        {
            "label": "build",
            "type": "shell",
            "isBackground": true,
            "command": "${workspaceFolder}/xxx/test.sh test1",
            "args": [],
            "problemMatcher": [
                {
                    "pattern": [
                        {
                            "regexp": ".",
                            "file": 1,
                            "location": 2,
                            "message": 3
                        }
                    ],
                    "background": {
                        // "activeOnStart": false,
                        "beginsPattern": ".*start qemu debug.*",  // 要对应编译成功后,一句echo的内容. 此处对应 Makefile Line:170   https://zhuanlan.zhihu.com/p/501901665
                        "endsPattern": "build debug elf done."
                    }
                },
            ],
            "presentation": {
                // "echo": true,
                // "showReuseMessage": false,
                // "clear": true,
                "close": true,
                // "group": "vm"
            },
        },
        {
            "label": "test",
            "type": "shell",
            // "dependsOn": "autosar64build",
            "command": "qemu-system-aarch64 -m 1024 -machine virt,gic-version=2,virtualization=on -cpu cortex-a53 -smp 2 -nographic -kernel ${workspaceFolder}/test -S -s -gdb",
            "args":[],
            "isBackground": true,
        },
        {
            "label": "singlebuild",
            "type": "shell",
            "command": "gcc",
            "args": ["-g", "${fileDirname}/${fileBasename}", "-o", "${fileDirname}/${fileBasenameNoExtension}"]
        },
    ]
}
launch.json
{
    // 使用 IntelliSense 了解相关属性。
    // 悬停以查看现有属性的描述。
    // 欲了解更多信息,请访问: https://go.microsoft.com/fwlink/?linkid=830387
    "version": "0.2.0",
    "configurations": [
        {
            "name": "debug_1",
            //"preLaunchTask": "build",
            "type": "cppdbg",
            "request": "launch",
            //"miDebuggerServerAddress": "127.0.0.1",
            "program": "${workspaceFolder}/test.elf",
            "args": [],
            "stopAtEntry": true,
            "cwd": "${workspaceFolder}/",
            "environment": [],
            "externalConsole": false,
            "logging": {
                "engineLogging": false
            },
            "MIMode": "gdb",
            "miDebuggerPath": "aarch64-none-elf-gdb",
            "setupCommands": [ //为了安装基础调试程序而执行的一个或多个GDB/LLDB命令
                {
                    "description": "Enable pretty-printing for gdb",
                    "text": "-enable-pretty-printing",
                    "ignoreFailures": true
                },
                { "text": "set output-radix 16" }
            ]
        },
        {
            "name": "c-debug", //配置名称,显示在配置下拉菜单中
            "type": "cppdbg", //配置类型
            "request": "launch", //请求配置类型,可以是启动或者是附加
            "program": "${workspaceFolder}/test", //程序可执行文件的完整路径,${workspaceFolder}表示远程连接的初始路径
            "args": [], //传递给程序的命令行参数
            "stopAtEntry": true,//可选参数,如果为true,调试程序应该在入口(main)处停止
            "cwd": "${workspaceFolder}/", //目标的工作目录
            "environment": [], //表示要预设的环境变量
            "externalConsole": false,//如果为true,则为调试对象启动控制台
            "MIMode": "gdb",//要连接到的控制台启动程序
            "setupCommands": [ //为了安装基础调试程序而执行的一个或多个GDB/LLDB命令
                {
                    "description": "为 gdb 启用整齐打印",
                    "text": "-enable-pretty-printing",
                    "ignoreFailures": true
                }
            ]
        }
    ]
}

// ${workspaceFolder} - 当前工作目录(根目录)
// ${workspaceFolderBasename} - 当前文件的父目录
// ${file} - 当前打开的文件名(完整路径)
// ${relativeFile} - 当前根目录到当前打开文件的相对路径(包括文件名)
// ${relativeFileDirname} - 当前根目录到当前打开文件的相对路径(不包括文件名)
// ${fileBasename} - 当前打开的文件名(包括扩展名)
// ${fileBasenameNoExtension} - 当前打开的文件名(不包括扩展名)
// ${fileDirname} - 当前打开文件的目录
// ${fileExtname} - 当前打开文件的扩展名
// ${cwd} - 启动时task工作的目录 Current Working Directory
// ${lineNumber} - 当前激活文件所选行
// ${selectedText} - 当前激活文件中所选择的文本
// ${execPath} - vscode执行文件所在的目录
// ${defaultBuildTask} - 默认编译任务(build task)的名字
服务器连接异常查看
可能是更新vscode 需要安装新的vscode-server,可以ps-ef | grep wget 抓取一下 手动下载,或者下面的方法下载
help->about 中可查看 commit号
wget --tries=1 --connect-timeout=7 --dns-timeout=7 -O vscode-server.tar.gz https://update.code.visualstudio.com/commit:0ee08df0cf4527e40edc9aa28f4b5bd38bbff2b2/server-linux-x64/stable
vscode-server手动下载链接
替换需要的 commitID
https://vscode.download.prss.microsoft.com/dbazure/download/stable/${commitID}/vscode-server-linux-x64.tar.gz解压到的路径
${HOME}/.vscode-server/cli/servers/Stable-${commitID}/server
${HOME}/.vscode-server/cli/servers/Stable-384ff7382de624fb94dbaf6da11977bba1ecd427/server
├── bin
├── extensions
├── LICENSE
├── node
├── node_modules
├── out
├── package.json
└── product.json
gtags 项目中查找跳转
参考:https://blog.japinli.top/2021/06/gtags-exclude-some-directories/
default:\
	:tc=gtags:tc=htags:

common:\
    :skip=GPATH,GTAGS,GRTAGS,dir1/:
gtags:\
    :tc=common:\
    :langmap=c\:.c.h,yacc\:.y,asm\:.s.S,java\:.java,cpp\:.c++.cc.cpp.cxx.hxx.hpp.C.H,php\:.php.php3.phtml:

htags:\
	:body_begin=<body text='#191970' bgcolor='#f5f5dc' vlink='gray'>:body_end=</body>:\
	:table_begin=<table>:table_end=</table>:\
	:title_begin=<h1><font color='#cc0000'>:title_end=</font></h1>:\
	:comment_begin=<i><font color='green'>:comment_end=</font></i>:\
	:sharp_begin=<font color='darkred'>:sharp_end=</font>:\
	:brace_begin=<font color='red'>:brace_end=</font>:\
	:warned_line_begin=<span style='background-color\:yellow'>:warned_line_end=</span>:\
	:reserved_begin=<b>:reserved_end=</b>:script_alias=/cgi-bin/:\
	:ncol#4:tabs#8:normal_suffix=html:gzipped_suffix=ghtml:\
	:definition_header=no:

// .globalrc_cfg
GPATH
GTAGS
GRTAGS
dir/
*/dir2/

// 使用:
        if [ -f $(pwd)/.globalrc ];then
            #
            readarray -t lines < $(pwd)/.globalrc_cfg
            skip="    :skip=$(IFS=,; echo "${lines[*]}"):"
            sed -i "5s|.*|${skip}|" $(pwd)/.globalrc

            #
            rm GPATH   GRTAGS  GTAGS
            echo " $(pwd)/.globalrc "
            export GTAGSCONF=$(pwd)/.globalrc
            gtags -v &> .globalrc_txt
        fi
异常:C++ Intellisense 升级到 C/C++,而两个同时安装,所以点击的时候有个相同的跳转地址
快捷键
- 聚焦窗口 ctrl 0,ctrl 9,alt 0, ctrl alt p
- 删除一行 ctrl shift k
- 选中一行 ctrl l
- 替换小窗口ctrl h
- 快捷键 ctrl k ctrl s
- 删除前后 ctrl back ,ctrl del
同步远程服务器插件
 7. 找到当前server中的 ~/.vscode-server/extensions/extensions.json 记录  "id":"twxs.cmake" , 找到需要的插件的id
vscode 的终端中 whereis code
code --install-extension twxs.cmake
下载想要同步的插件
引用其他文件夹的私钥文件
- C:\Users\bob.ssh\config_vscode 是vscode链接服务器的配置文件,内容如下
Host test
   HostName 192.168.68.2
   User test
   Port 22
   IdentityFile D:\dir1\dir2\id_rsa
- 关键需要设置D:\dir1\dir2\id_rsa文件的属性(私钥id_rsa 不在 C:\Users\bob.ssh)
1. 右键属性->安全->编辑->能删除的直接删除其他所有用户,只保留自己的用户名
2. 如果不能编辑的->高级->禁用继承->从此对象删除所有已继承的权限->确定->编辑->添加->高级->立即查找->找到自己的用户名双击->然后确定返回即可
3. 就能用vscode访问远程的服务器了
- 方案二:
如下管理员权限建立软连接,即可
mklink C:\Users\bob.ssh\config_vscode E:\xxxx\myconfig
汇编文件中添加调试断点
设置里面勾选如下,即可
“debug.allowBreakpointsEverywhere”: true

PDF加书签
https://github.com/ifnoelse/pdf-bookmark.git
由于网上download的ISO14229文档没有书签,故找了个小工具可以添加书签,留此记录。
GitHub - chroming/pdfdir: PDF导航(大纲/目录)添加工具 [PDFdir.7z-xxx]
目录需要正则表达式匹配:
二层 ^\d\d?.\d\d?\s 三层 ^\d\d?.\d\d?.\d\d?

附件(可以github下载)
xyz='''
Annex I (normative) Security access state chart  450
Annex J (informative) Recommended implementation for multiple client environments  458
Bibliography  464
'''
lines = xyz.split('\n')
#print(lines)
for line in lines:
    matchObj = re.search( r'\w+$', line, re.M|re.I)
    if matchObj:
        x=int(matchObj.group())+12
        print(re.sub(r'\w+$', str(x), line))
        # else:
    #    print(  "No match!!")
#re.search( r'\w+$', line, re.M|re.I)
精选文章
AUTOSAR精选文章推荐
如何快速学习AUTOSAR?
https://dev.toppers.jp/trac_user/ap/
https://www.toppers.jp/atk2-e-download.html
【Autosar】学习总结-BSW层_autosar bsw-CSDN博客
win获取ip地址
import psutil
def GetLocalIP(t=None):
    ips = []
    iptype = "AF_INET"
    if t == 6:
        iptype = "AF_INET6"

    dic = psutil.net_if_addrs()
    for adapter in dic:
        snicList = dic[adapter]
        for snic in snicList:
            if iptype in snic.family.name:
                if t == 4 and  ":" in snic.address:
                    continue
                ips.append(snic.address)
    return ips
import socket
def GetLocalIP(t=None):
    ips = []
    addrs = socket.getaddrinfo(socket.gethostname(),None)
    for item in addrs:
        if t == 4 and ':' in item[4][0]:
            continue
        if t == 6 and ':' not in item[4][0]:
            continue
        ips.append(item[4][0])
    return ips
import json
import requests
import time
import socket
import schedule
import datetime
import jenkins
import psutil

KEYSMILE='.'

def get_nodes_summary(username, password):
    # https://blog.csdn.net/Sudley/article/details/103848127
    #获取nodes节点的name、label、ip、status(连接状态)

    try:
        server = jenkins.Jenkins('http://%s:%s@xxxx:8080', username, password)

        nodes = server.get_nodes()

        win_slave = [x for x in nodes if x['name'] == 'win_Slave']
        # node_name = win_slave[0]['name']
        isonline = not win_slave[0]['offline']
    except Exception as e:
        isonline = False

    return isonline

def GetLocalIPNew(t=None):
    unwanted_interface = ['Eth_eth0', 'Loopback Pseudo-Interface 1']  # 不想要的网卡名
    ips = []
    interfaces = psutil.net_if_addrs()
    for name, net_addresses in interfaces.items():
        for net_address in net_addresses:
            if (net_address.family == socket.AF_INET or net_address.family == socket.AF_INET6) and name not in unwanted_interface:
                ips.append(net_address.address)
    return ips

def GetLocalIP(t=None):
    ips = []
    addrs = socket.getaddrinfo(socket.gethostname(),None)
    for item in addrs:
        if t == 4 and ':' in item[4][0]:
            continue
        if t == 6 and ':' not in item[4][0]:
            continue
        ips.append(item[4][0])
    return ips

def SendMessage(keyword, msg):
    url = 'bark.com'
    HEADERS = {
        "Content-Type": "application/json; charset=utf-8"
    }

    isonline = get_nodes_summary('user', 'test123')
    if isonline is False:
        msg += " , offine ~~~"

    sendMsg = {
        "msgtype": "text",
        "text": {
            "content": keyword + ' ' + msg
        }
    }

    try:
        requests.post(url, data=json.dumps(sendMsg), headers=HEADERS)
        ret = True
    except Exception as e:
        ret = False

    return ret

def job():
    SendMessage(KEYSMILE, "Good Morning")

if __name__ == '__main__':
    print(datetime.datetime.now(), "start run now ...")
    schedule.every().day.at("00:00").do(job)

    ips = []
    ipchanged = False

    while True:
        schedule.run_pending()
        time.sleep(20)

        if ips != GetLocalIPNew():
            ipchanged = True
            ips = GetLocalIPNew()
            print(datetime.datetime.now(), "warning ip changed: ", ips)
        if  ipchanged == True and \
            SendMessage(KEYSMILE, ', '.join(ips)) == True:
            ipchanged = False
小工具
tmux分屏
https://zhuanlan.zhihu.com/p/58668651
export TMUX_TMPDIR=~/.tmux/tmp
glnk
画笔工具 glnk , SumatraPDF, tftpd64,
process-explorer
Process Explorer - Sysinternals
pslist
Handle关联的句柄
jlink下载
@echo off

:: Calculate the number of parameters
set argC=0
for %%x in (%*) do Set /A argC+=1

if %argC% geq 3 (
    echo error, too many parameters
    echo one param: %0 test1
    echo two param: %0 [jlink.exe]_path test1
    exit /b 1
) else if %argC% == 2 (
    set jlinkpath=%1
    set project=%2
) else (
    set jlinkpath="C:\Program Files\SEGGER\JLink\JLink.exe"
    set project=%1
)

if [%project%] == [] (
    set project=test1
)

for /R ".\build\%project%\obj\bin\" %%F in (*.hex) do set "hexfile=.\build\%project%\obj\bin\%%~nxF"

if not exist %jlinkpath% ( echo jlinkpath error : %jlinkpath% & exit /b 2 )
if not exist %hexfile% ( echo project error : %project% & exit /b 2 )

set commandfile=jinkConfig.txt
@echo speed 4000 > %commandfile%
@echo r >> %commandfile%
@echo h >> %commandfile%
@echo erase >> %commandfile%
@echo loadfile %hexfile% >> %commandfile%
@echo q >> %commandfile%

%jlinkpath% -device STM32H743II -si swd -autoconnect 1 -nogui 1 -exitonerror 1 -commandfile %commandfile%
set err=%errorlevel%
if exist %commandfile% ( del %commandfile% )

if %err% neq 0 ( echo download error : %project% & exit /b %err% )
exit /b 0
minicom
win下minicom,ctrl a + q 要快
不能回车输入的话,minicom -s 把流控关闭
#!/bin/sh

ls /dev/ttyS*

if [ -z "$1" ]; then
  read -p "please input a num:" num
else
  num=$1
fi

minicom -b  115200 -D /dev/ttyS$num
ssh win之后使用 minicom,1.mobaxterm能用,2.通过gitbash套用,然后改一下.bashrc配置
"c:\Program Files\git\bin\bash.exe" -c "/c/Users/xxx/AppData/Roaming/Mobaxterm/slash/bin/bash.exe -i"

c:\Users\xxx\AppData\Roaming\MobaXterm\slash\bin\bash.exe -i
chrome浏览器离线安装包
https://www.google.com/intl/zh-CN/chrome/next-steps.html?platform=win64&standalone=1&statcb=0&installdataindex=empty&defaultbrowser=0

https://dl.google.com/tag/s/appguid%3D%7B8A69D345-D564-463C-AFF1-A69D9E530F96%7D%26iid%3D%7BBD6E01DD-2315-DD04-9D6B-5A409199B5FF%7D%26lang%3Dzh-CN%26browser%3D4%26usagestats%3D0%26appname%3DGoogle%2520Chrome%26needsadmin%3Dprefers%26ap%3Dx64-stable-statsdef_1%26installdataindex%3Dempty/chrome/install/ChromeStandaloneSetup64.exe
ssh server 服务 windows
https://github.com/PowerShell/Win32-OpenSSH/releases
下载安装OpenSSH-Win64-v9.5.0.0.msi
编程相关书籍
https://ebookfoundation.github.io/free-programming-books/books/free-programming-books-zh.html
https://github.com/p-moon/develop-reference-data


shell
scp -rp -P 22 test@xxxxx:/file .
错误直接退出
set -o errexit
一些命令记录
# 查找某个文件夹的前三级文件夹
# 如果查找前三级的文件 可以使用把 d --> f
find /path -mindepth 1 -maxdepth 3 -type d
tree -L 3 -d /path/
sed
某行插入文本
sed -i ‘8a This is a test’ regular_express.txt
字符替换
str=“hello world”
echo${str//o/P}
echo${str/o/P}
区别是str后面两个//可以全局替换
filestr=$(echo ${filestr}| sed ‘s/^/-add_set_file=/g’ )
filestr=$(sed ‘s/^/-add_set_file=/g’ <<<${filestr})
echo颜色
# 字体颜色
Black='\033[0;30m'        # 黑色
Red='\033[0;31m'          # 红色
Green='\033[0;32m'        # 绿色
Yellow='\033[0;33m'       # 黄色
Blue='\033[0;34m'         # 蓝色
Purple='\033[0;35m'       # 紫色
Cyan='\033[0;36m'         # 青色
White='\033[0;37m'        # 白色

# 背景颜色
On_Black='\033[40m'       # 黑色背景
On_Red='\033[41m'         # 红色背景
On_Green='\033[42m'       # 绿色背景
On_Yellow='\033[43m'      # 黄色背景
On_Blue='\033[44m'        # 蓝色背景
On_Purple='\033[45m'      # 紫色背景
On_Cyan='\033[46m'        # 青色背景
On_White='\033[47m'       # 白色背景

# 特效
NC='\033[0m'              # 无颜色,清除颜色设置
Bold='\033[1m'            # 粗体
Underline='\033[4m'       # 下划线
Blink='\033[5m'           # 闪烁
Inverted='\033[7m'        # 反白显示

echo -e "$REDS********$ENDS"
自动补全
- alias hi=‘$HOME/xxx/hi.sh’
- source hi_complete
- 在hi.sh中添加参数处理逻辑即可
complete -F _hi_complete hi

_hi_complete()
{
    local cur prev opts
    COMPREPLY=()
    cur="${COMP_WORDS[COMP_CWORD]}"
    prev="${COMP_WORDS[COMP_CWORD-1]}"
    local prev2="${COMP_WORDS[COMP_CWORD-2]}"

     case ${prev,,} in
        "hi")
            opts="build docker"
            COMPREPLY=( $(compgen -W '${opts[@]}' -- $cur) )
            ;;
        "docker")
            local docker_opts=(on off ps in)
            COMPREPLY=( $(compgen -W '${docker_opts[@]}' -- $cur) )
            ;;
        *)
            _filedir
            ;;
    esac

    # echo 'cur='$cur,'prev'=$prev,'prev2'=$prev2>>~/11.txt
}
添加用户/用户组
# 进入docker以后,新建一个和主机上相同的用户,用户组
sudo useradd bob
sudo groupadd autosar
sudo usermod -g autosar bob
	# usermod -aG autosar bob 新增用户组; -g 直接修改
sudo mkdir /home/bob
sudo chown bob:autosar /home/bob/

# 把docker中的id修改为主机上相同的id
cat /etc/passwd  | grep bob
# 记录用户id 用户组id bob:x:1006:1001:bob:/home/bob:/bin/sh
sudo usermod -u 1006 bob
sudo groupmod -g 1001 autosar

# 后续共享目录放到自己的用户目录中
挂载网络目录
sshfs cn@172.22.22.230:/mnt/hgfs/test/ test/
# 卸载
fusermount -u /path/to/local/mountpoint
wget
wget -r -np -nH --cut-dirs=3 -R "index.html*" "http://xxxxx/yy/zzz/dir/"


命令参数的解释:

-r 或 --recursive:递归下载。
-np 或 --no-parent:不下载父目录,避免爬升到父目录中去。
-nH 或 --no-host-directories:禁止创建包含服务器名的目录。
--cut-dirs=3:跳过远程服务器上的前3个目录层级。在这个例子中,yy/zzz/dir/ 被忽略。调整这个数字根据实际的URL路径。
-R "index.html*":拒绝下载所有以index.html开头的文件(这通常是服务器生成的目录索引页面)。
最后是您要下载的URL。
该命令会在当前目录下创建一个包含所有下载文件和目录的结构,忽略上述提到的目录层级。
gerrit
查询当前patch
#!/bin/sh

# Automatically trigger jenkins compilation
# */20 10-21 * * * /home/xxx/test.sh

# ~~~~~~~~~~~~~~~~~~~~~~~~~~~~~~~~~~~~~~~~~~~~~~~~~~~~~~~~ DO NOT EDIT ~~~~~~~~~~~~~~~~~~~~~~~~~~~~~~~~~~~~~~~~~~~~~~~~~~~~~~~~~~~~~~~~~~~~~
# exclude_times=("12:00" "18:00" "21:00")
# [[ " ${exclude_times[*]} " =~ " $(date '+%H:%M') " ]]  && exit 0

cd /home/xxx

current_timestamp=$(date +%s)
logfile='/home/xxx/test.log'
sed -i "1i$(date +"%Y.%m.%d %H:%M:%S")" $logfile

ssh -p 22 test@gerrit3.xxx.com gerrit query is:open project:code/test/branch/xxx --patch-sets --format json \
| jq -r 'select(.branch == "codebase_rtos_dev") | [.owner.email, (.patchSets | max_by(.number).createdOn), (.patchSets | max_by(.number).ref)] | @tsv'  | while IFS=$'\t' read -r -a array; do
    userName=$(echo "${array[0]}" | cut -d "@" -f 1)

    # echo "${array[0]} ${array[1]} ${array[2]}" # email, time, ref
    # if [[ $userName != "test" && $userName != "abc" ]]; then
    #     continue
    # fi
    sed -i "2i\    $(printf "%-16s" "$userName")    ${array[2]}  $(date -d@${array[1]} +"%m/%d %H:%M:%S")  $(date -d@${current_timestamp} +"%m/%d %H:%M:%S")" $logfile

    time_diff=$((current_timestamp - array[1]))
    if ((time_diff < 20*60)); then # delay require time
        patchUrl='git pull "ssh://'$userName'@gerrit3.xxx.com:22/code/test/branch/xxx" '${array[2]}
        patchParam='imagepath='$(echo $patchUrl | sed 's/ /%20/g' | sed 's/"/%22/g')'&build_all=yes&autotest=yes'
        projectNames=('test_build_1')
        for projectName in "${projectNames[@]}"
        do
            curlParam='rtosuser:rtos@user123 xxx:443/job/test_build_1/job/'$projectName'/buildWithParameters?token=123456&'$patchParam
            curl -u $curlParam
            sed -i "3i\        curl -u $curlParam" $logfile
        done
    fi
done
查询正在运行jenkins任务,并取消排队的重复任务
import subprocess
import requests
import re
from requests.utils import dict_from_cookiejar

logfile = "/home/xxx/test.log"
subprocess.run(f'sed -i "2i\    _cancelItem_:" {logfile}' , shell=True)

jenkins_url = "http://xxx:443/"
username = "test"
password = "xxx123"

response = requests.get(f'{jenkins_url}queue/api/json', auth=(username, password))
data = response.json()
# get block job list
g_patchUrlList = []
for item in data['items']:
    if item['task']['name'] == 'test_build_1':
        item_id = item["id"]
        causes_action = next((action for action in item['actions'] if action['_class'] == 'hudson.model.CauseAction'), None)
        startType = causes_action['causes'][0]['_class'] if causes_action else None
        if item["blocked"] and not item["buildable"]:
            if startType == 'hudson.model.Cause$RemoteCause' or 1:
                parameters = next((action['parameters'] for action in item['actions'] if action['_class'] == 'hudson.model.ParametersAction'), [])
                patchUrl = next((param['value'] for param in parameters if param['name'] == 'imagepath')).split()[-1]
                g_patchUrlList.append([item_id, patchUrl])

g_patchSet = set(re.search(r"(.*)/\d+$", y).group(1) for x, y in g_patchUrlList)
# cancel multi job
if len(g_patchSet) > 0:
    response = requests.get(f"{jenkins_url}crumbIssuer/api/xml?xpath=concat(//crumbRequestField,\":\",//crumb)", auth=(username, password))
    crumb = response.text.split(":")
    cookies = dict_from_cookiejar(response.cookies)
    headers = {
        "Jenkins-Crumb": crumb[1],
        "Cookie": "; ".join([f"{name}={value}" for name, value in cookies.items()])
    }
for patch in g_patchSet:
    tmpList = [x for x, y in g_patchUrlList if patch in y ]
    tmpList.remove(max(tmpList))
    for id in tmpList:
        cancelUrl = f"{jenkins_url}queue/cancelItem?id={id}"
        response = requests.post(cancelUrl, auth=(username, password), headers=headers)

        subprocess.run(f'sed -i "3i\        {next(y for x, y in g_patchUrlList if x == id)}    {response.status_code} {response.reason}" {logfile}' , shell=True)
gerrit 与 jenkins 集成互通
Gerit:
- 管理员登录gerrit, http:/xxxxx/admin/repos/All-Projects,access
- Global Capabilities->Stream Events 添加用户 jenkins
- Reference: refs/heads/*
- Label Code-Review: -1, +1 jenkins
- Label Verified: -1, +1 jenkins
Jenkins:
安装插件:
![[图片]](https://i-blog.csdnimg.cn/direct/1a95b808164741f69b7f7d4c476dbdd6.png)
Gerrit Trigger
新建gerrit trigger 服务
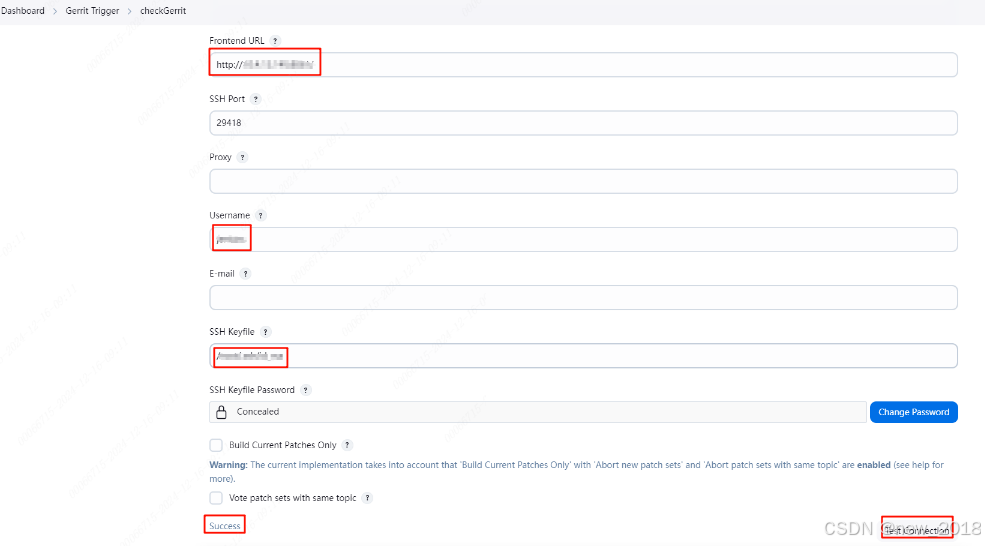
添加jenkins节点:https://www.cnblogs.com/sky-cheng/p/14931503.html
tab 忽略大小写
vim ~/.inputrc
# do not show hidden files in the list
set match-hidden-files off

# auto complete ignoring case
set show-all-if-ambiguous on
set completion-ignore-case on
保存重启终端
Office
onenote
关闭右下角图标
选择"文件--选项--显示"
在显示中将把“将OneNote图标放在任务栏通知区域”的勾选去掉,然后点击“确定”
vim
选择复制
进入字符模式
按 v (小写)键进入字符模式,可以逐字符地选择文本
进入行模式
按 V (大写) 键进入行模式,可以逐行地选择文本。
进入块模式
按 Ctrl + v 进入块模式,可以选择一个矩形区域。
复制选中的文本
选择文本后,按 y 键(表示 “yank”)将选中的文本复制到剪贴板。
粘贴文本
可以在所需位置按 p 键(小写 p)粘贴文本。如果想粘贴在光标之前,可以按 P 键(大写 P)。
插入
光标之前:i
光标之后:a
下一行插入:o
上一行插入:shift + o
docker
安装使用
docker 获取镜像,创建容器,配合shell章节的自动补全,环境配置好只需要使用就行了,无感操作
详细可参考:https://www.runoob.com/docker/docker-container-usage.html
# 安装docker,终端输入 docker,ubuntu24.04会提示安装命令
sudo apt install docker.io
# 安装完成之后 docker 执行需要root权限, 把需要操作的用户加入docker即可
sudo usermod -aG docker bob # 重启即可生效,其他方式如果ssh链接的,断开重连也会生效
# 会显示用户在docker组
id bob
groups bob


# 获取镜像
docker pull ubuntu
# 查看镜像
docker images
# 启动一个容器,镜像可以理解模版,容器是配置的不同的环境,可以一个镜像启动多个容器
# 可以先用起来,一些概念用着用着就熟悉了解了
docker run --privileged -it -d -v /home/bob:/home/bob --name my_nodejs ubuntu /bin/bash
# 这里启动一个my_nodejs的容器(里面用户和主机用户一样,方便后续操作,默认用root用户进入,然后创建和主机一样的用户)
# 前期可以直接 docker run --privileged -it -d --name my_nodejs ubuntu /bin/bash,直接用root操作
docker exec -it my_nodejs /bin/bash
# 如果主机 id bob 为 1000,进入docker cat /etc/passwd,如果有1000的用户,直接修改用户名
# usermod -l bob -d /home/bob -m ubuntu
# groupadd bob
# usermod -g bob -G bob bob

# 启动容器
docker start my_nodejs
# 关闭容器
docker stop my_nodejs
# 进入容器
docker exec -it -u bob -w /home/bob my_nodejs /bin/bash
动态添加端口
参考:https://blog.csdn.net/weixin_41148525/article/details/135675015
https://www.baeldung.com/ops/assign-port-docker-container
systemctl stop docker
docker info | grep Root
# dir
docker inspect xxx | grep Id
# idxxxxxxxx
cd /dir/idxxxxxxxx
# 修改如下
{ // hostconfig.json
  ...
  "PortBindings": {"80/tcp":[{"HostIp":"","HostPort":"20082"}]},
  ...
}
{ // config.v2.json
  "Config":
  {
    ...
    "ExposedPorts":
    {
      "80/tcp":{}
    },
    ...
  }
}
systemctl start docker
docker start xxxx
docker port xxxx
# 80/tcp -> 0.0.0.0:20082
# 80/tcp -> [::]:20082
github仓库
一些技术pdf:https://github.com/p-moon/develop-reference-data.git
freertos源码:https://github.com/JingLuozz/FreeRTOS_Template.git
ubuntu软件安装
应用修改图标
cd /usr/share/applications
vi xxx 中的 icon = xx.icon
chrome谷歌浏览器
wget https://dl.google.com/linux/direct/google-chrome-stable_current_amd64.deb
vscode
wget https://code.visualstudio.com/sha/download?build=stable&os=linux-deb-x64
sougou
下载页面:https://shurufa.sogou.com/linux
安装指导:https://shurufa.sogou.com/linux/guide
主要步骤
sudo apt -f install
系统设置->区域和语言->管理已安装的语言->在“语言”tab下->点击“添加或删除语言” -> fcitx
设置fcitx开机自启动
sudo cp /usr/share/applications/fcitx.desktop /etc/xdg/autostart/
卸载系统ibus输入法框架
sudo apt purge ibus
关闭繁简切换:https://blog.csdn.net/u013318019/article/details/125367112
vi ~/.config/sogoupinyin/conf/env.ini
ShortCutFanJian=1 # 修改为 0
vi ~/.config/fcitx/conf/fcitx-chttrans.config
#Hotkey=CTRL_SHIFT_F # 修改为 Hotkey=CTRL_SHIFT_]
.
皮肤位置 /opt/sogoupinyin/files/share/resources/skin/
nas挂载
sudo apt-get install cifs-utils
sudo mount -t cifs //192.168.1.1/share  /home/bob/mydir -o username=bob,password=bob,iocharset=utf8
# sudo mount -t cifs //192.168.1.1/share /home/bob/mydir -o username=bob,password=bob,iocharset=utf8,uid=1000,gid=1000,file_mode=0777,dir_mode=0777
截图工具
Snipaste : Snipaste-2.9.2-Beta-x86_64 电脑重启登录的时候,右下角设置图标选择 ubuntu on Xorg
PixPin 功能更丰富,暂不支持linux
鼠标手势
easystroke:功能上和windows上的 WGestures,还是差不少
手势设置:https://tianws.github.io/skill/2019/10/31/short-cut-ubuntu/
pdf阅读器
Okular:主要为了配置 back forward 快捷键 alt+left,alt+right
Settings->Configure Okular->General->Program Features->Open new files in tabs
gedit自定义快捷键
https://github.com/foolo/gedit_custom_keys/
设置 gedit -> Preferences-> Plugins -> Custom Keyboard Shortcuts
日历
显示周数
gsettings set org.gnome.desktop.calendar show-weekdate true
显示农历
https://extensions.gnome.org/extension/675/lunar-calendar/
安装扩展,chrome扩展配置,apt 连接器
触摸板
https://extensions.gnome.org/extension/4033/x11-gestures/
https://github.com/JoseExposito/touchegg
支持自定义手势
sudo apt install touchegg flatpak
flatpak install flathub com.github.joseexposito.touche
Wine
管理安装配置 wine
sudo apt install winetricks
下载:https://wiki.winehq.org/Download_zhcn
安装 VeryCapture:https://verycapture.com/download.html
>
# 安装快捷键转发
sudo apt install xdotool
# 配置
#!/bin/bash

if [ "${1}" == "PixPin" ];then
    xdotool key --window $( xdotool search --limit 1 --all --pid $( pgrep PixPin.exe ) --name PixPin ) "F1"
elif [ "${1}" == "VeryCapture" ];then
    xdotool key --window $( xdotool search --limit 1 --all --pid $( pgrep VeryCapture.exe ) --name VeryCapture ) "shift+F1"
fi

# settings-> Keyboard -> Keyboard Shortcuts -> View and Customize Shortcuts -> Custom Shortcuts
安装 pixpin,需要下面两个运行库
winetricks vcrun2015
winetricks vcrun2017


 被折叠的 条评论
为什么被折叠?
被折叠的 条评论
为什么被折叠?
 到【灌水乐园】发言


