


一、Apache ShardingSphere的概述
1、概述
官网:http://shardingsphere.apache.org/index_zh.html
下载地址:https://shardingsphere.apache.org/document/current/cn/downloads/
快速入门:https://shardingsphere.apache.org/document/current/cn/quick-start/shardingsphere-jdbc-quick-start/
关于 Apache ShardingSphere
Apache ShardingSphere 是一款开源分布式数据库生态项目,由 JDBC、Proxy 和 Sidecar(规划中) 3 款产品组成。其核心采用可插拔架构,通过组件扩展功能。对上以数据库协议及 SQL 方式提供诸多增强功能,包括数据分片、访问路由、数据安全等;对下原生支持 MySQL、PostgreSQL、SQL Server、Oracle 等多种数据存储引擎。Apache ShardingSphere 项目理念,是提供数据库增强计算服务平台,进而围绕其上构建生态。充分利用现有数据库的计算与存储能力,通过插件化方式增强其核心能力,为企业解决在数字化转型中面临的诸多使用难点,为加速数字化应用赋能。
ShardingSphere 已于2020年4月16日成为 Apache 软件基金会的顶级项目。
Apache ShardingSphere 功能结构图

2、认识ShardingSphere-JDBC
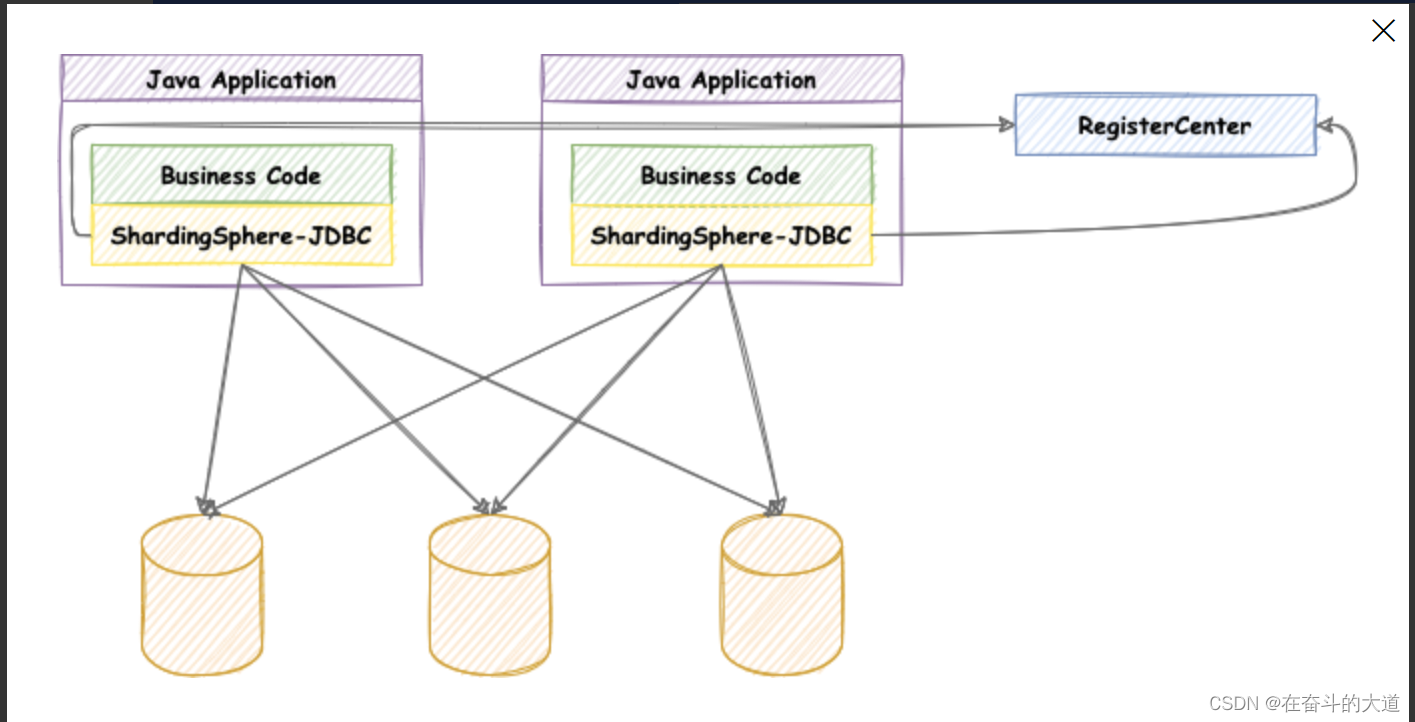
ShardingSphere-JDBC 是 Apache ShardingSphere 的第一个产品,也是 Apache ShardingSphere 的前身。 定位为轻量级 Java 框架,在 Java 的 JDBC 层提供的额外服务。 它使用客户端直连数据库,以 jar 包形式提供服务,无需额外部署和依赖,可理解为增强版的 JDBC 驱动,完全兼容 JDBC 和各种 ORM 框架。
- 适用于任何基于 JDBC 的 ORM 框架,如:JPA, Hibernate, Mybatis, Spring JDBC Template 或直接使用 JDBC;
- 支持任何第三方的数据库连接池,如:DBCP, C3P0, BoneCP, HikariCP 等;
- 支持任意实现 JDBC 规范的数据库,目前支持 MySQL,PostgreSQL,Oracle,SQLServer 以及任何可使用 JDBC 访问的数据库。
3、 认识ShardingSphere-Proxy

定位为透明化的数据库代理端,提供封装了数据库二进制协议的服务端版本,用于完成对异构语言的支持。(类似MyCat) 目前提供 MySQL 和 PostgreSQL(兼容 openGauss 等基于 PostgreSQL 的数据库)版本,它可以使用任何兼容 MySQL/PostgreSQL 协议的访问客户端(如:MySQL Command Client, MySQL Workbench, Navicat 等)操作数据,对 DBA 更加友好。
- 向应用程序完全透明,可直接当做 MySQL/PostgreSQL 使用;
- 适用于任何兼容 MySQL/PostgreSQL 协议的的客户端。
4 、三个组件的比较
| Sharding-Jdbc | Sharding-Proxy | Sharding-Sidecar | |
|---|---|---|---|
| 数据库 | 任意 | MYSQL | MYSQL |
| 连接消耗数 | 高 | 低 | 低 |
| 异构语言 | 仅Java | 任意 | 任意 |
| 性能 | 损耗低 | 损耗高 | 损耗低 |
| 中心化 | 是 | 否 | 是 |
| 静态入口 | 无 | 有 | 无 |
5、混合架构
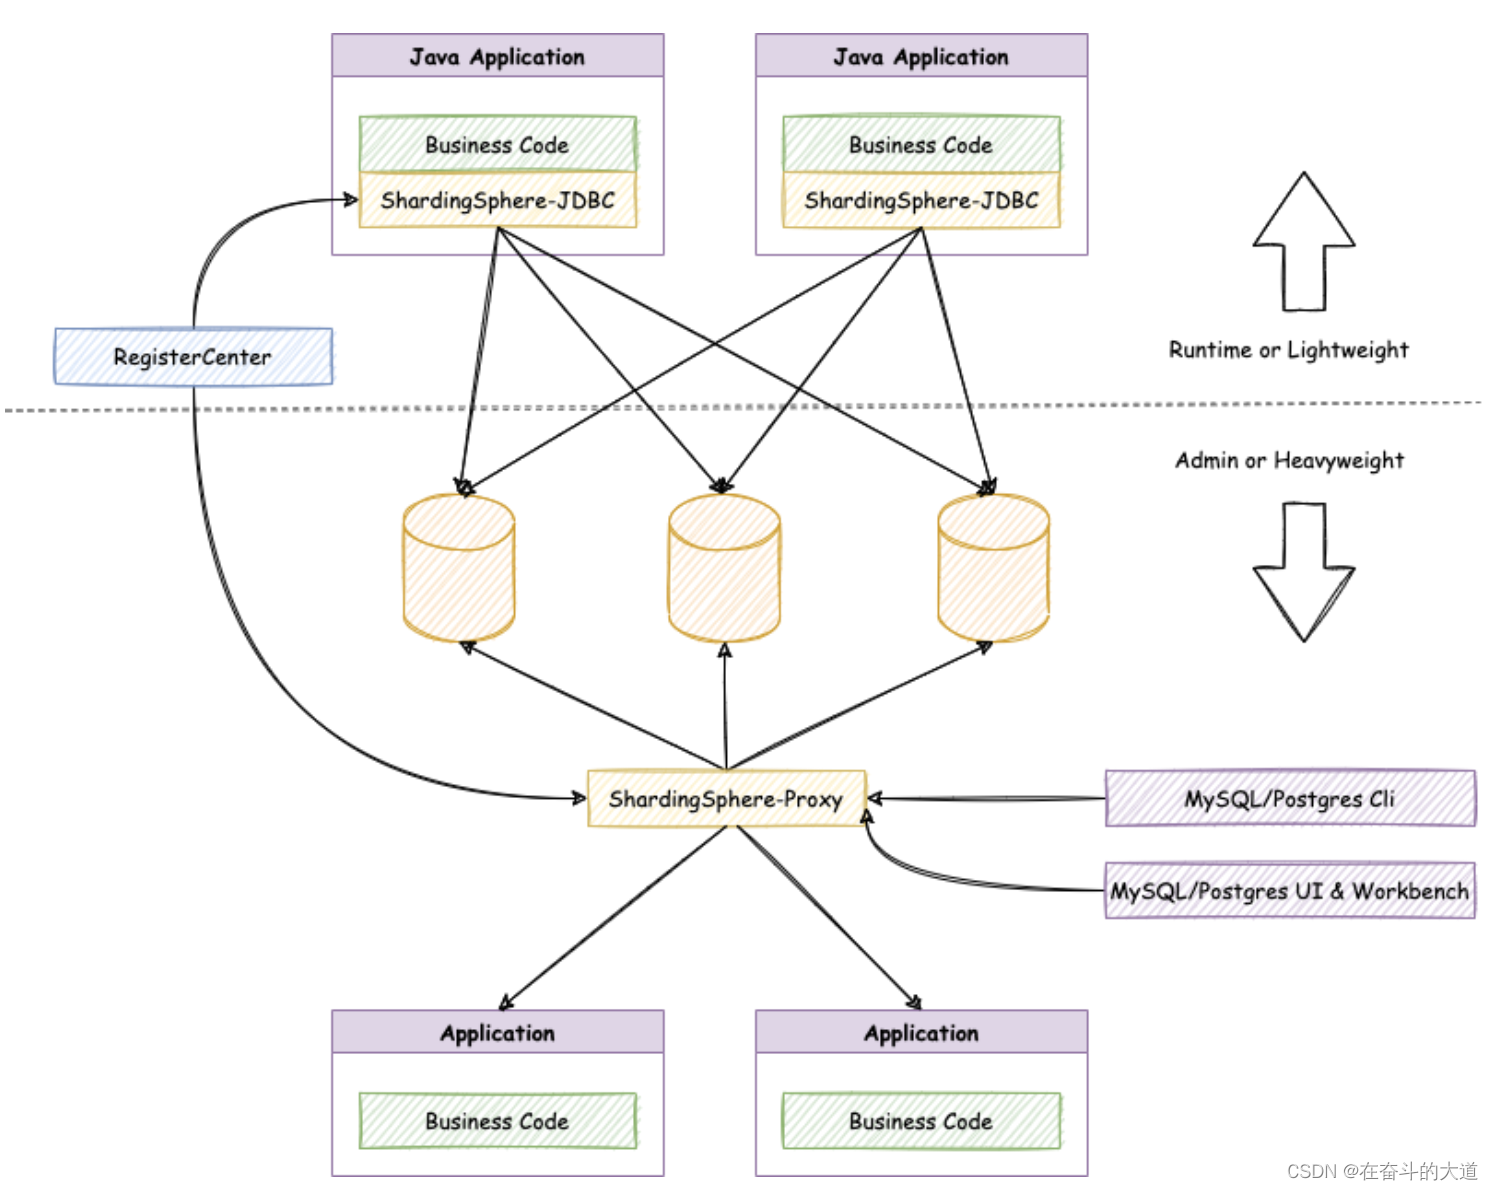
ShardingSphere-JDBC 采用无中心化架构,与应用程序共享资源,适用于 Java 开发的高性能的轻量级 OLTP 应用; ShardingSphere-Proxy 提供静态入口以及异构语言的支持,独立于应用程序部署,适用于 OLAP 应用以及对分片数据库进行管理和运维的场景。
Apache ShardingSphere 是多接入端共同组成的生态圈。 通过混合使用 ShardingSphere-JDBC 和 ShardingSphere-Proxy,并采用同一注册中心统一配置分片策略,能够灵活的搭建适用于各种场景的应用系统,使得架构师更加自由地调整适合于当前业务的最佳系统架构。
6、Apache ShardingSphere 功能清单
- 数据库兼容:支持那些数据库版本
- 数据库网关(正在开发中)
- 集群管控(正在开发中):主要实现数据库集群熔断和限流控制。
- 数据分片:本文重点
- 分布式事务:本文重点
- 读写分离:本文重点
- 高可用
- 弹性伸缩
- 数据加密
- 影子库压测
- 可观察性
温馨提示:标记红色字典内容部分,是本文的学习重点。
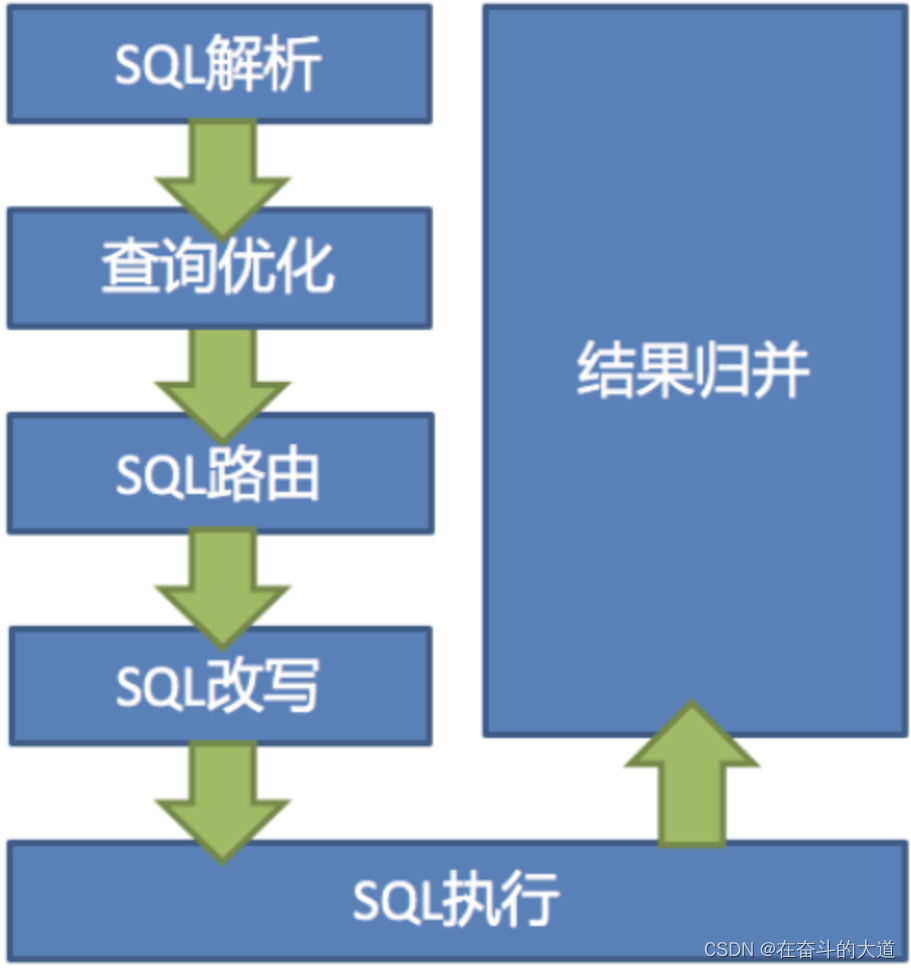
7、Apache ShardingSphere数据分片内核剖析
Apache ShardingSphere 的 3 个产品的数据分片主要流程是完全一致的。 核心由 SQL 解析 => 执行器优化 => SQL 路由 => SQL 改写 => SQL 执行 => 结果归并的流程组成。
SQL 解析
分为词法解析和语法解析。 先通过词法解析器将 SQL 拆分为一个个不可再分的单词。再使用语法解析器对 SQL 进行理解,并最终提炼出解析上下文。 解析上下文包括表、选择项、排序项、分组项、聚合函数、分页信息、查询条件以及可能需要修改的占位符的标记。
执行器优化
合并和优化分片条件,如 OR 等。
SQL 路由
根据解析上下文匹配用户配置的分片策略,并生成路由路径。目前支持分片路由和广播路由。
SQL 改写
将 SQL 改写为在真实数据库中可以正确执行的语句。SQL 改写分为正确性改写和优化改写。
SQL 执行
通过多线程执行器异步执行。
结果归并
将多个执行结果集归并以便于通过统一的 JDBC 接口输出。结果归并包括流式归并、内存归并和使用装饰者模式的追加归并这几种方式。
二、Apache ShardingSphere准备-- Docker 搭建MySQL5.7 主从
请参考:Docker 搭建5.7主从复制
三、ShardingSphere-JDBC之读写分离
3.1、内容目标
- 新建一个springboot工程
- 引入相关sharding依赖、ssm依赖、数据库驱动
- 定义配置application.yml
- 定义entity、mapper、controller
- 结果验证
- 总结
3.2、实践步骤
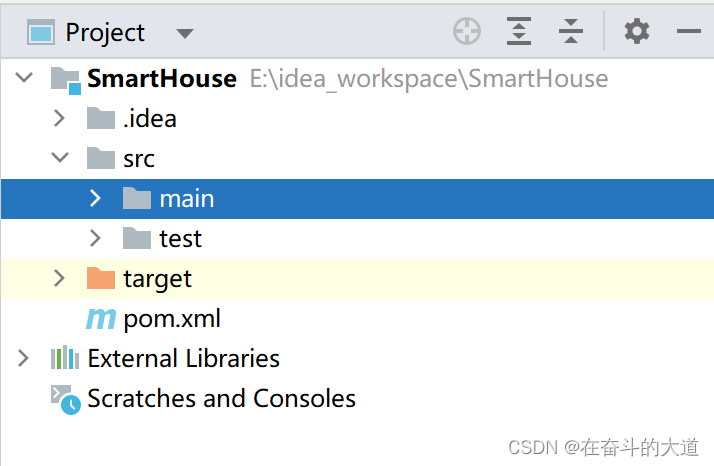
1、 新建一个springboot工程
2、 引入相关sharding依赖、ssm依赖、数据库驱动
<?xml version="1.0" encoding="UTF-8"?>
<project xmlns="http://maven.apache.org/POM/4.0.0"
         xmlns:xsi="http://www.w3.org/2001/XMLSchema-instance"
         xsi:schemaLocation="http://maven.apache.org/POM/4.0.0 http://maven.apache.org/xsd/maven-4.0.0.xsd">
    <modelVersion>4.0.0</modelVersion>
    <parent>
        <groupId>org.springframework.boot</groupId>
        <artifactId>spring-boot-starter-parent</artifactId>
        <version>2.2.2.RELEASE</version>
    </parent>

    <groupId>org.zzg</groupId>
    <artifactId>SmartHouse</artifactId>
    <version>1.0-SNAPSHOT</version>

    <properties>
        <java.version>1.8</java.version>
        <maven.compiler.source>8</maven.compiler.source>
        <maven.compiler.target>8</maven.compiler.target>
        <sharding-sphere.version>4.0.0-RC1</sharding-sphere.version>
    </properties>

    <dependencies>
        <dependency>
            <groupId>org.springframework.boot</groupId>
            <artifactId>spring-boot-starter-web</artifactId>
        </dependency>

        <dependency>
            <groupId>org.springframework.boot</groupId>
            <artifactId>spring-boot-starter-test</artifactId>
            <scope>test</scope>
            <exclusions>
                <exclusion>
                    <groupId>org.junit.vintage</groupId>
                    <artifactId>junit-vintage-engine</artifactId>
                </exclusion>
            </exclusions>
        </dependency>
        <dependency>
            <groupId>junit</groupId>
            <artifactId>junit</artifactId>
            <version>RELEASE</version>
            <scope>compile</scope>
        </dependency>

        <!--springboot 与 mybatis 集成 -->
        <dependency>
            <groupId>org.mybatis.spring.boot</groupId>
            <artifactId>mybatis-spring-boot-starter</artifactId>
            <version>1.3.2</version>
        </dependency>
        <!-- 数据库连接池druid -->
        <dependency>
            <groupId>com.alibaba</groupId>
            <artifactId>druid-spring-boot-starter</artifactId>
            <version>1.1.10</version>
        </dependency>
        <!--mysql 驱动程序 -->
        <dependency>
            <groupId>mysql</groupId>
            <artifactId>mysql-connector-java</artifactId>
            <version>5.1.49</version>
        </dependency>
        <!--依赖lombok-->
        <dependency>
            <groupId>org.projectlombok</groupId>
            <artifactId>lombok</artifactId>
            <optional>true</optional>
        </dependency>
        <dependency>
            <groupId>org.springframework.boot</groupId>
            <artifactId>spring-boot-starter-test</artifactId>
            <scope>test</scope>
        </dependency>
        <!--依赖sharding-->
        <dependency>
            <groupId>org.apache.shardingsphere</groupId>
            <artifactId>sharding-jdbc-spring-boot-starter</artifactId>
            <version>${sharding-sphere.version}</version>
        </dependency>
        <dependency>
            <groupId>org.apache.shardingsphere</groupId>
            <artifactId>sharding-core-common</artifactId>
            <version>${sharding-sphere.version}</version>
        </dependency>
    </dependencies>

    <dependencyManagement>
        <dependencies>
            <dependency>
                <groupId>org.springframework.cloud</groupId>
                <artifactId>spring-cloud-dependencies</artifactId>
                <version>Finchley.SR1</version>
                <type>pom</type>
                <scope>import</scope>
            </dependency>

            <dependency>
                <groupId>org.springframework.cloud</groupId>
                <artifactId>spring-cloud-alibaba-dependencies</artifactId>
                <version>0.2.2.RELEASE</version>
                <type>pom</type>
                <scope>import</scope>
            </dependency>
        </dependencies>
    </dependencyManagement>


    <build>
        <plugins>
            <plugin>
                <groupId>org.springframework.boot</groupId>
                <artifactId>spring-boot-maven-plugin</artifactId>
                <version>2.6.6</version>
            </plugin>
            <plugin>
                <groupId>org.mybatis.generator</groupId>
                <artifactId>mybatis-generator-maven-plugin</artifactId>
                <version>1.3.5</version>
                <configuration>
                    <configurationFile>src/main/resources/mybatis-generator/mybatis-generator-cfg.xml
                    </configurationFile>
                    <verbose>true</verbose>
                    <overwrite>true</overwrite>
                </configuration>
                <executions>
                </executions>
                <dependencies>
                    <dependency>
                        <groupId>org.mybatis.generator</groupId>
                        <artifactId>mybatis-generator-core</artifactId>
                        <version>1.3.5</version>
                    </dependency>
                    <!--mysql 驱动程序 -->
                    <dependency>
                        <groupId>mysql</groupId>
                        <artifactId>mysql-connector-java</artifactId>
                        <version>8.0.12</version>
                    </dependency>
                </dependencies>
            </plugin>

        </plugins>
    </build>


</project>
3、 定义配置application.yml
server:
  port: 8085
spring:
  main:
    allow-bean-definition-overriding: true
  shardingsphere:
    # 参数配置,显示sql
    props:
      sql:
        show: true
    # 配置数据源
    datasource:
      # 给每个数据源取别名,下面的ds1,ds2任意取名字
      names: ds1,ds2
      # 给master-ds1每个数据源配置数据库连接信息
      ds1:
        # 配置druid数据源
        type: com.alibaba.druid.pool.DruidDataSource
        driver-class-name: com.mysql.jdbc.Driver
        url: jdbc:mysql://192.168.43.10:3307/sync_data?useSSL=false&characterEncoding=utf8
        username: root
        password: root
        connectionTimeoutMilliseconds: 60000 #连接超时控制
        idleTimeoutMilliseconds: 60000 # 连接空闲时间设置
        maxLifetimeMilliseconds: 0 # 连接的最大持有时间,0为无限制
        maxPoolSize: 50 # 连接池中最大维持的连接数量
        minPoolSize: 1 # 连接池的最小连接数量
      # 配置ds2-slave
      ds2:
        type: com.alibaba.druid.pool.DruidDataSource
        driver-class-name: com.mysql.jdbc.Driver
        url: jdbc:mysql://192.168.43.10:3308/sync_data?useSSL=false&characterEncoding=utf8
        username: root
        password: root
        connectionTimeoutMilliseconds: 60000 #连接超时控制
        idleTimeoutMilliseconds: 60000 # 连接空闲时间设置
        maxLifetimeMilliseconds: 0 # 连接的最大持有时间,0为无限制
        maxPoolSize: 50 # 连接池中最大维持的连接数量
        minPoolSize: 1 # 连接池的最小连接数量
    # 配置默认数据源ds1
    sharding:
      # 默认数据源,主要用于写,注意一定要配置读写分离 ,注意:如果不配置,那么就会把三个节点都当做从slave节点,新增,修改和删除会出错。
      default-data-source-name: ds1
    # 配置数据源的读写分离,但是数据库一定要做主从复制
    masterslave:
      # 配置主从名称,可以任意取名字
      name: ms
      # 配置主库master,负责数据的写入
      master-data-source-name: ds1
      # 配置从库slave节点
      slave-data-source-names: ds2
      # 配置slave节点的负载均衡均衡策略,采用轮询机制
      load-balance-algorithm-type: round_robin
# 整合mybatis的配置XXXXX
mybatis:
  mapper-locations: classpath:mapper/*.xml
  type-aliases-package: com.zzg.model
重点注意:
# 配置默认数据源ds1
    sharding:
      # 默认数据源,主要用于写,注意一定要配置读写分离 ,注意:如果不配置,那么就会把二个节点都当做从slave节点,新增,修改和删除会出错。
      default-data-source-name: ds1
    # 配置数据源的读写分离,但是数据库一定要做主从复制
    masterslave:
      # 配置主从名称,可以任意取名字
      name: ms
      # 配置主库master,负责数据的写入
      master-data-source-name: ds1
      # 配置从库slave节点
      slave-data-source-names: ds2
      # 配置slave节点的负载均衡均衡策略,采用轮询机制
      load-balance-algorithm-type: round_robin
采用轮询机制选择数据源,如果不配置default-data-source-name,那么就会把二个节点都当做从slave节点,那么新增,修改和删除会出错。
4、 定义mapper、controller,entity
package com.zzg.model;

import lombok.Data;

import java.io.Serializable;

@Data
public class User implements Serializable {
    // 主键
    private Integer id;
    // 昵称
    private String nickname;
    // 密码
    private String password;
    // 性
    private Integer sex;
    // 性
    private String birthday;

}
package com.zzg.mapper;
import com.zzg.model.User;
import org.apache.ibatis.annotations.Insert;
import org.apache.ibatis.annotations.Select;
import java.util.List;
public interface UserMapper {
@Insert("insert into house_user(nickname,password,sex,birthday) values (#{nickname},#{password},#{sex},#{birthday})")
void addUser(User user);
@Select("select * from house_user")
List<User> findUsers();
}package com.zzg.controller;
import com.zzg.mapper.UserMapper;
import com.zzg.model.User;
import org.springframework.beans.factory.annotation.Autowired;
import org.springframework.web.bind.annotation.GetMapping;
import org.springframework.web.bind.annotation.RequestMapping;
import org.springframework.web.bind.annotation.RestController;
import java.util.List;
import java.util.Random;
@RestController
@RequestMapping("/user")
public class FirstController {
@Autowired
private UserMapper userMapper;
@GetMapping("/save")
public String insert() {
User user = new User();
user.setNickname("zzg" + new Random().nextInt());
user.setPassword("1234567");
user.setSex(1);
user.setBirthday("1991-12-20");
userMapper.addUser(user);
return "success";
}
@GetMapping("/listuser")
public List<User> listuser() {
return userMapper.findUsers();
}
}
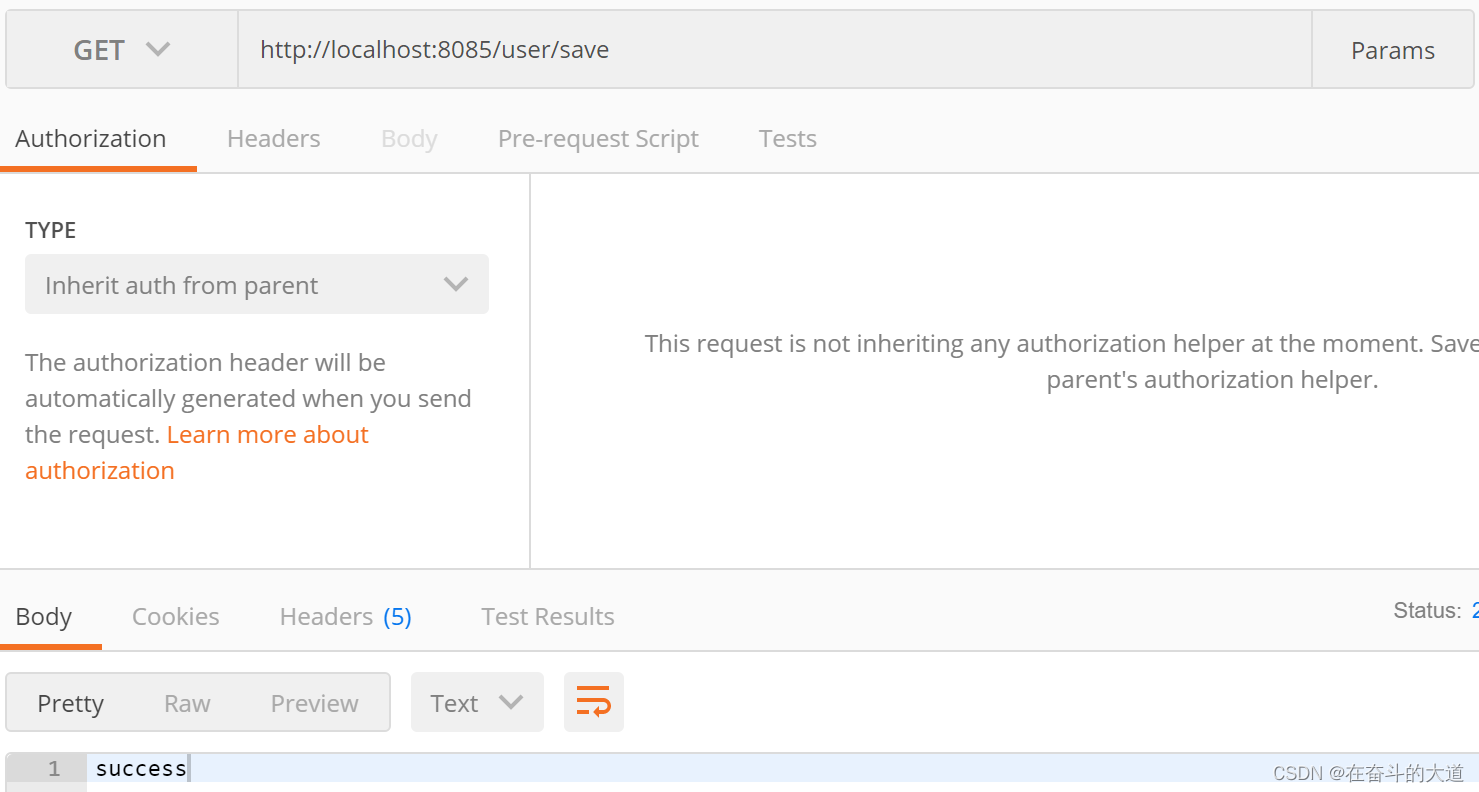
5、 PostMan测试效果
访问 http://localhost:8085/user/save ,数据源为ds1节点
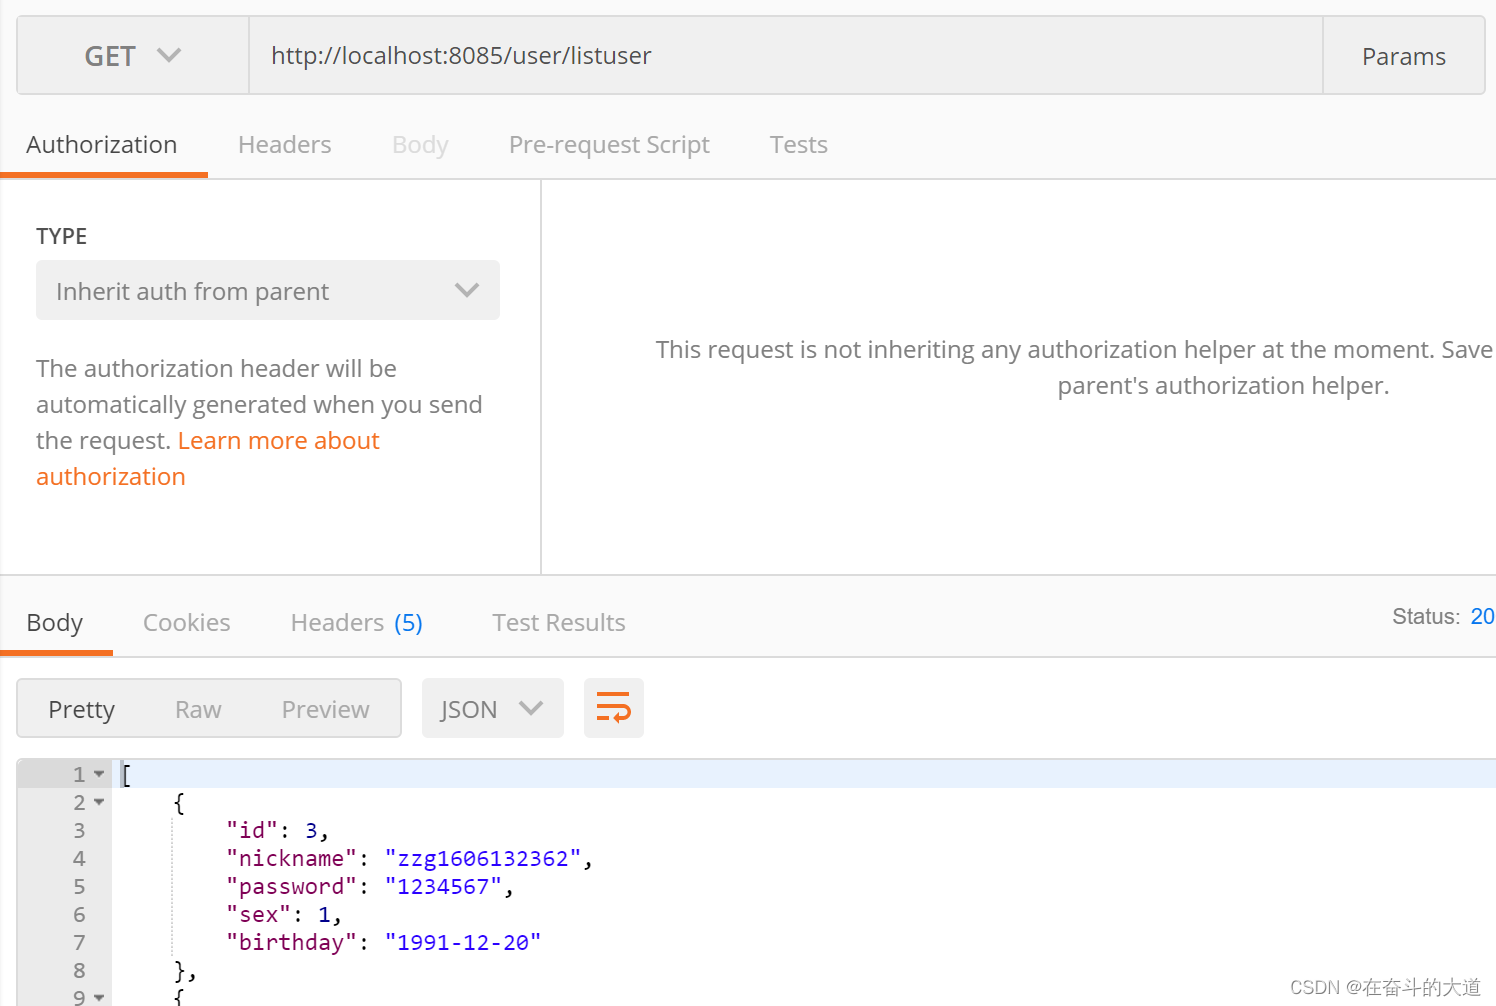
访问http://localhost:8085/user/listuser 数据源为ds2节点,并且轮询进入。
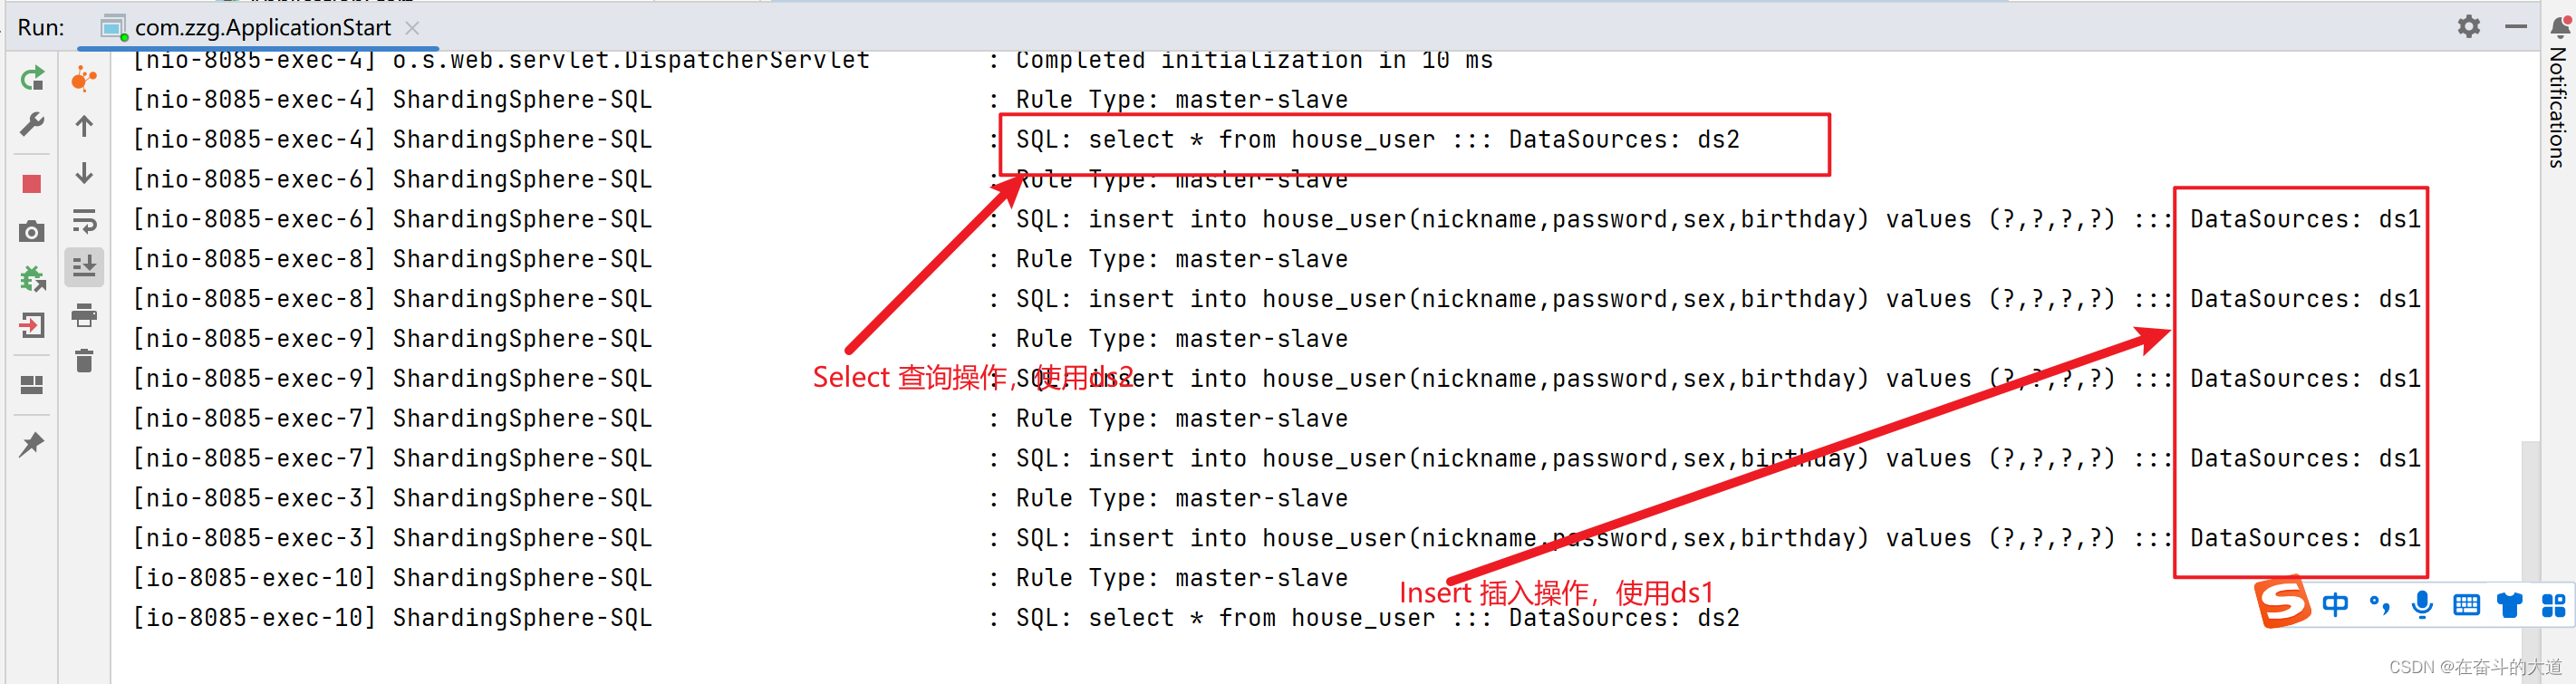
6、 日志查看
 四、MySQL分库分表原理
1、为什么要分库分表
一般的机器(4核16G),单库的MySQL并发(QPS+TPS)超过了2k,系统基本就完蛋了。最好是并发量控制在1k左右。这里就引出一个问题,为什么要分库分表?
分库分表目的:解决高并发,和数据量大的问题。
1、高并发情况下,会造成IO读写频繁,自然就会造成读写缓慢,甚至是宕机。一般单库不要超过2k并发,NB的机器除外。
2、数据量大的问题。主要由于底层索引实现导致,MySQL的索引实现为B+TREE,数据量其他,会导致索引树十分庞大,造成查询缓慢。第二,innodb的最大存储限制64TB。
解决上述问题。最常见做法,就是分库分表。
分库分表的目的,是将一个表拆成N个表,就是让每个表的数据量控制在一定范围内,保证SQL的性能。 一个表数据建议不要超过500W

2、分库分表
分为垂直拆分和水平拆分。
**水平拆分:**统一个表的数据拆到不同的库不同的表中。可以根据时间、地区、或某个业务键维度,也可以通过hash进行拆分,最后通过路由访问到具体的数据。拆分后的每个表结构保持一致。
**垂直拆分:**就是把一个有很多字段的表给拆分成多个表,或者是多个库上去。每个库表的结构都不一样,每个库表都包含部分字段。一般来说,可以根据业务维度进行拆分,如订单表可以拆分为订单、订单支持、订单地址、订单商品、订单扩展等表;也可以,根据数据冷热程度拆分,20%的热点字段拆到一个表,80%的冷字段拆到另外一个表。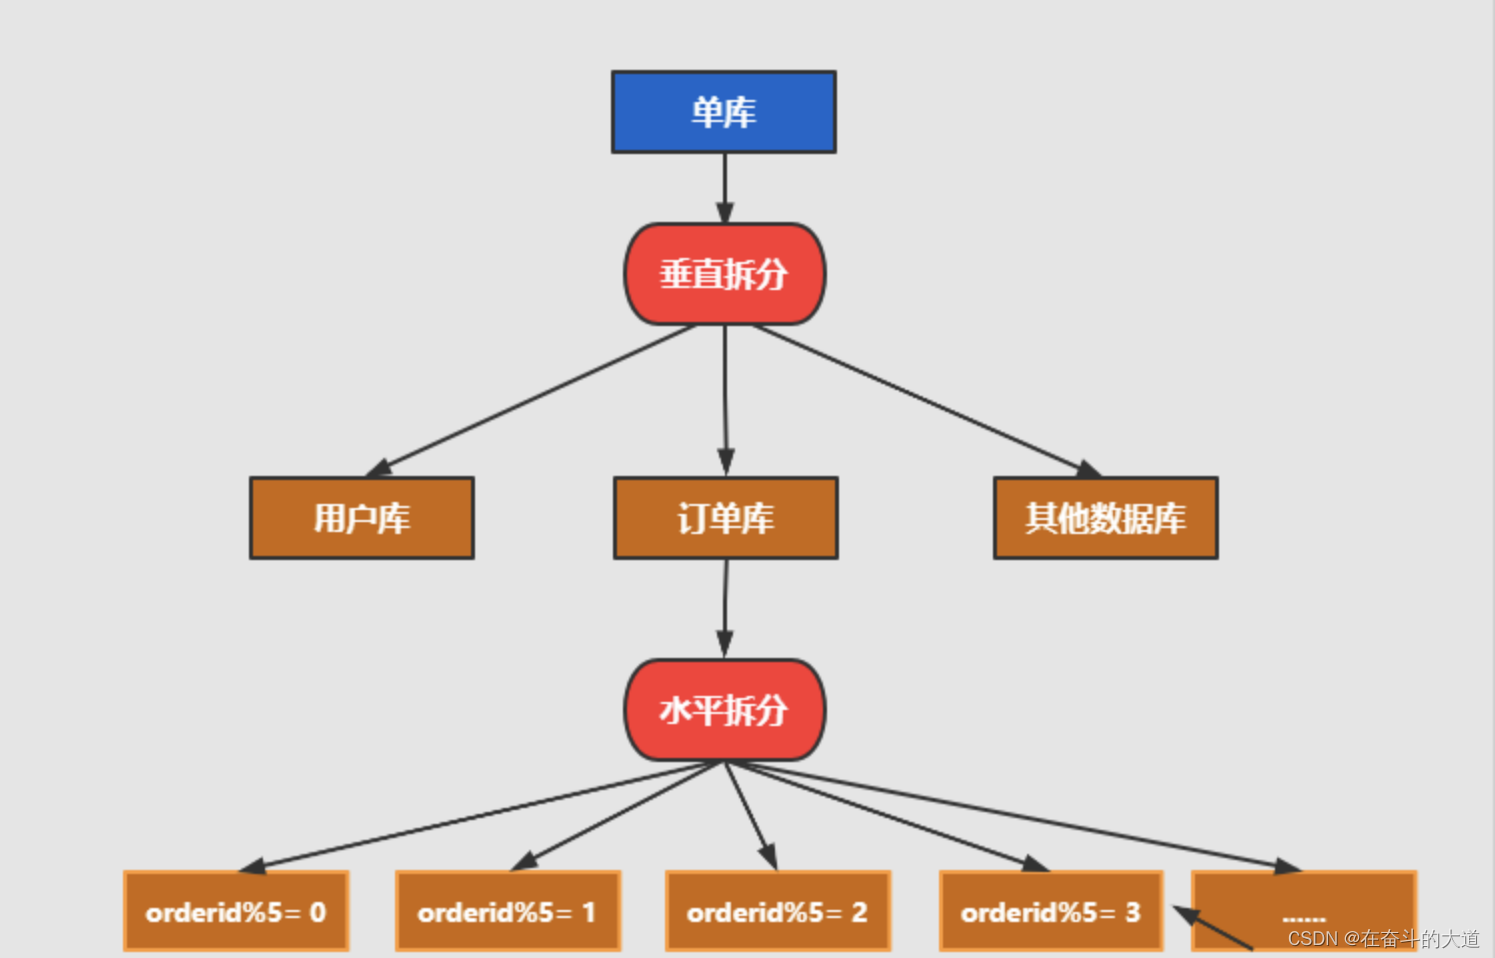
3、分库分表数据迁移
一般数据库的拆分也是有一个过程的,一开始是单表,后面慢慢拆成多表。那么我们就看下如何平滑的从MySQL单表过度到MySQL的分库分表架构。
1、利用mysql+canal做增量数据同步,利用分库分表中间件,将数据路由到对应的新表中。
2、利用分库分表中间件,全量数据导入到对应的新表中。
3、通过单表数据和分库分表数据两两比较,更新不匹配的数据到新表中。
4、数据稳定后,将单表的配置切换到分库分表配置上。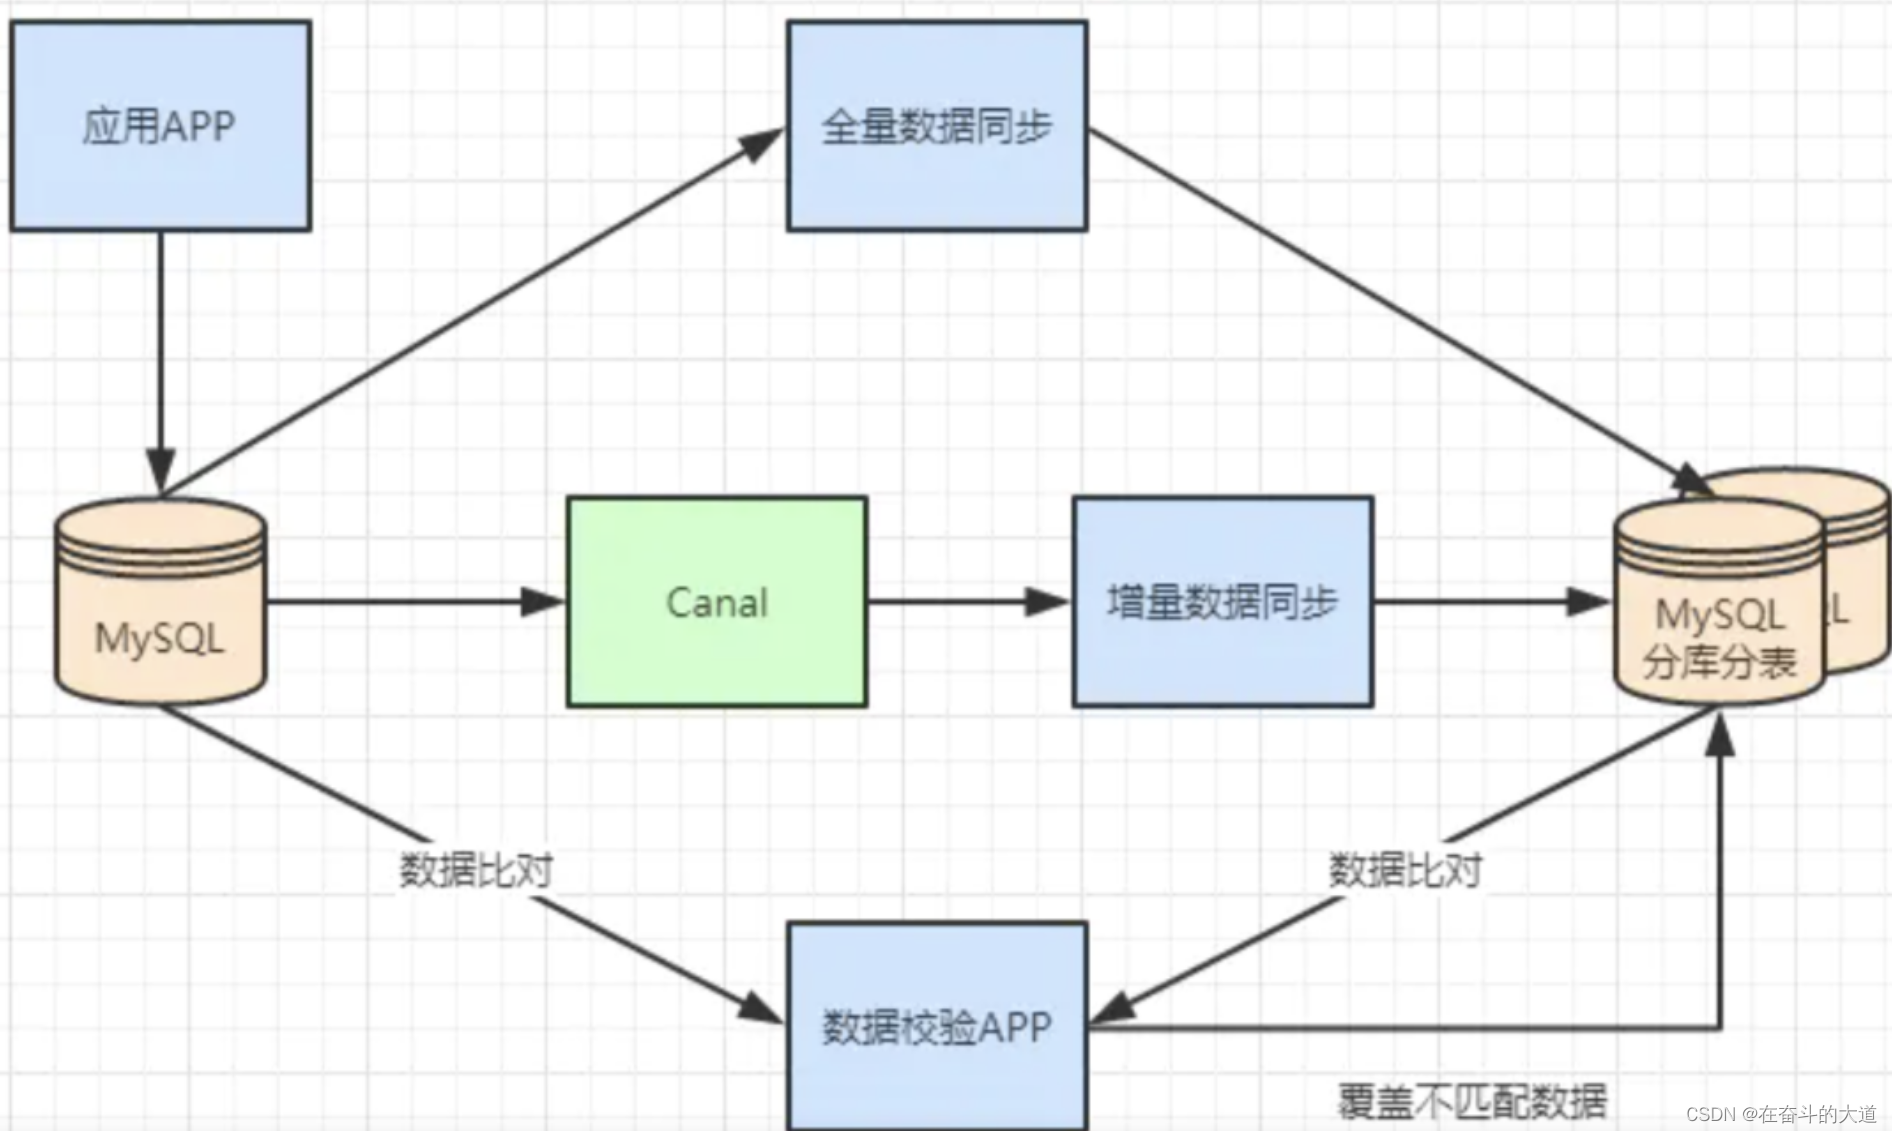
4、总结
垂直拆分:业务模块拆分、商品库,用户库,订单库
水平拆分:对表进行水平拆分(也就是我们说的:分表)
五、ShardingSphere-JDBC之分库和分表
1、分库分表的方式
**水平拆分:**统一个表的数据拆到不同的库不同的表中。可以根据时间、地区、或某个业务键维度,也可以通过hash进行拆分,最后通过路由访问到具体的数据。拆分后的每个表结构保持一致。
**垂直拆分:**就是把一个有很多字段的表给拆分成多个表,或者是多个库上去。每个库表的结构都不一样,每个库表都包含部分字段。一般来说,可以根据业务维度进行拆分,如订单表可以拆分为订单、订单支持、订单地址、订单商品、订单扩展等表;也可以,根据数据冷热程度拆分,20%的热点字段拆到一个表,80%的冷字段拆到另外一个表。
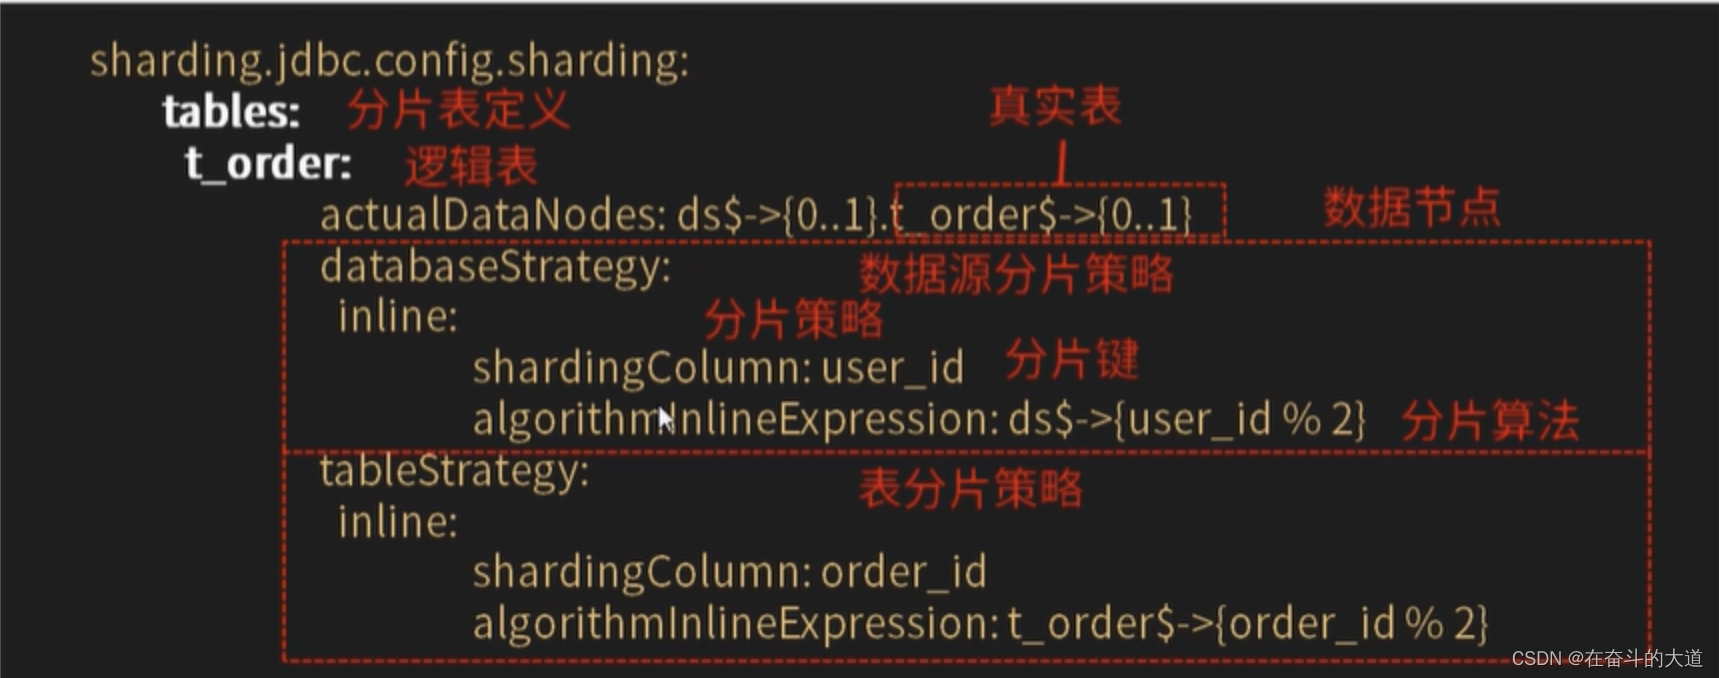
2、分库分表之核心概念
2.1、逻辑表
相同结构的水平拆分数据库(表)的逻辑名称,是 SQL 中表的逻辑标识。 例:学生数据根据主键尾数拆分为 10 张表,分别是 t_student_0 到 t_student_9,他们的逻辑表名为 t_student。
# 配置默认数据源ds0
sharding:
# 默认数据源,主要用于写,注意一定要配置读写分离 ,注意:如果不配置,那么就会把二个节点都当做从slave节点,新增,修改和删除会出错。
default-data-source-name: ds0
# 配置分表的规则
tables:
# t_student 逻辑表名
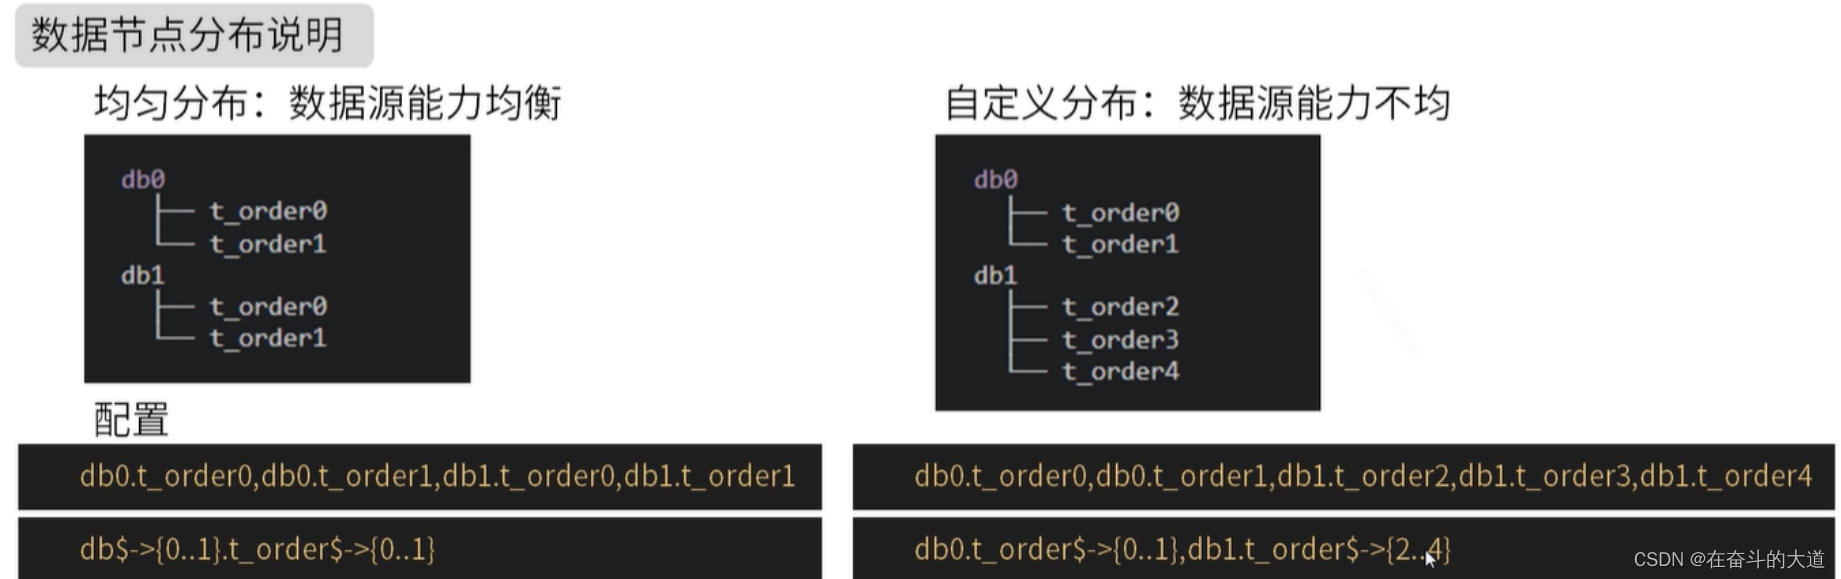
t_student:2.2、数据节点
 # 配置分表的规则
      tables:
        # t_student 逻辑表名
        t_student:
          # 数据节点:数据源$->{0..N}.逻辑表名$->{0..N}
          actual-data-nodes: ds$->{0..1}.t_student$->{0..1}
          # 拆分库策略,也就是什么样子的数据放入放到哪个数据库中。
          database-strategy:
            inline:
              sharding-column: sex    # 分片字段(分片键)
              algorithm-expression: ds$->{sex % 2} # 分片算法表达式
          # 拆分表策略,也就是什么样子的数据放入放到哪个数据表中。
          table-strategy:
            inline:
              sharding-column: age    # 分片字段(分片键)
              algorithm-expression: t_student$->{age % 2} # 分片算法表达
主要分为两种:均匀分布和自定义分布
数据分片的最小单元,由数据源名称和真实表组成。 例:ds_0.t_order_0。
寻找规则如下:
2.3、分片
分片键
用于将数据库(表)水平拆分的数据库字段。 例:将订单表中的订单主键的尾数取模分片,则订单主键为分片字段。 SQL 中如果无分片字段,将执行全路由,性能较差。 除了对单分片字段的支持,Apache ShardingSphere 也支持根据多个字段进行分片。
分片算法
用于将数据分片的算法,支持 =、>=、<=、>、<、BETWEEN 和 IN 进行分片。 分片算法可由开发者自行实现,也可使用 Apache ShardingSphere 内置的分片算法语法糖,灵活度非常高。
自动化分片算法
分片算法语法糖,用于便捷的托管所有数据节点,使用者无需关注真实表的物理分布。 包括取模、哈希、范围、时间等常用分片算法的实现。
自定义分片算法
提供接口让应用开发者自行实现与业务实现紧密相关的分片算法,并允许使用者自行管理真实表的物理分布。 自定义分片算法又分为:
- 标准分片算法
用于处理使用单一键作为分片键的 =、IN、BETWEEN AND、>、<、>=、<= 进行分片的场景。
- 复合分片算法
用于处理使用多键作为分片键进行分片的场景,包含多个分片键的逻辑较复杂,需要应用开发者自行处理其中的复杂度。
- Hint 分片算法
用于处理使用 Hint 行分片的场景。
分片算法详解
第一种:none
对应NoneShardingStragey,不分片策略,SQL会被发给所有节点去执行,这个规则没有子项目可以配置。
第二种:inline 行表达时分片策略(核心,必须要掌握)
对应InlineShardingStragey。使用Groovy的表达时,提供对SQL语句种的=和in的分片操作支持,只支持单分片键。对于简单的分片算法,可以通过简单的配置使用,从而避免繁琐的Java代码开放,如:t_student${分片键(数据表字段)age % 2} 表示t_student表根据某字段(age)模 5.从而分为2张表,表名称为:t_user0到t_user1。如果库也是如此。
server:
  port: 8085
spring:
  main:
    allow-bean-definition-overriding: true
  shardingsphere:
    # 参数配置,显示sql
    props:
      sql:
        show: true
    sharding:
      # 默认数据源,主要用于写,注意一定要配置读写分离 ,注意:如果不配置,那么就会把二个节点都当做从slave节点,新增,修改和删除会出错。
      default-data-source-name: ds0
      # 配置分表的规则
      tables:
        # t_student逻辑表名
        t_student:
          # 数据节点:数据源$->{0..N}.逻辑表名$->{0..N}
          actual-data-nodes: ds$->{0..1}.t_student$->{0..1}
          # 拆分库策略,也就是什么样子的数据放入放到哪个数据库中。
          database-strategy:
            inline:
              sharding-column: sex    # 分片字段(分片键)
              algorithm-expression: ds$->{sex % 2} # 分片算法表达式
          # 拆分表策略,也就是什么样子的数据放入放到哪个数据表中。
          table-strategy:
            inline:
              sharding-column: age    # 分片字段(分片键)
              algorithm-expression: t_student$->{age % 2} # 分片算法表达式
algorithm-expression行表达式:
${begin…end} 表示区间范围。
${[unit1,unit2,….,unitn]} 表示枚举值。
行表达式种如果出现连续多个e x p r e s s s i o n 或 {expresssion}或expresssion或->{expression}表达式,整个表达时最终的结果将会根据每个子表达式的结果进行笛卡尔组合。
完整案例和配置
- 准备两个数据库sync_data。名字相同,两个数据源ds0和ds1
- 每个数据库下方t_student0和t_student1即可。
- 数据库规则,性别为偶数的放入ds0库,奇数的放入ds1库。
- 数据表规则:年龄为偶数的放入t_user0库,奇数的放入t_user1库。
server:
  port: 8085
spring:
  main:
    allow-bean-definition-overriding: true
  shardingsphere:
    # 参数配置,显示sql
    props:
      sql:
        show: true
    # 配置数据源
    datasource:
      # 给每个数据源取别名,下面的ds0,ds1任意取名字
      names: ds0,ds1
      # 给master-ds1每个数据源配置数据库连接信息
      ds0:
        # 配置druid数据源
        type: com.alibaba.druid.pool.DruidDataSource
        driver-class-name: com.mysql.jdbc.Driver
        url: jdbc:mysql://192.168.43.10:3307/sync_data?useSSL=false&characterEncoding=utf8
        username: root
        password: root
        connectionTimeoutMilliseconds: 60000 #连接超时控制
        idleTimeoutMilliseconds: 60000 # 连接空闲时间设置
        maxLifetimeMilliseconds: 0 # 连接的最大持有时间,0为无限制
        maxPoolSize: 50 # 连接池中最大维持的连接数量
        minPoolSize: 1 # 连接池的最小连接数量
      # 配置ds1-slave
      ds1:
        type: com.alibaba.druid.pool.DruidDataSource
        driver-class-name: com.mysql.jdbc.Driver
        url: jdbc:mysql://192.168.43.10:3307/sync_data?useSSL=false&characterEncoding=utf8
        username: root
        password: root
        connectionTimeoutMilliseconds: 60000 #连接超时控制
        idleTimeoutMilliseconds: 60000 # 连接空闲时间设置
        maxLifetimeMilliseconds: 0 # 连接的最大持有时间,0为无限制
        maxPoolSize: 50 # 连接池中最大维持的连接数量
        minPoolSize: 1 # 连接池的最小连接数量
    # 配置默认数据源ds0
    sharding:
      # 默认数据源,主要用于写,注意一定要配置读写分离 ,注意:如果不配置,那么就会把二个节点都当做从slave节点,新增,修改和删除会出错。
      default-data-source-name: ds0
      # 配置分表的规则
      tables:
        # t_student 逻辑表名
        t_student:
          # 数据节点:数据源$->{0..N}.逻辑表名$->{0..N}
          actual-data-nodes: ds$->{0..1}.t_student$->{0..1}
          # 拆分库策略,也就是什么样子的数据放入放到哪个数据库中。
          database-strategy:
            inline:
              sharding-column: sex    # 分片字段(分片键)
              algorithm-expression: ds$->{sex % 2} # 分片算法表达式
          # 拆分表策略,也就是什么样子的数据放入放到哪个数据表中。
          table-strategy:
            inline:
              sharding-column: age    # 分片字段(分片键)
              algorithm-expression: t_student$->{age % 2} # 分片算法表达

# 整合mybatis的配置XXXXX
mybatis:
  mapper-locations: classpath:mapper/*.xml
  type-aliases-package: com.zzg.model
package com.zzg.model;

import lombok.Data;

@Data
public class Student implements java.io.Serializable {
    // 主键
    private Integer id;

    // 性别
    private Integer sex;

    // 年龄
    private Integer age;

    // 姓名
    private String name;

}
package com.zzg.mapper;

import com.zzg.model.Student;
import org.apache.ibatis.annotations.Insert;

public interface StudentMapper {

    @Insert("insert into t_student(sex,age,name) values (#{sex},#{age},#{name})")
    void addStudent(Student student);
}
package com.zzg.controller;

import com.zzg.mapper.StudentMapper;
import com.zzg.model.Student;
import org.springframework.beans.factory.annotation.Autowired;
import org.springframework.web.bind.annotation.GetMapping;
import org.springframework.web.bind.annotation.RequestMapping;
import org.springframework.web.bind.annotation.RestController;

import java.util.Random;

@RestController
@RequestMapping("/student")
public class StudentController {
    @Autowired
    private StudentMapper studentMapper;

    @GetMapping("/save")
    public String insert() {
        Student student = new Student();
        student.setName("zzg" + new Random().nextInt());
        student.setSex(new Random().nextInt(2) + 1);
        student.setAge(new Random().nextInt(6) + 6);
        studentMapper.addStudent(student);
        return "success";
    }
}
温馨提示:
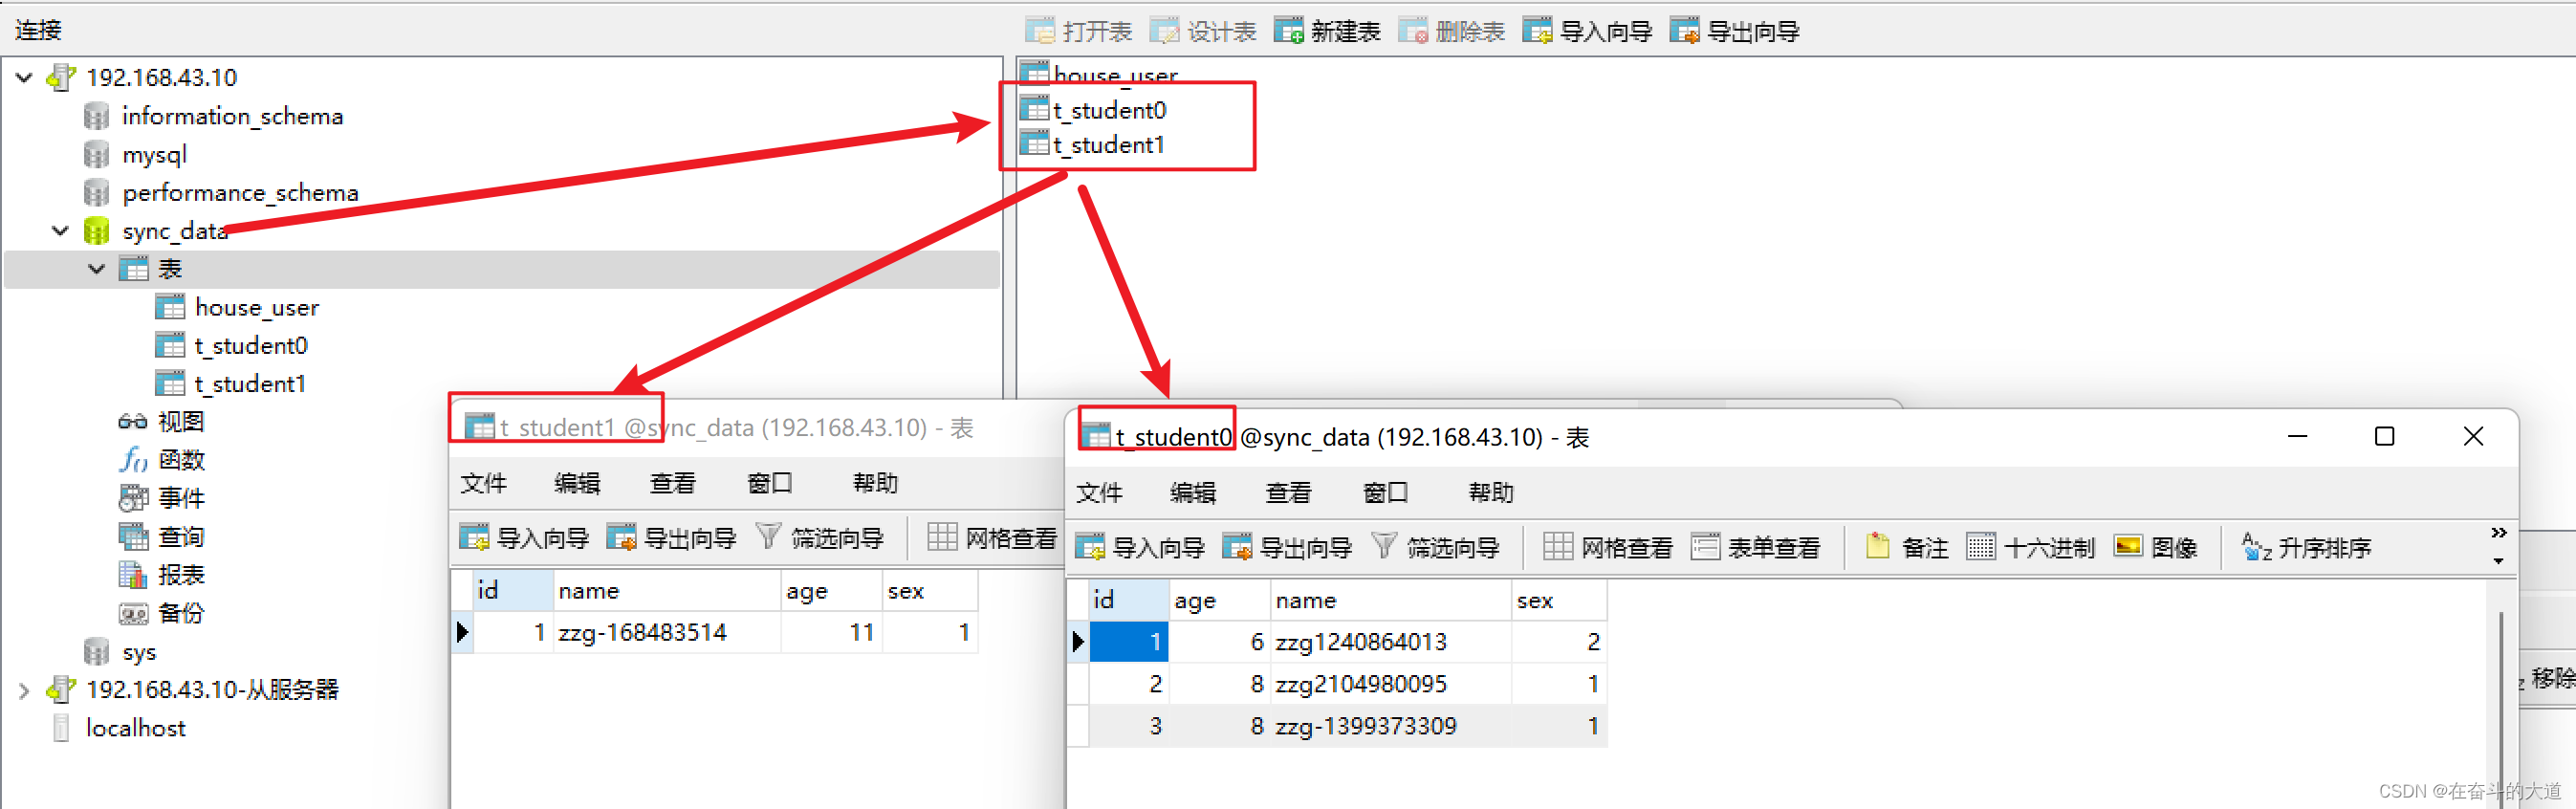
- 上述的功能演示分库分表应该是包含两个独立数据库,我没有配置两个独立数据库。所以上述功能实际实现了分表,如果是配置独立数据库则是完整的分库分表操作。
- shardsphere-jdbc 不能同时实现读写分离和分库分表的操作。主要是由于SQL解析时,如果是读写分离SQL语句中的实体表名进行映射处理,如果是分库分表SQL语句中的表名为虚拟表,依据相关规则进行转换为物理表进行操作。
Native For MySQL数据结果如下图:
第三种:根据实时间日期 - 按照标准规则分库分表
1、 标准分片 - Standard(了解)
- 对应StrandardShardingStrategy.提供对SQL语句中的=,in和恶between and 的分片操作支持。
- StrandardShardingStrategy只支持但分片键。提供PreciseShardingAlgorithm和RangeShardingAlgorithm两个分片算法。
- PreciseShardingAlgorithm是必选的呃,用于处理=和IN的分片
- 和RangeShardingAlgorithm是可选的,是用于处理Betwwen and分片,如果不配置和RangeShardingAlgorithm,SQL的Between AND 将按照全库路由处理。
2、定义分片的日期规则配置
server:
  port: 8085
spring:
  main:
    allow-bean-definition-overriding: true
  shardingsphere:
    # 参数配置,显示sql
    props:
      sql:
        show: true
    # 配置数据源
    datasource:
      # 给每个数据源取别名,下面的ds1,ds2任意取名字
      names: ds1,ds2
      # 给master-ds1每个数据源配置数据库连接信息
      ds1:
        # 配置druid数据源
        type: com.alibaba.druid.pool.DruidDataSource
        driver-class-name: com.mysql.jdbc.Driver
        url: jdbc:mysql://192.168.43.10:3307/sync_data?useSSL=false&characterEncoding=utf8
        username: root
        password: root
        connectionTimeoutMilliseconds: 60000 #连接超时控制
        idleTimeoutMilliseconds: 60000 # 连接空闲时间设置
        maxLifetimeMilliseconds: 0 # 连接的最大持有时间,0为无限制
        maxPoolSize: 50 # 连接池中最大维持的连接数量
        minPoolSize: 1 # 连接池的最小连接数量
      # 配置ds2-slave
      ds2:
        type: com.alibaba.druid.pool.DruidDataSource
        driver-class-name: com.mysql.jdbc.Driver
        url: jdbc:mysql://192.168.43.10:3308/sync_data?useSSL=false&characterEncoding=utf8
        username: root
        password: root
        connectionTimeoutMilliseconds: 60000 #连接超时控制
        idleTimeoutMilliseconds: 60000 # 连接空闲时间设置
        maxLifetimeMilliseconds: 0 # 连接的最大持有时间,0为无限制
        maxPoolSize: 50 # 连接池中最大维持的连接数量
        minPoolSize: 1 # 连接池的最小连接数量
    # 配置默认数据源ds0
    sharding:
      # 默认数据源,主要用于写,注意一定要配置读写分离 ,注意:如果不配置,那么就会把二个节点都当做从slave节点,新增,修改和删除会出错。
      default-data-source-name: ds0
      # 配置分表的规则
      tables:
        # t_user 逻辑表名
        t_user:
          # 数据节点:数据源$->{0..N}.逻辑表名$->{0..N}
          actual-data-nodes: ds$->{0..1}.t_user$->{0..1}
          # 拆分库策略,也就是什么样子的数据放入放到哪个数据库中。
          database-strategy:
            standard:
              shardingColumn: birthday
              preciseAlgorithmClassName: com.zzg.shardingjdbc.algorithm.BirthdayAlgorithm
          table-strategy:
            inline:
              sharding-column: age    # 分片字段(分片键)
              algorithm-expression: t_user$->{age % 2} # 分片算法表达式
# 整合mybatis的配置XXXXX
mybatis:
  mapper-locations: classpath:mapper/*.xml
  type-aliases-package: com.zzg.model
3、定义分片的日期规则
package com.zzg.shardingjdbc.algorithm;
import org.apache.shardingsphere.api.sharding.standard.PreciseShardingAlgorithm;
import org.apache.shardingsphere.api.sharding.standard.PreciseShardingValue;
import sun.util.resources.cldr.CalendarData;
import java.util.*;

public class BirthdayAlgorithm implements PreciseShardingAlgorithm<Date> {
    List<Date> dateList = new ArrayList<>();
    {
        Calendar calendar1 = Calendar.getInstance();
        calendar1.set(2020, 1, 1, 0, 0, 0);
        Calendar calendar2 = Calendar.getInstance();
        calendar2.set(2021, 1, 1, 0, 0, 0);
        Calendar calendar3 = Calendar.getInstance();
        calendar3.set(2022, 1, 1, 0, 0, 0);
        dateList.add(calendar1.getTime());
        dateList.add(calendar2.getTime());
        dateList.add(calendar3.getTime());
    }
    @Override
    public String doSharding(Collection<String> collection, PreciseShardingValue<Date> preciseShardingValue) {
        // 获取属性数据库的值
        Date date = preciseShardingValue.getValue();
        // 获取数据源的名称信息列表
        Iterator<String> iterator = collection.iterator();
        String target = null;
        for (Date s : dateList) {
            target = iterator.next();
            // 如果数据晚于指定的日期直接返回
            if (date.before(s)) {
                break;
            }
        }
        return target;
    }
}
4、测试查看结果
第四种:ShardingSphere - 符合分片策略(了解)
- 对应接口:HintShardingStrategy。通过Hint而非SQL解析的方式分片的策略。
- 对于分片字段非SQL决定,而是由其他外置条件决定的场景,克使用SQL hint灵活的注入分片字段。例如:按照用户登录的时间,主键等进行分库,而数据库中并无此字段。SQL hint支持通过Java API和SQL注解两种方式使用。让后分库分表更加灵活。

第五种:ShardingSphere - hint分片策略(了解)
- 对应ComplexShardingStrategy。符合分片策略提供对SQL语句中的-,in和between and的分片操作支持。
- ComplexShardingStrategy支持多分片键,由于多分片键之间的关系复杂,因此并未进行过多的封装,而是直接将分片键组合以及分片操作符透传至分片算法,完全由开发者自己实现,提供最大的灵活度。

分片策略
包含分片键和分片算法,由于分片算法的独立性,将其独立抽离。 真正可用于分片操作的是分片键 + 分片算法,也就是分片策略。
个人认为大致分为两大类:
- 数据源分片
- 表分片
强制分片路由
对于分片字段并非由 SQL 而是其他外置条件决定的场景,可使用 SQL Hint 注入分片值。 例:按照员工登录主键分库,而数据库中并无此字段。 SQL Hint 支持通过 Java API 和 SQL 注释(待实现)两种方式使用。
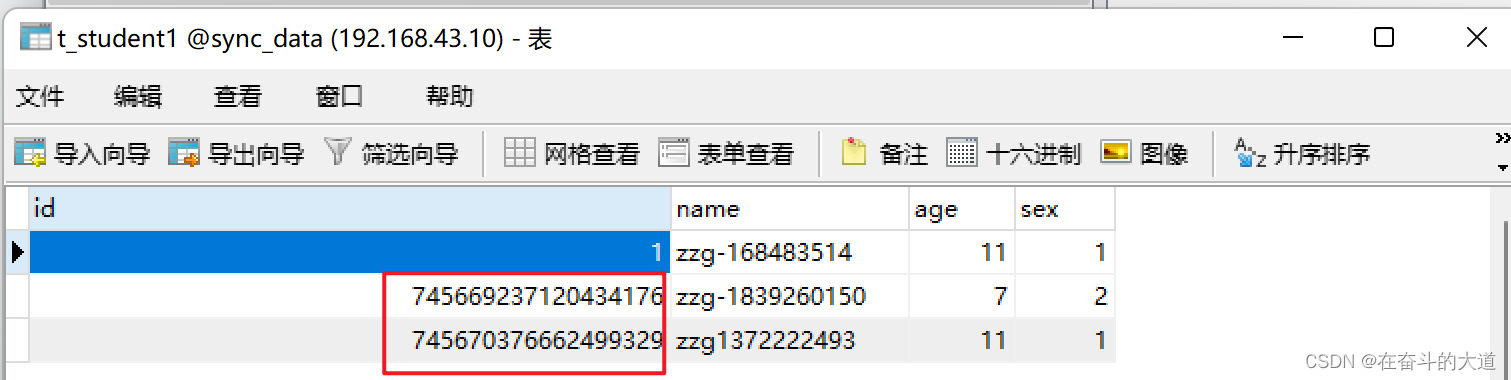
六、ShardingSphere-JDBC之分布式主键配置
1、ShardingSphere - 分布式主键配置
ShardingSphere提供灵活的配置分布式主键生成策略方式。在分片规则配置模块克配置每个表的主键生成策略。默认使用雪花算法。(snowflake)生成64bit的长整型数据。支持两种方式配置
- SNOWFLAKE
- UUID
温馨提示:主键列不能自增长。数据类型是:bigint(20)
spring:
  shardingsphere:
    sharding:
      tables:
        # t_student逻辑表名
        t_student:
          key-generator:
              # 主键的列明,
            column: id
            type: SNOWFLAKE
package com.zzg.model;

import lombok.Data;

@Data
public class Student implements java.io.Serializable {
    // 主键
    private Long id;

    // 性别
    private Integer sex;

    // 年龄
    private Integer age;

    // 姓名
    private String name;

    public Long getId() {
        return id;
    }

    public void setId(Long id) {
        this.id = id;
    }
}
server:
  port: 8085
spring:
  main:
    allow-bean-definition-overriding: true
  shardingsphere:
    # 参数配置,显示sql
    props:
      sql:
        show: true
    # 配置数据源
    datasource:
      # 给每个数据源取别名,下面的ds0,ds1任意取名字
      names: ds0,ds1
      # 给master-ds1每个数据源配置数据库连接信息
      ds0:
        # 配置druid数据源
        type: com.alibaba.druid.pool.DruidDataSource
        driver-class-name: com.mysql.jdbc.Driver
        url: jdbc:mysql://192.168.43.10:3307/sync_data?useSSL=false&characterEncoding=utf8
        username: root
        password: root
        connectionTimeoutMilliseconds: 60000 #连接超时控制
        idleTimeoutMilliseconds: 60000 # 连接空闲时间设置
        maxLifetimeMilliseconds: 0 # 连接的最大持有时间,0为无限制
        maxPoolSize: 50 # 连接池中最大维持的连接数量
        minPoolSize: 1 # 连接池的最小连接数量
      # 配置ds1-slave
      ds1:
        type: com.alibaba.druid.pool.DruidDataSource
        driver-class-name: com.mysql.jdbc.Driver
        url: jdbc:mysql://192.168.43.10:3307/sync_data?useSSL=false&characterEncoding=utf8
        username: root
        password: root
        connectionTimeoutMilliseconds: 60000 #连接超时控制
        idleTimeoutMilliseconds: 60000 # 连接空闲时间设置
        maxLifetimeMilliseconds: 0 # 连接的最大持有时间,0为无限制
        maxPoolSize: 50 # 连接池中最大维持的连接数量
        minPoolSize: 1 # 连接池的最小连接数量
    # 配置默认数据源ds0
    sharding:
      # 默认数据源,主要用于写,注意一定要配置读写分离 ,注意:如果不配置,那么就会把二个节点都当做从slave节点,新增,修改和删除会出错。
      default-data-source-name: ds0
      # 配置分表的规则
      tables:
        # t_student 逻辑表名
        t_student:
          key-generator:
            column: id
            type: SNOWFLAKE
          # 数据节点:数据源$->{0..N}.逻辑表名$->{0..N}
          actual-data-nodes: ds$->{0..1}.t_student$->{0..1}
          # 拆分库策略,也就是什么样子的数据放入放到哪个数据库中。
          database-strategy:
            inline:
              sharding-column: sex    # 分片字段(分片键)
              algorithm-expression: ds$->{sex % 2} # 分片算法表达式
          # 拆分表策略,也就是什么样子的数据放入放到哪个数据表中。
          table-strategy:
            inline:
              sharding-column: age    # 分片字段(分片键)
              algorithm-expression: t_student$->{age % 2} # 分片算法表达

# 整合mybatis的配置XXXXX
mybatis:
  mapper-locations: classpath:mapper/*.xml
  type-aliases-package: com.zzg.model
package com.zzg.mapper;

import com.zzg.model.Student;
import org.apache.ibatis.annotations.Insert;
import org.apache.ibatis.annotations.Options;

public interface StudentMapper {

    @Insert("insert into t_student(sex,age,name) values (#{sex},#{age},#{name})")
    @Options(useGeneratedKeys = true, keyColumn = "id", keyProperty = "id")
    void addStudent(Student student);
}
package com.zzg.controller;

import com.zzg.mapper.StudentMapper;
import com.zzg.model.Student;
import org.springframework.beans.factory.annotation.Autowired;
import org.springframework.web.bind.annotation.GetMapping;
import org.springframework.web.bind.annotation.RequestMapping;
import org.springframework.web.bind.annotation.RestController;

import java.util.Random;

@RestController
@RequestMapping("/student")
public class StudentController {
    @Autowired
    private StudentMapper studentMapper;

    @GetMapping("/save")
    public String insert() {
        Student student = new Student();
        student.setName("zzg" + new Random().nextInt());
        student.setSex(new Random().nextInt(2) + 1);
        student.setAge(new Random().nextInt(6) + 6);
        studentMapper.addStudent(student);
        return "success";
    }
}
效果展示:
七、ShardingSphere-JDBC之的事务管理
官网地址:
数据库事务需要满足ACID(原子性、一致性、隔离性、持久性)四个特性。
- 原子性(Atomicity)指事务作为整体来执行,要么全部执行,要么全不执行。
- 一致性(Consistency)指事务应确保数据从一个一致的状态转变为另一个一致的状态。
- 隔离性(Isolation)指多个事务并发执行时,一个事务的执行不应影响其他事务的执行。
- 持久性(Durability)指已提交的事务修改数据会被持久保存。
在单一数据节点中,事务仅限于对单一数据库资源的访问控制,称之为本地事务。几乎所有的成熟的关系型数据库都提供了对本地事务的原生支持。 但是在基于微服务的分布式应用环境下,越来越多的应用场景要求对多个服务的访问及其相对应的多个数据库资源能纳入到同一个事务当中,分布式事务应运而生。
关系型数据库虽然对本地事务提供了完美的ACID原生支持。 但在分布式的场景下,它却成为系统性能的桎梏。如何让数据库在分布式场景下满足ACID的特性或找寻相应的替代方案,是分布式事务的重点工作。
本地事务
在不开启任何分布式事务管理器的前提下,让每个数据节点各自管理自己的事务。 它们之间没有协调以及通信的能力,也并不互相知晓其他数据节点事务的成功与否。 本地事务在性能方面无任何损耗,但在强一致性以及最终一致性方面则力不从心。
两阶段提交
XA协议最早的分布式事务模型是由X/Open国际联盟提出的X/Open Distributed Transaction Processing(DTP)模型,简称XA协议。
基于XA协议实现的分布式事务对业务侵入很小。 它最大的优势就是对使用方透明,用户可以像使用本地事务一样使用基于XA协议的分布式事务。 XA协议能够严格保障事务ACID特性。
严格保障事务ACID特性是一把双刃剑。 事务执行在过程中需要将所需资源全部锁定,它更加适用于执行时间确定的短事务。 对于长事务来说,整个事务进行期间对数据的独占,将导致对热点数据依赖的业务系统并发性能衰退明显。 因此,在高并发的性能至上场景中,基于XA协议的分布式事务并不是最佳选择。
柔性事务
如果将实现了ACID的事务要素的事务称为刚性事务的话,那么基于BASE事务要素的事务则称为柔性事务。 BASE是基本可用、柔性状态和最终一致性这三个要素的缩写。
基本可用(Basically Available)保证分布式事务参与方不一定同时在线。
柔性状态(Soft state)则允许系统状态更新有一定的延时,这个延时对客户来说不一定能够察觉。
而最终一致性(Eventually consistent)通常是通过消息传递的方式保证系统的最终一致性。
在ACID事务中对隔离性的要求很高,在事务执行过程中,必须将所有的资源锁定。 柔性事务的理念则是通过业务逻辑将互斥锁操作从资源层面上移至业务层面。通过放宽对强一致性要求,来换取系统吞吐量的提升。
基于ACID的强一致性事务和基于BASE的最终一致性事务都不是银弹,只有在最适合的场景中才能发挥它们的最大长处。 可通过下表详细对比它们之间的区别,以帮助开发者进行技术选型。

ShardingSphere-JDBC集成XA事务
<?xml version="1.0" encoding="UTF-8"?>
<project xmlns="http://maven.apache.org/POM/4.0.0"
         xmlns:xsi="http://www.w3.org/2001/XMLSchema-instance"
         xsi:schemaLocation="http://maven.apache.org/POM/4.0.0 http://maven.apache.org/xsd/maven-4.0.0.xsd">
    <modelVersion>4.0.0</modelVersion>
    <parent>
        <groupId>org.springframework.boot</groupId>
        <artifactId>spring-boot-starter-parent</artifactId>
        <version>2.2.2.RELEASE</version>
    </parent>

    <groupId>org.zzg</groupId>
    <artifactId>SmartHouse</artifactId>
    <version>1.0-SNAPSHOT</version>

    <properties>
        <java.version>1.8</java.version>
        <maven.compiler.source>8</maven.compiler.source>
        <maven.compiler.target>8</maven.compiler.target>
        <sharding-sphere.version>4.1.1</sharding-sphere.version>
    </properties>

    <dependencies>
        <dependency>
            <groupId>org.springframework.boot</groupId>
            <artifactId>spring-boot-starter-web</artifactId>
        </dependency>

        <dependency>
            <groupId>org.springframework.boot</groupId>
            <artifactId>spring-boot-starter-test</artifactId>
            <scope>test</scope>
            <exclusions>
                <exclusion>
                    <groupId>org.junit.vintage</groupId>
                    <artifactId>junit-vintage-engine</artifactId>
                </exclusion>
            </exclusions>
        </dependency>
        <dependency>
            <groupId>junit</groupId>
            <artifactId>junit</artifactId>
            <version>RELEASE</version>
            <scope>compile</scope>
        </dependency>

        <!--springboot 与 mybatis 集成 -->
        <dependency>
            <groupId>org.mybatis.spring.boot</groupId>
            <artifactId>mybatis-spring-boot-starter</artifactId>
            <version>1.3.2</version>
        </dependency>
        <!-- 数据库连接池druid -->
        <dependency>
            <groupId>com.alibaba</groupId>
            <artifactId>druid-spring-boot-starter</artifactId>
            <version>1.1.10</version>
        </dependency>
        <!--mysql 驱动程序 -->
        <dependency>
            <groupId>mysql</groupId>
            <artifactId>mysql-connector-java</artifactId>
            <version>5.1.49</version>
        </dependency>
        <!--依赖lombok-->
        <dependency>
            <groupId>org.projectlombok</groupId>
            <artifactId>lombok</artifactId>
            <optional>true</optional>
        </dependency>
        <dependency>
            <groupId>org.springframework.boot</groupId>
            <artifactId>spring-boot-starter-test</artifactId>
            <scope>test</scope>
        </dependency>
        <!--依赖sharding-->
        <dependency>
            <groupId>org.apache.shardingsphere</groupId>
            <artifactId>sharding-jdbc-spring-boot-starter</artifactId>
            <version>4.1.1</version>
        </dependency>
        <dependency>
            <groupId>org.apache.shardingsphere</groupId>
            <artifactId>sharding-core-common</artifactId>
            <version>4.1.1</version>
        </dependency>
        <!--依赖sharding-xa 事务管理-->
        <dependency>
            <groupId>org.apache.shardingsphere</groupId>
            <artifactId>sharding-jdbc-spring-boot-starter</artifactId>
            <version>4.1.1</version>
        </dependency>
        <dependency>
            <groupId>org.apache.shardingsphere</groupId>
            <artifactId>sharding-transaction-xa-core</artifactId>
            <version>4.1.1</version>
        </dependency>
    </dependencies>


    <build>
        <plugins>
            <plugin>
                <groupId>org.springframework.boot</groupId>
                <artifactId>spring-boot-maven-plugin</artifactId>
                <version>2.6.6</version>
            </plugin>
            <plugin>
                <groupId>org.mybatis.generator</groupId>
                <artifactId>mybatis-generator-maven-plugin</artifactId>
                <version>1.3.5</version>
                <configuration>
                    <configurationFile>src/main/resources/mybatis-generator/mybatis-generator-cfg.xml
                    </configurationFile>
                    <verbose>true</verbose>
                    <overwrite>true</overwrite>
                </configuration>
                <executions>
                </executions>
                <dependencies>
                    <dependency>
                        <groupId>org.mybatis.generator</groupId>
                        <artifactId>mybatis-generator-core</artifactId>
                        <version>1.3.5</version>
                    </dependency>
                    <!--mysql 驱动程序 -->
                    <dependency>
                        <groupId>mysql</groupId>
                        <artifactId>mysql-connector-java</artifactId>
                        <version>8.0.12</version>
                    </dependency>
                </dependencies>
            </plugin>

        </plugins>
    </build>


</project>
package com.zzg.service;
/**
* XA事务Service 服务
*/
public interface xaService {
public void xaTransaction();
}
package com.zzg.service.impl;
import com.zzg.mapper.StudentMapper;
import com.zzg.mapper.UserMapper;
import com.zzg.model.Student;
import com.zzg.service.xaService;
import org.apache.shardingsphere.transaction.annotation.ShardingTransactionType;
import org.apache.shardingsphere.transaction.core.TransactionType;
import org.springframework.beans.factory.annotation.Autowired;
import org.springframework.stereotype.Service;
import org.springframework.transaction.annotation.Transactional;
import java.util.Random;
@Service
public class xaServiceImpl implements xaService {
@Autowired
private StudentMapper studentMapper;
@Autowired
private UserMapper userMapper;
@ShardingTransactionType(TransactionType.XA)
@Transactional(rollbackFor = Exception.class)
@Override
public void xaTransaction() {
Student student = new Student();
student.setName("zzg" + new Random().nextInt());
student.setSex(new Random().nextInt(2) + 1);
student.setAge(new Random().nextInt(6) + 6);
studentMapper.addStudent(student);
Student student2 = new Student();
student2.setName("zzg" + new Random().nextInt());
student2.setSex(new Random().nextInt(2) + 1);
student2.setAge(new Random().nextInt(6) + 6);
studentMapper.addStudent(student2);
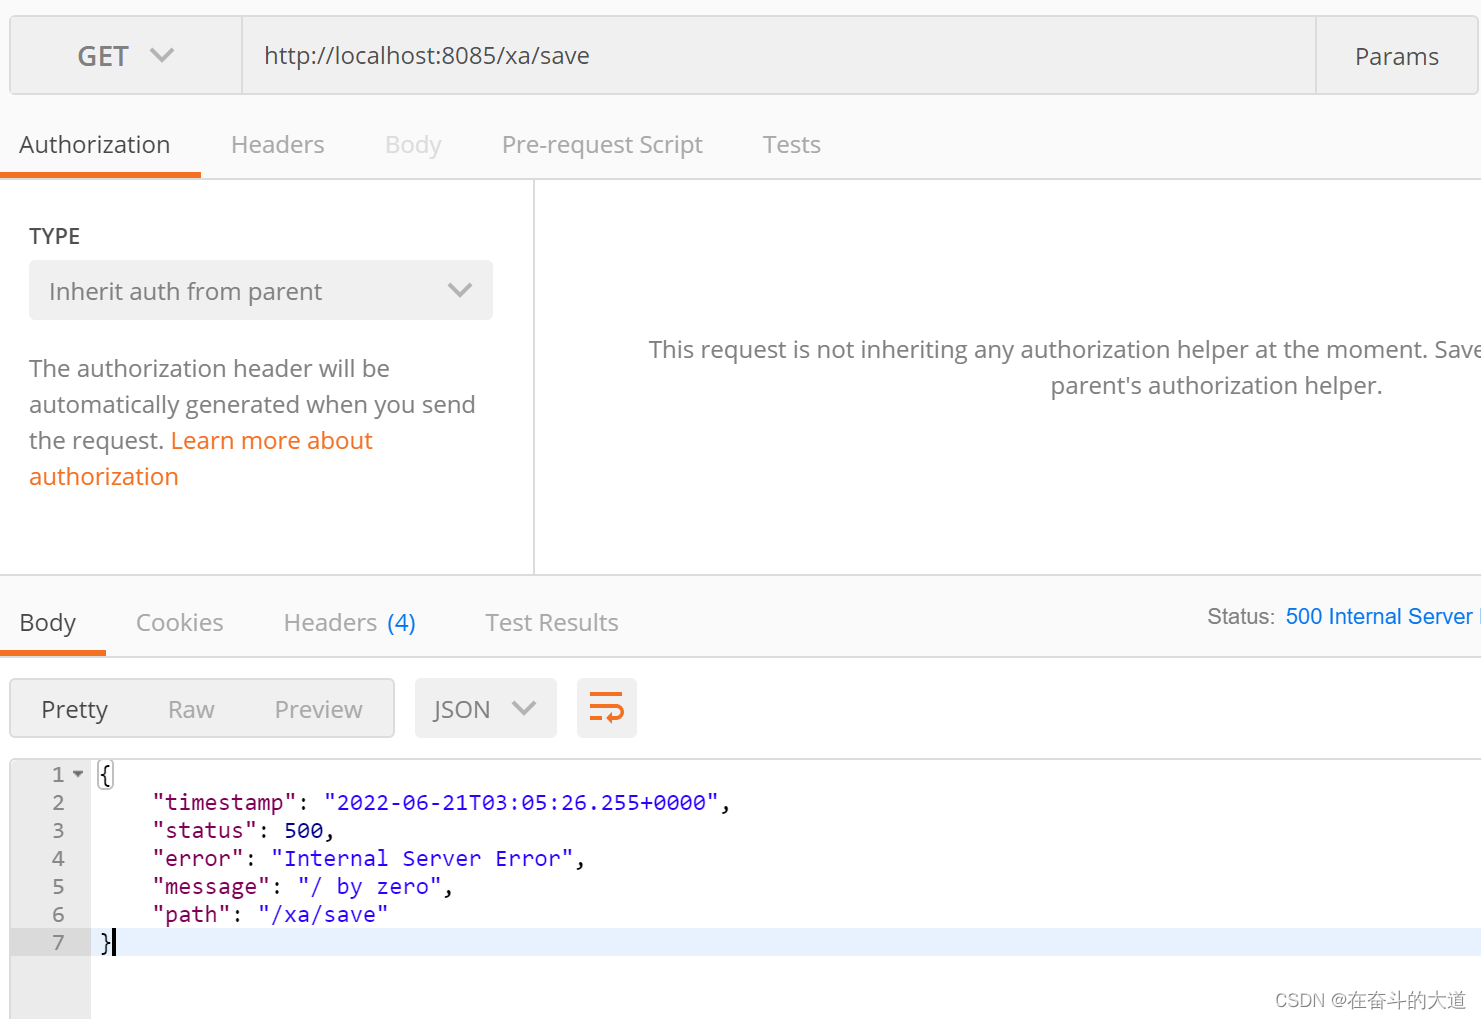
int a = 1 / 0; //测试回滚
}
}
package com.zzg.controller;

import com.zzg.service.xaService;
import org.springframework.beans.factory.annotation.Autowired;
import org.springframework.web.bind.annotation.GetMapping;
import org.springframework.web.bind.annotation.RequestMapping;
import org.springframework.web.bind.annotation.RestController;

@RestController
@RequestMapping("/xa")
public class XAController {
    @Autowired
    private xaService transaction;

    @GetMapping("/save")
    public String insert() {
        transaction.xaTransaction();
        return "success";
    }
}
测试结果:
事务几种类型的优缺点
本地事务
- 完全支持非跨库事务,例如:仅分表,或分库但是路由的结果在单库中。
- 完全支持因逻辑异常导致的跨库事务。例如:同一事务中,跨两个库更新。更新完毕后,抛出空指针,则两个库的内容都能回滚。
- 不支持因网络、硬件异常导致的跨库事务。例如:同一事务中,跨两个库更新,更新完毕后、未提交之前,第一个库宕机,则只有第二个库数据提交。
两阶段XA事务
- 支持数据分片后的跨库XA事务
- 两阶段提交保证操作的原子性和数据的强一致性
- 服务宕机重启后,提交/回滚中的事务可自动恢复
- SPI机制整合主流的XA事务管理器,默认Atomikos,可以选择使用Narayana和Bitronix
- 同时支持XA和非XA的连接池
- 提供spring-boot和namespace的接入端
不支持:
- 服务宕机后,在其它机器上恢复提交/回滚中的数据
Seata柔性事务
- 完全支持跨库分布式事务
- 支持RC隔离级别
- 通过undo快照进行事务回滚
- 支持服务宕机后的,自动恢复提交中的事务
依赖:
- 需要额外部署Seata-server服务进行分支事务的协调
待优化项 - ShardingSphere和Seata会对SQL进行重复解析
八、数据库总结
1、基础规范
- 表必须有主键,建议使用整型作为主键
- 禁止使用外键,表之间的关联性和完整性通过应用层来控制
- 表在设计之初,应该考虑到大致的数据级,若表记录小于1000W,尽量使用单表,不建议分表。
- 建议将大字段,访问频率低,或者不需要作为筛选条件的字段拆分到拓展表中,(做好表垂直拆分)
- 控制单实例表的总数,单个表分表数控制在1024以内。
2、列设计规范
- 正确区分tinyint、int、bigint的范围
- 使用varchar(20)存储手机号,不要使用整数
- 使用int存储ipv4 不要使用char(15)
- 涉及金额使用decimal/varchar,并制定精度
- 不要设计为null的字段,而是用空字符,因为null需要更多的空间,并且使得索引和统计变得更复杂。
3、索引规范
- 唯一索引使用uniq_[字段名]来命名
- 非唯一索引使用idx_[字段名]来命名
- 不建议在频繁更新的字段上建立索引
- 非必要不要进行JOIN,如果要进行join查询,被join的字段必须类型相同,并建立索引。
- 单张表的索引数量建议控制在5个以内,索引过多,不仅会导致插入更新性能下降,还可能导致MYSQL的索引出错和性能下降
- 组合索引字段数量不建议超过5个,理解组合索引的最左匹配原则,避免重复建设索引。比如你建立了
- (x,y,z) 相当于你建立了(x),(x,y),(x,y,z)
4、SQL规范
- 禁止使用selet ,只获取必要字段,select 会增加cpu/i0/内存、带宽的消耗。
- insert 必须指定字段,禁止使用insert into Table values().指定字段插入,在表结果变更时,能保证对应应用程序无影响。
- 隐私类型转换会使索引失效,导致全表扫描。(比如:手机号码搜索时未转换成字符串)
- 禁止在where后面查询列使用内置函数或者表达式,导致不能命中索引,导致全表扫描
- 禁止负向查询(!=,not like ,no in等)以及%开头的模糊查询,造成不能命中索引,导致全表扫描
- 避免直接返回大结果集造成内存溢出,可采用分段和游标方式。
- 返回结果集时尽量使用limit分页显示。
- 尽量在order by/group by的列上创建索引。
- 大表扫描尽量放在镜像库上去做
- 禁止大表join查询和子查询
- 尽量避免数据库内置函数作为查询条件
- 应用程序尽量捕获SQL异常
5、表的垂直拆分
垂直拆分:业务模块拆分、商品库,用户库,订单库
水平拆分:对表进行水平拆分(也就是我们说的:分表)
表进行垂直拆分:表的字段过多,字段使用的频率不一。(可以拆分两个表建立1:1关系)
- 将一个属性过多的表,一行数据较大的表,将不同的属性分割到不同的数据库表中。以降低单库表的大小。
特点:
- 每个表的结构不一致
- 每个表的数量都是全量
- 表和表之间一定会有一列会进行关联,一般都是主键
原则:
- 将长度较短,访问频率较高的字段放在一个表中,主表
- 将长度较长、访问频率比较低的字段放一个表中
- 将经常访问字段放一个表中。
- 所有表的并集是全量数据。
6、如何平滑添加字段
场景:在开发时,有时需要给表加字段,在大数据量且分表的情况下,怎么样平滑添加。
-
直接alter table add column,数据量大时不建议,(会产生写锁)
alter table t_user add column api_pay_no varchar(32) not null comment '用户扩展订单号'
-
提前预留字段(不优雅:造成空间浪费,预留多少很难控制,拓展性差)
-
新增一张表,(增加字段),迁移原表数据,在重新命名新表作为原表。
-
放入extinfo(无法使用索引)
-
提前设计,使用key/value方法存储,新增字段时 ,直接加一个key就好了(优雅)
本文基于狂神学ShardingSphere-jdbc,感兴趣的同学可以在B站中自行检索学习。


 被折叠的 条评论
为什么被折叠?
被折叠的 条评论
为什么被折叠?
 到【灌水乐园】发言


