


1、前言:
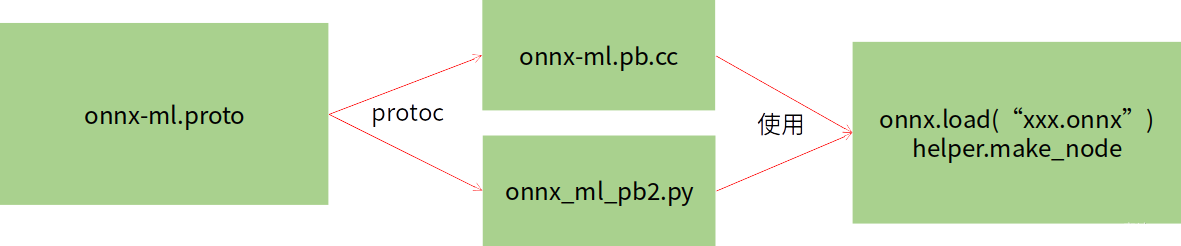
1、ONNX的本质,是一种Protobuf格式文件
2、Protobuf则通过onnx-ml.proto编译得到onnx-ml.pb.h和onnx-ml.pb.cc或onnx_ml_pb2.py
3、然后用onnx-ml.pb.cc和代码来操作onnx模型文件,实现增删改
4、onnx-ml.proto则是描述onnx文件如何组成的,具有什么结构,他是操作onnx经常参照的东西

model:表示整个onnx的模型,包含图结构和解析器格式、opset版本、导出程序类型
model.graph:表示图结构,通常是我们netron看到的主要结构
model.graph.node:表示图中的所有节点,数组,例如conv、bn等节点就是在这里的,通过input、output表示节点之间的连接关系
model.graph.initializer:权重类的数据大都储存在这里
model.graph.input:整个模型的输入储存在这里,表明哪个节点是输入节点,shape是多少
model.graph.output:整个模型的输出储存在这里,表明哪个节点是输出节点,shape是多少
2、自制onnx
import torch
import torch.nn as nn
import torch.nn.functional as F
import torch.onnx
import os

class Model(torch.nn.Module):
    def __init__(self):
        super().__init__()

        self.conv = nn.Conv2d(1, 1, 3, padding=1)
        self.relu = nn.ReLU()
        self.conv.weight.data.fill_(1)
        self.conv.bias.data.fill_(0)

    def forward(self, x):
        x = self.conv(x)
        x = self.relu(x)
        return x

# 这个包对应opset11的导出代码,如果想修改导出的细节,可以在这里修改代码
# import torch.onnx.symbolic_opset11
print("对应opset文件夹代码在这里:", os.path.dirname(torch.onnx.__file__))

model = Model()
dummy = torch.zeros(1, 1, 3, 3)
torch.onnx.export(
    model,

    # 这里的args,是指输入给model的参数,需要传递tuple,因此用括号
    (dummy,),

    # 储存的文件路径
    "demo.onnx",

    # 打印详细信息
    verbose=True,

    # 为输入和输出节点指定名称,方便后面查看或者操作
    input_names=["image"],
    output_names=["output"],

    # 这里的opset,指,各类算子以何种方式导出,对应于symbolic_opset11
    opset_version=11,

    # 表示他有batch、height、width3个维度是动态的,在onnx中给其赋值为-1
    # 通常,我们只设置batch为动态,其他的避免动态
    dynamic_axes={
        "image": {0: "batch", 2: "height", 3: "width"},
        "output": {0: "batch", 2: "height", 3: "width"},
    }
)

print("Done.!") 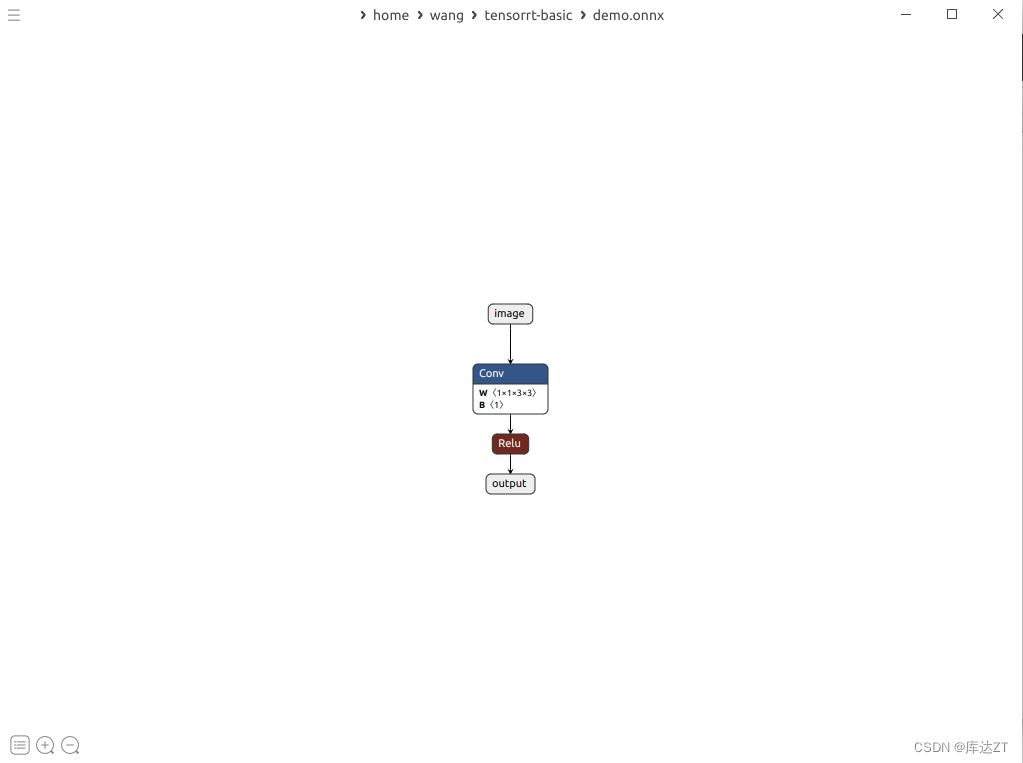
导出结果如图所示。
在read onnx.py 中我们可以发现 :
model = onnx.load("demo.onnx")

#打印信息
print("==============node信息")
# print(helper.printable_graph(model.graph))
print(model)
node {
    input: "image"
    input: "conv.weight"
    input: "conv.bias"
    output: "input"
    name: "Conv_0"
    op_type: "Conv"
    attribute {
      name: "dilations"
      type: INTS
      ints: 1
      ints: 1
    }
输入其实不止有image,而是有三个!
其中包括了image、weight、bias。
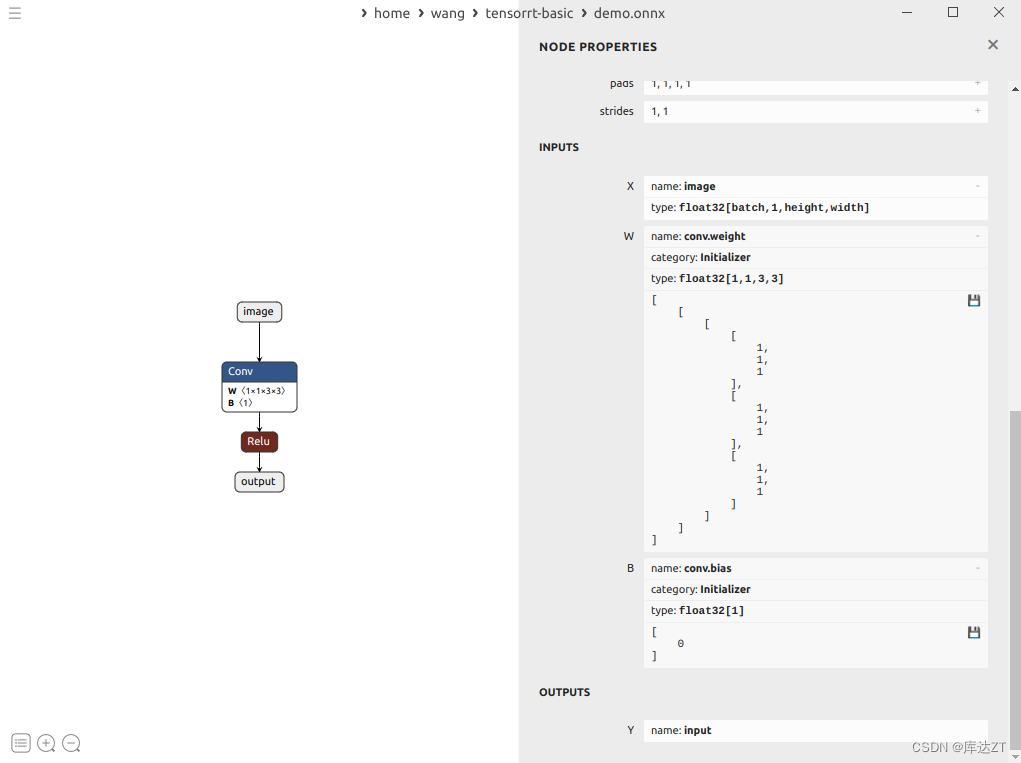
这一点和我们平时所经常熟知的一个箭头的单输入却是很不同。
3、创建onnx
import onnx # pip install onnx>=1.10.2
import onnx.helper as helper
import numpy as np

# https://github.com/onnx/onnx/blob/v1.2.1/onnx/onnx-ml.proto

nodes = [
    helper.make_node(
        name="Conv_0",   # 节点名字,不要和op_type搞混了
        op_type="Conv",  # 节点的算子类型, 比如'Conv'、'Relu'、'Add'这类,详细可以参考onnx给出的算子列表
        inputs=["image", "conv.weight", "conv.bias"],  # 各个输入的名字,结点的输入包含:输入和算子的权重。必有输入X和权重W,偏置B可以作为可选。
        outputs=["3"],
        pads=[1, 1, 1, 1], # 其他字符串为节点的属性,attributes在官网被明确的给出了,标注了default的属性具备默认值。
        group=1,
        dilations=[1, 1],
        kernel_shape=[3, 3],
        strides=[1, 1]
    ),
    helper.make_node(
        name="ReLU_1",
        op_type="Relu",
        inputs=["3"],
        outputs=["output"]
    )
]

initializer = [
    helper.make_tensor(
        name="conv.weight",
        data_type=helper.TensorProto.DataType.FLOAT,
        dims=[1, 1, 3, 3],
        vals=np.array([1.0, 1.0, 1.0, 1.0, 1.0, 1.0, 1.0, 1.0, 1.0], dtype=np.float32).tobytes(),
        raw=True
    ),
    helper.make_tensor(
        name="conv.bias",
        data_type=helper.TensorProto.DataType.FLOAT,
        dims=[1],
        vals=np.array([0.0], dtype=np.float32).tobytes(),
        raw=True
    )
]

inputs = [
    helper.make_value_info(
        name="image",
        type_proto=helper.make_tensor_type_proto(
            elem_type=helper.TensorProto.DataType.FLOAT,
            shape=["batch", 1, 3, 3]
        )
    )
]

outputs = [
    helper.make_value_info(
        name="output",
        type_proto=helper.make_tensor_type_proto(
            elem_type=helper.TensorProto.DataType.FLOAT,
            shape=["batch", 1, 3, 3]
        )
    )
]

graph = helper.make_graph(
    name="mymodel",
    inputs=inputs,
    outputs=outputs,
    nodes=nodes,
    initializer=initializer
)

# 如果名字不是ai.onnx,netron解析就不是太一样了
opset = [
    helper.make_operatorsetid("ai.onnx", 11)
]
#AI.ONNX代表人工智能开放模型与表示(Open Neural Network Exchange)。
# producer主要是保持和pytorch一致
model = helper.make_model(graph, opset_imports=opset, producer_name="pytorch", producer_version="1.9")
onnx.save_model(model, "my.onnx")

print(model)
print("Done.!")
实际上就是通过helper和各种make函数来构造一个onnx模型出来。
4、修改onnx
对于onnx的修改:
import onnx
import onnx.helper as helper
import numpy as np

model = onnx.load("demo.onnx")

# 可以取出权重
conv_weight = model.graph.initializer[0]
conv_bias = model.graph.initializer[1]
# 修改权
conv_weight.raw_data = np.arange(9, dtype=np.float32).tobytes()

# 修改权重后储存
onnx.save_model(model, "demo.change.onnx")
print("Done.!")
取出------>修改------>保存


 867
867


 被折叠的 条评论
为什么被折叠?
被折叠的 条评论
为什么被折叠?
 到【灌水乐园】发言


