


UIAlertView

警告显示用户向用户显示一个简洁和信息的警告信息。警告视图传达了一个应用程序或设备的重要信息,打断了用户,要求他们停止他们正在做的选择行动或解雇警报。例如,iOS使用警报,警告用户电池电量不足,所以他们可以在他们的工作被中断连接电源适配器。警报视图出现在顶部的应用程序的内容,必须手动解除由用户才可以与应用程序恢复作用。
UIAlertView的使用
1.样式1

// Default样式 新建控件方式1
    func initUIAlertView1(){
        let alertView1 = UIAlertView.init(title: "样式1", message: "测试", delegate: self, cancelButtonTitle: "取消", otherButtonTitles: "确定","按钮3") // Available in iOS 2.0 and later.Deprecated in iOS 9.0.
        alertView1.show()
}2.样式2

func initUIAlertView2(){
        let alertView2 = UIAlertView.init()
        alertView2.title = "样式2"
        alertView2.message = "测试"
        alertView2.addButtonWithTitle("取消") // 先添加 "取消" 按钮,它的index = 0
        alertView2.addButtonWithTitle("确定") // index = 1
        alertView2.delegate = self
        alertView2.show()
}上面样式1和样式2是一样的,只是两种不同的新建控件的方式,且样式1比样式2多了一个按钮.
3.样式3

func initUIAlertView3(){
        let alertView3 = UIAlertView.init()
        alertView3.alertViewStyle = UIAlertViewStyle.SecureTextInput // 密文
        alertView3.title = "SecureTextInput"
        alertView3.addButtonWithTitle("确定")
        alertView3.delegate = self
        alertView3.show()
}4.样式4
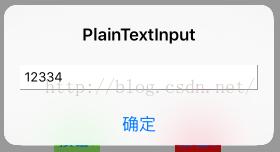
func initUIAlertView4(){
        let alertView4 = UIAlertView.init()
        alertView4.alertViewStyle = UIAlertViewStyle.PlainTextInput  // 非密文
        alertView4.title = "PlainTextInput"
        alertView4.addButtonWithTitle("确定")
        alertView4.delegate = self
        alertView4.show()
}样式3和样式4,基本也是一样,知识视图中间的TextFiled一个是密文一个不是.
5.样式5
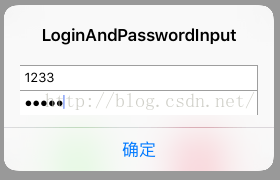
    func initUIAlertView5(){
        let alertView5 = UIAlertView.init()
        alertView5.alertViewStyle = UIAlertViewStyle.LoginAndPasswordInput  // 登录用户名和密码输入样式
        alertView5.title = "LoginAndPasswordInput"
        alertView5.addButtonWithTitle("确定")
        alertView5.delegate = self
        alertView5.show()
    }
UIAlertViewDelegate
代理,一般使用只需要实现有一个方法就可以了.
func alertView(alertView: UIAlertView, clickedButtonAtIndex buttonIndex: Int) {
        print("title = \(alertView.buttonTitleAtIndex(buttonIndex)) buttonIndex = \(buttonIndex)") // 打印按钮的title和index

        if alertView.alertViewStyle == UIAlertViewStyle.LoginAndPasswordInput {
            print("\(alertView.textFieldAtIndex(0)?.text)") // 打印输入的内容
            print("\(alertView.textFieldAtIndex(1)?.text)") // 打印输入的内容
        }
        else{
            print("\(alertView.textFieldAtIndex(0)?.text)") // 打印输入的内容
        }
    }
UIActionSheet
UIActionSheet的使用和UIAlertView基本一样,只是两种不同的控件,和显示风格.
UIActionSheet的使用
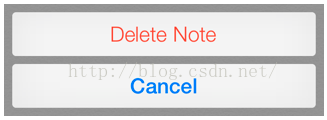
1.样式1

这种是系统默认样式
func initUIActionSheet1(){
        let actionSheet1 = UIActionSheet.init(title: "UIActionSheet", delegate: self, cancelButtonTitle: "取消", destructiveButtonTitle: "确定")// Available in iOS 2.0 and later.Deprecated in iOS 8.3.
        actionSheet1.showInView(self.view)
    }
2.样式2
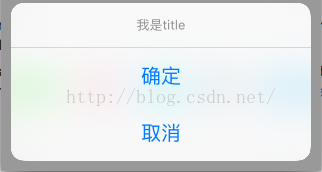
func initUIActionSheet2(){
        let actionSheet2 = UIActionSheet.init()
        actionSheet2.title = "我是title"
        actionSheet2.addButtonWithTitle("确定")
        actionSheet2.addButtonWithTitle("取消")
        actionSheet2.delegate = self
        actionSheet2.showInView(self.view)
    }
UIActionSheetDelegate
    func actionSheet(actionSheet: UIActionSheet, clickedButtonAtIndex buttonIndex: Int) {
        print("title = \(actionSheet.buttonTitleAtIndex(buttonIndex)) buttonIndex = \(buttonIndex)") // 打印按钮的title和index
    }
Demo界面
整个界面是做了7个按钮来触发这个两个控件的7种样式
@IBAction func btnClick(sender: UIButton) {
        let tag = sender.tag
        // 打印按钮tag和标题
        print("tag = \(tag) title = \(sender.titleLabel?.text)")
        switch tag {
        case 1:
            self.initUIAlertView1()
            break
        case 2:
            self.initUIAlertView2()
            break
        case 3:
            self.initUIAlertView3()
            break
        case 4:
            self.initUIAlertView4()
            break
        case 5:
            self.initUIAlertView5()
            break

        default: break

        }
    }
@IBAction func btnClick2(sender: UIButton) {
        let tag = sender.tag
        // 打印按钮tag和标题
        print("tag = \(tag) title = \(sender.titleLabel?.text)")
        switch tag {
        case 1:
            self.initUIActionSheet1()
            break
        case 2:
            self.initUIActionSheet2()
            break
        default: break
        }
    }


 561
561


 被折叠的 条评论
为什么被折叠?
被折叠的 条评论
为什么被折叠?
 到【灌水乐园】发言


