


1. 前言
仅用作自己备份使用, 有些内容比较私密, 就不再写出
2. 效果:
配置失败时候, 会提示请手动配置,
配置成功会提示配置成功
3. 一些配置文件说明:
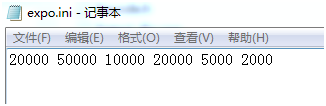
- 请在相机AVT.exe 文件对应目录下, 放置一个配置文件 expo.ini
其格式为 左相机曝光度下限, 左相机曝光度上限, 右相机曝光度下限, 右相机曝光度上限, 左相机曝光度调节步长, 右相机曝光度调节步长。
2.程序会优先读取 expo.ini 中的配置参数, 当然如果没有这个文件, 程序会使用程序中的默认参数进行配置, 但是效果可能不会很好。
tPvUint32 V_intl, gapl = 5000, gapr = 5000, V_intr, V_intl_low = 10000, V_intl_high = 60000, V_intr_low = 10000, V_intr_high = 60000;
ifstream left_params("expo.ini");
if (left_params)
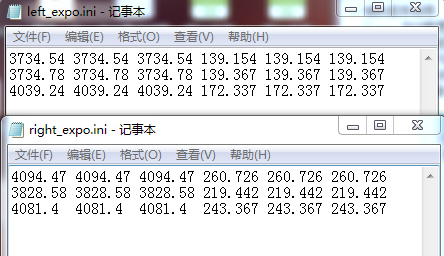
left_params >> V_intl_low >> V_intl_high >> V_intr_low >> V_intr_high >> gapl >> gapr;程序运行自动调节功能后会自动生成 配置文件 right_expo.ini 和 left_expo.ini 分别记录每幅图片中相应的编码点的亮斑和暗环的均值信息。
需要注意的是, 这里面的第一组数据实际是有问题的, 经过分析发现, 由于相机底层设置相机的曝光度实际上是需要占用一定时间的,为了确保采图的时候, 这个参数已经设置成功, 我们这里使用了sleep(1500) 确保有足够的余量。程序中设定的曝光度调节成功的标准是 light_avg 在 区间 [4000, 4096], light_dark 在区间 [160, 250]. 实际操作中, 由于我们是12bit 的相机, 所以图像的灰度上限为 4095.
自动调节完成之后, 请敲击回车键, 实现配置参数写入到文件中
调用的 core_functions::GetMeanAndVar 是实验室另外一个同学写的代码, 用来实现对拍摄图像中的编码点信息中亮暗环带的灰度信息的均值检测。

4. 实现原理
原理非常的easy, 就是一个 for 循环遍历, 找到所需要的曝光度即可。
5. 部分实现代码
/************************************************************************/
/* 自动调节曝光度线程                                                   */
/************************************************************************/
int CAVTDlg::_AutoSetExpoThread(void * params)
{
    system("del left_expo.ini right_expo.ini left.tif right.tif");
    Sleep(1000);

    CAVTDlg * pdlg = static_cast<CAVTDlg *>(params);
    vector<double> vec;
    const string  filePath_left = R"(left.tif)";
    const string  filePath_right = R"(right.tif)";
    int ret = 0;
    bool flagl = false, flagr = false;
    ofstream ofs_left("left_expo.ini", ios::app);
    ofstream ofs_right("right_expo.ini", ios::app);

    // 遍历 2000 ~ 6000 直接查找合适的 曝光度数值
    tPvUint32 V_intl, gapl = 5000, gapr = 5000, V_intr, V_intl_low = 10000, V_intl_high = 60000, V_intr_low = 10000, V_intr_high = 60000;

    ifstream left_params("expo.ini");
    if (left_params)
        left_params >> V_intl_low >> V_intl_high >> V_intr_low >> V_intr_high >> gapl >> gapr;

    // 配置左右相机保存
    int intSaveCamera = 0;
    if (pdlg->m_cameraHandle && pdlg->m_cameraHandle_right)
        intSaveCamera = 2;
    else if (pdlg->m_cameraHandle)
        intSaveCamera = 0;
    else if (pdlg->m_cameraHandle_right)
        intSaveCamera = 1;

    // 遍历配置
    for (V_intl = V_intl_low, V_intr = V_intr_low;
        (pdlg->m_cameraHandle && !flagl && V_intl < V_intl_high) || (pdlg->m_cameraHandle_right && !flagr && V_intr < V_intr_high);
        V_intl += gapl, V_intr += gapr){

        // 调节曝光度
        if (pdlg->m_cameraHandle && !flagl){
            PvAttrUint32Set(pdlg->m_cameraHandle, "ExposureValue", V_intl);
            CString str;
            str.Format(_T("%d"), V_intl);
            pdlg->GetDlgItem(IDC_EXPOSURE_MAIN)->SetWindowText(str);
        }
        if (pdlg->m_cameraHandle_right && !flagr){
            PvAttrUint32Set(pdlg->m_cameraHandle_right, "ExposureValue", V_intr);
            CString str;
            str.Format(_T("%d"), V_intr);
            pdlg->GetDlgItem(IDC_EXPOSURE_RIGHT_MAIN)->SetWindowText(str);
        }

        // 设置抓图相机
        if (!flagl && !flagr)
            intSaveCamera = 2;
        else if (!flagl)
            intSaveCamera = 0;
        else
            intSaveCamera = 1;

        // 由于相机设置参数需要一定时间, 这里给充足的余量, 保证设置成功
        Sleep(1000);
        pdlg->PostMessage(SAVE_OPTION_NEW, 1, intSaveCamera);
        Sleep(3000);


        // test left camera
        if (pdlg->m_cameraHandle && !flagl){
            if ((ret = pdlg->AutoSetExpo(filePath_left, vec)) == 0){
                flagl = true;
            }

            if (ret == -2){
                AfxMessageBox(_T("左相机没有检测到标志点, 请调整后重新尝试"));
                goto END;
            }

            // log
            for_each(vec.begin(), vec.end(), [&](double data){ofs_left << data << "\t"; });
            ofs_left << endl;
        }

        // test right camera
        if (pdlg->m_cameraHandle_right && !flagr){
            if ((ret = pdlg->AutoSetExpo(filePath_right, vec)) == 0){
                flagr = true;
            }

            if (ret == -2){
                AfxMessageBox(_T("右相机没有检测到标志点, 请调整后重新尝试"));
                goto END;
            }

            for_each(vec.begin(), vec.end(), [&](double data){ofs_right << data << "\t"; });
            ofs_right << endl;
        }
    }

    if (!flagl){
        AfxMessageBox(_T("左相机曝光度自动调节失败, 请手动尝试"));
    }

    if (!flagr){
        AfxMessageBox(_T("右相机曝光度自动调节失败, 请手动尝试"));
    }

    if (flagl && flagr){
        AfxMessageBox(_T("相机曝光度自动调节成功, enjoy yourself"));
    }

END:
    (CWnd *)pdlg->GetDlgItem(IDC_BTN_EXPO_AUTO_SET)->EnableWindow(true);
    pdlg->m_isAutoExpoAdjust = false;

    return 0;
}

//************************************
// Method:    OnBnClickedBtnExpoAutoSet
// FullName:  CAVTDlg::OnBnClickedBtnExpoAutoSet
// Access:    protected
// Returns:   void
// Qualifier: 用来实现曝光度自动调节功能
// date :     20160418
//************************************
void CAVTDlg::OnBnClickedBtnExpoAutoSet()
{
    // TODO:  在此添加控件通知处理程序代码
    (CWnd *)GetDlgItem(IDC_BTN_EXPO_AUTO_SET)->EnableWindow(FALSE);
    m_isAutoExpoAdjust = true;

    thread t1(_AutoSetExpoThread, this);
    t1.detach();
}


//************************************
// Method:    AutoSetExpo
// FullName:  CAVTDlg::AutoSetExpo
// Access:    private
// Returns:   int : 0: ok , 1 : 向上调节, -1 向下调节
// Qualifier:
// Parameter: const string & filePath
// Parameter: vector<double> & res
//************************************
int CAVTDlg::AutoSetExpo(const string & filePath, vector<double> & res)
{
    // vec 亮区域 0 : 5 : r g b 分别的均值和方差, 后面一部分是暗区域的相应值
    bool ret = core_functions::GetMeanAndVar(filePath, res);
    if (!ret)
        return -2;

    double light_R = res[0], light_G = res[1], light_B = res[2];
    double dark_R = res[3], dark_G = res[4], dark_B = res[5];
    double light_gray = (light_R + light_G + light_B ) / 3.0;
    double dark_gray = (dark_R + dark_G + dark_B) / 3.0;

    static const double light_upper = 4097;
    static const double light_lower = 4000;
    static const double dark_upper = 250;
    static const double dark_lower = 160;

    if (light_gray < light_upper && light_gray > light_lower
        && dark_gray < dark_upper && dark_gray > dark_lower)
        return 0;
    else if (light_gray <= light_lower)
        return 1;
    else
        return -1;
}


 1785
1785

 被折叠的 条评论
为什么被折叠?
被折叠的 条评论
为什么被折叠?
 到【灌水乐园】发言


