


目录
前言
在前面的学习中,我们知道了Web开发一般分为三层:控制层(Controller)、Service(业务逻辑层)、Dao(数据访问层)。
Dao层的数据是要持久化存储的,而在我们前面的案例中,Dao层的数据其实是随着应用程序的销毁而销毁的,那么我们需要将数据进行持久化存储,就需要使用数据库,而在前面,我们其实已经学习过JDBC来操作数据库,但JDBC的步骤过于繁琐。
JDBC操作步骤:
- 创建数据库连接池 DataSource;
- 通过DataSource 获取数据库连接 Connection;
- 编写要执行带 ? 占位符的SQL语句;
- 通过Connection及SQL创建操作命令对象preparedStatement
- 替换占位符:指定要替换的数据库字段类型,占位符索引以及要替换的值
- 使用preparedStatement对象执行SQL语句
- 查询操作:返回结果集ResultSet,更新操作:返回更新的数量
- 处理结果集
- 释放资源
如:
package com.example.demo;

import javax.sql.DataSource;
import java.sql.Connection;
import java.sql.PreparedStatement;
import java.sql.SQLException;

/**
 * OptionJdbc 类用于演示如何使用 JDBC 进行数据库操作
 * 它提供了一个示例方法,用于查询用户表中的特定用户信息
 */
public class OptionJdbc {
    // 数据源,用于获取数据库连接
    private final DataSource dataSource;

    /**
     * 构造方法,初始化 OptionJdbc 类的实例
     * @param dataSource 数据源,用于数据库连接
     */
    public OptionJdbc(DataSource dataSource){
        this.dataSource = dataSource;
    }

    /**
     * 执行数据库查询操作的示例方法
     * 该方法尝试从用户表中查询特定ID的用户信息
     */
    public void option(){
        // 定义数据库连接和预编译语句对象,初始值为 null
        Connection connection=null;
        PreparedStatement preparedStatement=null;
        try {
            // 从数据源获取数据库连接
            connection=dataSource.getConnection();
            // 准备 SQL 查询语句,使用预编译以提高性能和安全性
            preparedStatement= connection.prepareStatement("select * from user where id=?");
            // 设置查询参数,此处查询 ID 为 1 的用户
            preparedStatement.setInt(1,1);
            // 执行查询语句
            preparedStatement.execute();
            // 关闭预编译语句,释放资源
            preparedStatement.close();
        } catch (SQLException e) {
            // 捕获并打印 SQL 异常信息,便于调试和日志记录
            e.printStackTrace();
        }
    }
}
可以看到,操作过程是很复杂的。
那么有没有一种方法,能够帮助我们更加简便的操作数据库呢?这就是本篇要将的内容,学习mybatis,mybatis能够帮助我们更方便、更快速的操作数据库。
持久化框架
mybatis是一种持久化框架。
什么是持久换框架?
持久化框架是一种用于将数据存储到持久化存储(如数据库)并从中检索数据的软件工具。它在应用程序和数据库之间提供了一个抽象层,简化了数据访问和管理的复杂性。
持久化框架的类型
- ORM框架(对象关系映射):将数据库表映射为对象,通过操作对象来完成数据库操作。常见的ORM框架有Hibernate、Ebean、Spring Data JPA等。
- SQL映射框架:允许开发者编写SQL语句,但通过框架提供的工具来管理SQL的执行和映射。常见的SQL映射框架有Mybatis、JOOQ等。
- 轻量级数据访问框架:提供简单的数据访问功能,通常基于JDBC,适合轻量级应用。如Spring Data JDBC、jdbcTemplate。
而本篇我们要讲的正是SQL映射框架中的Mybatis。
持久化框架的作用
- 提高开发效率:减少重复代码,简化数据访问逻辑。
- 提高代码质量:通过封装和模块化,使代码更加清晰和可维护。
- 支持多种数据库:大多数持久化框架支持多种数据库,方便项目迁移。
- 性能优化:提供缓存、批量操作等功能,提高数据访问性能。
既然了解了什么是持久化框架,那么我们就开始来学习MyBatis。
什么是MyBatis?
MyBatis是一款“半自动化 ORM”的持久化框架,即支持通过配置文件或者注解将数据库表映射为java对象,也允许开发者编写原生SQL语句来实现复杂的数据操作。mybatis简化了操作数据库的步骤,支持自定义SQL、存储过程及高级映射,MyBatis相当于一座桥梁,简化了开发者操作数据库。
Mybatis使用
接下来,就来学习如何使用MyBatis来操作数据库。
前置工作
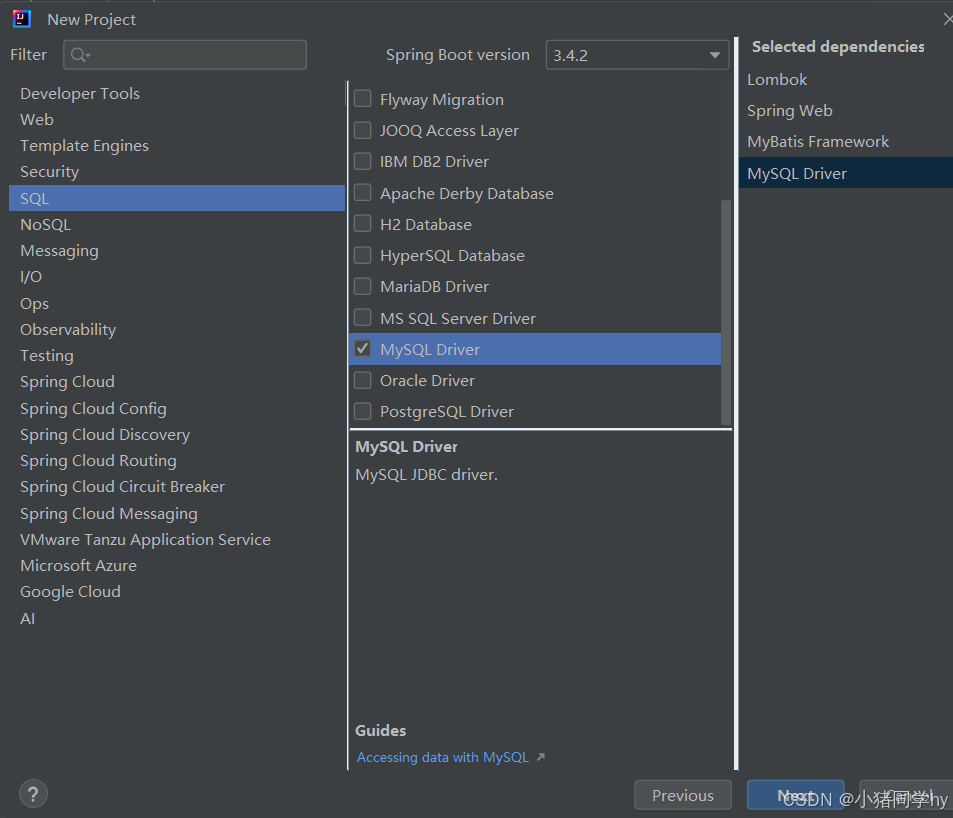
我们首先需要创建一个带有MyBatis框架的SpringBoot项目。
在创建项目时将Mybatis Framework 和MySQLDriver 勾上。(这里我们操作的是MySQL,所以需要有mysql的驱动)。
除了上面这种方法,我们也可以在SpingBoot项目的 pom.xml 配置文件中将MyBatis和MySQL的依赖添加进去。
手动添加mybatis依赖需要注意Spring版本和mybatis版本的对应关系。
<dependency>
    <groupId>org.mybatis.spring.boot</groupId>
    <artifactId>mybatis-spring-boot-starter-test</artifactId>
    <version>3.0.3</version>
    <scope>test</scope>
</dependency>

<dependency>
    <groupId>com.mysql</groupId>
    <artifactId>mysql-connector-j</artifactId>
    <scope>runtime</scope>
</dependency>
此外,还有一种方法,就是利用前面安装的 Edit Starters 插件来添加MyBatis和mysql依赖。

前置工作做完,那么我们就可以来使用MyBatis了。
数据表准备
-- 创建数据库
DROP DATABASE IF EXISTS mybatis_test;
CREATE DATABASE mybatis_test DEFAULT CHARACTER SET utf8mb4;
-- 使⽤数据数据
USE mybatis_test;
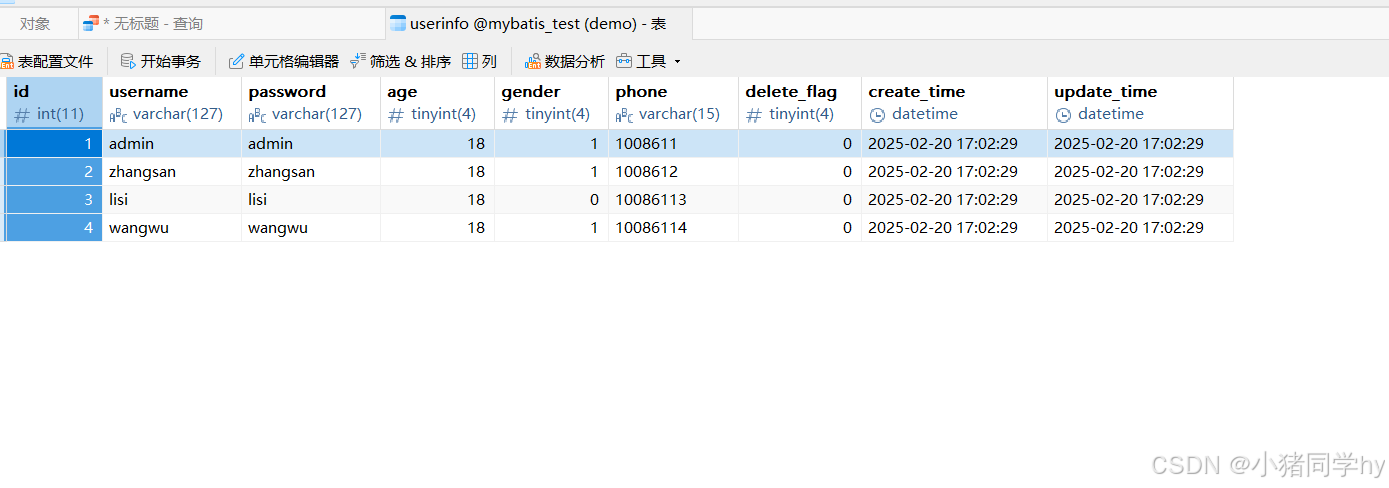
-- 创建表[⽤⼾表]
DROP TABLE IF EXISTS user_info;
CREATE TABLE `userinfo` (
`id` INT ( 11 ) NOT NULL AUTO_INCREMENT,
`username` VARCHAR ( 127 ) NOT NULL,
`password` VARCHAR ( 127 ) NOT NULL,
`age` TINYINT ( 4 ) NOT NULL,
`gender` TINYINT ( 4 ) DEFAULT '0' COMMENT '1-男 2-⼥ 0-默认',
`phone` VARCHAR ( 15 ) DEFAULT NULL,
`delete_flag` TINYINT ( 4 ) DEFAULT 0 COMMENT '0-正常, 1-删除',
`create_time` DATETIME DEFAULT now(),
`update_time` DATETIME DEFAULT now(),
PRIMARY KEY ( `id` )
) ENGINE = INNODB DEFAULT CHARSET = utf8mb4;
-- 添加⽤⼾信息
INSERT INTO mybatis_test.userinfo ( username, `password`, age, gender, phone )
VALUES ( 'admin', 'admin', 18, 1, '18612340001' );
INSERT INTO mybatis_test.userinfo ( username, `password`, age, gender, phone )
VALUES ( 'zhangsan', 'zhangsan', 18, 1, '18612340002' );
INSERT INTO mybatis_test.userinfo ( username, `password`, age, gender, phone )
VALUES ( 'lisi', 'lisi', 18, 1, '18612340003' );
INSERT INTO mybatis_test.userinfo ( username, `password`, age, gender, phone )
VALUES ( 'wangwu', 'wangwu', 18, 1, '18612340004' );
这里我们使用的是Navicat来查看数据库。
对应的,我们需要在项目中创建出对应的实体类,字段名需要和列名一一对应。
package com.example.demo.Model;
import lombok.Data;
import java.util.Date;

@Data
public class UserInfo {
    private Integer id;
    private String userName;
    private String password;
    private Integer age;
    private Integer gender;
    private String phone;
    private Integer deleteFlag;
    private Date createTime;
    private Date updateTime;
}
配置数据库连接字符串
spring:
  datasource:
    url: jdbc:mysql://127.0.0.1:3306/mybatis_test?characterEncoding=utf8&useSSL=false
    username: root
    password: xxxxxx
    driver-class-name: com.mysql.cj.jdbc.Driver
这里需要注意:
如果MySql版本是5.X之前的,那么 driver-class-name 选项的值要使用 com.mysql.jdbc.Driver,大于5.X的使用上面的配置。
实现持久层代码
Mapper接口规范:统一Mapper结尾,即XxxMapper。
在mybatis中,我们需要使用注解@Mapper 来标识接口,标识这是mybatis的一个映射接口。
注意是接口哦,为什么不能是类呢?
mybatis的核心是通过动态代理啦实现数据访问层的功能。Mybatis会根据接口定义和映射文件(或注解)生成接口的代理实现类。代理类中包含了该接口中所有方法对应的SQL语句和执行逻辑。
在 Spring 集成环境下,
@Mapper注解的接口会被 Spring 扫描并注册为 Bean。Spring 使用MapperScannerConfigurer或@MapperScan注解来扫描带有@Mapper的接口,并将其注册为 Spring 的 Bean。如果@Mapper注解修饰的是类,那么 Spring 将无法正确识别和管理这些 Mapper。
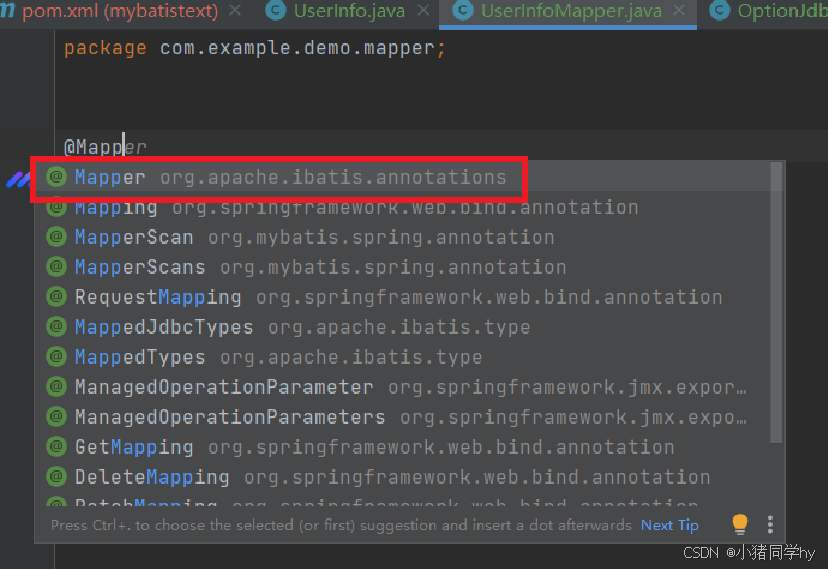
package com.example.demo.mapper;


import org.apache.ibatis.annotations.Mapper;
import org.apache.ibatis.annotations.Select;

@Mapper
public interface UserInfoMapper {

    //查询
    @Select("select * from user_info")
    public void select();
}
@Select("select * from user_info") 是这个方法的实现,public void select(); 是方法的声明。
这里UserInfoMapper为什么要使用 interface 而不使用 class 呢?
如果我们类(class)来定义Mapper,那么开发者可能会在类中手动实现方法,而 MyBatis 同时也会通过注解(如
@Select、@Insert等)或 XML 映射文件生成方法的实现。这种情况就会出现手动实现与自动生成的冲突、代码冗余和混乱。
而接口(interface)中方法是默认抽象的,不能有具体方法的实现(直到java 8引入默认方法和静态方法,但在mybatis中仍不适用)。所以使用接口不会引入冲突。
单元测试
写完上面的代码,那么我们如何来测试这个方法能不能正常访问数据库呢?
我们可以通过单元测试的方法来快速测试我们的代码功能。
单元测试(Unit Testing)是软件开发过程中对软件中的最小可测试单元进行检查和验证的一种测试方法。是软件开发过程中不可或缺的一部分,它通过验证代码的逻辑正确性,帮助开发者提高代码质量、支持重构和维护,并促进良好的代码设计。编写有效的单元测试需要遵循最佳实践,如隔离依赖、使用测试框架、保持测试代码的可维护性等。通过单元测试,开发者可以在早期发现和修复问题,从而提高开发效率和软件质量。
在java中,单元测试一般指的是一个类。
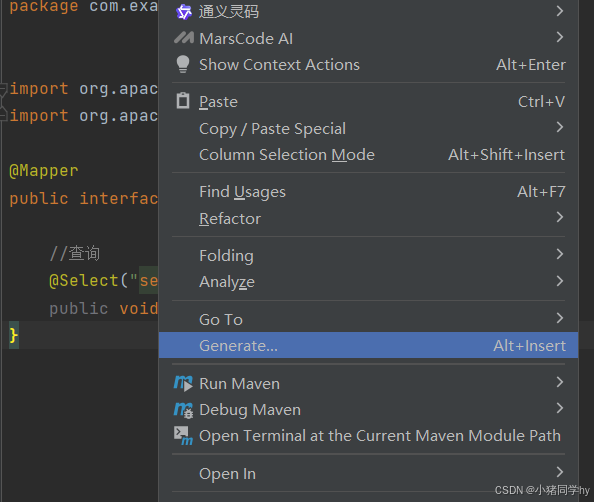
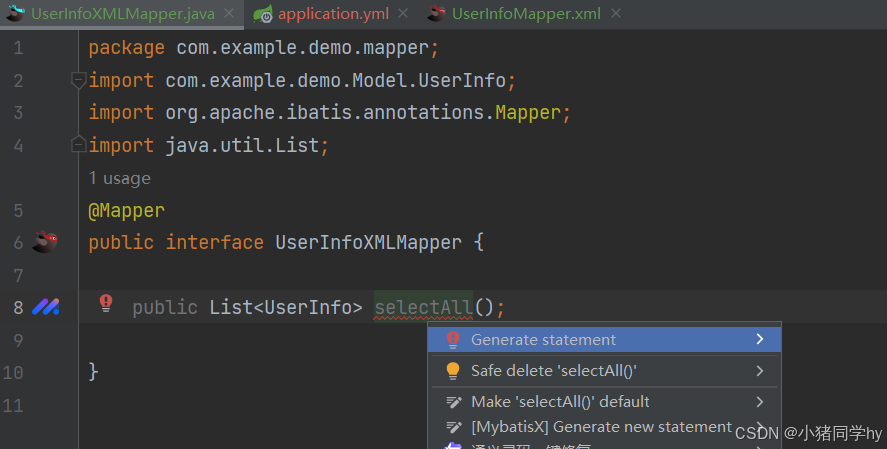
我们在需要测试的接口/类点击右键选择generate。
选择test,并勾选我们所要测试的方法。
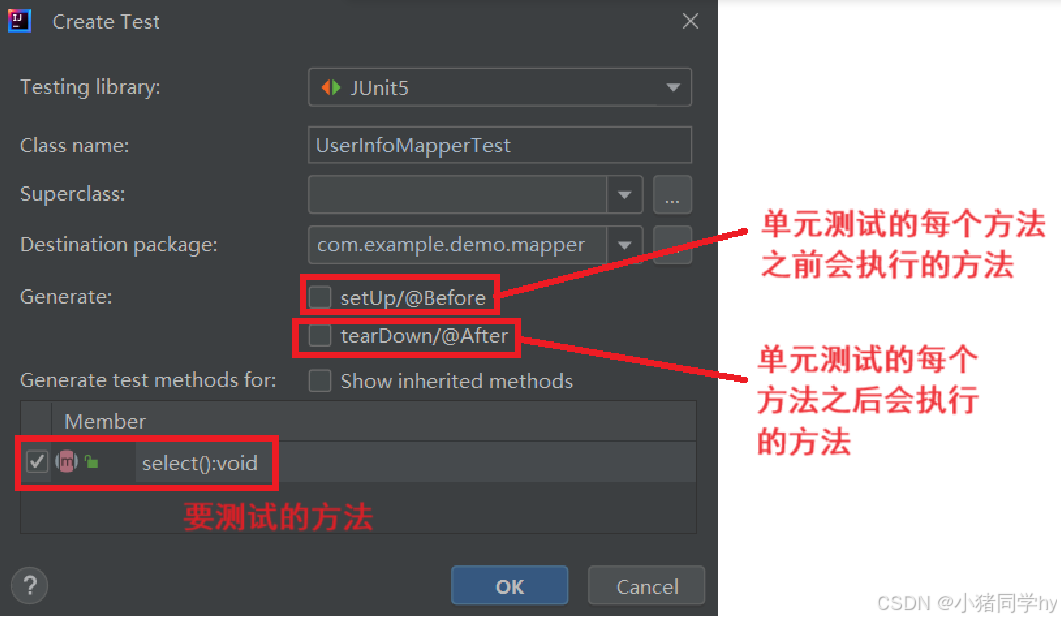
之后就会生成一个测试类:
package com.example.demo.mapper;
import com.example.demo.Model.UserInfo;
import org.junit.jupiter.api.AfterEach;
import org.junit.jupiter.api.BeforeEach;
import org.junit.jupiter.api.Test;
import org.springframework.beans.factory.annotation.Autowired;
import java.util.List;
import static org.junit.jupiter.api.Assertions.*;
class UserInfoMapperTest {
@Autowired
private UserInfoMapper userInfoMapper;
@Test
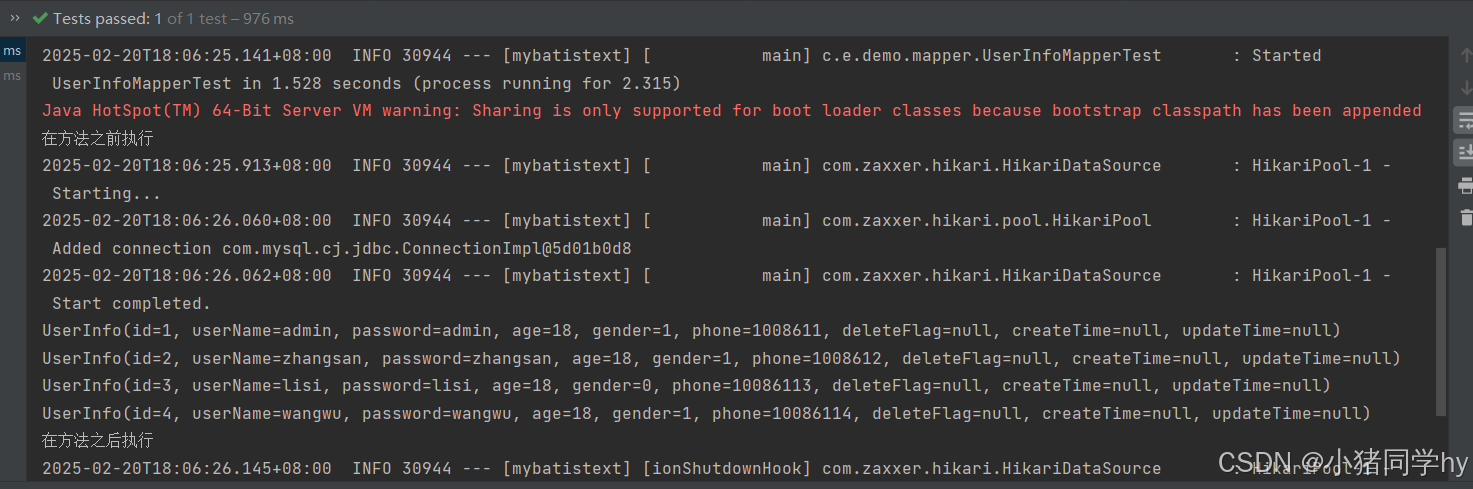
void select() {
List<UserInfo> list = userInfoMapper.select();
for (UserInfo userInfo : list) {
System.out.println(userInfo);
}
}
@BeforeEach
void setUp() {
System.out.println("在方法之前执行");
}
@AfterEach
void tearDown() {
System.out.println("在方法之后执行");
}
}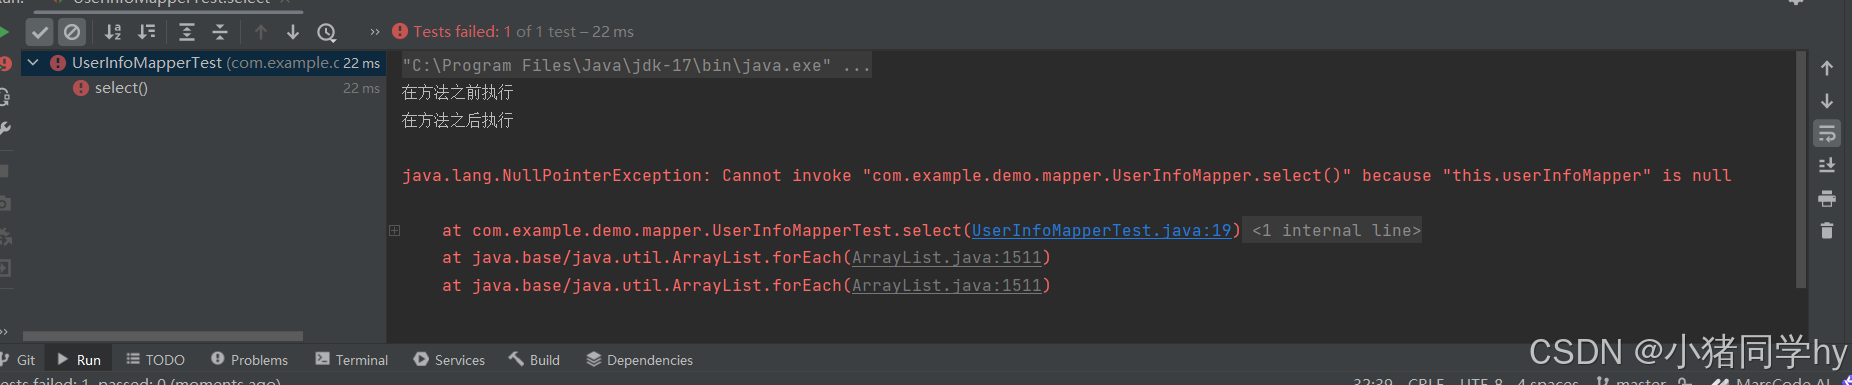
为什么是这样,这是因为没有加上 @SpringBootTest 来为这个类加上Spring上下文管理。
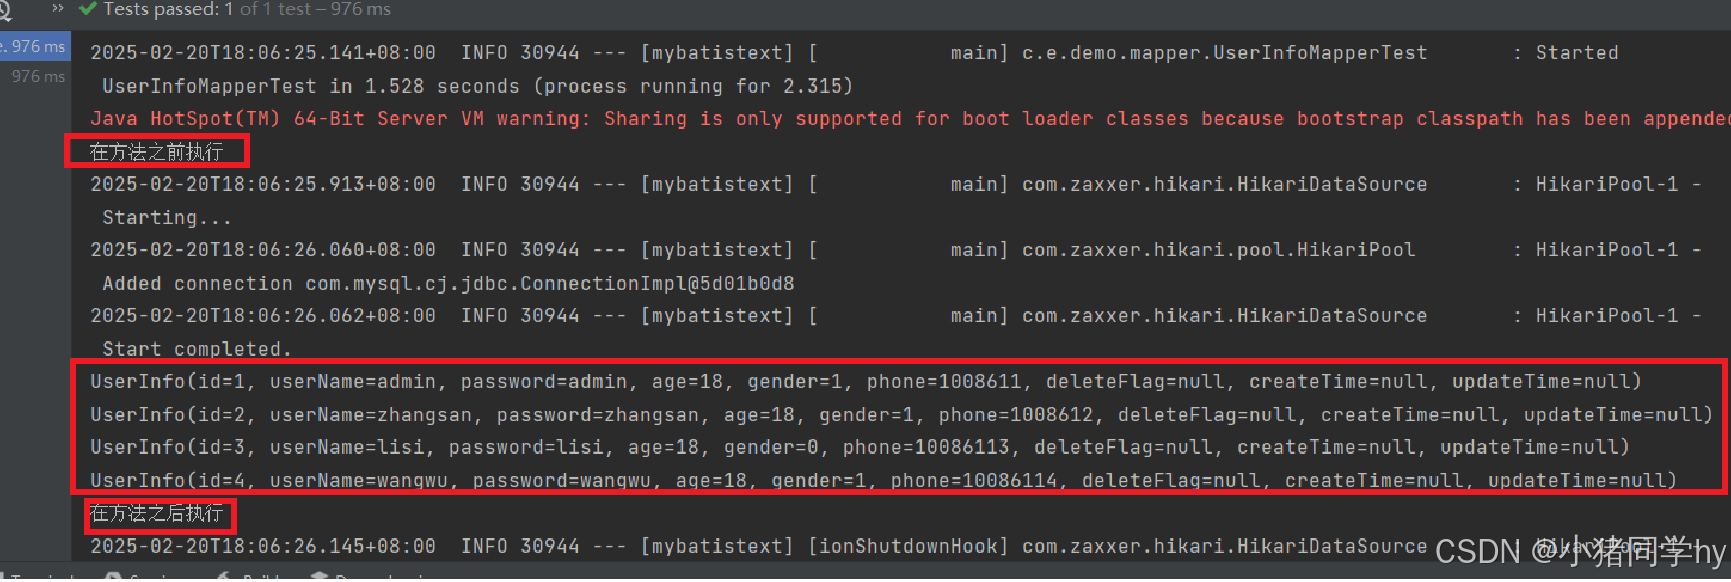
可以看到,程序能够成功运行了。
MyBatis的基础操作
在前面中,我们已经知道了MyBatis的查询操作,那么接下来,我们就来学习MyBatis的增删改操作。
打印日志配置
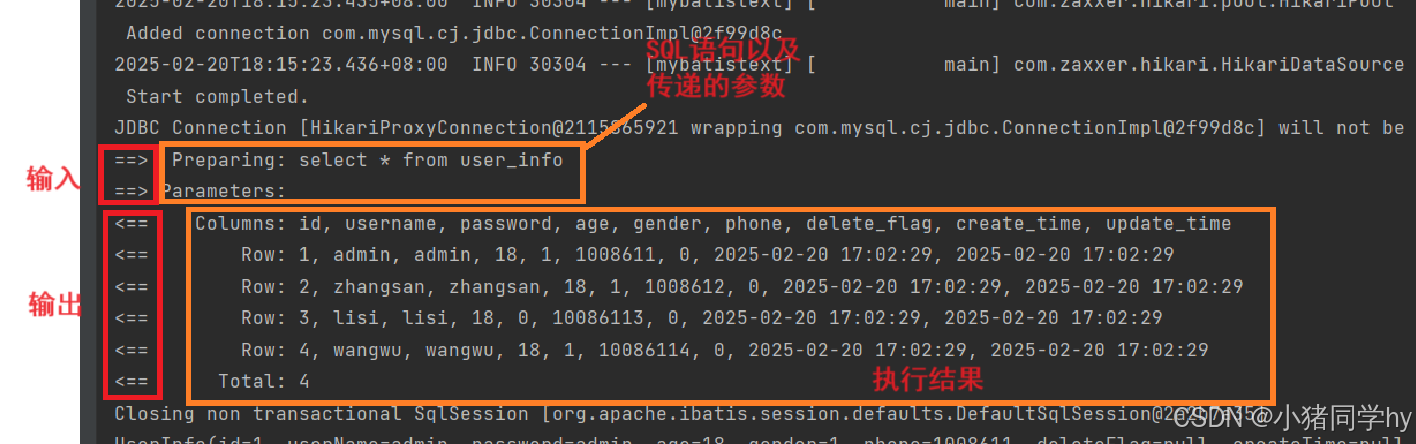
在这之前,我们先来配置一下MyBatis日志。
yml配置文件:
mybatis:
  configuration:
    log-impl: org.apache.ibatis.logging.stdout.StdOutImpl # 配置打印 MyBatis⽇志
我们可以来测试一下:
配置之前:
配置之后:
参数传递
假设我们现在要查新id为1的用户信息,那么对应的sql语句如下:
    @Select("select * from user_info where id = 1")
    public UserInfo selectById();
测试:
@Test
    void selectById() {
        UserInfo userInfo = userInfoMapper.selectById();
        System.out.println(userInfo);
    }
可以看到,上面的代码能够完成我们的要求,但是假如我们想要自己传入id,上面的代码中,id已经写死了,那应该怎么办?
这里就需要用到MyBatis的相关知识。
在MyBatis中,可以使用 #{} 来获取方法中的参数,在调用方法的时候将参数传递给方法,SQL语句中就能根据 #{} 来获取到方法中的参数。
@Select("select * from user_info where id = #{id}")
    public UserInfo selectById(Integer id);
}
@Test
void selectById() {
UserInfo userInfo = userInfoMapper.selectById(1);
System.out.println(userInfo);
}
如果方法中只有一个参数,那么 #{} 中的属性名可以随便写,但建议和参数名保持一致。
    @Select("select * from user_info where id = #{man}")
public UserInfo selectById(Integer id);此外,我们还可以给方法中的参数设置别名,但如果用 @Param 设置别名,那么 #{} 中的属性名需要和 @Param 中的别名一致。
    @Select("select * from user_info where id = #{userId}")
    public UserInfo selectById(@Param("userId") Integer id);
错误示例:属性名和别名不一致
   @Select("select * from user_info where id = #{id}")
    public UserInfo selectById(@Param("userId") Integer id);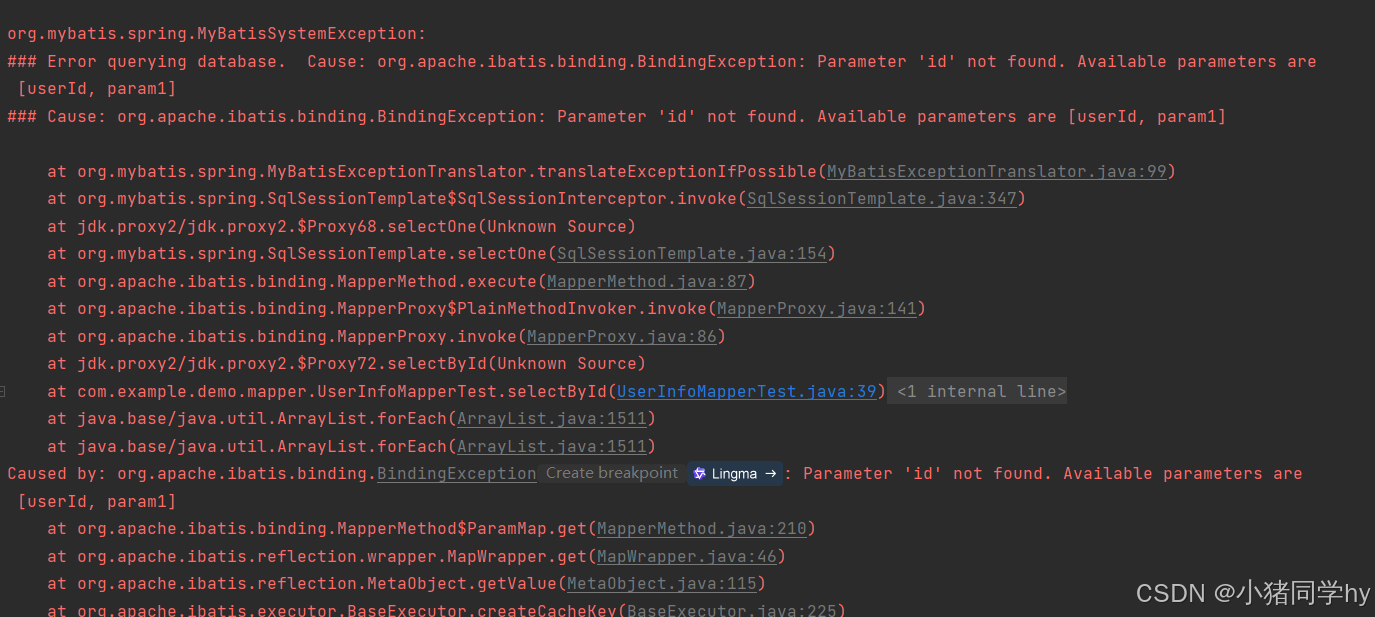
插入操作@Insert
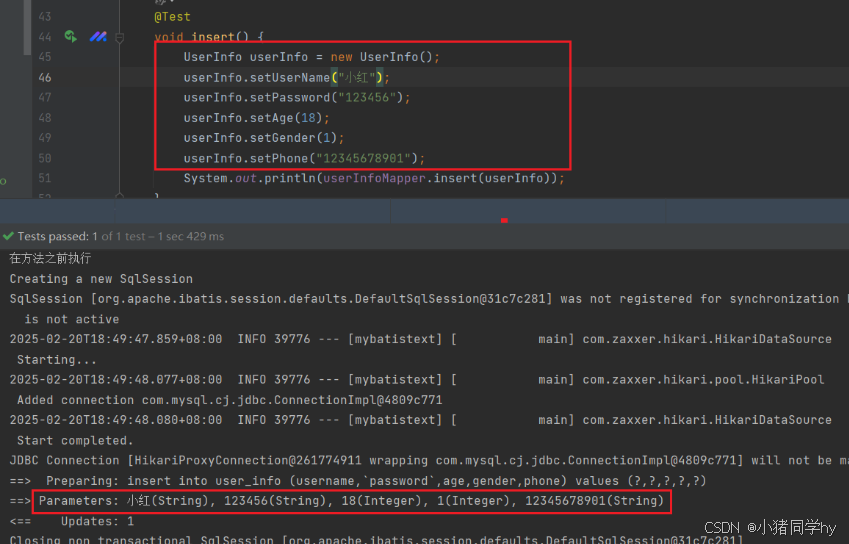
在MyBatis中,想要给表中插入数据,那么我们需要使用 @Insert 注解。
    @Insert("insert into user_info (username,`password`,age,gender,phone) values " +
            "(#{userName},#{password},#{age},#{gender},#{phone})")
    public Integer insert(UserInfo userInfo);
这里类似于我们MVC阶段,我们可以将要插入的数据封装成一个java对象作为参数传入,也可以一个个传递,但如果参数多的情况下,就显得很繁琐,所以我们可将要传输的对象封装起来,且保持对象中的字段名要和数据库中的列名一致。
当执行方法后,Mybatis就会进入对象中,将对象中的属性和列名进行比较,如果相同,则将属性值代入到SQL语句中对应的属性名。不相同则不传入。
    @Test
    void insert() {
        UserInfo userInfo = new UserInfo();
        userInfo.setUserName("小红");
        userInfo.setPassword("123456");
        userInfo.setAge(18);
        userInfo.setGender(1);
        userInfo.setPhone("12345678901");
        System.out.println(userInfoMapper.insert(userInfo));
    }
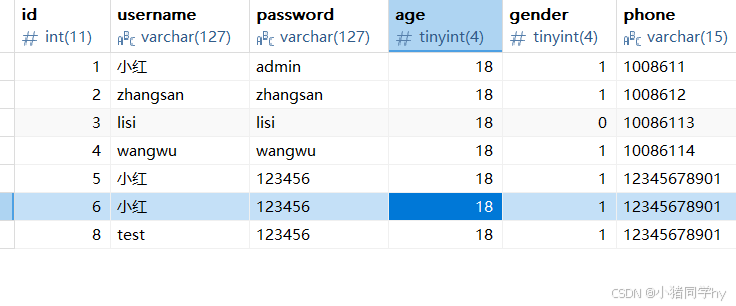
打开Navicat查看:

可以看到,确实插入数据了。
返回主键
Insert语句默认返回的是受影响的行数。
在有些情况下,我们可能需要获取到新插入数据的id。比如自增主键的值,那么如何获取呢?
mybatis会将自增主键的值填入到ajva对象吗?我们可以试试:

可以看到,并不会,那么我们应该如何获取到自增主键的值呢?
我们可以在方法中添加以下 @Options 注解。
    @Options(useGeneratedKeys = true,keyProperty = "id")
    @Insert("insert into user_info (username,`password`,age,gender,phone) values " +
            "(#{userName},#{password},#{age},#{gender},#{phone})")
    public Integer insert(UserInfo userInfo);
- useGeneratedKeys :是一个布尔值属性,用于指定是否使用JDBC的getGeneratedKeys() 方法来获取数据库自动生成的主键值。(默认false)
- keyProperty :字符串属性,用于指定实体类中用于接收主键值的字段名称。应与数据库主键类型一致。
测试:
 可以看到,加了 @Options 注解并指定之后,我们就能获取到自增主键的值。
此外,我们这里也可以使用 @Param 注解来对方法参数起别名。但需要注意的是:
如果参数是对象的话,那么在起别名之后,想要获取对象中的字段,那么SQL语句中属性获取值的时候就需要指定是哪个对象的哪个属性,即 #{别名.属性名}。
    @Options(useGeneratedKeys = true,keyProperty = "id")
    @Insert("insert into user_info (username,`password`,age,gender,phone) values " +
            "(#{user.userName},#{user.password},#{user.age},#{user.gender},#{user.phone})")
    public Integer insert(@Param("user") UserInfo userInfo);
删除操作@Delete
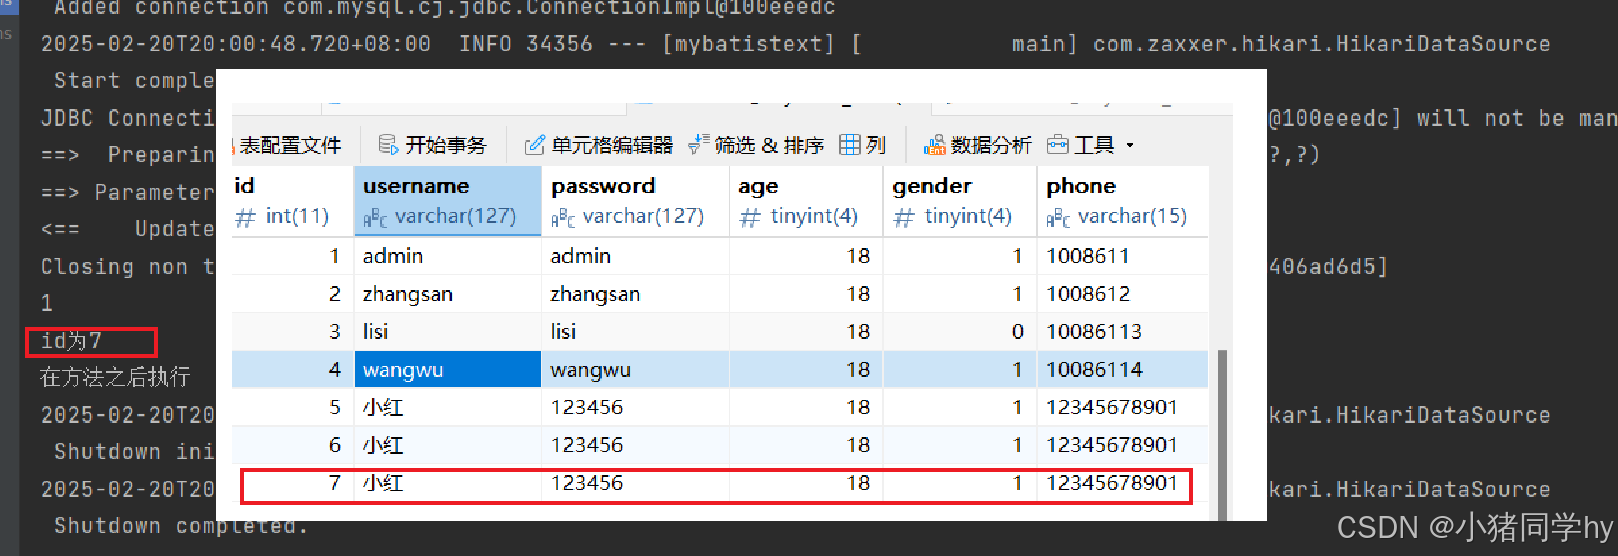
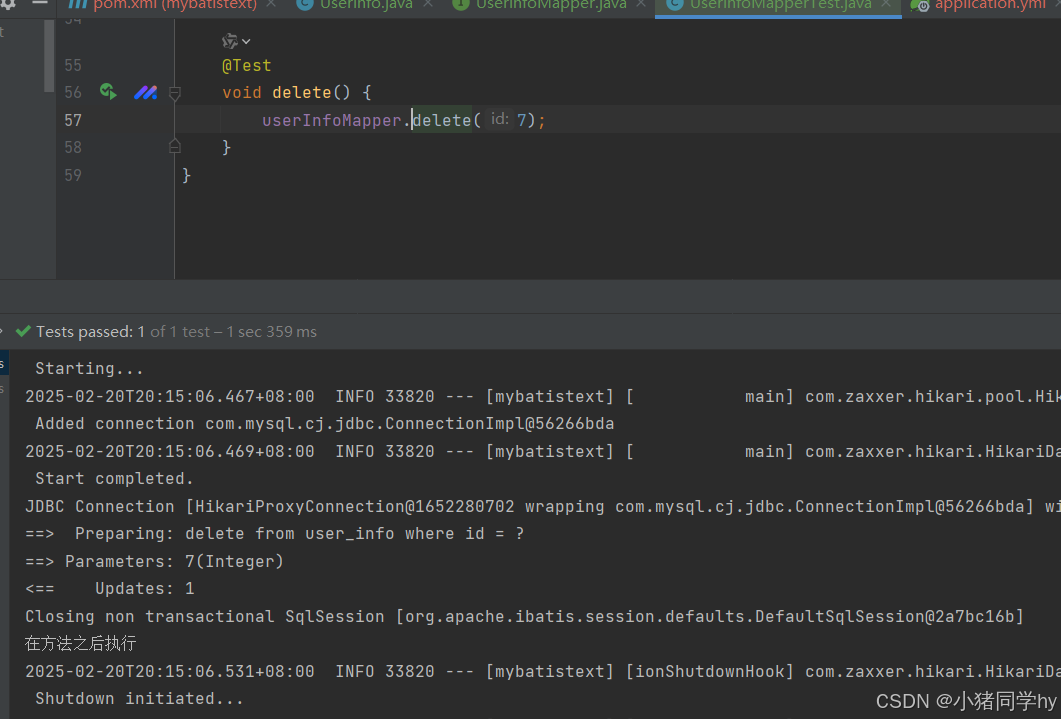
使用MyBatis对数据库进行删除数据操作需要使用 @Delete 注解。
 @Delete("delete from user_info where id = #{id}")
    public Integer delete(Integer id);
@Test
void delete() {
userInfoMapper.delete(7);
}
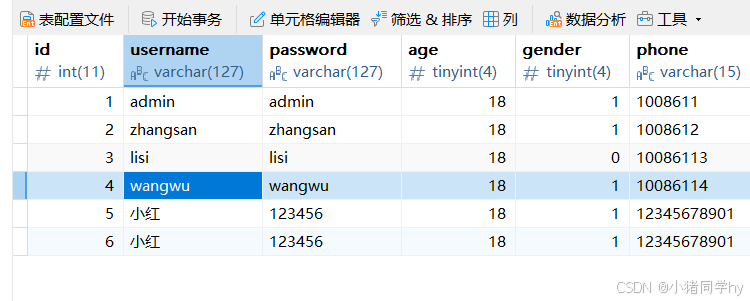
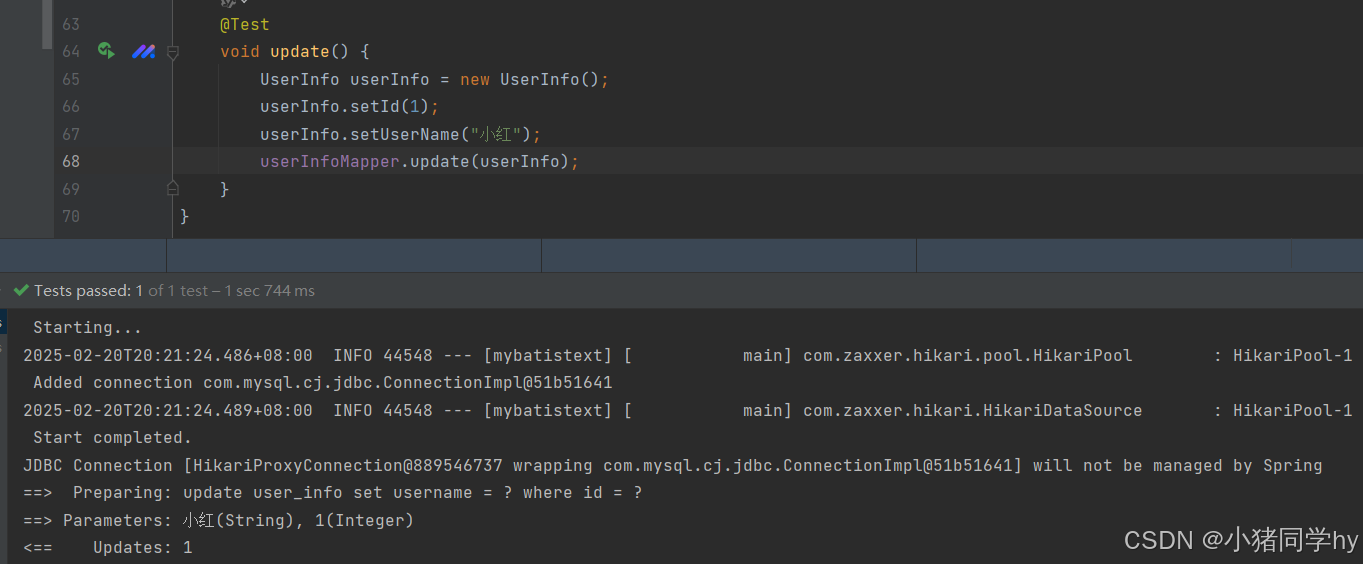
修改操作@Update
在MyBatis中实现修改操作需要用 @Update 注解。
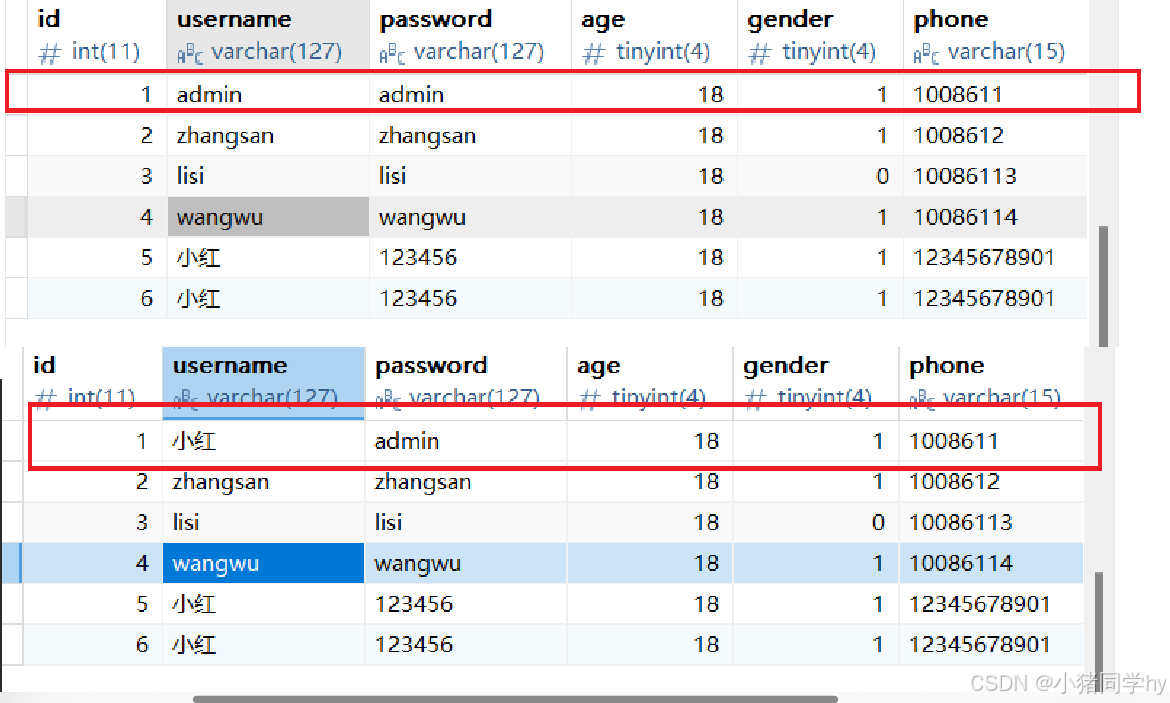
    @Update("update user_info set username = #{user.userName} where id = #{user.id}")
    public Integer update(@Param("user") UserInfo userInfo);
@Test
void update() {
UserInfo userInfo = new UserInfo();
userInfo.setId(1);
userInfo.setUserName("小红");
userInfoMapper.update(userInfo);
}
查找操作@Select
这个在前面中,我们已经知道它的基本使用,但在前面的查询中我们可以看到,userinfo对象中有三个属性(deleteFlag、createTime、updateTime)没有赋值成功。

这是因为只有在对象的属性名和数据库表中的列名一致的时候,才能赋值成功。如果是普通的数据类型,并且查询出来的结果的类型和方法返回值的类型相同的话,那么就会直接将这个查询结果返回;但如果方法返回值是java对象的话,那么mybatis就会将查询出来的结果按照列名映射到java对象中名称相同的属性。
虽然保证数据库表和jiava对象的属性名一致很重要,但由于SQL和java的变量名命名规范和习惯不同。比如:在java中变量是以小驼峰的形式来命名的,如deleteFlag,而在SQL中则是用下划线来隔开的,如delete_flag.。
那么我们就需要想办法让他们能够赋值成功。
对查询结果进行起别名
在前面的学习中,我们学过,如果想要对SQL语句中属性名和java对象不同的进行起别名,那么这里就需要用到 as。
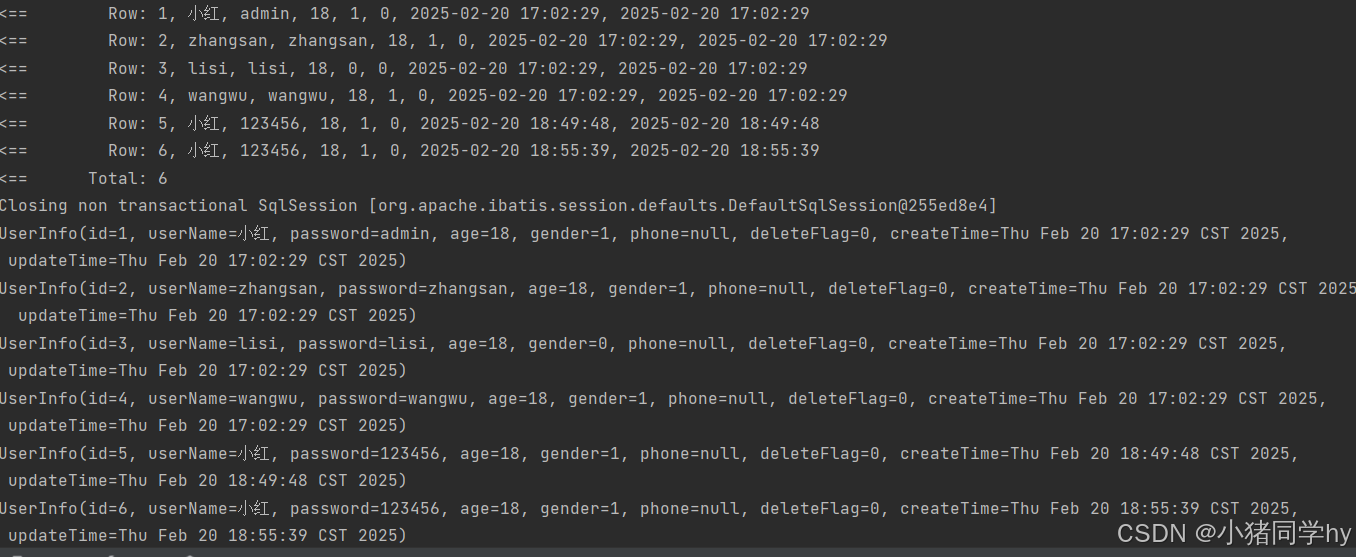
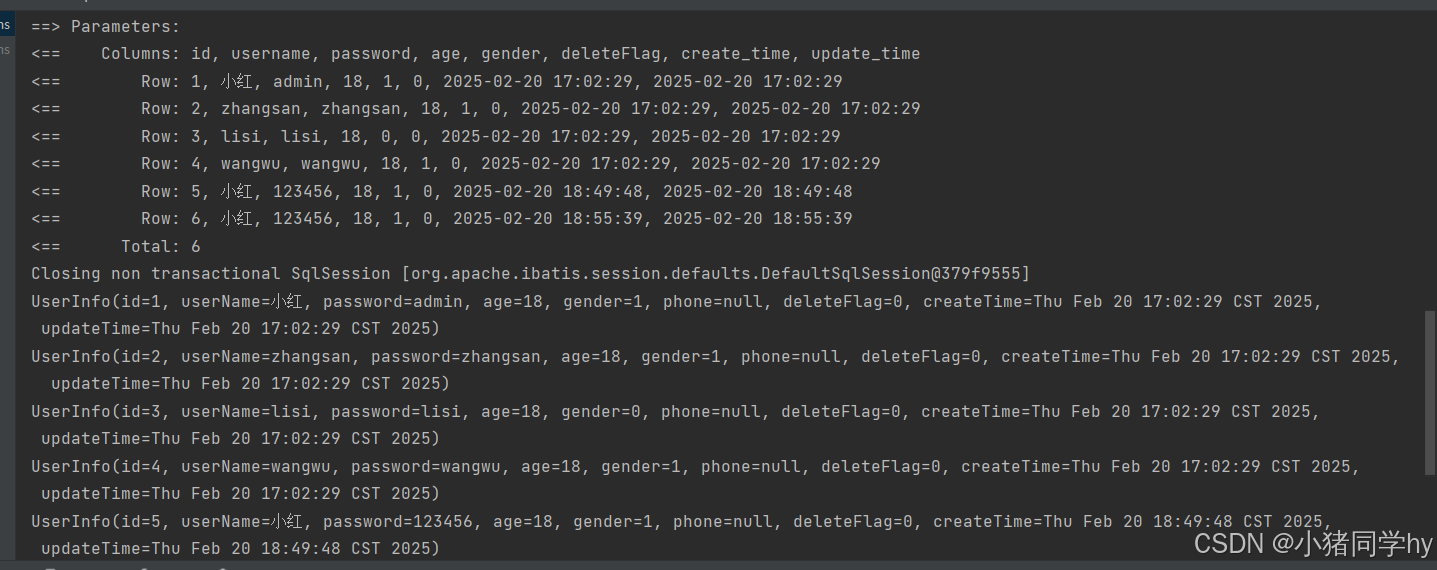
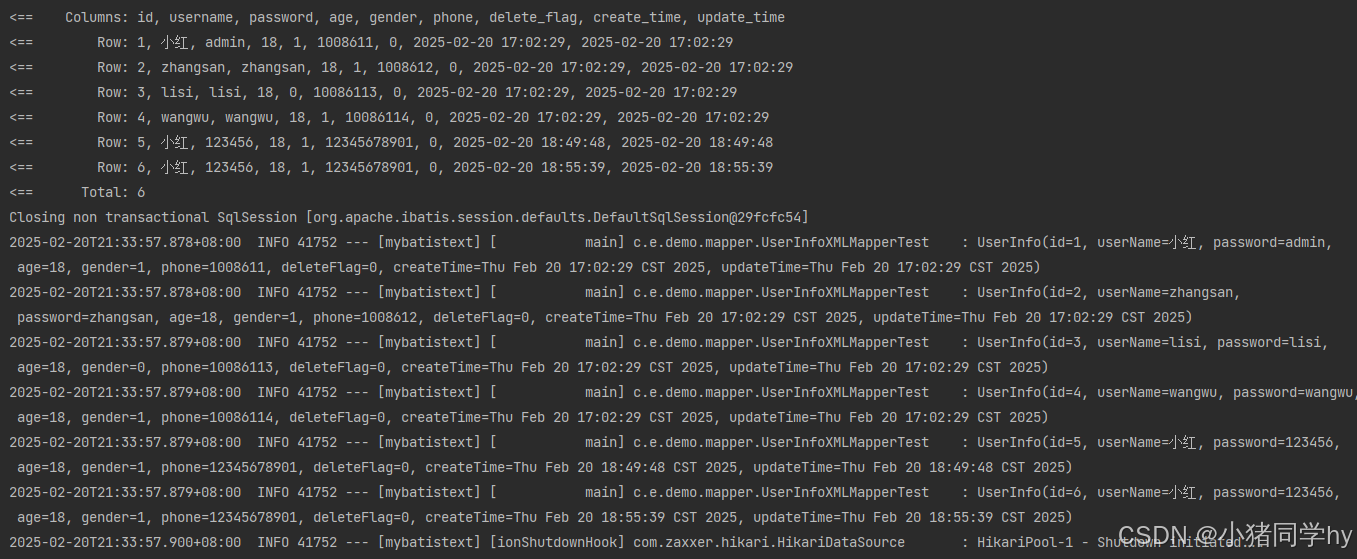
   @Select("select id, username, password, age, gender, delete_flag as deleteFlag," +
            "create_time as createTime, update_time as updateTime from user_info")
    public List<UserInfo> selectAll();
@Test
void selectAll() {
List<UserInfo> list = userInfoMapper.selectAll();
for (UserInfo userInfo : list) {
System.out.println(userInfo);
}
}
@Results注解
我们来看下@Results注解内部:
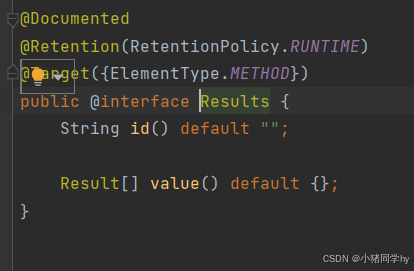
可以看到,@Results 注解有两个属性,第一个id是String类型,第二个value参数是一个Result数组,数组中每个元素都是Result类型。我们可以查看一下Result的内部。
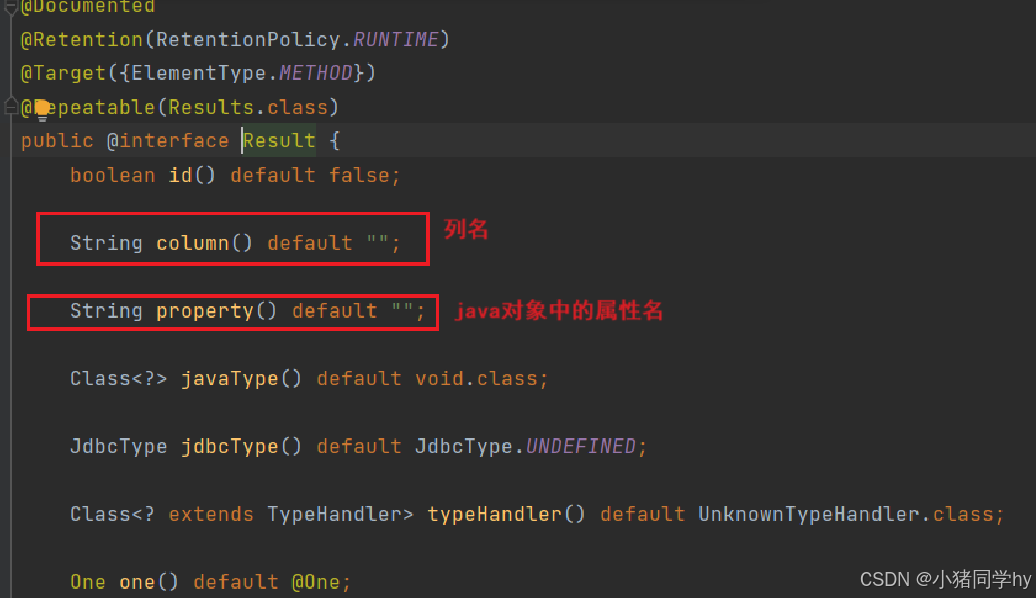
Result中有很多参数,但我们这里只需要用到两个。
    @Results(value = {
            @Result(column = "deleteFlag",property = "deleteFlag"),
            @Result(column = "create_time",property = "createTime"),
            @Result(column = "update_time",property = "updateTime")
    })
    @Select("select id, username, password, age, gender, delete_flag as deleteFlag," +
            "create_time , update_time  from user_info")
    public List<UserInfo> selectAll1();
@Test
void selectAll1() {
List<UserInfo> list = userInfoMapper.selectAll1();
for (UserInfo userInfo : list) {
System.out.println(userInfo);
}
} 可以看到,利用 @Results 注解也可以赋值成功,但如果我想要想要根据id来进行查询,那岂不是又要重写一次?其实是不用的,我们可以指定通过 @Results 中第一个参数id,让这个 @Results可以重复使用。
 @Results(id = "BaseMap",value = {
            @Result(column = "deleteFlag",property = "deleteFlag"),
            @Result(column = "create_time",property = "createTime"),
            @Result(column = "update_time",property = "updateTime")
    })
    @Select("select id, username, password, age, gender, delete_flag as deleteFlag," +
            "create_time , update_time  from user_info")
    public List<UserInfo> selectAll1();
如果后面的方法想要使用和这个 @Results注解相同的配置,那么我们只需要在对应方法上加 @ResultMap 注解即可。
@ResultMap 中的参数要保证和 @Results 注解中的id一样。
 @ResultMap("BaseMap")
    @Select("select id, username, password, age, gender, delete_flag as deleteFlag," +
            "create_time , update_time  from user_info where id = #{id}")
    public List<UserInfo> selectAll2(Integer id);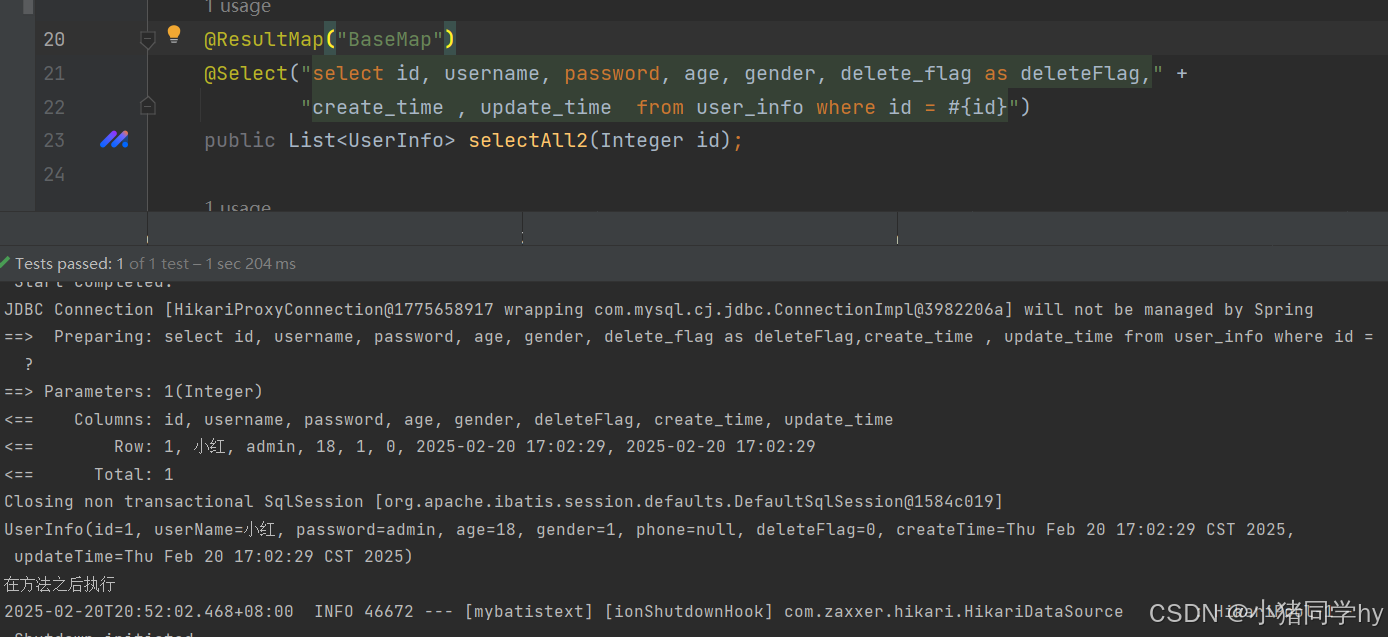
开启驼峰命名
除了上面说的这两种,其实我们感觉还可以再简便一店,那就可以在配置中添加驼峰自动转换。
mybatis:
	configuration:
		map-underscore-to-camel-case: true #配置驼峰⾃动转换
那么添加驼峰自动转换后,我们试试结果咋样:
    //查询
    @Select("select * from user_info")
    public List<UserInfo> select();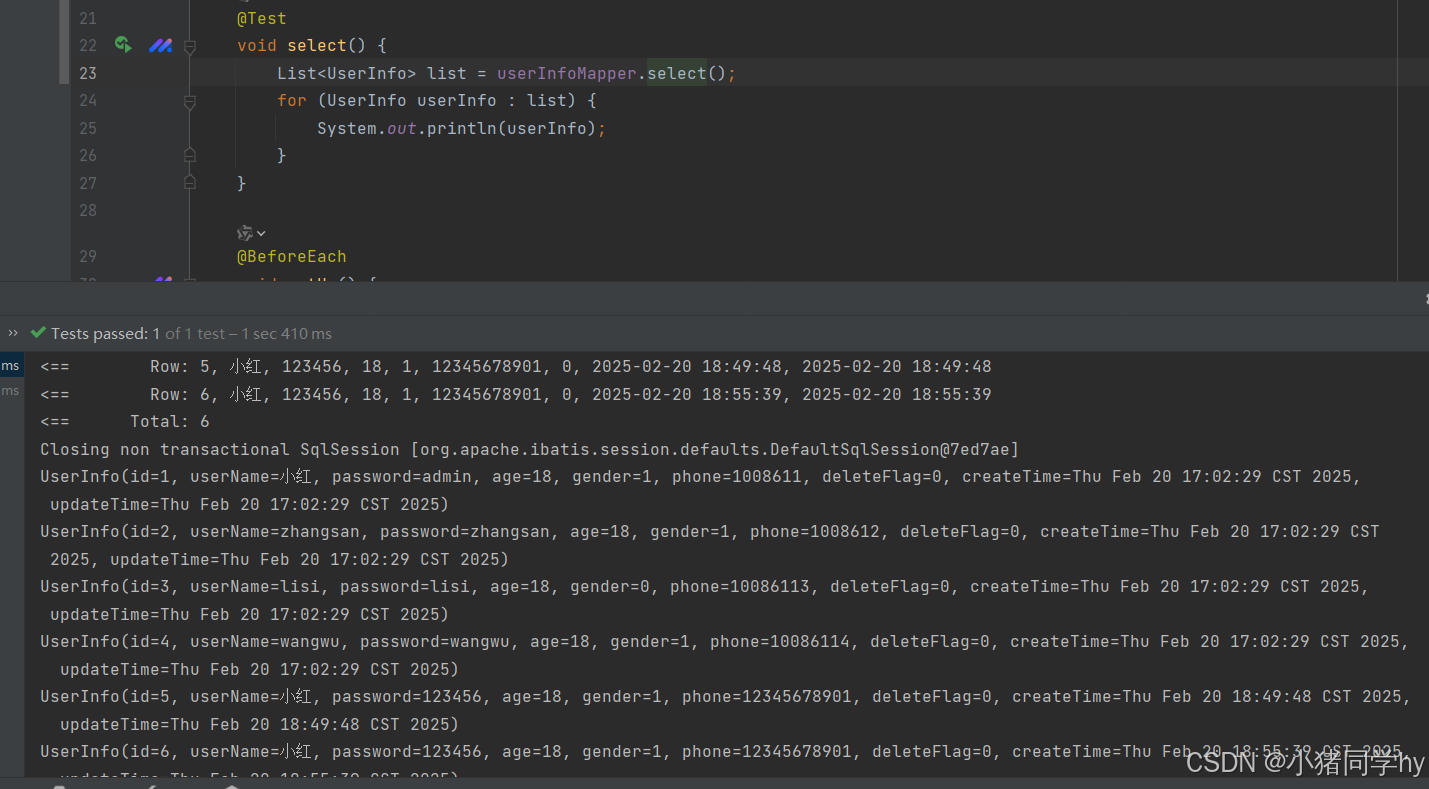
可以看到,通过短短的一小段配置代码,也能够解决SQL和java命名规则不同而导致的问题。
推荐使用这一种。
MyBatis XML配置文件
MyBatis的开发有两种方式:
- 注解
- XML
在上面中,我们已经学习了注解的方式,那么就下来我们就来学习如何使用XML配置来操作数据库。
数据库的配置信息
和使用注解一样,都需要先配置数据库连接。
# 数据库连接配置
spring:
	datasource:
		url: jdbc:mysql://127.0.0.1:3306/mybatis_test?
		characterEncoding=utf8&useSSL=false
		username: root
		password: root
		driver-class-name: com.mysql.cj.jdbc.Driver
指定XML的文件路径
既然使用XML文件来编写SQL,那么我们首先需要配置mybatis xml的文件路径。
mybatis:
mapper-locations: classpath:mapper/**Mapper.xml # 配置 mapper.xml 路径 在resources/mapper/ 下mybatis的xml文件放在resources/mapper目录底下。(只要是放在resource目录下即可,这里为了方便区别,再创建一个mapper目录来存放xml文件。

classpath是 Java 项目中用于存放资源文件的路径,而resources目录是 Maven 或 Gradle 等构建工具中默认的资源文件存放位置。在项目中,我们通常会创建一个mapper目录,专门用于存放 MyBatis 的映射文件(.xml),以实现更好的组织和管理。以
Mapper.xml结尾的文件名是开发团队自定义的命名规范,用于标识所有与 MyBatis 相关的映射文件。这种命名方式便于快速识别文件的用途,并确保在 MyBatis 配置中能够正确加载和解析这些文件。总之,这种规范是开发团队根据项目需求自行定义的,只要在 MyBatis 的配置文件中正确指定了路径和文件名,即可正常工作。因此,保持一致性和清晰性是关键,以便于项目的维护和开发。
XML编写SQL语句
固定格式
首先我们需要在XML中添加固定格式:
<?xml version="1.0" encoding="UTF-8"?>
<!DOCTYPE mapper PUBLIC "-//mybatis.org//DTD Mapper 3.0//EN"
        "http://mybatis.org/dtd/mybatis-3-mapper.dtd">
<mapper  namespace="com.example.demo.mapper.UserInfoXMLMapper">

</mapper>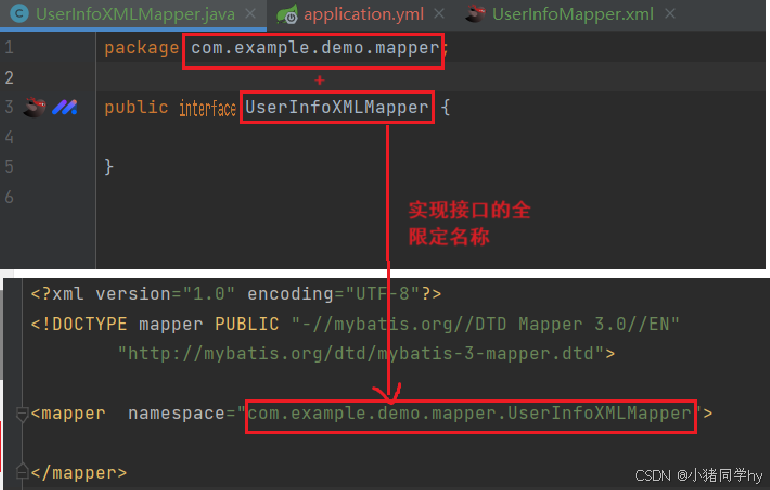
在 MyBatis 中,
namespace的值是对应的 Mapper 接口的全限定类名。这个全限定类名必须与接口的实际路径完全一致,确保 MyBatis 能够正确地将 SQL 映射与接口方法关联起来。只有当namespace与接口的全限定类名完全匹配时,MyBatis 才能正常工作。
接口中的方法就跟注解中用的方法一样,只不过不用加注解了。
而我们的实现则是在XML文件中的 <mapper> 标签中来编写的。
<?xml version="1.0" encoding="UTF-8"?>
<!DOCTYPE mapper PUBLIC "-//mybatis.org//DTD Mapper 3.0//EN"
"http://mybatis.org/dtd/mybatis-3-mapper.dtd">
<mapper namespace="com.example.demo.mapper.UserInfoXMLMapper">
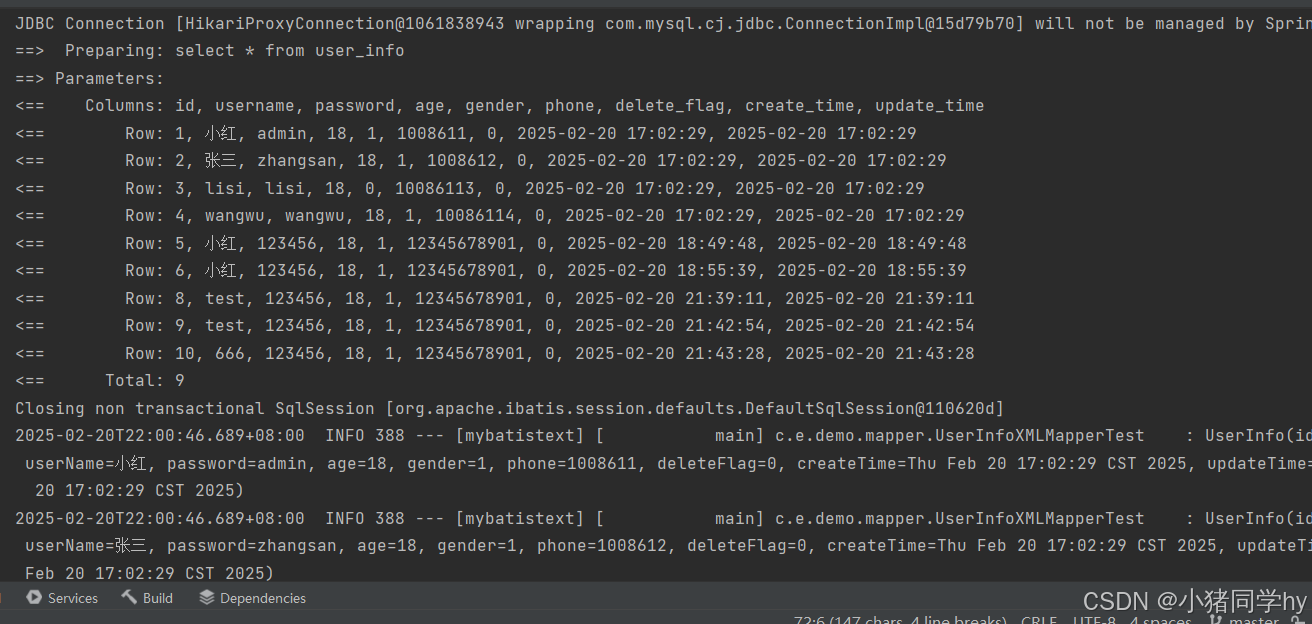
<select id="selectAll" resultType="com.example.demo.Model.UserInfo">
select * from user_info
</select>
</mapper>
- id :表示要实现接口中的方法名称
- resultType:表示该方法废返回数据类型,这里不是List,而是List中元素的类型。
我们来测试一下:
package com.example.demo.mapper;

import lombok.extern.slf4j.Slf4j;
import org.junit.jupiter.api.Test;
import org.springframework.beans.factory.annotation.Autowired;
import org.springframework.boot.test.context.SpringBootTest;

import static org.junit.jupiter.api.Assertions.*;


@SpringBootTest
@Slf4j
class UserInfoXMLMapperTest {

    @Autowired
    private UserInfoXMLMapper userInfoXMLMapper;
    @Test
    void selectAll() {
        // 查询所有用户信息
        userInfoXMLMapper.selectAll().forEach(userInfo -> log.info(userInfo.toString()));
    }
}
增加操作
public Integer insert(UserInfo userInfo);
   <insert id="insert">
        insert into user_info (username,password,age,gender,phone)
        values (#{userName},#{password},#{age},#{gender},#{phone})
    </insert>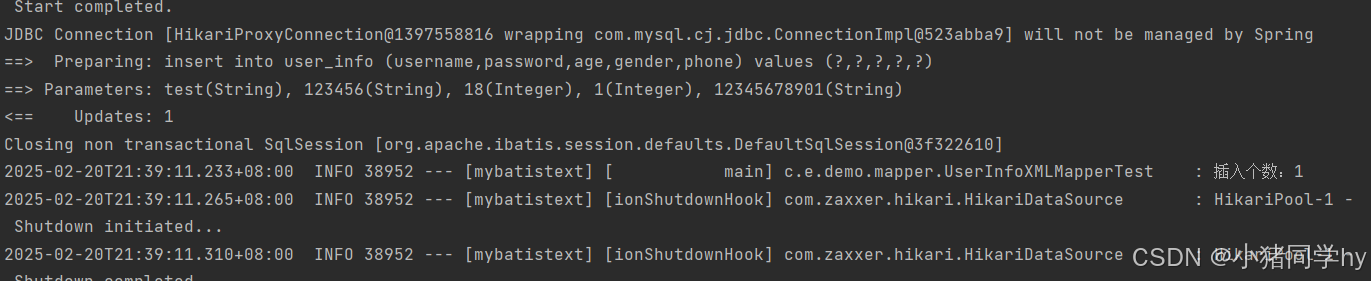
 获取插入数据的自增主键
同样的,要想获取到插入数据的自增主键,需要在 <insert> 标签中配置 userGenerateKeys 参数和 keyProperty 参数。
   <insert id="insert" useGeneratedKeys="true" keyProperty="id">
        insert into user_info (username,password,age,gender,phone)
        values (#{userName},#{password},#{age},#{gender},#{phone})
    </insert>
@Test
void insert() {
UserInfo userInfo = new UserInfo();
userInfo.setUserName("666");
userInfo.setPassword("123456");
userInfo.setAge(18);
userInfo.setGender(1);
userInfo.setPhone("12345678901");
userInfoXMLMapper.insert(userInfo);
//{} 表示占位符 , 后面的参数会依次替换占位符
log.info("获取到的id为:{}", userInfo.getId());
}
@Param 设置参数名称
用@Param设置参数名称,使用方法和注解类似。
public Integer insert1(@Param("user") UserInfo userInfo);
 <insert id="insert1" useGeneratedKeys="true" keyProperty="id">
        insert into user_info (username,password,age,gender,phone)
        values (#{user.userName},#{user.password},#{user.age},#{user.gender},#{user.phone})
    </insert>
@Test
void insert1() {
UserInfo userInfo = new UserInfo();
userInfo.setUserName("xiaoma");
userInfo.setPassword("123456");
userInfo.setAge(18);
userInfo.setGender(1);
userInfo.setPhone("123456111");
userInfoXMLMapper.insert(userInfo);
//{} 表示占位符 , 后面的参数会依次替换占位符
log.info("获取到的id为:{}", userInfo.getId());
} 
删除操作
public void delete(Integer id);
    <delete id="delete">
            delete from user_info where id = #{id}
    </delete>
@Test
void delete() {
userInfoXMLMapper.delete(11);
}

修改操作
public Integer update(UserInfo userInfo);
 <update id="update">
        update user_info set username = #{userName}
        where id = #{id}
    </update>
@Test
void update() {
UserInfo userInfo = new UserInfo();
userInfo.setId(2);
userInfo.setUserName("张三");
System.out.println(userInfoXMLMapper.update(userInfo));
}
查找操作
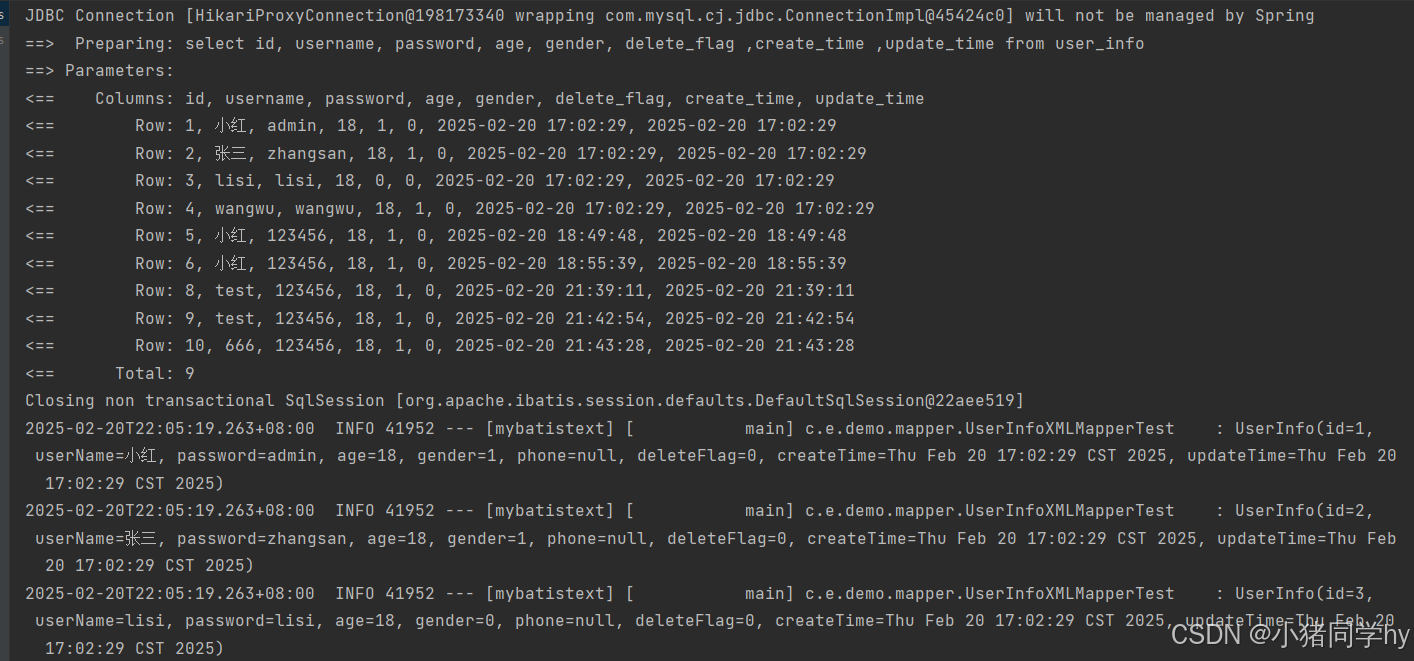
public UserInfo selectById(@Param("userId") Integer id); <select id="selectById" resultType="com.example.demo.Model.UserInfo">
select * from user_info where id = #{userId}
</select> @Test
void selectById() {
log.info(userInfoXMLMapper.selectById(1).toString());
}
上面这种是在配置了驼峰自动转换才能赋值成功,我们也来写下xml文件中起别名和利用@Results是什么写的。
别名
public List<UserInfo> selectAll1();
 <select id="selectAll1" resultType="com.example.demo.Model.UserInfo">
        select id, username, password, age, gender, delete_flag as deleteFlag,
        create_time as createTime, update_time as updateTime from user_info
    </select>
@Test
void selectAll1() {
// 查询所有用户信息
userInfoXMLMapper.selectAll1().forEach(userInfo -> log.info(userInfo.toString()));
}
Results
public List<UserInfo> selectAll2();
 <resultMap id="BaseMap" type="com.example.demo.Model.UserInfo">
        <result column="delete_flag" property="deleteFlag"/>
        <result column="create_time" property="createTime"/>
        <result column="update_time" property="updateTime"/>
    </resultMap>
    <select id="selectAll2" resultType="com.example.demo.Model.UserInfo" resultMap="BaseMap">
        select id, username, password, age, gender, delete_flag ,create_time ,update_time from user_info
    </select>
@Test
void selectAll1() {
// 查询所有用户信息
userInfoXMLMapper.selectAll2().forEach(userInfo -> log.info(userInfo.toString()));
}

以上就是本篇所有内容~
若有不足,欢迎指正~


 被折叠的 条评论
为什么被折叠?
被折叠的 条评论
为什么被折叠?
 到【灌水乐园】发言


