


五、共享模型之无锁
1、无锁解决线程安全问题
-
使用原子整数
AtomicInteger balance = new AtomicInteger();
interface Account {
Integer getBalance();
void withdraw(Integer amount);
/**
* 方法内会启动 1000 个线程,每个线程做 -10 元 的操作 * 如果初始余额为 10000 那么正确的结果应当是 0
*/
static void demo(Account account) {
List<Thread> ts = new ArrayList<>();
long start = System.nanoTime();
for (int i = 0; i < 1000; i++) {
ts.add(new Thread(() -> {
account.withdraw(10);
}));
}
ts.forEach(Thread::start);
ts.forEach(t -> {
try {
t.join();
} catch (InterruptedException e) {
e.printStackTrace();
}
});
long end = System.nanoTime();
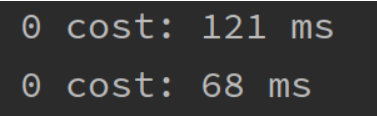
System.out.println(account.getBalance() + " cost: " + (end - start) / 1000_000 + " ms");
}
}
//线程不安全的做法
class AccountUnsafe implements Account {
private Integer balance;
public AccountUnsafe(Integer balance) {
this.balance = balance;
}
@Override
public Integer getBalance() {
return this.balance;
}
@Override
public synchronized void withdraw(Integer amount) {
balance -= amount;
}
public static void main(String[] args) {
Account.demo(new AccountUnsafe(10000));
Account.demo(new AccountCas(10000));
}
}
//线程安全的做法
class AccountCas implements Account {
//使用原子整数
private AtomicInteger balance;
public AccountCas(int balance) {
this.balance = new AtomicInteger(balance);
}
@Override
public Integer getBalance() {
//得到原子整数的值
return balance.get();
}
@Override
public void withdraw(Integer amount) {
while(true) {
//获得修改前的值
int prev = balance.get();
//获得修改后的值
int next = prev-amount;
//比较并设值
if(balance.compareAndSet(prev, next)) {
break;
}
}
}
}
2、CAS与volatile
前面看到的 AtomicInteger 的解决方法,内部并没有用锁来保护共享变量的线程安全。那么它是如何实现的呢?
其中的关键是 compareAndSwap(比较并设置值),它的简称就是 CAS (也有 Compare And Swap 的说法),它必须是原子操作。

工作流程
- 当一个线程要去修改Account对象中的值时,先获取值pre(调用get方法),然后再将其设置为新的值next(调用cas方法)。在调用cas方法时,会将pre与Account中的余额进行比较。
- 如果两者相等,就说明该值还未被其他线程修改,此时便可以进行修改操作。
- 如果两者不相等,就不设置值,重新获取值pre(调用get方法),然后再将其设置为新的值next(调用cas方法),直到修改成功为止。
注意
- 其实 CAS 的底层是 lock cmpxchg 指令(X86 架构),在单核 CPU 和多核 CPU 下都能够保证【比较-交换】的原子性。
- 在多核状态下,某个核执行到带 lock 的指令时,CPU 会让总线锁住,当这个核把此指令执行完毕,再开启总线。这个过程中不会被线程的调度机制所打断,保证了多个线程对内存操作的准确性,是原子的。
volatile
获取共享变量时,为了保证该变量的可见性,需要使用 volatile 修饰。
它可以用来修饰成员变量和静态成员变量,他可以避免线程从自己的工作缓存中查找变量的值,必须到主存中获取 它的值,线程操作 volatile 变量都是直接操作主存。即一个线程对 volatile 变量的修改,对另一个线程可见。
注意
volatile 仅仅保证了共享变量的可见性,让其它线程能够看到新值,但不能解决指令交错问题(不能保证原子性)
CAS 必须借助 volatile 才能读取到共享变量的新值来实现【比较并交换】的效果
效率问题
一般情况下,使用无锁比使用加锁的效率更高。
原因
CAS特点
结合 CAS 和 volatile 可以实现无锁并发,适用于线程数少、多核 CPU 的场景下。
-
CAS 是基于乐观锁的思想:乐观的估计,不怕别的线程来修改共享变量,就算改了也没关系,我吃亏点再重试呗。
-
synchronized 是基于悲观锁的思想:悲观的估计,得防着其它线程来修改共享变量,我上了锁你们都别想改,我改完了解开锁,你们才有机会。
-
CAS 体现的是
无锁并发、无阻塞并发
,请仔细体会这两句话的意思
- 因为没有使用 synchronized,所以线程不会陷入阻塞,这是效率提升的因素之一
- 但如果竞争激烈,可以想到重试必然频繁发生,反而效率会受影响
3、原子整数
J.U.C 并发包提供了
- AtomicBoolean
- AtomicInteger
- AtomicLong
以 AtomicInteger 为例
 AtomicInteger i = new AtomicInteger(0);

// 获取并自增(i = 0, 结果 i = 1, 返回 0),类似于 i++ System.out.println(i.getAndIncrement());

// 自增并获取(i = 1, 结果 i = 2, 返回 2),类似于 ++i System.out.println(i.incrementAndGet());

// 自减并获取(i = 2, 结果 i = 1, 返回 1),类似于 --i System.out.println(i.decrementAndGet());

// 获取并自减(i = 1, 结果 i = 0, 返回 1),类似于 i--
System.out.println(i.getAndDecrement());

// 获取并加值(i = 0, 结果 i = 5, 返回 0)
System.out.println(i.getAndAdd(5));

// 加值并获取(i = 5, 结果 i = 0, 返回 0)
System.out.println(i.addAndGet(-5));

// 获取并更新(i = 0, p 为 i 的当前值, 结果 i = -2, 返回 0)
// 其中函数中的操作能保证原子,但函数需要无副作用
System.out.println(i.getAndUpdate(p -> p - 2));

// 更新并获取(i = -2, p 为 i 的当前值, 结果 i = 0, 返回 0)
// 其中函数中的操作能保证原子,但函数需要无副作用
System.out.println(i.updateAndGet(p -> p + 2));

// 获取并计算(i = 0, p 为 i 的当前值, x 为参数1, 结果 i = 10, 返回 0)
// 其中函数中的操作能保证原子,但函数需要无副作用 // getAndUpdate 如果在 lambda 中引用了外部的局部变量,要保证该局部变量是 final 的
// getAndAccumulate 可以通过 参数1 来引用外部的局部变量,但因为其不在 lambda 中因此不必是
final System.out.println(i.getAndAccumulate(10, (p, x) -> p + x));

// 计算并获取(i = 10, p 为 i 的当前值, x 为参数1, 结果 i = 0, 返回 0)
// 其中函数中的操作能保证原子,但函数需要无副作用
System.out.println(i.accumulateAndGet(-10, (p, x) -> p + x));
4、原子引用
public interface DecimalAccount {
	BigDecimal getBalance();

	void withdraw(BigDecimal amount);

	/**
	 * 方法内会启动 1000 个线程,每个线程做 -10 元 的操作
     * 如果初始余额为 10000 那么正确的结果应当是 0
	 */
	static void demo(DecimalAccountImpl account) {
		List<Thread> ts = new ArrayList<>();
		long start = System.nanoTime();
		for (int i = 0; i < 1000; i++) {
			ts.add(new Thread(() -> {
				account.withdraw(BigDecimal.TEN);
			}));
		}
		ts.forEach(Thread::start);
		ts.forEach(t -> {
			try {
				t.join();
			} catch (InterruptedException e) {
				e.printStackTrace();
			}
		});
		long end = System.nanoTime();
		System.out.println(account.getBalance() + " cost: " + (end - start) / 1000_000 + " ms");
	}
}

class DecimalAccountImpl implements DecimalAccount {
	//原子引用,泛型类型为小数类型
	AtomicReference<BigDecimal> balance;

	public DecimalAccountImpl(BigDecimal balance) {
		this.balance = new AtomicReference<BigDecimal>(balance);
	}

	@Override
	public BigDecimal getBalance() {
		return balance.get();
	}

	@Override
	public void withdraw(BigDecimal amount) {
		while(true) {
			BigDecimal pre = balance.get();
			BigDecimal next = pre.subtract(amount);
			if(balance.compareAndSet(pre, next)) {
				break;
			}
		}
	}

	public static void main(String[] args) {
		DecimalAccount.demo(new DecimalAccountImpl(new BigDecimal("10000")));
	}
}
5、ABA问题
public class Demo3 {
	static AtomicReference<String> str = new AtomicReference<>("A");
	public static void main(String[] args) {
		new Thread(() -> {
			String pre = str.get();
			System.out.println("change");
			try {
				other();
			} catch (InterruptedException e) {
				e.printStackTrace();
			}
			try {
				Thread.sleep(1000);
			} catch (InterruptedException e) {
				e.printStackTrace();
			}
			//把str中的A改为C
			System.out.println("change A->C " + str.compareAndSet(pre, "C"));
		}).start();
	}

	static void other() throws InterruptedException {
		new Thread(()-> {
			System.out.println("change A->B " + str.compareAndSet("A", "B"));
		}).start();
		Thread.sleep(500);
		new Thread(()-> {
			System.out.println("change B->A " + str.compareAndSet("B", "A"));
		}).start();
	}
}

主线程仅能判断出共享变量的值与初值 A 是否相同,不能感知到这种从 A 改为 B 又 改回 A 的情况,如果主线程希望:
只要有其它线程【动过了】共享变量,那么自己的 cas 就算失败,这时,仅比较值是不够的,需要再加一个版本号
AtomicStampedReference
public class Demo3 {
//指定版本号
static AtomicStampedReference<String> str = new AtomicStampedReference<>("A", 0);
public static void main(String[] args) {
new Thread(() -> {
String pre = str.getReference();
//获得版本号
int stamp = str.getStamp();
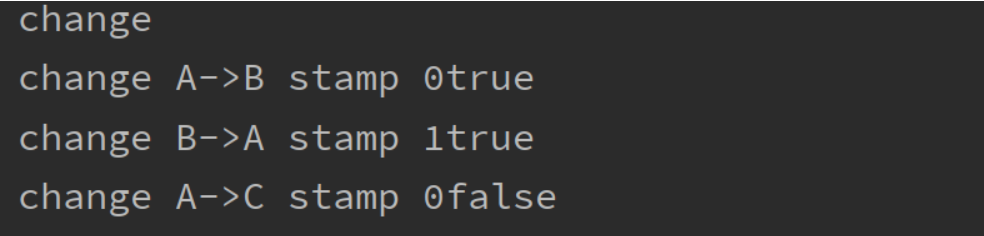
System.out.println("change");
try {
other();
} catch (InterruptedException e) {
e.printStackTrace();
}
try {
Thread.sleep(1000);
} catch (InterruptedException e) {
e.printStackTrace();
}
//把str中的A改为C,并比对版本号,如果版本号相同,就执行替换,并让版本号+1
System.out.println("change A->C stamp " + stamp + str.compareAndSet(pre, "C", stamp, stamp+1));
}).start();
}
static void other() throws InterruptedException {
new Thread(()-> {
int stamp = str.getStamp();
System.out.println("change A->B stamp " + stamp + str.compareAndSet("A", "B", stamp, stamp+1));
}).start();
Thread.sleep(500);
new Thread(()-> {
int stamp = str.getStamp();
System.out.println("change B->A stamp " + stamp + str.compareAndSet("B", "A", stamp, stamp+1));
}).start();
}
}
AtomicMarkableReference
AtomicStampedReference 可以给原子引用加上版本号,追踪原子引用整个的变化过程,如: A -> B -> A -> C ,通过AtomicStampedReference,我们可以知道,引用变量中途被更改了几次。
但是有时候,并不关心引用变量更改了几次,只是单纯的关心是否更改过,所以就有了 AtomicMarkableReference
public class Demo4 {
	//指定版本号
	static AtomicMarkableReference<String> str = new AtomicMarkableReference<>("A", true);
	public static void main(String[] args) {
		new Thread(() -> {
			String pre = str.getReference();
			System.out.println("change");
			try {
				other();
			} catch (InterruptedException e) {
				e.printStackTrace();
			}
			try {
				Thread.sleep(1000);
			} catch (InterruptedException e) {
				e.printStackTrace();
			}
			//把str中的A改为C,并比对版本号,如果版本号相同,就执行替换,并让版本号+1
			System.out.println("change A->C mark " +  str.compareAndSet(pre, "C", true, false));
		}).start();
	}

	static void other() throws InterruptedException {
		new Thread(() -> {
			System.out.println("change A->A mark " + str.compareAndSet("A", "A", true, false));
		}).start();
	}
}

两者的区别
- AtomicStampedReference 需要我们传入整型变量作为版本号,来判定是否被更改过
- AtomicMarkableReference需要我们传入布尔变量作为标记,来判断是否被更改过
6、原子数组
- AtomicIntegerArray
- AtomicLongArray
- AtomicReferenceArray
lamba表达式的使用
- 提供者
- 无参又返回
- ()->返回结果
- 方法
- 有参有返回
- (参数一…)->返回结果
- 消费者
- 有参无返回
- (参数一…)->void
7、原子更新器
- AtomicReferenceFieldUpdater // 域 字段
- AtomicIntegerFieldUpdater
- AtomicLongFieldUpdate
原子更新器用于帮助我们改变某个对象中的某个属性
public class Demo1 {
   public static void main(String[] args) {
      Student student = new Student();

      // 获得原子更新器
      // 泛型
      // 参数1 持有属性的类 参数2 被更新的属性的类
      // newUpdater中的参数:第三个为属性的名称
      AtomicReferenceFieldUpdater<Student, String> updater = AtomicReferenceFieldUpdater.newUpdater(Student.class, String.class, "name");

      // 修改
      updater.compareAndSet(student, null, "Nyima");
      System.out.println(student);
   }
}

class Student {
   volatile String name;

   @Override
   public String toString() {
      return "Student{" +
            "name='" + name + '\'' +
            '}';
   }
}
原子更新器初始化过程
从上面的例子可以看出,原子更新器是通过newUpdater来获取实例的。其中传入了三个参数
- 拥有属性的类的Class
- 属性的Class
- 属性的名称
大概可以猜出来,初始化过程用到了反射,让我们看看源码来验证一下这个猜测。
newUpdater方法
public static <U,W> AtomicReferenceFieldUpdater<U,W> newUpdater(Class<U> tclass,
                                                                Class<W> vclass,
                                                                String fieldName) {
    // 返回了一个AtomicReferenceFieldUpdaterImpl实例
    return new AtomicReferenceFieldUpdaterImpl<U,W>
        (tclass, vclass, fieldName, Reflection.getCallerClass());
}
从newUpdater方法还并不能看出来具体的初始化过程
内部实现类
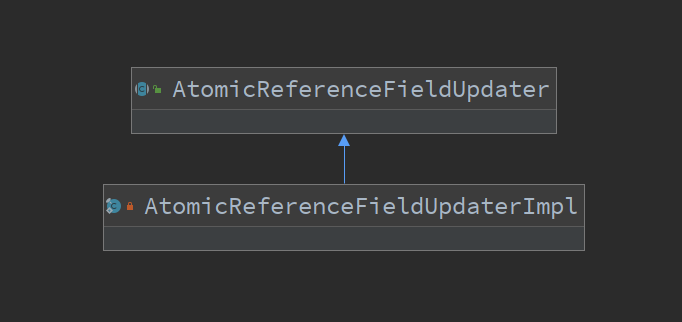
AtomicReferenceFieldUpdater为抽象类,该类内部有一个自己的实现类AtomicReferenceFieldUpdaterImpl
private static final class AtomicReferenceFieldUpdaterImpl<T,V>
        extends AtomicReferenceFieldUpdater<T,V>
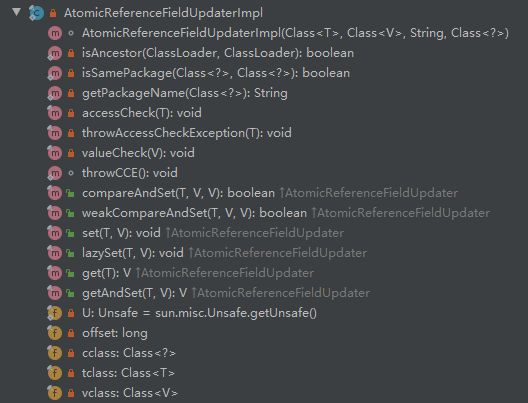
构造方法
AtomicReferenceFieldUpdaterImpl(final Class<T> tclass,
                                final Class<V> vclass,
                                final String fieldName,
                                final Class<?> caller) {
    // 用于保存要被修改的属性
    final Field field;

    // 属性的Class
    final Class<?> fieldClass;

    // field的修饰符
    final int modifiers;
    try {
        // 反射获得属性
        field = AccessController.doPrivileged(
            new PrivilegedExceptionAction<Field>() {
                public Field run() throws NoSuchFieldException {
                    // tclass为传入的属性的Class,可以通过它来获得属性
                    return tclass.getDeclaredField(fieldName);
                }
            });

        // 获得属性的修饰符,主要用于判断
        // 1、vclass 与 属性确切的类型是否匹配
        // 2、是否为引用类型
        // 3、被修改的属性是否加了volatile关键字
        modifiers = field.getModifiers();
        sun.reflect.misc.ReflectUtil.ensureMemberAccess(
            caller, tclass, null, modifiers);
        ClassLoader cl = tclass.getClassLoader();
        ClassLoader ccl = caller.getClassLoader();
        if ((ccl != null) && (ccl != cl) &&
            ((cl == null) || !isAncestor(cl, ccl))) {
            sun.reflect.misc.ReflectUtil.checkPackageAccess(tclass);
        }

        // 获得属性类的Class
        fieldClass = field.getType();
    } catch (PrivilegedActionException pae) {
        throw new RuntimeException(pae.getException());
    } catch (Exception ex) {
        throw new RuntimeException(ex);
    }

    if (vclass != fieldClass)
        throw new ClassCastException();
    if (vclass.isPrimitive())
        throw new IllegalArgumentException("Must be reference type");

    if (!Modifier.isVolatile(modifiers))
        throw new IllegalArgumentException("Must be volatile type");

    // Access to protected field members is restricted to receivers only
    // of the accessing class, or one of its subclasses, and the
    // accessing class must in turn be a subclass (or package sibling)
    // of the protected member's defining class.
    // If the updater refers to a protected field of a declaring class
    // outside the current package, the receiver argument will be
    // narrowed to the type of the accessing class.
 	// 对类中的属性进行初始化
    this.cclass = (Modifier.isProtected(modifiers) &&
                   tclass.isAssignableFrom(caller) &&
                   !isSamePackage(tclass, caller))
                  ? caller : tclass;
    this.tclass = tclass;
    this.vclass = vclass;
    // 获得偏移量
    this.offset = U.objectFieldOffset(field);
}
可以看出,原子引用更新器确实使用了反射
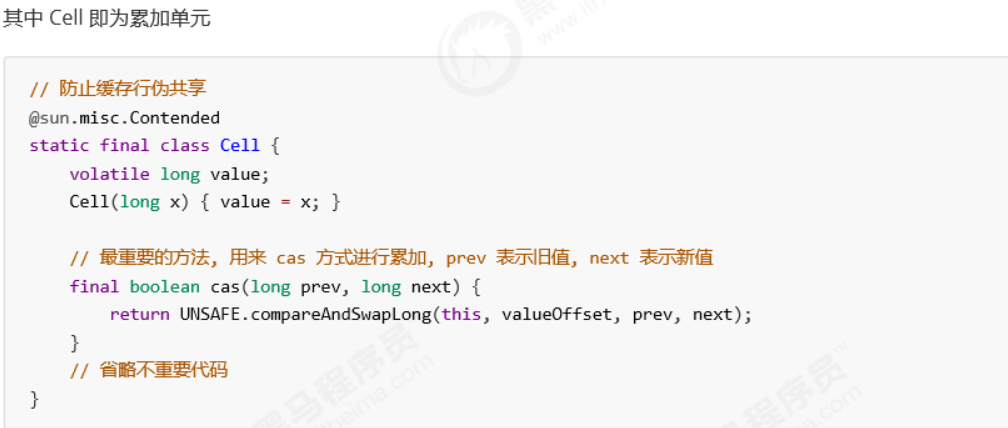
8、LongAdder原理
原理之伪共享
缓存行伪共享得从缓存说起
缓存与内存的速度比较
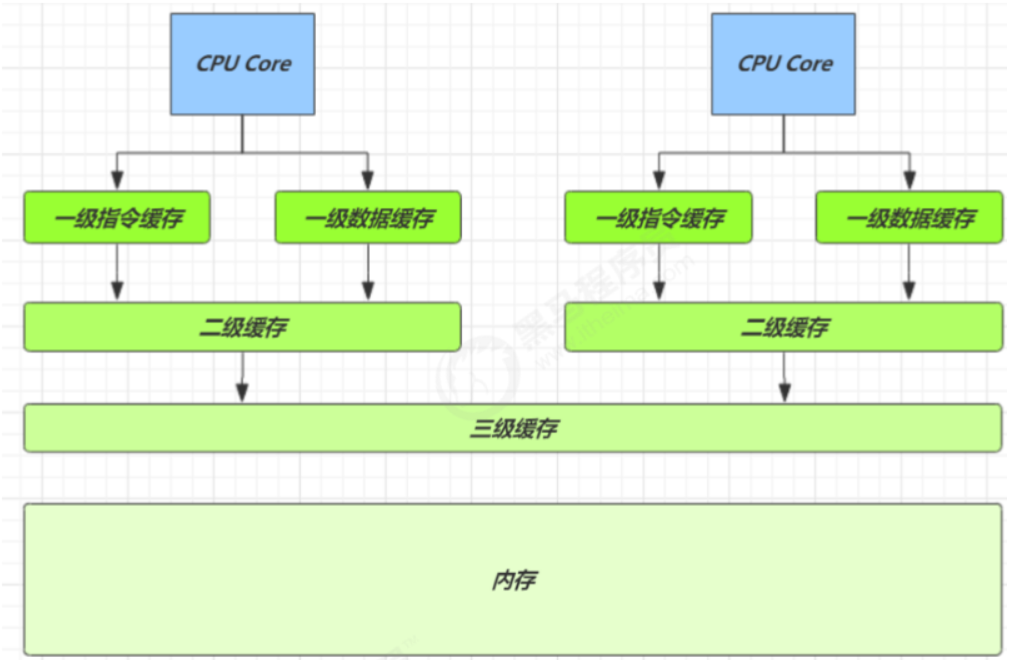
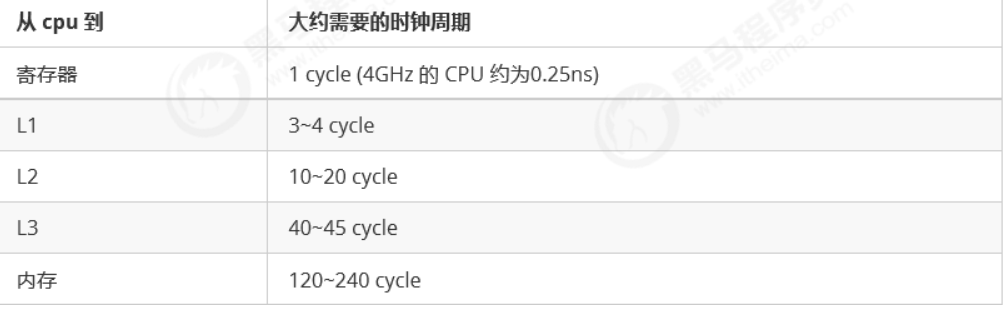
因为 CPU 与 内存的速度差异很大,需要靠预读数据至缓存来提升效率。
而缓存以缓存行为单位,每个缓存行对应着一块内存,一般是 64 byte(8 个 long)
缓存的加入会造成数据副本的产生,即同一份数据会缓存在不同核心的缓存行中
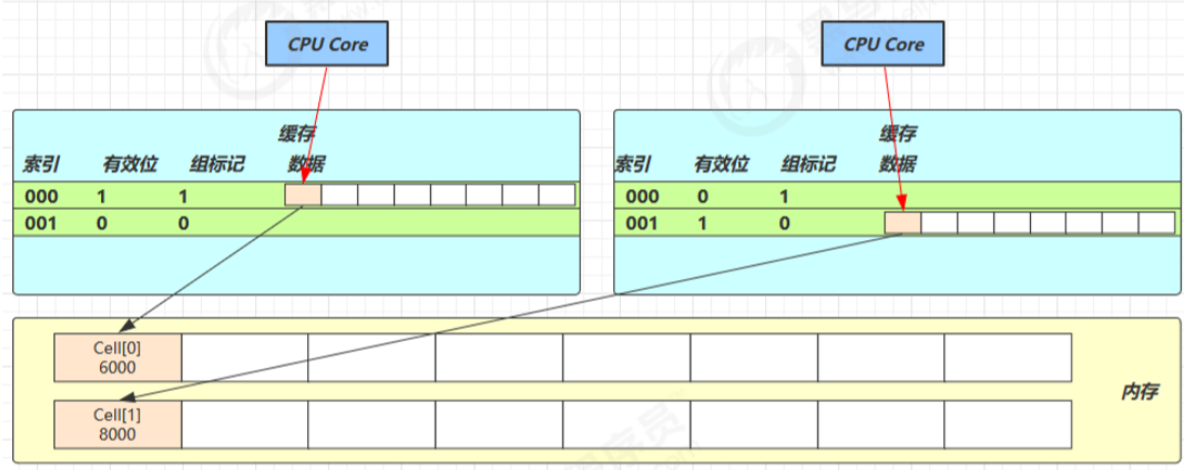
CPU 要保证数据的一致性,如果某个 CPU 核心更改了数据,其它 CPU 核心对应的整个缓存行必须失效
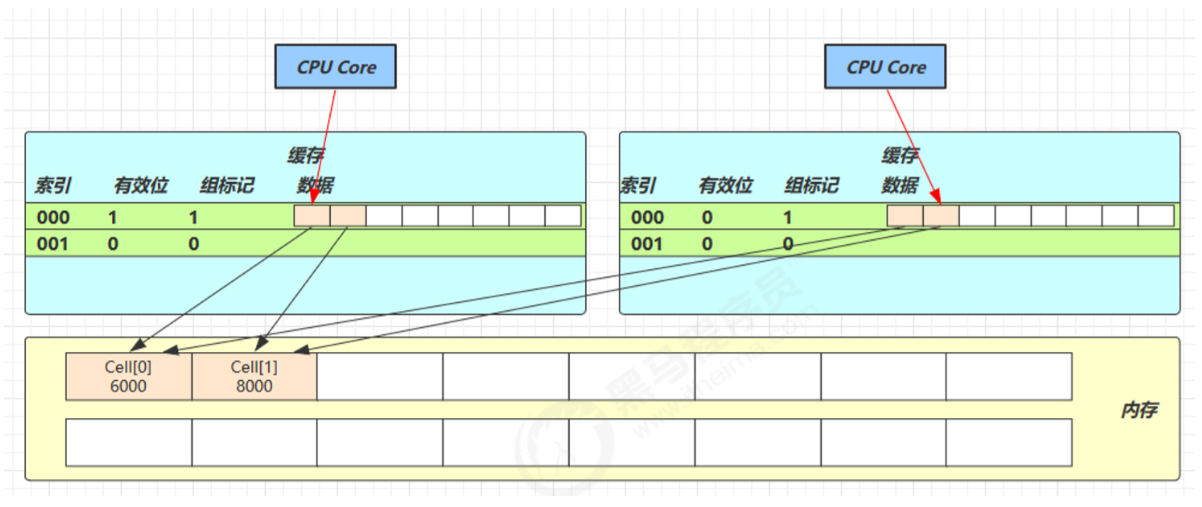
因为 Cell 是数组形式,在内存中是连续存储的,一个 Cell 为 24 字节(16 字节的对象头和 8 字节的 value),因 此缓存行可以存下 2 个的 Cell 对象。这样问题来了:
- Core-0 要修改 Cell[0]
- Core-1 要修改 Cell[1]
无论谁修改成功,都会导致对方 Core 的缓存行失效,
比如 Core-0 中 Cell[0]=6000, Cell[1]=8000 要累加 Cell[0]=6001, Cell[1]=8000 ,这时会让 Core-1 的缓存行失效
@sun.misc.Contended 用来解决这个问题,它的原理是在使用此注解的对象或字段的前后各增加 128 字节大小的 padding(空白),从而让 CPU 将对象预读至缓存时占用不同的缓存行,这样,不会造成对方缓存行的失效
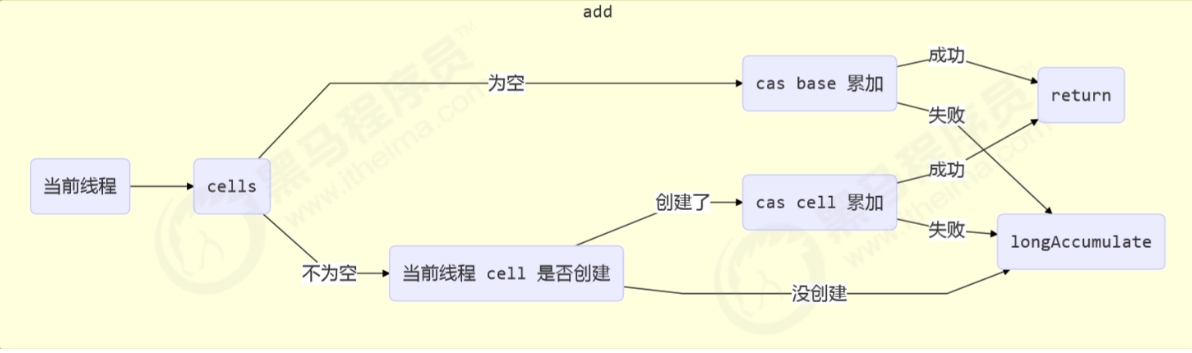
累加主要调用以下方法
public void add(long x) {
       Cell[] as; long b, v; int m; Cell a;
       if ((as = cells) != null || !casBase(b = base, b + x)) {
           boolean uncontended = true;
           if (as == null || (m = as.length - 1) < 0 ||
               (a = as[getProbe() & m]) == null ||
               !(uncontended = a.cas(v = a.value, v + x)))
               longAccumulate(x, null, uncontended);
       }
   }
累加流程图
9、Unsafe
Unsafe 对象提供了非常底层的,操作内存、线程的方法,Unsafe 对象不能直接调用,只能通过反射获得
public class GetUnsafe {
	public static void main(String[] args) throws NoSuchMethodException, IllegalAccessException, InvocationTargetException, InstantiationException, NoSuchFieldException {
		// 通过反射获得Unsafe对象
		Class unsafeClass = Unsafe.class;
		// 获得构造函数,Unsafe的构造函数为私有的
		Constructor constructor = unsafeClass.getDeclaredConstructor();
		// 设置为允许访问私有内容
		constructor.setAccessible(true);
		// 创建Unsafe对象
		Unsafe unsafe = (Unsafe) constructor.newInstance();

		// 创建Person对象
		Person person = new Person();
		// 获得其属性 name 的偏移量
		Field field = Person.class.getDeclaredField("name");
		long offset = unsafe.objectFieldOffset(field);

		// 通过unsafe的CAS操作改变值
		unsafe.compareAndSwapObject(person, offset, null, "Nyima");
		System.out.println(person);
	}
}

class Person {
    // 配合CAS操作,必须用volatile修饰
 	volatile String name;


	@Override
	public String toString() {
		return "Person{" +
				"name='" + name + '\'' +
				'}';
	}
}


 333
333


 被折叠的 条评论
为什么被折叠?
被折叠的 条评论
为什么被折叠?
 到【灌水乐园】发言


