java学习脚印 : 错误列表 Errorlist
写在前面
这是学习或者使用java过程中碰到的错误的一个归纳表,随着实践进行,这个列表将持续更新。
1.Eclipse给出警告“finally block does not complete normally”
可参考 : chh_jiang的专栏 finally块的问题(finally block does not complete normally)。
这里也转载过来:
当finall块中包含return语句时,Eclipse会给出警告“finally block does not complete normally”,原因分析如下:
1、不管try块、catch块中是否有return语句,finally块都会执行。
2、finally块中的return语句会覆盖前面的return语句(try块、catch块中的return语句),所以如果finally块中有return语句,Eclipse编译器会报警告“finally block does not complete normally”。
3、如果finally块中包含了return语句,即使前面的catch块重新抛出了异常,则调用该方法的语句也不会获得catch块重新抛出的异常,而是会得到finally块的返回值,并且不会捕获异常。
结论,应避免在finally块中包含return语句。如果你在前面的语句中包含了return语句或重新抛出了异常,又在finally块中包含了return语句,说明你概念混淆,没有理解finally块的意义。
2.三目条件运算符不能取代一般的if语句
条件表达式不能取代一般的if语句,仅当if语句中内嵌的语句为赋值语句(且两个分支都给同一变量赋值)时才能代替if语句.例如:
if(a%2==0)
printf("even/n");
else
printf("odd/n");
不能写成:
(a%2==0)?printf("even/n"):printf("odd/n");
但可以用下面语句代替:
printf("%s/n",(a%2==0?"even":"odd");
3.Jadclipse 插件安装不出现Jadclipse选项
Jadclipse 是一款反编译插件,可以按照: http://www.mkyong.com/java/java-decompiler-plugin-for-eclipse/ 上的步骤安装,一般可以安装成功。
linux下安装不成功,除了clean参数重启外,可能还有一个原因:权限问题。
将拷贝的jar文件权限修改: sudo chown user: sudo chmod u+x 后可以再试,应该成功了。
4. java不同版本类间序列化出错,java.io.InvalidClassException
例如,错误信息如下,
Exception in thread "main" java.io.InvalidClassException: com.learningjava.Shape; local class incompatible: stream classdesc serialVersionUID = -2375324835839981909, local class serialVersionUID = -2375324835839981999
这是因为对类进行更新后,类之间的版本不兼容造成的,当类之间还有兼容可能性时,可以将更新后的类的序列化号码改为之前类的序列号,即可解决;当然如果更新后的类与之前完全没有兼容性了,这种方法不一定可行。
5. Error loading stylesheet: Parsing an XSLT stylesheet failed.
可能出错原因:
1)没有正确的xsl命名空间,例如xsl书写错误,
xmlns:xsl="http://www.w3.org/1999/xsl/Transform"
应该写为大写的:
xmlns:xsl="http://www.w3.org/1999/XSL/Transform".(XML大小写敏感)
2)xsl代码中出现配对错误,例如没有关闭相应的标签,如没有</xsl:for-each>。
这里推荐xsl一个有力工具,xsltproc,这个工具使用的典型命令如下:
xsltproc -o output.html Note.xsl Note3.xml
可以通过显式的错误信息准确定位,然后排除错误。
ubuntu用户,可到http://www.ubuntuupdates.org/package/core/saucy/main/base/xsltproc下载,其他用户可到相关网站搜索后安装。
另外关于更多使用xsl来样式化xml的工具可以参考:
《Process an XML document using an XSLT stylesheet》 这篇文章,里面有丰富介绍。
6. XML Parsing Error: junk after document element.
xml规定,xml文件必须有一个根元素,一般这个错误是由没有定义根元素引起,例如如下代码:
<?xml version="1.0" encoding="UTF-8"?>
<table>
   <tr>
   <td>Apples</td>
   <td>Bananas</td>
   </tr>
</table>
<table>
   <name>African Coffee Table</name>
   <width>80</width>
   <length>120</length>
</table>
这里解析是把前一个table作为根元素了,因此会提示后一个table以后的代码为垃圾元素。添加一个根元素即可解决问题。
解决这类低级错误的原则就是遵照xml的要求,编写风格良好的xml文档。
xml基本规范:
1)所有 XML 元素都须有关闭标签;
2)XML 标签对大小写敏感;
3)XML 必须正确地嵌套;
4)XML 文档必须有根元素;
5)在 XML 中,一些拥有特殊意义的字符用实体引用来代替;
7.与迭代相关的错误
这里列举两个与迭代相关的错误。
错误类型1: 试图使用不合适的迭代器,在迭代过程中修改元素值。
如下代码示例几种迭代方式,只有一种迭代方式能够在字符串上使用trim方法去掉头部和尾部的空格。
package com.learningjava;

import java.util.*;
/**
 * this program try more ways to traverse a List
 * @author wangdq
 * 2013-11-2
 */
public class CollectionsDemo6 {
	public static void main(String[] args) {
		String[] ads = new String[]{" what ", " you ", " see ", " is ",
				" what " ," you "," get "};
		List<String>  list= Arrays.asList(ads);
		System.out.println("before: "+list);
		TrimList_version3(list);//change version to observe result
		System.out.println("after:  "+list);
	}

	//version1 not work
	//Limitations: cannot be used to add, remove, or modify elements.
	public static void TrimList_version1 (List<String> list) {
		for(String s:list) {
			// change to the temporary variable
			// will not affect the value in the container
			s = s.trim();
		}
	}
	//version2 not work
	//Limitations: cannot be used to modify elements.
	public static void TrimList_version2 (List<String> list) {
		for(Iterator<String> it = list.iterator();it.hasNext();) {
			it.next().trim();
		}
	}
	//version3 work
	//Limitations: none.
	public static void TrimList_version3 (List<String> list) {
		for(ListIterator<String> listIt = list.listIterator();listIt.hasNext();) {
			listIt.set(listIt.next().trim());
		}
	}

}
只有方式三,输出结果去除了字符串头部和尾部的空格如下:
before: [ what , you , see , is , what , you , get ]
after: [what, you, see, is, what, you, get]
其他两种方式视图修改局部变量,来达到修改列表中字符串的目的是行不通的。
错误类型2 :迭代过程中涉及到动态修改操作,导致数据变化,静态的迭代方式引起错误。
例如,我们想去除简单XML DOM 树中的空白字符结点,有如下方法:
//This code will not work to remove whitespace text node
public static int removeWhiteSpaceTextElement_failed(Node node) {

	int count = 0;
	if(node == null)
		return 0;
	System.out.println("visting :"+node.getNodeName());
	if(node.getNodeType() == Node.ELEMENT_NODE)
	{
		NodeList childList = node.getChildNodes();
		//iterate childList
        //here we can not guarantee the node order after remove element
		//so this incur errors
		for(int ix = 0;ix<childList.getLength();ix++) {
			count += removeWhiteSpaceTextElement_failed(childList.item(ix));
		}
	} else if(node.getNodeType() == Node.TEXT_NODE) {
		Text textNode = (Text)node;
		String data = textNode.getData().trim();
		if(data.isEmpty()) {
			//remove whitespace textNode
			//System.out.println("remove "+textNode.getNodeName());
			textNode.getParentNode().removeChild(textNode);
			count++;
		}
	}
	return count;
}
根据XML DOM规范,NodeList对象将保持自身的动态更新,也就是说删除结点后会反映到它的数据结构上。在这段代码中,迭代过程中如果删除了结点,却仍然继续使用先前保存的索引,那么就会引用到错误的结点上,导致该方法失效。
下面是改进的代码:
 /**
     * remove whitespace textnode
     * note,here we only consider the  ELEMENT_NODE and TEXT_NODE
     * @param node the node needed to purify by removing whitespace textnode
     * @return the nums of whitespace textnode that had been removed
     */
    public static int removeWhiteSpaceTextElement(Node node) {

    	int count = 0;
    	if(node == null)
    		return 0;
    	//System.out.println("visting :"+node.getNodeName());
		if(node.getNodeType() == Node.ELEMENT_NODE)
		{
			//iterate child node
			for(Node childNode = node.getFirstChild(); childNode!=null;){
			    Node nextChild = childNode.getNextSibling();
			    // Do something with childNode, including move or delete...
			    count += removeWhiteSpaceTextElement(childNode);
			    childNode = nextChild;
			}
		} else if(node.getNodeType() == Node.TEXT_NODE) {
			Text textNode = (Text)node;
			String data = textNode.getData().trim();
			if(data.isEmpty()) {
				//remove whitespace textNode
				//System.out.println("remove "+textNode.getNodeName());
				textNode.getParentNode().removeChild(textNode);
				count++;
			}
		}
		return count;
    }
这两种与迭代相关的错误,值得我们思考。什么时候使用哪种迭代方式要灵活运用。
8.与刷新缓冲区相关的错误
在操作文件时,使用带有缓冲的输出器,例如PrintWriter,即是没有调用flush或者传递给构造函数autoflush以true标志的话,文件也还是保存了,控制台还是输出了内容,例如如下代码:
PrintWriter filewriter = new PrintWriter(new FileOutputStream("1.txt"));
			filewriter.println("Hello! Enter BYE to exit.");
			filewriter.close();//will flush the buffer

			PrintWriter consolewriter = new PrintWriter(System.out);
			consolewriter.println("Hello! Enter BYE to exit.");
			consolewriter.close();//will flush the buffer
这里,我们依赖了close()方法刷新缓冲区的特性,如果你去掉close()方法调用,然后退出程序,在我的ubuntu系统中文件就没有写入任何东西,控制台也没有输出任何内容。
我们要注意缓冲区刷新问题,不要依赖于close()的刷新特性,因为有时候需要在关闭流之前就看到输出内容,尤其在网络应用程序中。
例如,编写一个最简单的EchoServer程序,它用来回显客户端的输入内容,关键语句如下:
                        //create ServerSocket
			ServerSocket server = new ServerSocket(8100);
			//wait until a client connect to this port
			Socket incoming = server.accept();
			System.out.println("connection success.");
			//get i/o stream
			InputStream in = incoming.getInputStream();
			OutputStream out = incoming.getOutputStream();
			Scanner input = new Scanner(in);
			//attention,here we have to set autoflush
			PrintWriter writer = new PrintWriter(out,true);
			writer.println("Hello! Enter BYE to exit.");
			boolean done = false;
			while(!done && input.hasNextLine()) {
				String line = input.nextLine();
				//echo the what the client say
				writer.println("echo: "+line);
				if(line.trim().toUpperCase().equals("BYE")) {
					done = true;
				}
			}
这里,如果没有向PrintWriter传递自动刷新的true值或者没有调用flush()方法,那么客户端输入内容后,将始终无法看到任何回显内容。
9. java.lang.UnsatisfiedLinkError: no HelloNative in java.library.path
使用java本地方法时没有找到共享库时会提示此错误。
解决方法:
1) 将当前目录添加到系统库路径中去,执行命令:
export LD_LIBRARY_PATH=.:$LD_LIBRARY_PATH
或
2)设置java.library.path属性:
java -Djava.library.path=. HelloNativeTest
可参考: http://www.cnblogs.com/lovesaber/archive/2013/04/01/2993375.html
10. exception in thread main java.lang.NoClassDefFoundError wrong name
可参见 http://blog.csdn.net/xifeijian/article/details/8831916 .
11.Exception in thread "main" java.util.MissingResourceException: Can't find bundle for base name MessagesBundle, locale en_US
编译运行java tutorial 上国际化第一个程序,其中定位包的代码如下:
messages = ResourceBundle.getBundle("MessagesBundle",currentLocale);
简单来说就是定位语言包失败,值得注意地地方如下:
1)在使用基名的时候,特别要注意给出完整的类名(或者路径名)。
2)MessagesBundle指的基名,现在有四个文件
MessagesBundle.propertiesMessagesBundle_de_DE.propertiesMessagesBundle_en_US.propertiesMessagesBundle_fr_FR.properties
这里的MessagesBundle可能的解决方法:
1)将几个propertires文件放置在src第一层目录下,如果编译错误,可能就是eclipse没有实现自动复制功能,我遇到的情况就是这种,可以到[preference]--->[java]--->[complier]-->[Building]里面选择[Restore Defaults]可能修复自动复制功能(这个查了好久,暂时我没找到更权威的方法)。
2)在src同级建立resource之类的文件夹,然后将几个propertires放进去,同时刷新工程,
[Properties]--->[java build path]--->[source]--[Add folder]将resource文件夹作为资源添加进来,之后eclipse就会自动复制到bin目录下了,可以正常工作。
3)使用jar访问资源。
创建一个和src同级的目录resource,并把几个propertires放进去,访问资源的代码书写为:
Locale currentLocale = new Locale(language, country);

  ResourceBundle messages =
    ResourceBundle.getBundle("resource.MessagesBundle",currentLocale);

  System.out.println(messages.getString("greetings"));
  System.out.println(messages.getString("inquiry"));
  System.out.println(messages.getString("farewell"));
注意这里要加用resource.MessageBundle来作为路径访问,注意这个参数的意义:
baseName - the base name of the resource bundle, a fully qualified class name .
运行如下:
D:\>java -jar Sample.jar zh CN
你好.
你好吗?
再见.
12.java 国际化 中文乱码
存储语言的属性文件都是ascii码文件,如果需要保存unicode字符文件到属性文件中,那么需要用\uxxxx编码方式进行编码。java提供native2ascii工具来实现,例如java tutorial中的那个Quick Example中添加中文资源文件,然后进行转化如下图所示:
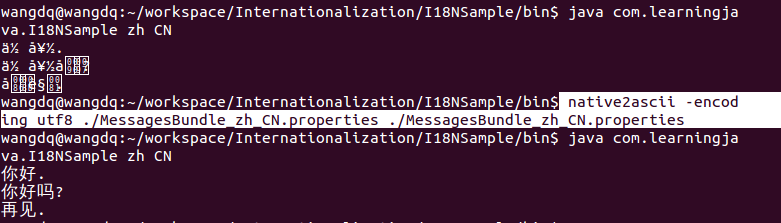
转换后即可正常显式中文了。
13 . the import javax.servlet cannot be resolved
解决办法:这个错误是因为没有servlet-api.jar这个包,将这个包导入项目里面就可以了。
那么这个包一般到那里去找呢?我们可以到tomcat的lib目录下面找到这个包
在eclipse中,右击项目 properties,选择java Build Path>Libraries>Add External JARS,
找到你计算机中的tomcat的安装路径,在common\lib文件夹下,选中"servlet-api.jar",
添加点击“确定”,ok.
(转载自: 51cto sjg11 的BLOG http://10000001.blog.51cto.com/4600383/1248361)
14 . tomcat 7 in eclipse kepler版本,安装tomcat后工具栏上可以显示tomcat启动关闭图标,但是创建服务器时,无选项框,无法创建server.
解决办法:
If you did not install the package Eclipse IDE for Java EE Developers so you have to make sure that you install the plug-in "JST Server Adapters Extensions".
To do so, go to Help->Install New Software... and select the"Kepler" repository. Then expand "Web, XML, Java EE and OSGi Enterprise Development" and check the box for "JST Server Adapters Extensions". Click "Finish", accept, install and restart. Now you should be able to add the new server like you're used to.(来自:http://stackoverflow.com/questions/17983453/running-tomcat-with-eclipse-kepler)
15. maven no main manifest attribute, in My App-1.0-SNAPSHOT.jar
解决办法:
Open your pom.xml and add the section listed:
<build>
   <plugins>
      <plugin>
          <artifactId>maven-assembly-plugin</artifactId>
          <configuration>
          <archive>
               <manifest>
                    <mainClass>fully.qualified.MainClass</mainClass>
               </manifest>
          </archive>
     <descriptorRefs>
          <descriptorRef>jar-with-dependencies</descriptorRef>
      </descriptorRefs>
 </configuration>
</plugin>
</plugins>
</build>
This goes after the URL tag, but before the dependencies tag.
After this, run the following maven command:
mvn clean compile assembly:single
This will output a jar-with-dependencies.jar file in your target\ directory.
或者是加上:
<build>
        <plugins>
                <plugin>
                        <groupId>org.apache.maven.plugins</groupId>
                        <artifactId>maven-jar-plugin</artifactId>
                        <configuration>
                                <archive>
                                        <manifest>
                                                <mainClass>com.dan.pimidi.App</mainClass>
                                        </manifest>
                                </archive>
                        </configuration>
                </plugin>
        </plugins>
</build>
16. Access restriction on required library jdk 7/jre/lib/rt.jar
解决方法: from http://stackoverflow.com/questions/860187/access-restriction-on-class-due-to-restriction-on-required-library-rt-jar
There's another solution that also works. I found it on this forum:
- Go to the Build Path settings in the project properties.
- Remove the JRE System Library
- Add it back; Select "Add Library" and select the JRE System Library. The default worked for me.
This works because you have multiple classes in different jar files. Removing and re-adding the jre lib will make the right classes be first.If you want a fundamental solution make sure you exclude the jar files with the same classes.
for me i have: javax.xml.soap.SOAPPart in 3 different jars: axis-saaj-1.4.jar saaj-api-1.3.jar and the rt.jar
17.将eclipse项目源文件导入maven project后出现 @override出现must override a superclass method异常
解决方法: from http://www.myexception.cn/eclipse/792928.html
1.在maven配置文件pom.xml中添加
<span style="font-size:14px;"><plugin>
  <groupId>org.apache.maven.plugins</groupId>
  <artifactId>maven-compiler-plugin</artifactId>
  <version>2.1</version>
  <configuration>
    <source>1.6</source>
    <target>1.6</target>
  </configuration>
</plugin></span>
2.同时为了稳定起见修改eclipse配置window->preferences->Java->Compiler中的Compiler compliance level修改为1.6或以上(目前1.6是最高版本)
3.相信在eclipse中使用maven的人都装了m2eclipse插件,在项目上右击选择maven-> Update Project Configuration。
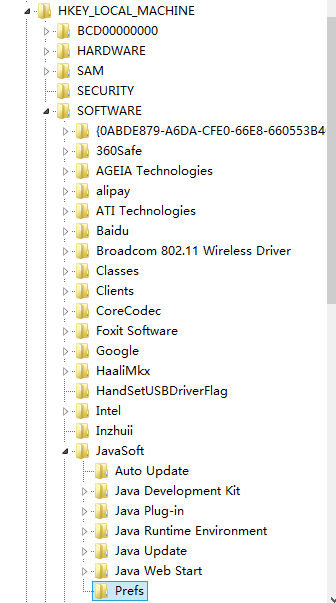
18 java.util.prefs.WindowsPreferences <init>
警告: Could not open/create prefs root node Software\JavaSoft\Prefs at root 0x80000002. Windows RegCreateKeyEx(...) returned error code 5.
在windows下创建程序偏好设置注册表项目时出错,解决方法:
打开注册表,找到 HKEY_LOCAL_MACHINE\Software\JavaSoft条目,然后新建Prefs键即可解决,如下图所示:
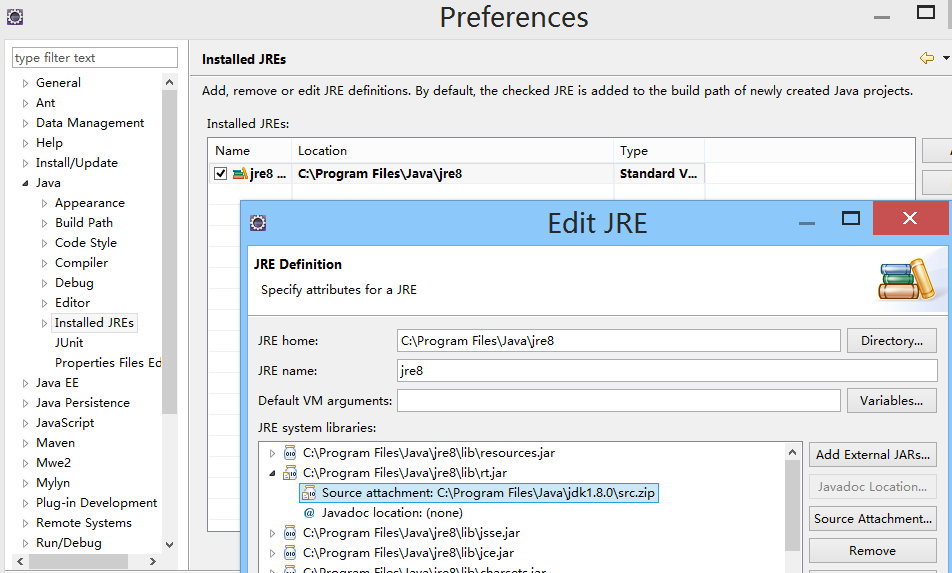
19. The JAR file "C:\Program Files\Java\jre6\jdk-6u14-fcs-src-b08-jrl-21_may_2009.jar"
has no source attachment.
使用eclipse环境开发时,无法获取源代码帮助信息,解决方法:
选择 Windows -> Preferences -> Java -> Installed JREs , 编辑jre项目,展开 rt.jar, 选择“Source attachment” and添加你的磁盘上src.zip 文件路径,如下图所示:
20.Exception in thread "AWT-EventQueue-0" java.util.ConcurrentModificationException
at java.util.ArrayList$Itr.checkForComodification(Unknown Source)
at java.util.ArrayList$Itr.next(Unknown Source)
错误原因: 在创建线性表的迭代器之后,修改了线性表,同时利用之前的迭代器继续迭代表的话则产生这种错误。可参考:stackoverflow.
The iterators returned by this ArrayList's iterator and listIterator methods are fail-fast: if the list is structurally modified at any time after the iterator is created, in any way except through the iterator's own remove or add methods, the iterator will throw a ConcurrentModificationException. Thus, in the face of concurrent modification, the iterator fails quickly and cleanly, rather than risking arbitrary, non-deterministic behavior at an undetermined time in the future.
典型错误:
Iterator<String> lir = al.iterator(); // Iterator created

while (lir.hasNext())
    System.out.println(lir.next());
al.add(2, "inserted"); // List is modified here
while (lir.hasNext())
    System.out.println(lir.next());// Again it try to access list
此时产生错误,可以再修改表后重新获取迭代器以避免此错误:
...
al.add(2, "inserted");
lir = al.iterator();
while (lir.hasNext())
    System.out.println(lir.next());
21 : javax.xml.bind.UnmarshalException: 意外的元素 (uri:"", local:"metadata")。所需元素为(none)
javax.xml.bind.MarshalException missing an @XmlRootElement annotation
解决办法:
使用xsd文档,利用xjc编译生成的java类中会产生一个ObjectFactory,而并没有给根元素添加@XmlRootElement的注解,因此产生这之类的错误。
解决办法就是利用ObjectFactory的JAXBElement来进行java object的解压和封装,例如MetaData类产生的ObjectFactory如下:
@XmlElementDecl(namespace = "", name = "metadata")
    public JAXBElement<Metadata> createMetadata(Metadata value) {
        return new JAXBElement<Metadata>(_Metadata_QNAME, Metadata.class, null, value);
    }
那么可以这样进行解压和封装:
ObjectFactory of = new ObjectFactory();
Metadata meta  = of.createMetadata();
//set attribute of meta ...
File file = new File("D:\\metadata.xml");
//marshal
JAXBContext context = JAXBContext.newInstance(ObjectFactory.class);
Marshaller marshaller = context.createMarshaller();
marshaller.setProperty(Marshaller.JAXB_FORMATTED_OUTPUT, Boolean.TRUE);
marshaller.marshal(of.createMetadata(meta), file);
//unmarshall
@SuppressWarnings("unchecked")
JAXBElement<Metadata> metaWrapper = (JAXBElement<Metadata>)context.createUnmarshaller().unmarshal(file);
System.out.println(metaWrapper.getValue());
22. java UTF-8 windows上乱码
问题描述: 从SO上查看一段从文件读取内容,并转换为字符串的函数,定义如下:
 public static String getStringFromFile(Class<?> cls,String path) {
    	InputStream is =  getInputStream(cls,path);
    	if(is == null) return "";
    	Scanner scanner = new Scanner(is);
    	scanner.useDelimiter("\\A");
	    String content = scanner.hasNext() ? scanner.next() : "";
	    scanner.close();
	    return content;
    }
可是Windows上 读取utf8格式编码的文件时出现乱码如下图所示:

第一个字节竟然出现乱码,很疑惑。
使用Windows的童鞋要特别注意
这篇博客,提到windows上utf8编码可能带有标识符,应该编码为utf-8 withour BOM,比较二者区别如下:

所以这里出现乱码,竟然归结为windows记事本的utf-8编码,多了一个BOM。
解决办法: 将文件存为utf-8 without BOM格式。
23. 添加jar的API Doc
以JavaFX为例。
You can configure the Javadocs with downloading jar, basically javadocs will be referred directly from internet.
Complete steps:
- Open the Build Path page of the project (right click, properties,Java build path).
- Open the Libraries tab.
- Expand the node of the library in question (JavaFX).
- Select JavaDoc location and click edit.
- Enter the location to the file which contains the Javadoc.Specifically for the javaFX javadoc enterhttp://docs.oracle.com/javafx/2.0/api/
for offline javadocs, you can download from : http://www.oracle.com/technetwork/java/javase/documentation/java-se-7-doc-download-435117.html
After clicking Accept License Agreement you can download *javafx-2_2_0-apidocs.zip*
24.stanford Protege 4.3 ERROR: Bundle org.protege.common
使用stanford protege4.3 具体错误:
ERROR: Bundle org.protege.common [1] Error starting file:/home/xxx/Protege_4.3/bundles/org.protege.common.jar (org.osgi.framework.BundleException: Unresolved constraint in bundle org.protege.common [1]: Unable to resolve 1.0: missing requirement [1.0] osgi.wiring.package; (&(osgi.wiring.package=org.w3c.dom)(version>=0.0.0)))
....
解决办法:
1)下载最新版本的felix.jar 文件,2015年3月我上的网站是: http://mirror.bit.edu.cn/apache//felix/org.apache.felix.main.distribution-4.6.1.tar.gz
2)将下载的felix.jar替换/Protege_4.3/bin/目录下的同名文件,重新启动protege4.3即可.
参考自: Protégé 4.1 startup fails under Java 7...here is a workaround.


 2万+
2万+


 被折叠的 条评论
为什么被折叠?
被折叠的 条评论
为什么被折叠?
 到【灌水乐园】发言


