


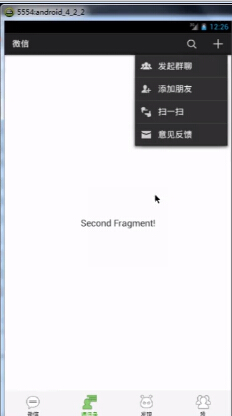
原文地址:微信6.0主界面
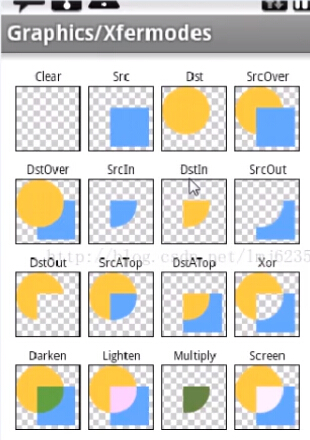
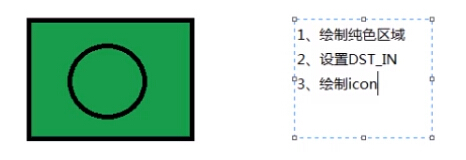
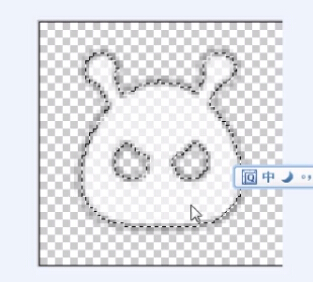
一、关于滑动时下面图标颜色的渐变Xfermodes:
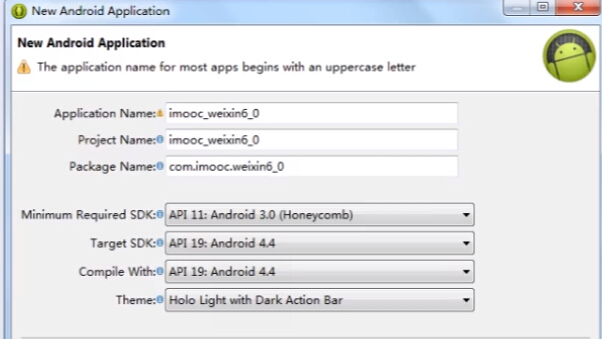
一、创建工程
因为Actionbar出现在Android3.0之后,所以:
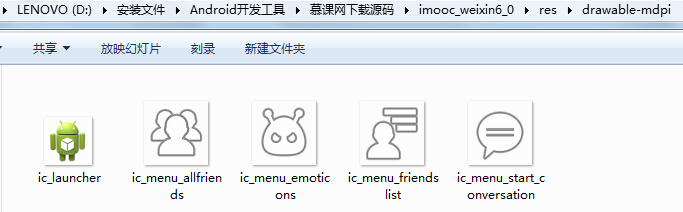
我们的图片资源:
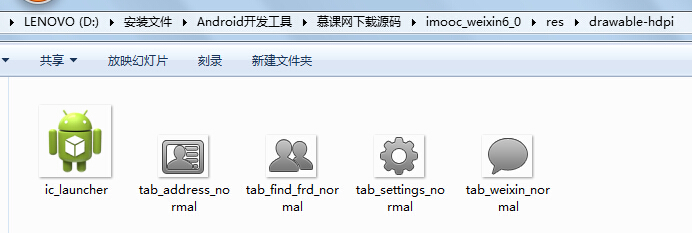
最下面的四个:
右上角的几个:

然后在values文件夹下的string.xml中设置:
<?xml version="1.0" encoding="utf-8"?>
<resources>

    <string name="app_name">微信</string>
    <string name="action_search">查找</string>
    <string name="action_add">添加</string>
    <string name="menu_group_chat">发起群聊</string>
    <string name="menu_feedback">意见反馈</string>
    <string name="menu_addfriend">添加朋友</string>
    <string name="menu_scan">扫一扫</string>
    <string name="tab_contact">通讯录</string>
    <string name="tab_found">发现</string>
    <string name="tab_me">我</string>

</resources>
二、制作全新的TitleBar
<menu xmlns:android="http://schemas.android.com/apk/res/android" >

    <item
        android:id="@+id/action_search"
        android:actionViewClass="android.widget.SearchView"
        android:icon="@drawable/actionbar_search_icon"
        android:showAsAction="ifRoom|collapseActionView"
        android:title="@string/action_search"/>

    <item
        android:id="@+id/action_group_chat"
        android:icon="@drawable/menu_group_chat_icon"
        android:title="@string/menu_group_chat"/>
    <item
        android:id="@+id/action_add_friend"
        android:icon="@drawable/menu_add_icon"
        android:title="@string/menu_addfriend"/>
    <item
        android:id="@+id/action_scan"
        android:icon="@drawable/men_scan_icon"
        android:title="@string/menu_scan"/>
    <item
        android:id="@+id/action_feedback"
        android:icon="@drawable/menu_feedback_icon"
        android:title="@string/menu_feedback"/>

</menu>
注意点一:在第一个item中有android.widget.SearchView,自己去找一下详细的介绍。
注意点二:在Android项目中默认的右上角只会有一个放大镜的搜索的小按钮,并不会出现加好+的那个按钮。看下图为默认:看<application>下的theme属性:
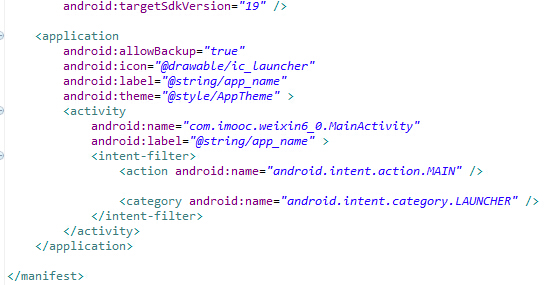
当我们【ctrl+左键】进入AppTheme这个主题后:会进入res/values/styles.xml文件:
<resources>

    <!--
        Base application theme, dependent on API level. This theme is replaced
        by AppBaseTheme from res/values-vXX/styles.xml on newer devices.
    -->
    <style name="AppBaseTheme" parent="android:Theme.Light">
        <!--
            Theme customizations available in newer API levels can go in
            res/values-vXX/styles.xml, while customizations related to
            backward-compatibility can go here.
        -->
    </style>

    <!-- Application theme. -->
    <style name="AppTheme" parent="AppBaseTheme">
        <!-- All customizations that are NOT specific to a particular API-level can go here. -->
    </style>

</resources>然后我们就自定义了其中的一些东西:
<resources xmlns:android="http://schemas.android.com/apk/res/android">

    <!--
        Base application theme for API 14+. This theme completely replaces
        AppBaseTheme from BOTH res/values/styles.xml and
        res/values-v11/styles.xml on API 14+ devices.

    -->
    <style name="AppBaseTheme" parent="android:Theme.Holo.Light.DarkActionBar">

        <!-- API 14 theme customizations(自定义) can go here. -->
        <item name="android:actionOverflowButtonStyle">@style/weixinActionOverflowButtonStyle</item>
    </style>

    <style name="weixinActionOverflowButtonStyle">
        <item name="android:src">@drawable/actionbar_add_icon</item>
    </style>

</resources>我们去MainActivity中写,然后让系统强制显示:
	@Override
	public boolean onCreateOptionsMenu(Menu menu)
	{
		getMenuInflater().inflate(R.menu.main, menu);
		return true;
	}

	/**
	 * 强制让系统显示右上角的加号。
	 * 当然这样少不了values-v14里面的设置啦
	 */
	private void setOverflowButtonAlways()
	{
		try
		{
			// 设置的原理是将sHasPermanentMenuKey这个MenuKey设置为false
			ViewConfiguration config = ViewConfiguration.get(this);
			Field menuKey = ViewConfiguration.class
					.getDeclaredField("sHasPermanentMenuKey");
			menuKey.setAccessible(true);
			menuKey.setBoolean(config, false);
		} catch (Exception e)
		{
			e.printStackTrace();
		}
	}

	/**
	 * 设置menu显示icon
	 */
	@Override
	public boolean onMenuOpened(int featureId, Menu menu)
	{

		if (featureId == Window.FEATURE_ACTION_BAR && menu != null)
		{
			if (menu.getClass().getSimpleName().equals("MenuBuilder"))
			{
				try
				{
					Method m = menu.getClass().getDeclaredMethod(
							"setOptionalIconsVisible", Boolean.TYPE);
					m.setAccessible(true);
					m.invoke(menu, true);
				} catch (Exception e)
				{
					e.printStackTrace();
				}
			}
		}

		return super.onMenuOpened(featureId, menu);
} setOverflowButtonAlways();
getActionBar().setDisplayShowHomeEnabled(false);
注意点一:对于ViewPager,首先注意它的包,【ctrl+shift+K】去找一下ViewPager,然后去它的源码找一下包名吧。
注意点二:代码中ViewPager的height为0dp,LinearLayout的height为60dp,同时设置ViewPager的weight为1,这样就代表着整个页面高度减去0dp,减去60dp,剩下的都是内容的高度了。
<LinearLayout xmlns:android="http://schemas.android.com/apk/res/android"
xmlns:tools="http://schemas.android.com/tools"
xmlns:hyman="http://schemas.android.com/apk/res/com.imooc.weixin6_0"
android:layout_width="match_parent"
android:layout_height="match_parent"
android:orientation="vertical" >
<android.support.v4.view.ViewPager
android:id="@+id/id_viewpager"
android:layout_width="match_parent"
android:layout_height="0dp"
android:layout_weight="1" >
</android.support.v4.view.ViewPager>
<LinearLayout
android:layout_width="match_parent"
android:layout_height="60dp"
android:background="@drawable/tab_bg"
android:orientation="horizontal" >
<com.imooc.weixin6_0.ChangeColorIconWithText
android:id="@+id/id_indicator_one"
android:layout_width="0dp"
android:layout_height="fill_parent"
android:layout_weight="1"
android:padding="5dp"
hyman:icon="@drawable/ic_menu_start_conversation"
hyman:text="@string/app_name"
hyman:text_size="12sp"
hyman:color="#ff45c01a" />
<com.imooc.weixin6_0.ChangeColorIconWithText
android:id="@+id/id_indicator_two"
android:layout_width="0dp"
android:layout_height="fill_parent"
android:layout_weight="1"
android:padding="5dp"
hyman:icon="@drawable/ic_menu_friendslist"
hyman:text="@string/tab_contact"
hyman:text_size="12sp"
hyman:color="#ff45c01a" />
<com.imooc.weixin6_0.ChangeColorIconWithText
android:id="@+id/id_indicator_three"
android:layout_width="0dp"
android:layout_height="fill_parent"
android:layout_weight="1"
android:padding="5dp"
hyman:icon="@drawable/ic_menu_emoticons"
hyman:text="@string/tab_found"
hyman:text_size="12sp"
hyman:color="#ff45c01a" />
<com.imooc.weixin6_0.ChangeColorIconWithText
android:id="@+id/id_indicator_four"
android:layout_width="0dp"
android:layout_height="fill_parent"
android:layout_weight="1"
android:padding="5dp"
hyman:icon="@drawable/ic_menu_allfriends"
hyman:text="@string/tab_me"
hyman:text_size="12sp"
hyman:color="#ff45c01a" />
</LinearLayout>
</LinearLayout><?xml version="1.0" encoding="utf-8"?>
<shape xmlns:android="http://schemas.android.com/apk/res/android" >
<stroke
android:width="1dp"
android:color="#eee" />
<solid android:color="#f7f7f7" />
</shape>
package com.imooc.weixin6_0;
import android.graphics.Color;
import android.os.Bundle;
import android.support.v4.app.Fragment;
import android.view.Gravity;
import android.view.LayoutInflater;
import android.view.View;
import android.view.ViewGroup;
import android.widget.TextView;
/**
* 显示外部传来title的view,就是整个页面中间的部分,把传来的title内容显示出来。
* @author hanxiao
*
*/
public class TabFragment extends Fragment
{
private String mTitle = "Default";
public static final String TITLE = "title";
/**
*
*/
@Override
public View onCreateView(LayoutInflater inflater, ViewGroup container,
Bundle savedInstanceState)
{
// getArguments这个一定是Fragment它自带的啦,对应的还有setArguments
if (getArguments() != null)
{
mTitle = getArguments().getString(TITLE);
}
TextView tv = new TextView(getActivity());
tv.setTextSize(20);
// 白色
tv.setBackgroundColor(Color.parseColor("#ffffffff"));
tv.setText(mTitle);
tv.setGravity(Gravity.CENTER);
return tv;
}
}
public class MainActivity extends FragmentActivity implements OnClickListener,
OnPageChangeListener
{
private ViewPager mViewPager;
// 对应下面的四个小图标中间会有四个页面的显示,每个页面都是一个Fragment。
private List<Fragment> mTabs = new ArrayList<Fragment>();
private String[] mTitles = new String[]
{ "First Fragment !", "Second Fragment !", "Third Fragment !",
"Fourth Fragment !" };
private FragmentPagerAdapter mAdapter;
private List<ChangeColorIconWithText> mTabIndicators = new ArrayList<ChangeColorIconWithText>();
@Override
protected void onCreate(Bundle savedInstanceState)
{
super.onCreate(savedInstanceState);
setContentView(R.layout.activity_main);
		setOverflowButtonAlways();
		getActionBar().setDisplayShowHomeEnabled(false);
// 初始化VIew:
initView();
// 初始化数据:
initDatas();
mViewPager.setAdapter(mAdapter);
initEvent();
}
/**
* 初始化数据:
*/
private void initDatas()
{
for (String title : mTitles)
{
TabFragment tabFragment = new TabFragment();
Bundle bundle = new Bundle();
bundle.putString(TabFragment.TITLE, title);
// 与TabFragment中的代码对应上了
tabFragment.setArguments(bundle);
// 还可以这样添加:
mTabs.add(tabFragment);
}
mAdapter = new FragmentPagerAdapter(getSupportFragmentManager())
{
@Override
public int getCount()
{
return mTabs.size();
}
@Override
public Fragment getItem(int position)
{
return mTabs.get(position);
}
};
}
/**
* 初始化VIew:
*/
private void initView()
{
mViewPager = (ViewPager) findViewById(R.id.id_viewpager);
}四、自定义下面每个小框的View
1、attr.xml:

<?xml version="1.0" encoding="utf-8"?>
<resources>
<attr name="icon" format="reference"></attr>
<attr name="color" format="color"></attr>
<attr name="text" format="string"></attr>
<attr name="text_size" format="dimension"></attr>
<declare-styleable name="ChangeColorIconWithText">
<attr name="icon"></attr>
<attr name="color"></attr>
<attr name="text"></attr>
<attr name="text_size"></attr>
</declare-styleable>
</resources>2、布局文件中使用:
<LinearLayout xmlns:android="http://schemas.android.com/apk/res/android"
    xmlns:tools="http://schemas.android.com/tools"
    xmlns:hyman="http://schemas.android.com/apk/res/com.imooc.weixin6_0"
    android:layout_width="match_parent"
    android:layout_height="match_parent"
    android:orientation="vertical" >

    <android.support.v4.view.ViewPager
        android:id="@+id/id_viewpager"
        android:layout_width="match_parent"
        android:layout_height="0dp"
        android:layout_weight="1" >
    </android.support.v4.view.ViewPager>

    <LinearLayout
        android:layout_width="match_parent"
        android:layout_height="60dp"
        android:background="@drawable/tab_bg"
        android:orientation="horizontal" >

        <com.imooc.weixin6_0.ChangeColorIconWithText
            android:id="@+id/id_indicator_one"
            android:layout_width="0dp"
            android:layout_height="fill_parent"
            android:layout_weight="1"
            android:padding="5dp"
            hyman:icon="@drawable/ic_menu_start_conversation"
            hyman:text="@string/app_name"
            hyman:text_size="12sp"
            hyman:color="#ff45c01a" />

        <com.imooc.weixin6_0.ChangeColorIconWithText
            android:id="@+id/id_indicator_two"
            android:layout_width="0dp"
            android:layout_height="fill_parent"
            android:layout_weight="1"
            android:padding="5dp"
            hyman:icon="@drawable/ic_menu_friendslist"
            hyman:text="@string/tab_contact"
            hyman:text_size="12sp"
            hyman:color="#ff45c01a" />

        <com.imooc.weixin6_0.ChangeColorIconWithText
            android:id="@+id/id_indicator_three"
            android:layout_width="0dp"
            android:layout_height="fill_parent"
            android:layout_weight="1"
            android:padding="5dp"
            hyman:icon="@drawable/ic_menu_emoticons"
            hyman:text="@string/tab_found"
            hyman:text_size="12sp"
            hyman:color="#ff45c01a" />

        <com.imooc.weixin6_0.ChangeColorIconWithText
            android:id="@+id/id_indicator_four"
            android:layout_width="0dp"
            android:layout_height="fill_parent"
            android:layout_weight="1"
            android:padding="5dp"
            hyman:icon="@drawable/ic_menu_allfriends"
            hyman:text="@string/tab_me"
            hyman:text_size="12sp"
            hyman:color="#ff45c01a" />
    </LinearLayout>

</LinearLayout>注意点二:<com.imooc.weixin6_0.ChangeColorIconWithText>
注意点三:attr中属性的使用:
            hyman:icon="@drawable/ic_menu_start_conversation"
            hyman:text="@string/app_name"
            hyman:text_size="12sp"
            hyman:color="#ff45c01a"
3、构造方法中获取自定义属性:


 5075
5075

 被折叠的 条评论
为什么被折叠?
被折叠的 条评论
为什么被折叠?
 到【灌水乐园】发言


