


 本文介绍了FacebookResearch的DiT模型,其使用Transformer实现可扩展的扩散模型,涵盖了采样过程、预训练和自定义模型的使用,以及训练脚本的详细说明,包括FID和InceptionScore的评估方法。
论文翻译
Scalable Diffusion Models with Transformers-CSDN博客
实验指标
1 可视化展示(x increasing transformer size | y decreasing patch size)
2 Transformer Gflops
Training Compute (Gflops)
4 FID IS Precision Recalls (256x256 512x512)
5 sampling-up compute (Gflops)
github使用说明
一、采样过程samlpe
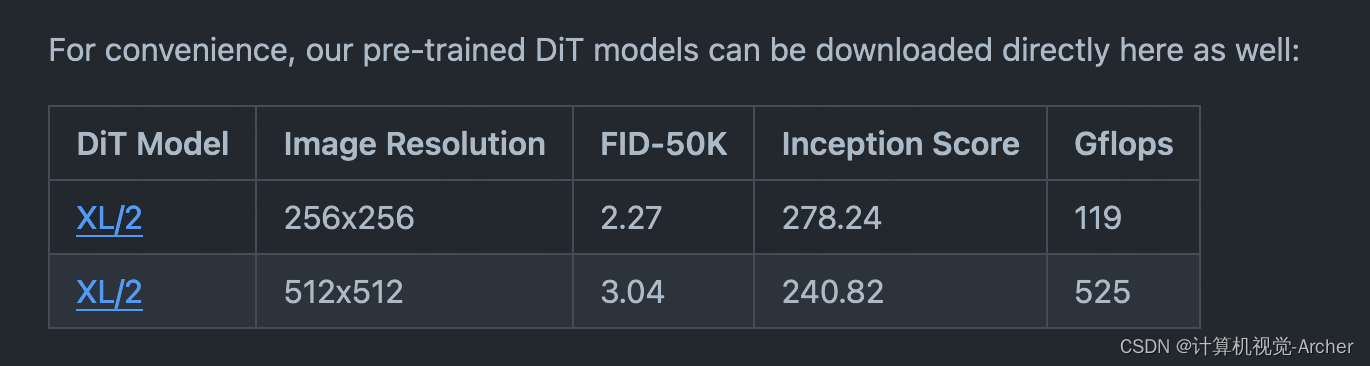
Pre-trained DiT checkpoints. You can sample from our pre-trained DiT models with sample.py. Weights for our pre-trained DiT model will be automatically downloaded depending on the model you use. The script has various arguments to switch between the 256x256 and 512x512 models, adjust sampling steps, change the classifier-free guidance scale, etc. For example, to sample from our 512x512 DiT-XL/2 model, you can use:
重新训练DiT检查点。
您可以使用sample.py从我们预训练的DiT模型中进行抽样。
我们预训练的DiT模型的权重将根据您使用的模型自动下载。
该脚本具有各种参数,用于在256x256和512x512模型之间切换,调整采样步骤,更改无分类器的指导尺度等。例如,要从512x512 DiT-XL/2模型中取样,您可以使用:
python sample.py --image-size 512 --seed 1训练好的模型下载
Custom DiT checkpoints. If you've trained a new DiT model with train.py (see below), you can add the --ckpt argument to use your own checkpoint instead. For example, to sample from the EMA weights of a custom 256x256 DiT-L/4 model, run:
自定义DiT检查点。
如果您使用train.py(见下文)训练了一个新的DiT模型,
那么您可以添加——ckpt参数来使用您自己的检查点。
例如,要从自定义256x256 DiT-L/4型号的EMA权重中采样,请运行:
python sample.py --model DiT-L/4 --image-size 256 --ckpt /path/to/model.pt我的(注意历经是./pretrain_model, 模型名DiT-XL/2)
python sample.py --model DiT-XL/2 --image-size 256 --ckpt ./pretrained_models/DiT-XL-2-256x256.pt--model

--image-size
--ckpt pretrained_models/DiT-XL-2-512x512.pt

二、训练过程
We provide a training script for DiT in train.py.
This script can be used to train class-conditional DiT models, but it can be easily modified to support other types of conditioning. To launch DiT-XL/2 (256x256) training with N GPUs on one node:
我们在train.py中为DiT提供了一个训练脚本。
该脚本可用于训练类条件DiT模型,但是可以很容易地修改它以支持其他类型的条件。在一个节点上使用N个gpu启动DiT-XL/2 (256x256)训练:
torchrun --nnodes=1 --nproc_per_node=N train.py --model DiT-XL/2 --data-path /path/to/imagenet/traintorchrun
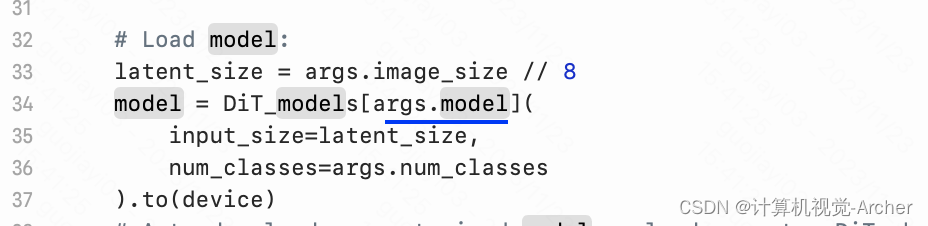
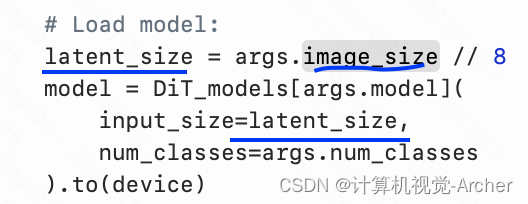
--nnodes=1 (nnodes:节点的数量,通常一个节点对应一个主机,方便记忆,直接表述为主机)
--nproc_per_node=N (nproc_per_node参数为使用GPU数量)
train.py
--model DiT-XL/2
--data-path /path/to/imagenet/train
我的指令(特别注意)
torchrun --nnodes=1 --nproc_per_node=8 train.py --model DiT-XL/2 --data_path /home/pansiyuan/jupyter/qianyu/data/train
torchrun --nnodes=1 --nproc_per_node=8 train.py --model DiT-XL/2 --data_path /home/pansiyuan/jupyter/qianyu/data/traintorchrun这里是分布式计算的写法
--nnodes=1这个是表示一个节点(当前)
--nproc_per_node=8这里表示每个节点8显卡
值得注意的是训练要用8个卡,debug的时候用1个卡,不然报错不会显示
对于accelerate的写法如下:
1 多卡-训练: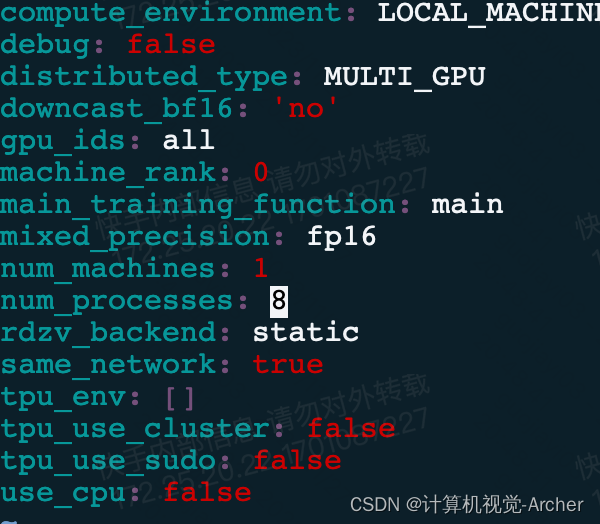
2 单卡-debug: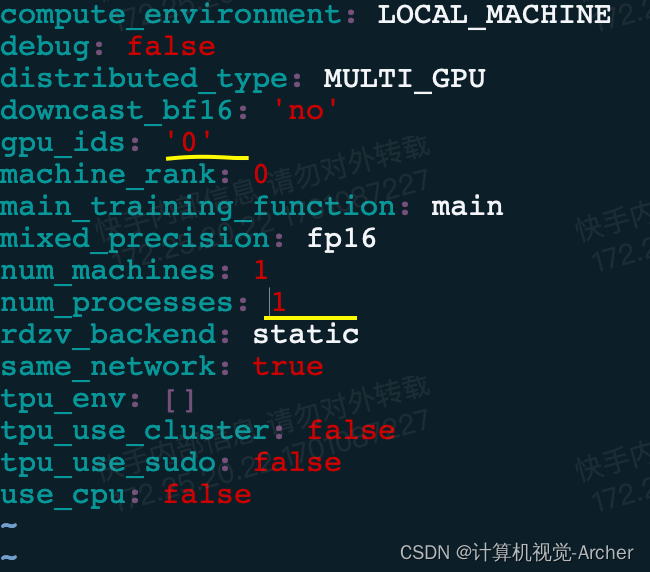
即使这样还会出现单卡无法运行(因为内存不够),多卡不显示报错的情况,因此可以把batchsize 256调整为1来debug
--data_path这里是下划线,作者给的是错误的(data-path,类似的写错下划线“_“为”-“的还有很多,在args里面全部需要修改)
/home/pansiyuan/jupyter/qianyu/data/train 这里需要写到imaget数据集中的train文件夹这一层级
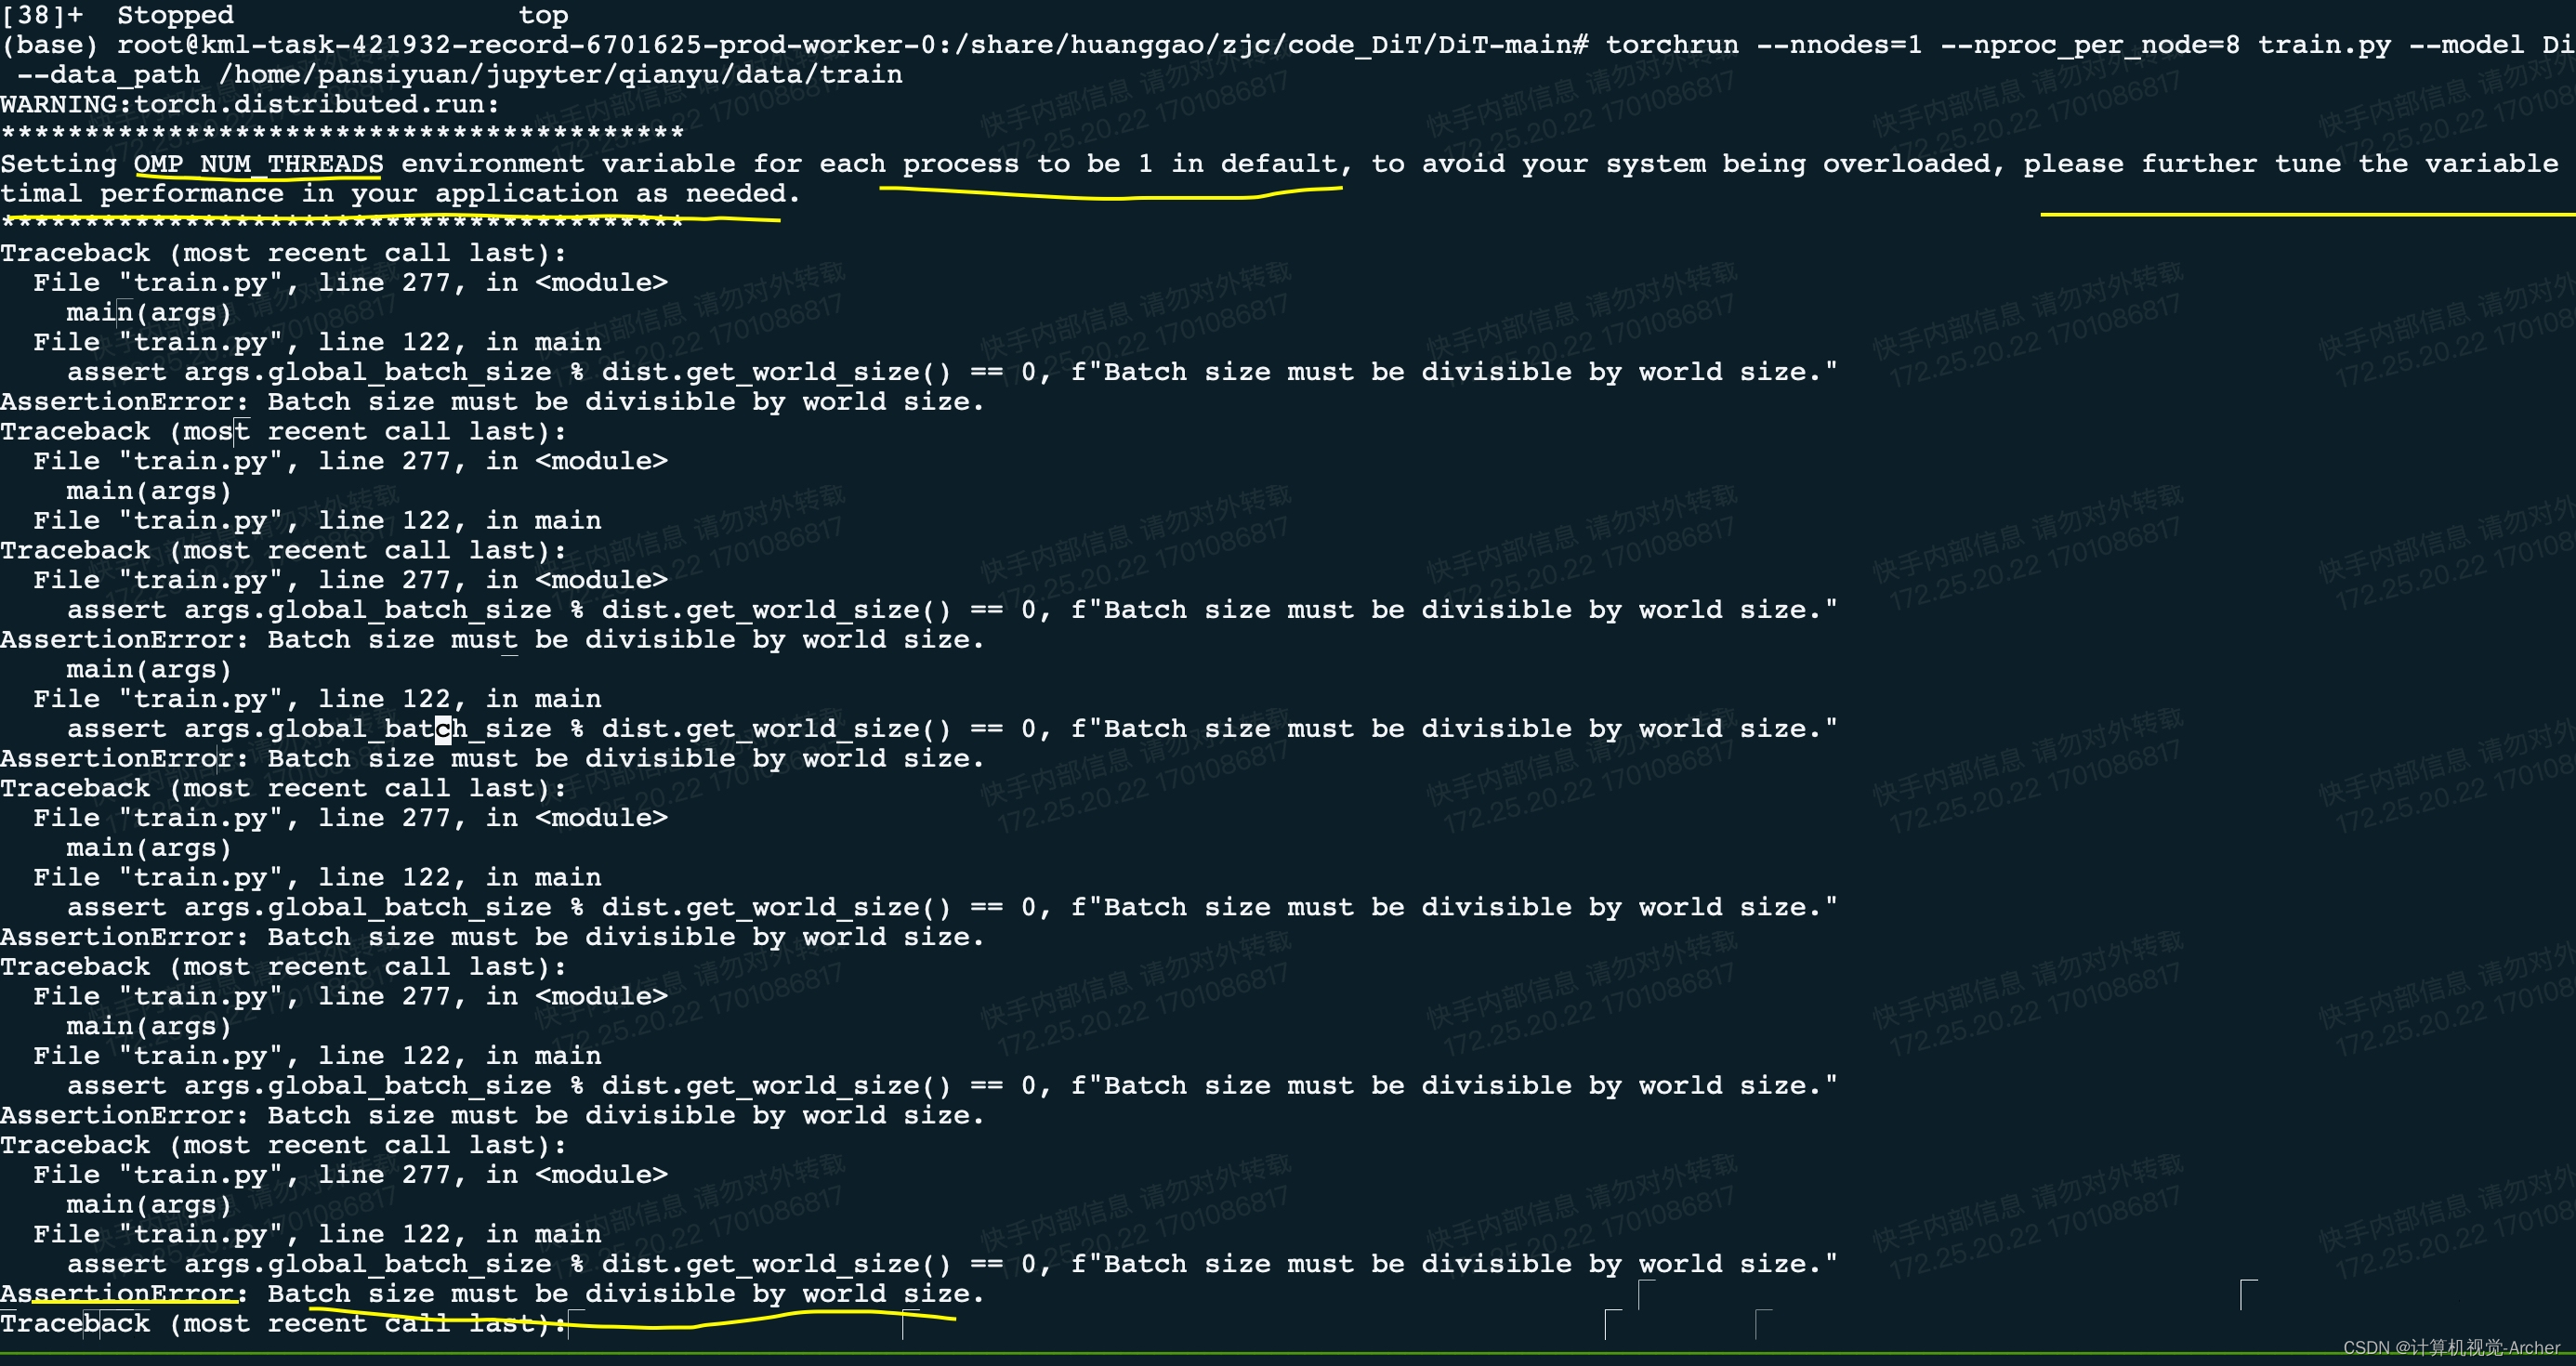 setting OMP_NUM_THREADS environment variable for each process to be 1 in default, to avoid your system being overloaded, please further tune the variable for optimal performance in your application as needed.
将每个进程的OMP_NUM_THREADS环境变量默认设置为1,为了避免系统过载,请根据需要进一步调优该变量以获得应用程序的最佳性能。(这个没啥用)
Batch size must be divisible by world size
批量大小必须能被世界大小整除
现在又8张卡,设置为8的倍数即可,256batch size,内存吃不下,设置为128即可
三、训练结果
PyTorch Training Results
We've trained DiT-XL/2 and DiT-B/4 models from scratch with the PyTorch training script to verify that it reproduces the original JAX results up to several hundred thousand training iterations. Across our experiments, the PyTorch-trained models give similar (and sometimes slightly better) results compared to the JAX-trained models up to reasonable random variation. Some data points:
我们已经用PyTorch训练脚本从头开始训练DiT-XL/2和DiT-B/4模型,以验证它能够再现多达数十万次训练迭代的原始JAX结果。
在我们的实验中,与jax训练的模型相比,pytorch训练的模型给出了类似(有时略好)的结果,但存在合理的随机变化。一些数据点:
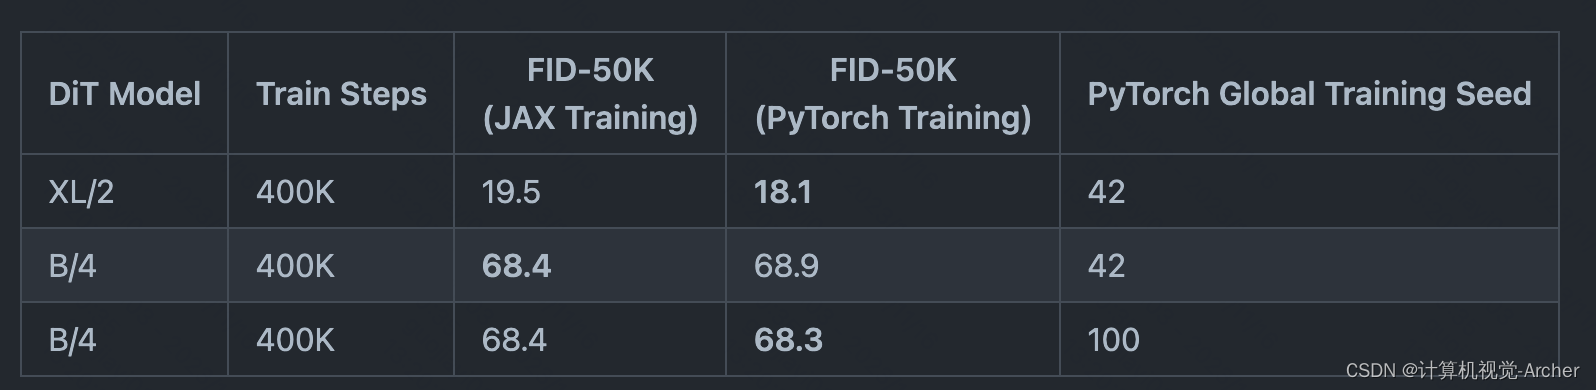
These models were trained at 256x256 resolution; we used 8x A100s to train XL/2 and 4x A100s to train B/4. Note that FID here is computed with 250 DDPM sampling steps, with the mse VAE decoder and without guidance (cfg-scale=1).
这些模型以256x256分辨率进行训练;
我们用8倍a100来训练XL/2,
用4倍a100来训练B/4。
请注意,这里的FID是用250 DDPM采样步骤计算的,使用mse VAE解码器,没有指导(cfg-scale=1)。
TF32 Note (important for A100 users). When we ran the above tests, TF32 matmuls were disabled per PyTorch's defaults. We've enabled them at the top of train.py and sample.py because it makes training and sampling way way way faster on A100s (and should for other Ampere GPUs too), but note that the use of TF32 may lead to some differences compared to the above results.
TF32说明(对于A100用户很重要)。
当我们运行上述测试时,根据PyTorch的默认设置禁用了TF32 matmul。
我们在train.py和sample.py的顶部启用了它们,因为它使a100上的训练和采样方式更快(对于其他ampere gpu也应该如此),但请注意,与上述结果相比,使用TF32可能会导致一些差异。
eature Update Check out this repository at https://github.com/chuanyangjin/fast-DiT to preview a selection of training speed acceleration and memory saving features including gradient checkpointing, mixed precision training and pre-extrated VAE features. With these advancements, we have achieved a training speed of 0.84 steps/sec for DiT-XL/2 using just a single A100 GPU.
查看此存储库https://github.com/chuanyangjin/fast-DiT
预览选择的训练速度加速和内存节省功能,包括梯度检查点,混合精度训练和预提取的VAE功能。凭借这些进步,我们仅使用单个A100 GPU就实现了DiT-XL/2的0.84步/秒的训练速度。
Evaluation (FID, Inception Score, etc.)
We include a sample_ddp.py script which samples a large number of images from a DiT model in parallel.
This script generates a folder of samples as well as a .npz file which can be directly used with ADM's TensorFlow evaluation suite to compute FID, Inception Score and other metrics.
For example, to sample 50K images from our pre-trained DiT-XL/2 model over N GPUs, run:
我们包含了一个sample_ddp.py脚本,该脚本从DiT模型中并行采样大量图像。
该脚本生成一个样本文件夹以及一个.npz文件,该文件可以直接与ADM的TensorFlow评估套件一起使用,以计算FID, Inception Score和其他指标。
例如,要在N个gpu上从预训练的DiT-XL/2模型中采样50K图像,请运行:
torchrun --nnodes=1 --nproc_per_node=N sample_ddp.py --model DiT-XL/2 --num-fid-samples 50000torchrun --nnodes=1 --nproc_per_node=N
sample_ddp.py --model DiT-XL/2 --num-fid-samples 50000


 2671
2671

 被折叠的 条评论
为什么被折叠?
被折叠的 条评论
为什么被折叠?
 到【灌水乐园】发言


