


 本文档详细介绍了Android平台下蓝牙应用层的软件,涵盖蓝牙应用层框架、Bluedroid软件结构、Bluedroid与蓝牙apk接口、蓝牙应用程序Bluetooth.apk的流程,以及Bluetooth framework层。重点解析了Bluedroid的接口交互,包括HCI层协议、核心层启动和部分Profile的流程,旨在为蓝牙初学者提供基础学习指导。
前言
本文档主要介绍android平台下bluetooth的应用层软件,先介绍bluetooth应用层的框架,接着分别介绍Bluedroid层软件、Bluetooth应用程序(Bluetooth.apk),Bluetooth framework层,最后完整分析一些蓝牙的操作流程。基于android 5.1的平台,涉及的bluetooth硬件为realtek的蓝牙。文档主要针对蓝牙的初学者,提供基础的学习指导。
1 Bluetooth应用层框架介绍
要介绍android平台bluetooth应用层的软件,首先介绍一下bluetooth的应用层整体框架,如图1为android下的bluetooth的框架。
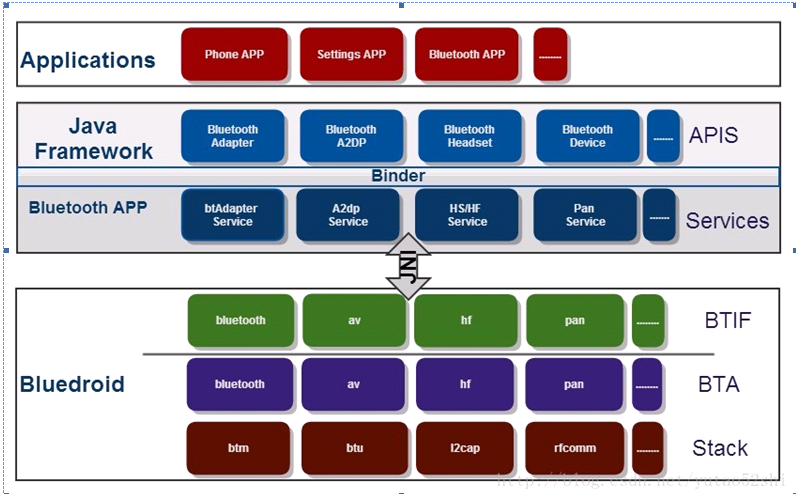
图1 bluetooth应用层框架
Applications:Android蓝牙应用程序,就是使用蓝牙的API的程序;
java Framework:提供给应用使用的API,我们平时使用的BluetoothAdapter,BluetoothDevice,BluetoothSocket等;
BluetoothAPP:这个应该也是属于java framework范畴,不过由于它比较特殊,所以独立出来,提供所有的上层服务以及与Bluedroid底层进行交互。其中btAdapter主要提供蓝牙的基本操作,比如enable, disable, discovery, pair, unpair, createRfcomm等,其他的就都是Profile的各自的Service了;
Bluedroid:蓝牙协议栈,提供所有蓝牙的实际操作,开关蓝牙,蓝牙的管理,搜索管理,链路管理,各种profile的实现,包括HCI,ACL,SCO,L2CAP,各种profile等;
这里Bluedroid分为三部分:
BTIF(Bluetooth Interface):提供所有Bluetooth.apk需要的API(使用HAL)
BTA(Bluetooth Application):蓝牙应用,一般指蓝牙的Profile的Bluedroid实现。
Stack:实现所有蓝牙底层的操作,其中还要分为btm(Bluetooth manager),btu(Bluetooth Upper Layer)等。
2 Bluedroid软件介绍
在第一节的bluetooth应用层框架图中,已可看到bluedroid的一个架构,但bluedroid与底层的接口就没表示出来。图2为bluedroid各层交互的框架图。

图2 bluedroid框架图
下面再看一下bluedroid下的目录结构及每个目录的功能。
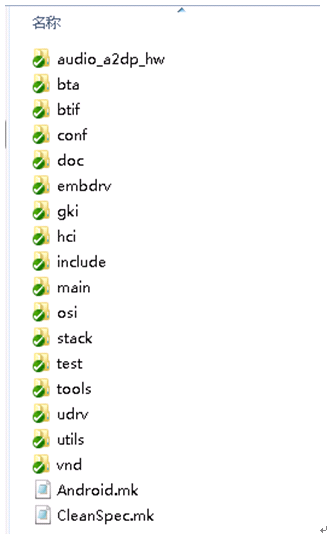
图3 bluedroid目录结构
audio_a2dp_hw: Implements hal for bluedroid a2dp audio device。 a2dp在bluedroid中的hal层实现。它通过socket与stack通信(通信机制实现参考udv目录下的uipc);
bta:buetooth application layer,实现应用层的一些接口,但都由Btif层进行管理和调用。
Ag:audio gateway (AG) subsystem of BTA
Ar:implementation for the audio/video registration module.
Av:implementation of the API for the advanced audio/video (AV)
* subsystem of BTA, Broadcom’s Bluetooth application layer for mobile
* phones.
Dm:API implementation file for the BTA device manager
Fs: implementation file for the file system call-in functions. //phone
Gattr: the GATT server and client implementation
Hh:host hid
btif:all BTIF functions accessed from main bluetooth HAL(与android的Bluetooth apk的jni层通信的接口,真正的为app提供interface的接口);
conf:是Bluedroid的一些配置文件;
embdrv: 主要负责sbc编码,SBC是由蓝牙特别兴趣组(SIG)提出的一种用于蓝牙设备标准音频编解码器的高效编码方法。在蓝牙技术的A2DP的音频数据规格中,SBC是用来保持互连能力的一个十分重要的音频数据编码方法,它是MP3和MPEG-4 AAC的规定选项;
gki/osi:general kernel interface/os interface,针对os的移植层,包括多任务和timer实现,实际就是为stack代码提供一个抽象的多任务和时间控制环境,达到可移植的目的;
hci:host control interface,实现hci的协议,并连接stack层与底层通信的实现;
main:处理配置信息,各个模块的初始化,连接btif与hci,提供btif控制hci的接口;
stack: 协议栈代码,各种profile;
udrv:代码作用是跟a2dp端进行socket通信,处理命令和a2dp数据pcm流,media task调用这里的接口,实际就是跟audio_a2dp_hw 的audio hal通信;
utils:杂项,很简单,目前就是提高a2dp任务优先级的函数;
vnd: vendor specific feature for BLE;
其中还有一个bt vendor没包含在bluedroid中,对于realtek的蓝牙,都是使用相同的bluedroid,但不同的蓝牙模块有不同的bt vendor库,该vendor库的功能是给蓝牙模块上、掉电,打开、关闭、配置串口,download fw(usb接口蓝牙的download fw在驱动内实现)。
2.1 Bluedroid对上层接口
Bluedroid与上层有多个接口, bluedroid\btif\src\bluetooth.c为一个主要接口,负责蓝牙的开关及基本控制, bluedroid\audio_a2dp_hw\audio_a2dp_hw.c专门针对a2dp的控制,还有部分profile也提供一些接口,这些接口为不同profile的独立接口。其中bluetooth.c实现一系列接口,由上层调用来控制蓝牙,同时在初始化的时候,上层会传递过来一个回调接口,当bluedroid有消息或结果需要通知上层时,就通过该回调接口。但像蓝牙的opp、hid等profile的数据就不是通过接口传递的,都是创建socket接口来交互数据的。
\bluedroid\btif\src\bluetooth.c
static const bt_interface_t bluetoothInterface = {
    sizeof(bluetoothInterface),
    init,
    enable,
    disable,
    get_recv_byte,
    get_send_byte,
    cleanup,
    get_adapter_properties,
    get_adapter_property,
    set_adapter_property,
    get_remote_device_properties,
    get_remote_device_property,
    set_remote_device_property,
    get_remote_service_record,
    get_remote_services,
    start_discovery,
    cancel_discovery,
    create_bond,
    remove_bond,
    cancel_bond,
    get_connection_state,
    pin_reply,
    ssp_reply,
    get_profile_interface,
    dut_mode_configure,
    dut_mode_send,
#if BLE_INCLUDED == TRUE
    le_test_mode,
#else
    NULL,
#endif
    config_hci_snoop_log,
    set_os_callouts,
    read_energy_info,
};
hardware\libhardware\include\hardware\bluetooth.h
typedef struct {                                /* 蓝牙接口结构体定义 */
    /** set to sizeof(bt_interface_t) */
    size_t size;
    /**
     * Opens the interface and provides the callback routines
     * to the implemenation of this interface.
     */
    int (*init)(bt_callbacks_t* callbacks );

    /** Enable Bluetooth. */
    int (*enable)(void);

    /** Disable Bluetooth. */
    int (*disable)(void);
    /** Get Bluetooth recv */
    int (*get_recv_byte)(void);

    ……  /* 省略中间代码 */

    int (*read_energy_info)();
} bt_interface_t;
\bluedroid\btif\src\bluetooth.c
static int init(bt_callbacks_t* callbacks )   /* 初始化时,上层传递下来的回调接口结构体 */
{
ALOGI(“init”);

/* sanity check */
if (interface_ready() == TRUE)
        return BT_STATUS_DONE;

/* store reference to user callbacks */
    Bt_hal_cbacks = callbacks;

    /* add checks for individual callbacks ? */

    bt_utils_init();

    /* init btif */
    btif_init_bluetooth();

    return BT_STATUS_SUCCESS;
}
hardware\libhardware\include\hardware\bluetooth.h
/** Bluetooth DM callback structure. */           /* 回调结构体 */
typedef struct {
    /** set to sizeof(bt_callbacks_t) */
    size_t size;
    adapter_state_changed_callback adapter_state_changed_cb;
    adapter_properties_callback adapter_properties_cb;
    remote_device_properties_callback remote_device_properties_cb;
    device_found_callback device_found_cb;
    discovery_state_changed_callback discovery_state_changed_cb;
    pin_request_callback pin_request_cb;
    ssp_request_callback ssp_request_cb;
    bond_state_changed_callback bond_state_changed_cb;
    acl_state_changed_callback acl_state_changed_cb;
    callback_thread_event thread_evt_cb;
    dut_mode_recv_callback dut_mode_recv_cb;
    le_test_mode_callback le_test_mode_cb;
    energy_info_callback energy_info_cb;
} bt_callbacks_t;
其中在get_profile_interface函数中会返回各种profile提供的接口。
\bluedroid\btif\src\bluetooth.c
static const void* get_profile_interface (const char *profile_id)
{
    ALOGI("get_profile_interface %s", profile_id);
    /* sanity check */
    if (interface_ready() == FALSE)
        return NULL;
    /* check for supported profile interfaces */
    if (is_profile(profile_id, BT_PROFILE_HANDSFREE_ID))
        return btif_hf_get_interface();
    if (is_profile(profile_id, BT_PROFILE_HANDSFREE_CLIENT_ID))
        return btif_hf_client_get_interface();
    if (is_profile(profile_id, BT_PROFILE_SOCKETS_ID))          /* rfcomm使用 */
        return btif_sock_get_interface();
    if (is_profile(profile_id, BT_PROFILE_PAN_ID))
        return btif_pan_get_interface();
    if (is_profile(profile_id, BT_PROFILE_ADVANCED_AUDIO_ID))
        return btif_av_get_src_interface();
    if (is_profile(profile_id, BT_PROFILE_ADVANCED_AUDIO_SINK_ID))
        return btif_av_get_sink_interface();
    if (is_profile(profile_id, BT_PROFILE_HIDHOST_ID))
        return btif_hh_get_interface();
    if (is_profile(profile_id, BT_PROFILE_HEALTH_ID))
        return btif_hl_get_interface();
    if (is_profile(profile_id, BT_PROFILE_MAP_CLIENT_ID))
        return btif_mce_get_interface();
#
最低0.47元/天 解锁文章


 942
942

 被折叠的 条评论
为什么被折叠?
被折叠的 条评论
为什么被折叠?
 到【灌水乐园】发言


