


在专题的上一章中,重点讲解了项目的改造背景、难点分析
传送门:【Jeepay】01-Kafka实现延迟消息与广播模式概要设计
在进入正篇之前,想简单说一下,之所以会如此的追本溯源的去记录:
第一是因为:一个可以落地的解决方案的敲定,是综合项目各方面的原因得到的。没有完美的架构,只有刚好的架构;没有满足一切的架构,只有满足目标的架构。
第二是因为想要通过这样的记录,让后面的同学能快速的理解:实践中并不需要沿用我的解决方案,只要能把思路打开,一定会找到更加适合你们项目的方式。
好了废话不多说,本章会就Kafka实现延迟消息与广播模式的技术细节展开讨论。
Kafka延迟发送
解决思路:
Kafka延迟发送的解决思路:利用Redis的ZSet集合,实现Redis缓存队列
生产者在调用延迟发送方法时,消息并不会立刻被投递到Topic中,转而发送到延迟队列
将当前时间戳与延迟时间进行相加,将结果作为ZSet的score进行设置。
除此之外,延迟队列有包含线程池、分布式锁。每5s循环一次,对比当前时间戳与ZSet的score。拉取缓存队列中到期的消息,将消息重新组装,投递到Topic并进行消费。

代码实现
Kafka延迟发送的核心代码
package com.kearey.boot.mq.vender.kafka;

import com.kearey.boot.cache.delay.ADelayQueueInfo;
import com.kearey.boot.cache.delay.kafka.KafkaDelayQueue;
import lombok.SneakyThrows;
import lombok.extern.slf4j.Slf4j;
import org.springframework.beans.factory.annotation.Autowired;
import org.springframework.boot.ApplicationArguments;
import org.springframework.boot.ApplicationRunner;
import org.springframework.stereotype.Component;

import java.util.List;
import java.util.concurrent.ExecutorService;
import java.util.concurrent.Executors;

/**
 * @author kearey
 * @description: 延迟缓存队列定时消费,并投递到常规队列
 * @date 2023年04月26日
 * @version: 1.0
 */@Slf4j
@Component
public class KafkaDelaySender implements ApplicationRunner {

    public  static ExecutorService executorService = Executors.newFixedThreadPool(5);

    @Autowired
    KafkaDelayQueue cacheQueue;

    @Autowired
    KafkaSender kafkaSender;

    private boolean stopFlag=false;

    public void setStopFlag(boolean stopFlag) {
        this.stopFlag = stopFlag;
    }

    /**
     * @Tips: ApplicationRunner 的实现方法,项目启动时加载
     * @param args
     * @throws Exception
     */
    @Override
    public void run(ApplicationArguments args) throws Exception {
        log.debug("===== 容器启动完毕,开始加载 delaySend() 方法 =====");
        this.delaySend();
    }

    @SneakyThrows
    public void delaySend(){
        executorService.execute(()->{
            while(!stopFlag){
                List<ADelayQueueInfo> messageList = cacheQueue.pull();
                // 循环处理ZSet集合
                if( messageList == null || messageList.size() == 0 ) {
                    try {
                        // 没有拉取到的话,就睡眠5s
                        Thread.sleep(5 * 1000);
                    } catch (InterruptedException e) {
                        e.printStackTrace();
                    }
                }else {
                    for (ADelayQueueInfo info : messageList){
                        // 尝试获取锁,获取不到就执行下一个
                        if (cacheQueue.tryLock()) {
                            // 发送消息
                            kafkaSender.sendCache(info);
                            // 删除缓存
                            cacheQueue.remove(info);
                            // 释放锁
                            cacheQueue.releaseLock();
                        }
                    }
                }
            }
        });
    }
}
Redis延时队列
基于Redis的ZSet实现的Kafka延时队列数据结构:
ZSet数据结构说明:
zadd <key><score1><value1><score2><value2>...
key:DELAY_QUEUE
score:timestamp
value:topic;message
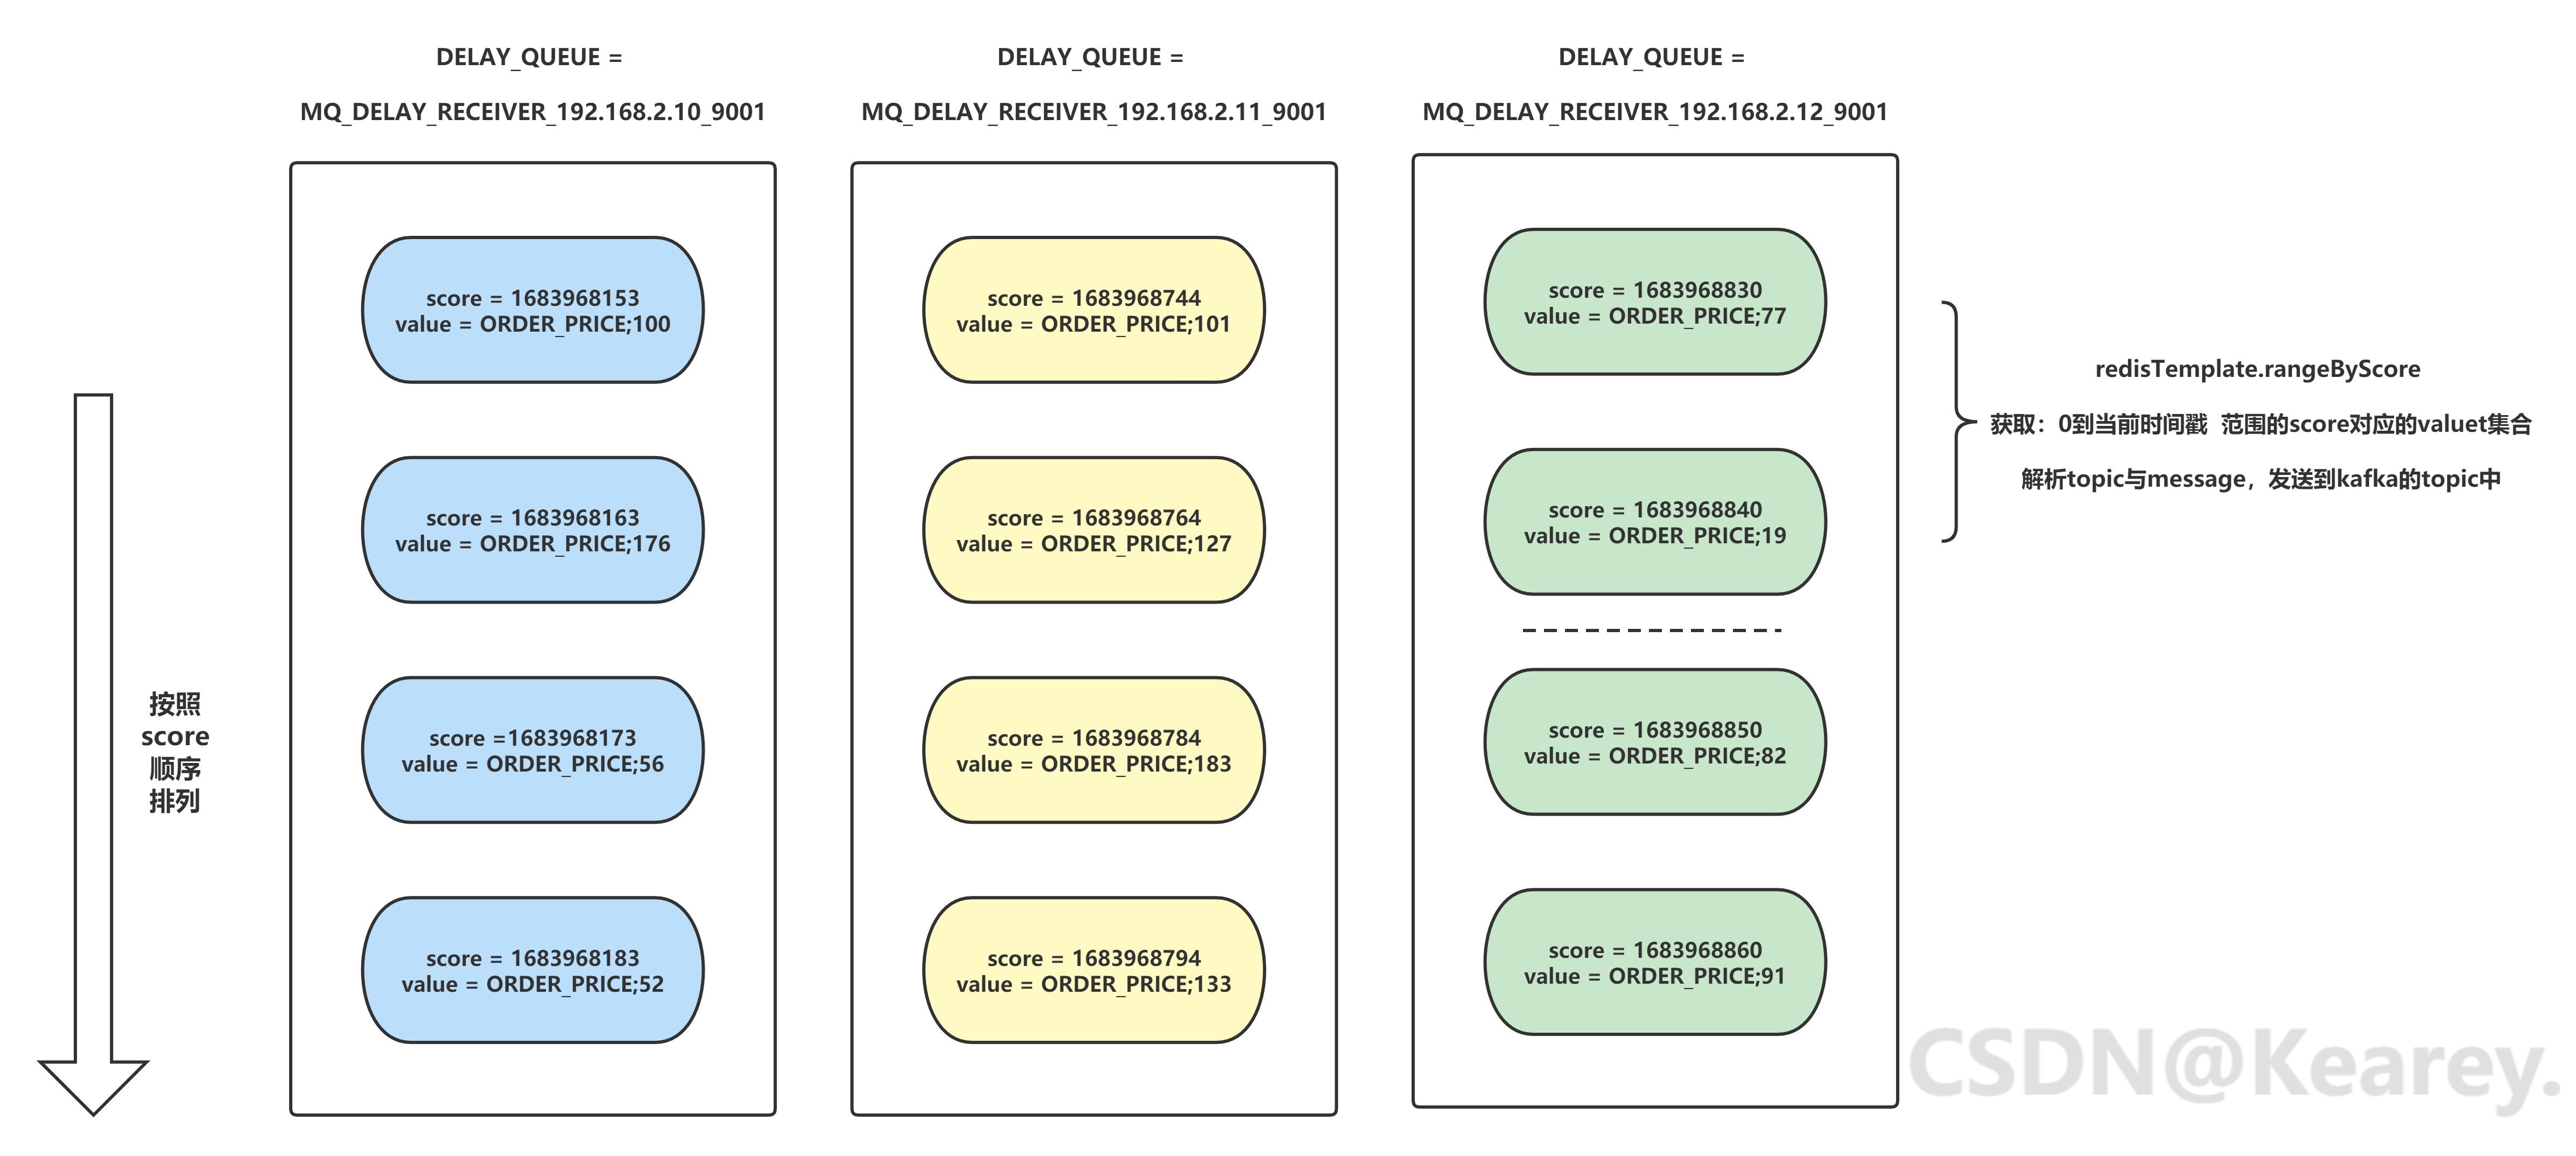
1、key为:DELAY_QUEUE。为了减少分布式环境下,延迟队列中的资源竞争,在设置DELAY_QUEUE时,可以增加_ip_port 的后缀。
2、score为:当前时间戳 + 延迟时间的求和。ZSet集合依据score,会从最低分到最高分的方式排序集合中的成员,这样设计就可以实现按照先后时间排序的效果。
3、value为:kafka的topic + message 的组合字段,用 ; 进行分割。 如果觉得利用分隔符组合value的方式不优雅,这里也可以采用json串的数据格式。
将延时消息按照如上结构存储到Redis后,启动定时任务进行扫描。可以使用springboot自带的定时任务,也可以自己用线程池来自己实现。
以上就是基于Redis的延迟队列的实现思路。
代码实现
基于Redis的ZSet实现的Kafka延时队列核心代码:
package com.kearey.boot.cache.delay.kafka;

import com.kearey.boot.cache.constant.DelayQueueConstant;
import com.kearey.boot.cache.delay.ADelayQueueInfo;
import com.kearey.boot.cache.delay.IDelayQueue;
import com.kearey.boot.cache.delay.InitDelayQueue;
import lombok.SneakyThrows;
import lombok.extern.slf4j.Slf4j;
import org.springframework.beans.factory.annotation.Autowired;
import org.springframework.data.redis.core.RedisTemplate;
import org.springframework.stereotype.Component;

import java.util.ArrayList;
import java.util.List;
import java.util.Set;
import java.util.concurrent.TimeUnit;
import java.util.stream.Collectors;

/**
 * @author kearey
 * @description: 延迟缓存队列 —— Kafka实现类
 * @useage: com.kearey.boot.mq.vender.kafka.KafkaDelaySender
 *          com.kearey.boot.mq.vender.kafka.KafkaSender
 * @date 2023年04月25日
 * @version: 1.0
 */@Slf4j
@Component
public class KafkaDelayQueue implements IDelayQueue {

    @Autowired
    RedisTemplate redisTemplate;

    @Autowired
    InitDelayQueue config;


    @Override
    @SneakyThrows
    public Boolean pushMessage(ADelayQueueInfo info, int delay) {
        // score为当前的 时间戳+延迟时间
        long score= System.currentTimeMillis() + delay * 1000;
        String mqTopic = info.getMQTopic();
        String mqMessage = info.getMQMessage();
        log.debug("====== 将延迟消息投递至Redis:  topic:"+mqTopic+" === Message:"+mqMessage+"+=====");
        Boolean add = redisTemplate.opsForZSet().add(config.getDELY_QUEUE(), mqTopic+ DelayQueueConstant.SPLIT_FLAG +mqMessage, score);
        return add;
    }


    @Override
    @SneakyThrows
    public List<ADelayQueueInfo> pull() {
        List<ADelayQueueInfo> msgList  =new ArrayList<>();
        try {
            //@Tips:rangeByScore 根据score范围获取 从0到当前时间戳可以拉取当前时间及以前的需要被消费的消息
            Set<String> scoreSet = redisTemplate.opsForZSet().rangeByScore(config.getDELY_QUEUE(), 0, System.currentTimeMillis());
            log.debug("====== 拉取最新需要被消费的消息 数量:"+scoreSet.size()+" =====");
            if ( scoreSet == null || scoreSet.size() == 0) {
                return null;
            }
            //@Tips:stream 流处理
            msgList = scoreSet.stream().map(msg -> {
                KafkaDelayQueueInfo kafkaInfo = new KafkaDelayQueueInfo();
                try {
                    //截取字符串
                    kafkaInfo.setMQTopic(msg.split(DelayQueueConstant.SPLIT_FLAG)[0]);
                    kafkaInfo.setMQMessage(msg.split(DelayQueueConstant.SPLIT_FLAG)[1]);
                } catch (Exception e) {
                    e.printStackTrace();
                }
                return kafkaInfo;
            }).collect(Collectors.toList());
        } catch (Exception e) {
            log.error(e.toString());
        }
        return msgList;
    }

    @Override
    @SneakyThrows
    public Boolean remove(ADelayQueueInfo info) {
        String mqTopic = info.getMQTopic();
        String mqMessage = info.getMQMessage();
        Long remove = redisTemplate.opsForZSet().remove(config.getDELY_QUEUE(), mqTopic+ DelayQueueConstant.SPLIT_FLAG+mqMessage);
        return remove > 0 ? true : false;
    }


    @Override
    @SneakyThrows
    public Boolean tryLock(){
        boolean lock = false;
        //获得锁
        lock = redisTemplate.opsForValue().setIfAbsent(DelayQueueConstant.LOCK_KEY , config.getDELY_QUEUE(),30, TimeUnit.SECONDS);
        return lock;
    }

    @Override
    @SneakyThrows
    public void releaseLock(){
        redisTemplate.delete(DelayQueueConstant.LOCK_KEY);
    }
}
广播模式
这里列举两种实现思路:
解决思路1:
在Kafka中,同一Topic的一条消息只能被同一个Consumer Group内的一个Consumer消费,但多个Consumer Group可同时消费这一消息。不同消费组中的消费者消费时互不影响。 Kafka就是通过消费者组的方式来实现P2P模式和广播模式。
基于以上前提,有两种实现方式:
1.在消费者 @KafkaListener注解中,利用Spring EL 表达式,动态的赋予全局唯一的GroupID。
2.利用kafka监听工厂,初始化消费者工厂配置,动态的赋予全局唯一的GroupID。
这样就能保证每个项目启动时消费者分组不同,从而达到广播消费的目的。

解决思路2:
由于我们的公共支付服务本身是提供给内部机构进行使用,本身业务范围和规模不大。Jeepay的分账、转账等功能并不在我们的使用范围内。
通过源码得知,涉及到消息广播的就只有:更新系统配置参数需要改造。既然是更新系统配置参数,那索性就把这一部分改成数据库操作。
考虑到时间成本的原因,这样的改造是最快能看到效果的。如果你的项目要求时间紧,任务重,且后续业务迭代速度不快,思路2也不失为一个最优的解决方案。
代码实现
这里我就贴一下在解决思路1中提到的,实现Kafka消费者的广播模式的核心代码,以供参考。
Spring-kafka 动态赋予groupId,实现kafka的广播模式:
package com.kearey.boot.mq.conf;

import com.kearey.boot.cache.delay.InitDelayQueue;
import lombok.extern.slf4j.Slf4j;
import org.apache.kafka.clients.consumer.ConsumerConfig;
import org.apache.kafka.common.serialization.StringDeserializer;
import org.springframework.beans.factory.annotation.Autowired;
import org.springframework.beans.factory.annotation.Value;
import org.springframework.context.annotation.Bean;
import org.springframework.kafka.config.ConcurrentKafkaListenerContainerFactory;
import org.springframework.kafka.config.KafkaListenerContainerFactory;
import org.springframework.kafka.core.ConsumerFactory;
import org.springframework.kafka.core.DefaultKafkaConsumerFactory;
import org.springframework.kafka.listener.ConcurrentMessageListenerContainer;
import org.springframework.stereotype.Component;

import java.util.HashMap;
import java.util.Map;

/**
 * @author kearey
 * @description: Kafka动态设置消费组GroupID
 * @date 2023年05月13日
 * @version: 1.0
 */
@Slf4j
@Component
public class KafkaConsumerConfig {

    @Value("${spring.kafka.bootstrap-servers}")
    private String BROKERS;
    @Value("${spring.kafka.consumer.enable-auto-commit}")
    private Boolean ENABLE_AUTO_COMMIT;
    @Value("${spring.kafka.consumer.auto-commit-interval-ms}")
    private String AUTO_COMMIT_INTERVAL_MS;
    @Value("${spring.kafka.consumer.auto-offset-reset}")
    private String AUTO_OFFSET_RESET;
    @Value("${spring.kafka.consumer.max-poll-records}")
    private String MAX_POLL_RECORDS;

    private String CURRENT_INSTANCE_GROUP_ID;

    @Autowired
    InitDelayQueue config;

    /**构建kafka监听工厂*/
    @Bean
    public KafkaListenerContainerFactory<ConcurrentMessageListenerContainer<String, String>> kafkaListenerContainerFactory() throws Exception {
        ConcurrentKafkaListenerContainerFactory<String, String> factory = new ConcurrentKafkaListenerContainerFactory<String, String>();
        factory.setConsumerFactory(consumerFactory());
        return factory;
    }

    /**初始化消费工厂配置,动态指定消费分组*/
    private ConsumerFactory<String, String> consumerFactory() throws Exception {
        Map<String, Object> properties = new HashMap<String, Object>();
        properties.put(ConsumerConfig.BOOTSTRAP_SERVERS_CONFIG, BROKERS);
        properties.put(ConsumerConfig.ENABLE_AUTO_COMMIT_CONFIG, ENABLE_AUTO_COMMIT);
        properties.put(ConsumerConfig.AUTO_COMMIT_INTERVAL_MS_CONFIG, AUTO_COMMIT_INTERVAL_MS);
        properties.put(ConsumerConfig.MAX_POLL_RECORDS_CONFIG, MAX_POLL_RECORDS);
        properties.put(ConsumerConfig.KEY_DESERIALIZER_CLASS_CONFIG, StringDeserializer.class);
        properties.put(ConsumerConfig.VALUE_DESERIALIZER_CLASS_CONFIG, StringDeserializer.class);
        /** 依照服务实例维度,根据延迟队列名称来命名GroupID */
        CURRENT_INSTANCE_GROUP_ID = config.getDELY_QUEUE();
        log.info("当前实例kafka分组id---{}",CURRENT_INSTANCE_GROUP_ID);
        properties.put(ConsumerConfig.GROUP_ID_CONFIG, CURRENT_INSTANCE_GROUP_ID);
        properties.put(ConsumerConfig.AUTO_OFFSET_RESET_CONFIG, AUTO_OFFSET_RESET);
        return new DefaultKafkaConsumerFactory<String, String>(properties);
    }
}
消息可靠性
由于我们的公共支付服务本身是提供给内部机构进行使用,业务范围和规模不大。
Jeepay的分账、转账等功能并不在我们的使用范围内。
综合考虑,kafka本身的消息可靠性是可以满足我们自身的需要,并不需要额外的进行扩展和增强。
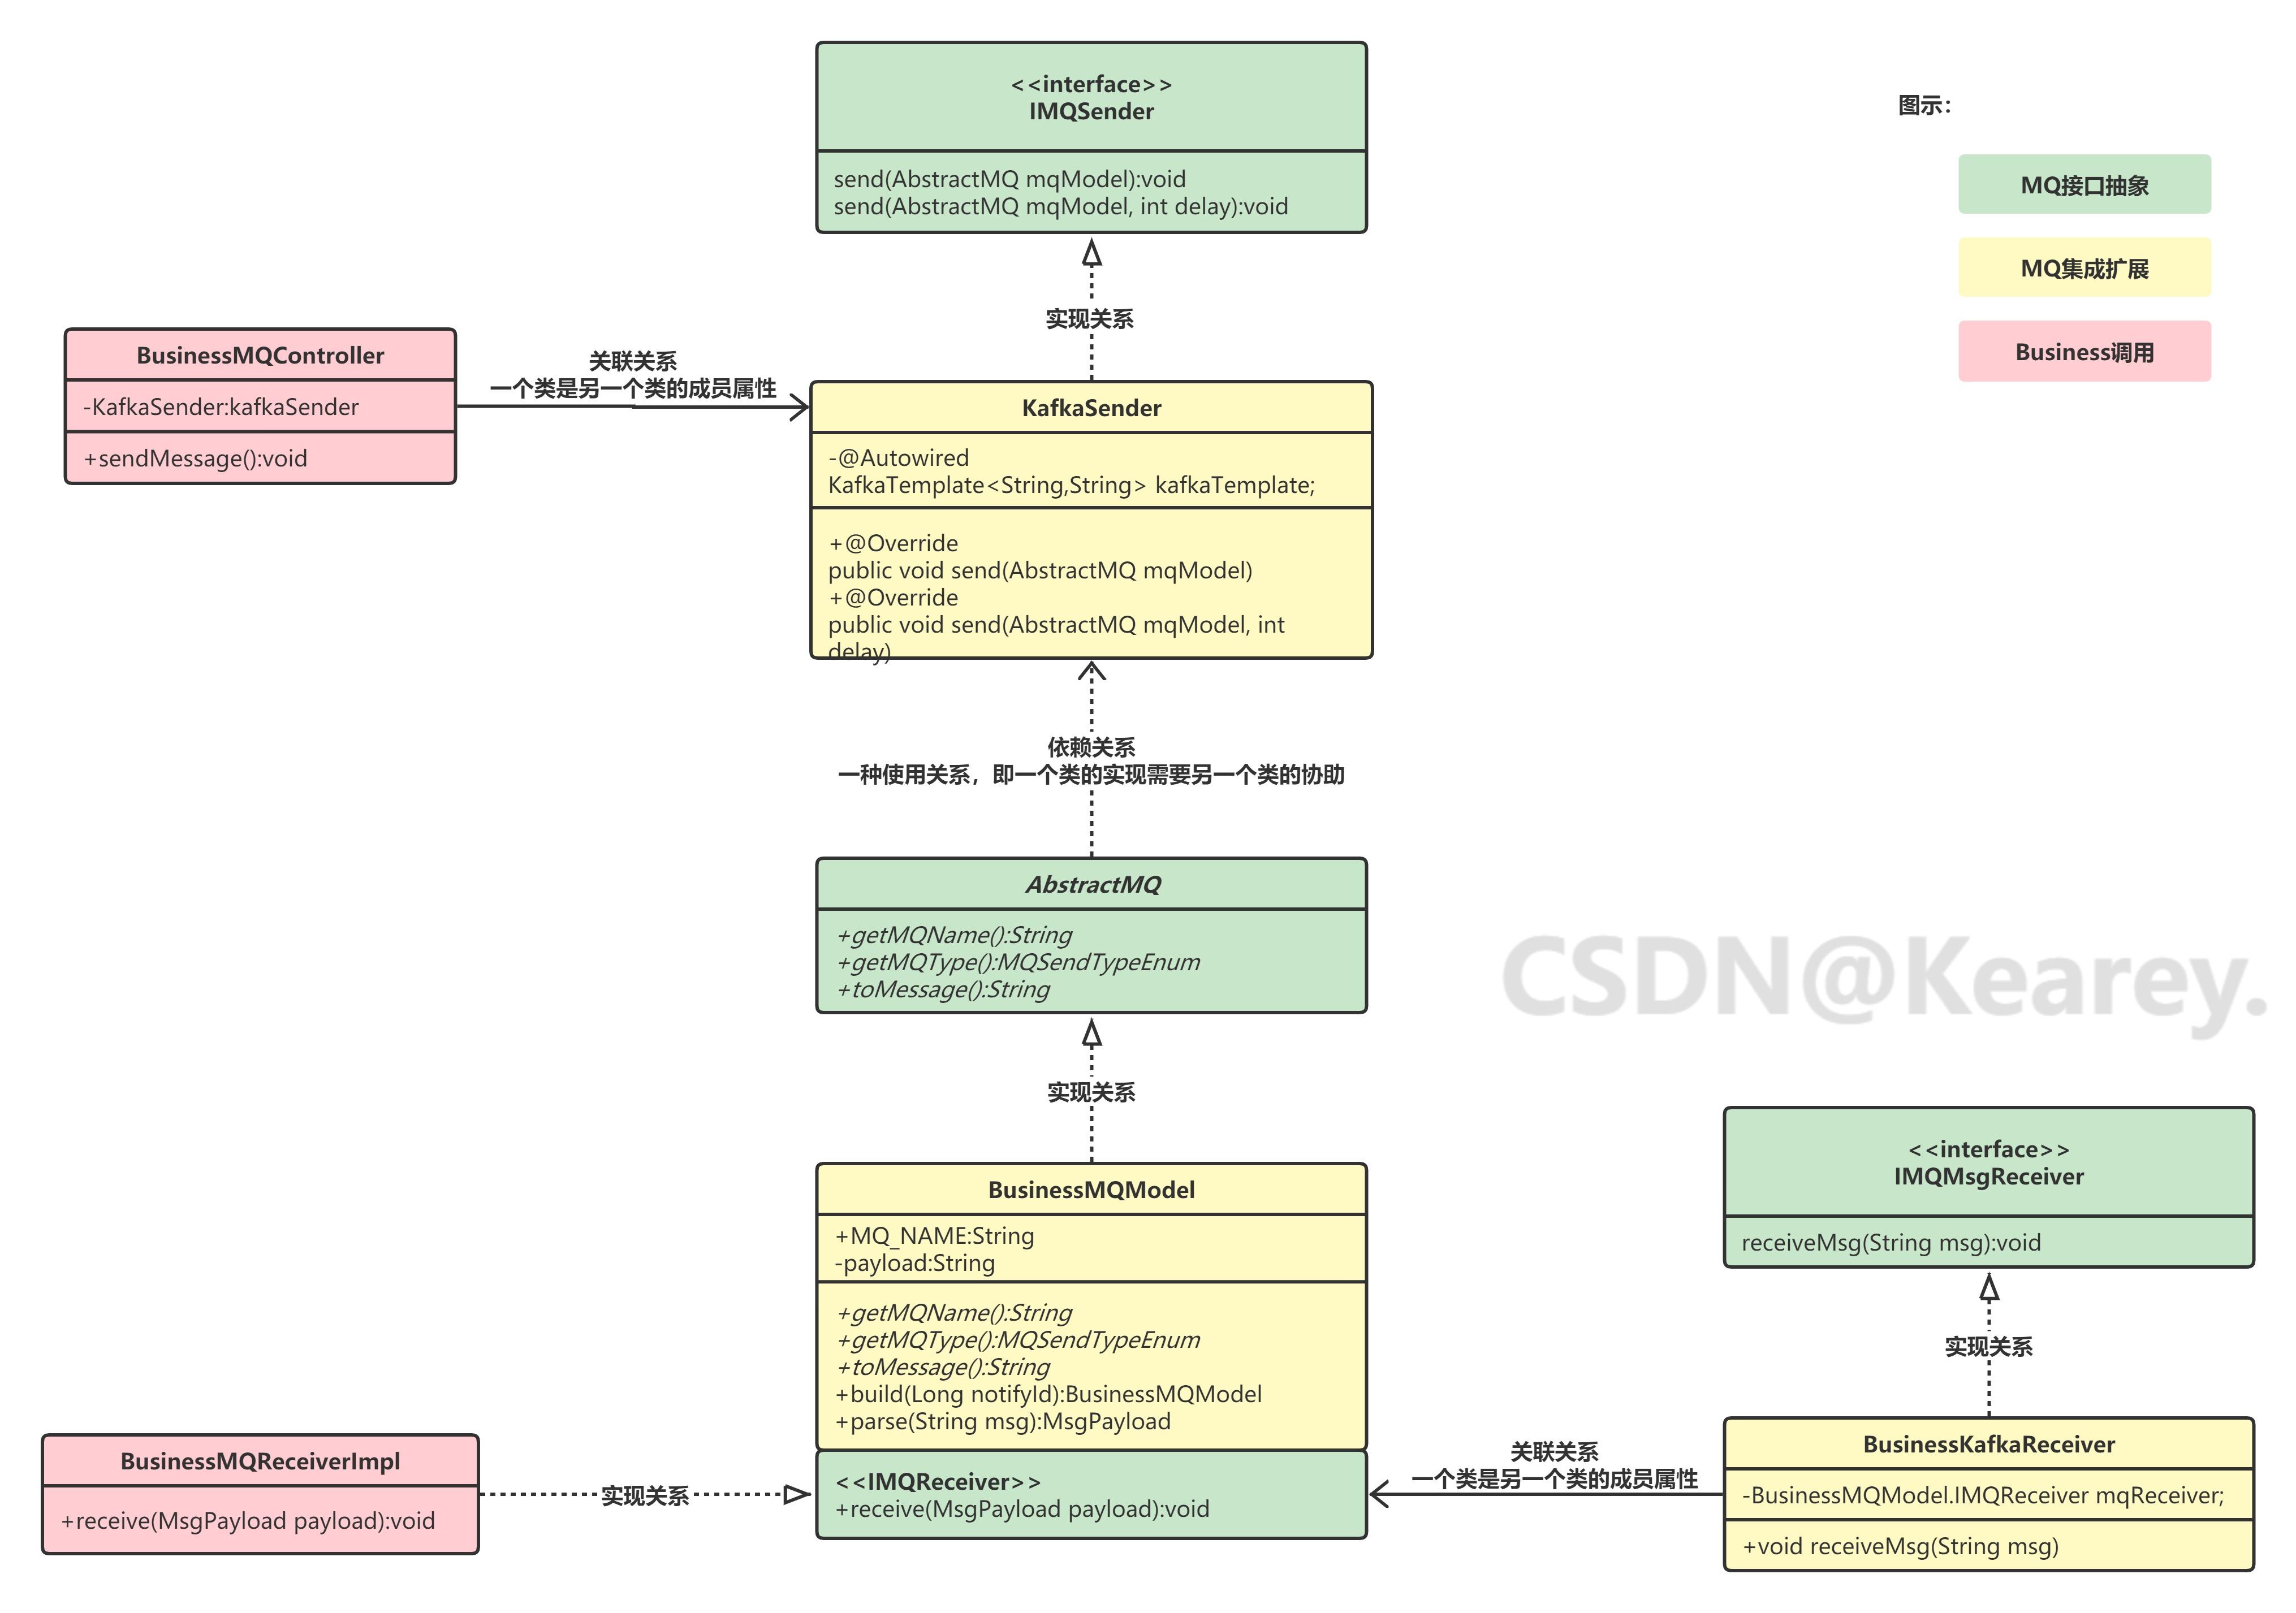
Jeepay集成Kafka
Jeepay的MQ框架的类图如下图所示,可以从红色部分开始,按照箭头到黄色的MQ集成扩展模块。按照顺序进行梳理学习。
红色和黄色部分是基于绿色部分的MQ框架进行开发的(绿色部分不变)。总体的脉络还是比较清晰易懂的。
MQ 厂商定义类:
public class MQVenderCS {
    public static final String YML_VENDER_KEY = "component.mq.vender";
    public static final String ACTIVE_MQ = "activeMQ";
    public static final String RABBIT_MQ = "rabbitMQ";
    public static final String ROCKET_MQ = "rocketMQ";
    public static final String ALIYUN_ROCKET_MQ = "aliYunRocketMQ";
    // 额外增加Kafka的扩展
    public static final String KAFKA = "kafka";
}
配置文件的配置,修改vender为kafka:
#系统业务参数
isys:
...
  mq:
    vender: kafka
Kafka的生产者和消费者改造起来也很简单,复制并修改@ConditionalOnProperty的havingValue即可:
@Slf4j
@Component
@ConditionalOnProperty(name = MQVenderCS.YML_VENDER_KEY, havingValue = MQVenderCS.KAFKA)
public class KafkaSender implements IMQSender {

    @Autowired
    private KafkaTemplate<String,String> kafkaTemplate;

    @Autowired
    KafkaDelayQueue cacheQueue;

    @Override
    public void send(AbstractMQ mqModel) {
        kafkaTemplate.send(mqModel.getMQName(),mqModel.toMessage());
    }

    @Override
    public void send(AbstractMQ mqModel, int delay) {
        KafkaDelayQueueInfo info = new KafkaDelayQueueInfo();
        info.setMQTopic(mqModel.getMQName());
        info.setMQMessage(mqModel.toMessage());
        // 发送延迟消息
        cacheQueue.pushMessage(info, delay);
    }
    /**
     * 延迟消息到期后进行的第二次发送
     * @param info
     */
    public void sendCache(ADelayQueueInfo info) {
        log.info("====== 时间到期,准备第二次发送延迟消息 =====");
        kafkaTemplate.send(info.getMQTopic(),info.getMQMessage());
    }
}
消费者也同样的修改@ConditionalOnProperty的havingValue即可:
@Slf4j
@Component
@ConditionalOnProperty(name = MQVenderCS.YML_VENDER_KEY, havingValue = MQVenderCS.KAFKA)
@ConditionalOnBean(BusnQueueModel.IMQReceiver.class)
public class BusnKafkaQueueReceiver implements IMQMsgReceiver{

    @Autowired
    private BusnQueueModel.IMQReceiver mqReceiver;

    /** 接收 【 queue 】 类型的消息 **/
    @Override
    @KafkaListener(topics = {BusnQueueModel.MQ_NAME})
    public void receiveMsg(String msg) {
        log.info("=========== BusnQueueModel 接收到待消费的消息 === "+msg+" ================");
        mqReceiver.receive(BusnQueueModel.parse(msg));
    }
}
源码仓库
详细完整的代码已经上传仓库,想要进一步交流的同学可以去到:
Jeepay集成kafka项目源码


 808
808

 被折叠的 条评论
为什么被折叠?
被折叠的 条评论
为什么被折叠?
 到【灌水乐园】发言


