| 随着深层学习的火热,越来越多的人开始使用深层学习训练自己的模型。
用GPU训练的速度比CPU快很多倍,可让需要训练一周的模型只在一天内完成。
这篇post就介绍如何在Ubuntu14.04上安装用GPU训练的Theano、Lasagne、TensorFlow
Anaconda
由于将会用到很多python的库包,安装Anaconda(https://www.continuum.io/)将会很方便
安装
下载完毕后,执行,根据提示安装到想要安装的目录下
>sudo bash Anaconda2-2.5.0-Linux-x86_64.sh 如果遇到 Error: Missing write permissions in: */anaconda2
You don't appear to have the necessary permissions to update packages
into the install area */anaconda2 运行下面指令,更改组群可以解决(请把usr 和 */ 替换为自己的内容)
>sudo chown -R usr */anaconda2
使用
所有指令都可以在Using conda(http://conda.pydata.org/docs/using/index.html)找到
这里列出几个常用指令 更新conda
>conda update conda
显示可用packages
>conda list
从conda安装package
>conda install package-name
如果conda没有,可从anaconda.org(http://anaconda.org/)上搜索,键入所显示的指令即可
>conda install -c channel package-name
删除package
>conda remove package-name
更新package
>conda update package-name
GPU配置
安装CUDA
CUDA download(https://developer.nvidia.com/cuda-downloads)(本文将选择network安装) 下载完毕后执行
>sudo dpkg -i cuda-repo-ubuntu1404_7.5-18_amd64.deb
>sudo apt-get update
>sudo apt-get install cuda (耗时)
拥有cuda的并行计算模块就可以用GPU训练Theano的模型了
安装cuDNN
Theano也支持cuDNN(可选),而Tensorflow则必需要cuDNN cuDNN download(https://developer.nvidia.com/cudnn)(需要注册),下载完毕后执行
>tar xvzf cudnn-7.0-linux-x64-v4.0-prod.tgz
>sudo cp cuda/include/cudnn.h /usr/local/cuda/include
>sudo cp cuda/lib64/libcudnn* /usr/local/cuda/lib64
>sudo chmod a+r /usr/local/cuda/lib64/libcudnn*
Theano
由于Theano(http://deeplearning.net/software/theano/)对模型拥有很高的控制权,深受研究人员喜欢
安装
>sudo apt-get install g++ libopenblas-dev
>conda install git
>pip install --upgrade --no-deps git+git://github.com/Theano/Theano.git 上面默认版本应该为0.7.0,如果想安装最新版可以从anaconda.org(http://anaconda.org/)上搜索,或执行:
>pip install --upgrade --no-deps git+git://github.com/Theano/Theano.git
GPU环境变量设置
>export CUDA_ROOT=/usr/local/cuda-7.5/
>export PATH=$PATH:$CUDA_ROOT/bin
>export LD_LIBRARY_PATH=$LD_LIBRARY_PATH:$CUDA_ROOT/lib64
>export THEANO_FLAGS=mode=FAST_RUN,device=gpu,floatX=float32,allow_gc=False
>export CUDA_LAUNCH_BLOCKING=1 需要注意的是GPU只支持float32的数据,想要更多的速度,就要把数据的类型都转为float32
GPU运行测试
from theano import function, config, shared, tensor, sandbox
import numpy
import time vlen = 10 * 30 * 768 # 10 x #cores x # threads per core
iters = 1000 rng = numpy.random.RandomState(22)
x = shared(numpy.asarray(rng.rand(vlen), config.floatX))
f = function([], tensor.exp(x))
print(f.maker.fgraph.toposort())
t0 = time.time()
for i in range(iters):
r = f()
t1 = time.time()
print("Looping %d times took %f seconds" % (iters, t1 - t0))
print("Result is %s" % (r,))
if numpy.any([isinstance(x.op, tensor.Elemwise) and
('Gpu' not in type(x.op).__name__)
for x in f.maker.fgraph.toposort()]):
print('Used the cpu')
else:
print('Used the gpu')
CPU结果:
[Elemwise{exp,no_inplace}(<TensorType(float64, vector)>)]
Looping 1000 times took 3.060987 seconds
Result is [ 1.23178032 1.61879341 1.52278065 ..., 2.20771815 2.29967753
1.62323285]
Used the cpu
GPU结果:
Using gpu device 0: GeForce GTX 980 Ti (CNMeM is disabled, CuDNN 4007)
[GpuElemwise{exp,no_inplace}(<CudaNdarrayType(float32, vector)>), HostFromGpu(GpuElemwise{exp,no_inplace}.0)]
Looping 1000 times took 0.208453 seconds
Result is [ 1.23178029 1.61879349 1.52278066 ..., 2.20771813 2.29967761
1.62323296]
Used the gpu
Lasagne
安装
Lasagne(http://lasagne.readthedocs.org/en/latest/index.html)是写在Theano之上的库包,可以使用户更简单的使用深层学习训练
这里将要安装的是Lasagne 0.2.dev1版本,直接执行
>conda install -c http://conda.anaconda.org/toli lasagne
教程
这里有Lasagne tutorial(https://github.com/craffel/Lasagne-tutorial/blob/master/examples/tutorial.ipynb) 和 Lasagne tutorial2(https://github.com/ebenolson/pydata2015/blob/master/2%20-%20Lasagne%20Basics/Introduction%20to%20Lasagne.ipynb)的简单ipython教程
TensorFlow TensorFlow(https://www.tensorflow.org/)是由Google开源的深层学习包,在概念上和Theano十分相似,都是生成computational graph(https://www.tensorflow.org/versions/r0.7/get_started/basic_usage.html#basic-usage)并可自动求导,虽然表达上比Theano简洁了一些,但对于模型结构的控制能力不如Theano。当前的GPU版本还在显存占用方便有问题。总体来说十分“年轻”。但是拥有强大的公司背景。使人十分期待未来发布的版本。
安装
CPU only
>pip install --upgrade https://storage.googleapis.com/tensorflow/linux/cpu/tensorflow-0.7.1-cp27-none-linux_x86_64.whl
GPU enabled >pip install --upgrade https://storage.googleapis.com/tensorflow/linux/gpu/tensorflow-0.7.1-cp27-none-linux_x86_64.whl 遇到如下问题时
Cannot remove entries from nonexistent file /usr/local/bin/anaconda2/lib/python2.7/site-packages/easy-install.pth
执行,删除后setuptools再运行
>conda remove setuptools
GPU环境变量设置
>export LD_LIBRARY_PATH="$LD_LIBRARY_PATH:/usr/local/cuda/lib64
>export CUDA_HOME=/usr/local/cuda
简单测试
import tensorflow as tf
hello = tf.constant('Hello, TensorFlow!')
sess = tf.Session()
print(sess.run(hello)) Hello, TensorFlow! a = tf.constant(10)
b = tf.constant(32)
print(sess.run(a + b)) 期间你将会看到类似的信息 Creating TensorFlow device (/gpu:0) -> (device: 0, name: GeForce GTX 980 Ti, pci bus id: 0000:01:00.0)
TensorBoard
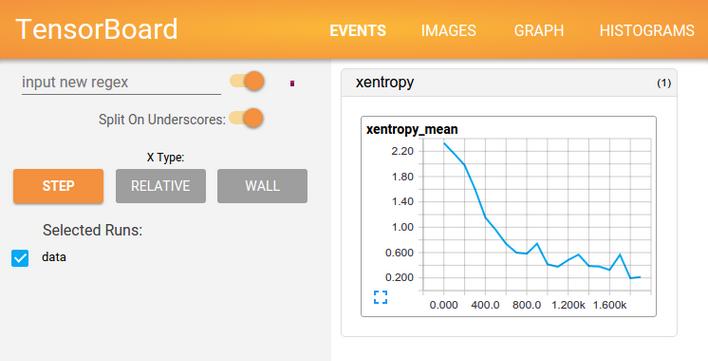
比较人性化的地方是工具TensorBoard(https://www.tensorflow.org/versions/r0.7/how_tos/graph_viz/index.html#tensorboard-graph-visualization)可以自动生成如下的交互界面,允许用户更好的追踪数据和分析自己所建的模型
追踪数据
分析模型 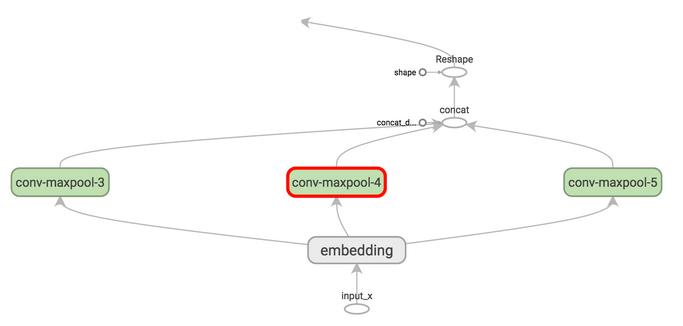
教程
还有很多教程可以参考官网:https://www.tensorflow.org/versions/r0.7/tutorials/index.html
本文永久更新地址:http://www.linuxdiyf.com/linux/18652.html
| 


 724
724


 被折叠的 条评论
为什么被折叠?
被折叠的 条评论
为什么被折叠?
 到【灌水乐园】发言


