


一、官方文档
为保证安装成功,安装顺序尽可能和官方文档保持一致,如果没有在文档中体现,往往是因为不需要具体操作步骤。
第一步:所有节点安装kubeadm
第二步:使用kubeadm引导kubernetes部署,包括在主节点初始化kubernetes集群,其他节点接入kubernetes集群。
本文主要说明第二步:使用kubeadm引导kubernetes部署
需要注意的是,本文是进行三节点安装(1个control-plane node,2个work node),三个节点的kubeadm版本相同,其中:
- 初始化集群(kubeadm init)和安装网络插件只在control-plane node上进行(本文主机k8s-1)
- 加入集群(kubeadm join)在worker node上进行(本文主机k8s-2/k8s-3)
二、网络设置
这里主要需要注意,kubernetes各节点及组件的IP地址获取方式。
kubeadm 和其他 Kubernetes 组件类似,会尝试在主机的默认网关关联的网络接口上找到一个可用的 IP 地址。找到这样的 IP 后,它会用于组件的通告和/或监听。
比如主机k8s-1默认网关经过ens33网络端口,该网络端口的IP地址11.0.1.21会被kubernetes使用。
lxhub@k8s-1:~$ ip route show
default via 11.0.1.2 dev ens33 proto static
11.0.1.0/24 dev ens33 proto kernel scope link src 11.0.1.21
lxhub@k8s-1:~$ ip a
1: lo: <LOOPBACK,UP,LOWER_UP> mtu 65536 qdisc noqueue state UNKNOWN group default qlen 1000
    link/loopback 00:00:00:00:00:00 brd 00:00:00:00:00:00
    inet 127.0.0.1/8 scope host lo
       valid_lft forever preferred_lft forever
    inet6 ::1/128 scope host
       valid_lft forever preferred_lft forever
2: ens33: <BROADCAST,MULTICAST,UP,LOWER_UP> mtu 1500 qdisc fq_codel state UP group default qlen 1000
    link/ether 00:0c:29:71:a5:18 brd ff:ff:ff:ff:ff:ff
    altname enp2s1
    inet 11.0.1.21/24 brd 11.0.1.255 scope global ens33
       valid_lft forever preferred_lft forever
    inet6 fe80::20c:29ff:fe71:a518/64 scope link
       valid_lft forever preferred_lft forever
lxhub@k8s-1:~$
三、Initializing your control-plane node
控制平面节点是指承载控制平面组件的主机(本文中为k8s-1),其中包括 etcd(集群数据库)和 API Server(kubectl 命令行工具就是和API Server通信)。
初始化控制平面节点是指在 Kubernetes 集群中设置和配置第一个控制平面节点的过程。这个过程通常包括安装和配置必要的软件组件,以便控制平面节点能够管理集群。
只在k8s-1上执行以下命令。
使用 kubeadm init 命令初始化控制平面节点。这将设置和配置 etcd、API Server、Controller Manager 和 Scheduler 等组件。
sudo kubeadm init --pod-network-cidr=10.244.0.0/16
这里的 --pod-network-cidr 参数指定了 Pod 网络的范围,这是一个常见的设置,需要和后面安装的网络插件相应的参数保持一致。
运行实例:

lxhub@k8s-1:~$ sudo kubeadm init --pod-network-cidr=10.244.0.0/16 --apiserver-advertise-address=11.0.1.21
I0518 15:05:34.006929   10492 version.go:256] remote version is much newer: v1.30.1; falling back to: stable-1.29
[init] Using Kubernetes version: v1.29.5
[preflight] Running pre-flight checks
[preflight] Pulling images required for setting up a Kubernetes cluster
[preflight] This might take a minute or two, depending on the speed of your internet connection
[preflight] You can also perform this action in beforehand using 'kubeadm config images pull'
W0518 15:12:35.247442   10492 checks.go:835] detected that the sandbox image "registry.k8s.io/pause:3.6" of the container runtime is inconsistent with that used by kubeadm. It is recommended that using "registry.k8s.io/pause:3.9" as the CRI sandbox image.
[certs] Using certificateDir folder "/etc/kubernetes/pki"
[certs] Generating "ca" certificate and key
[certs] Generating "apiserver" certificate and key
[certs] apiserver serving cert is signed for DNS names [k8s-1 kubernetes kubernetes.default kubernetes.default.svc kubernetes.default.svc.cluster.local] and IPs [10.96.0.1 11.0.1.21]
[certs] Generating "apiserver-kubelet-client" certificate and key
[certs] Generating "front-proxy-ca" certificate and key
[certs] Generating "front-proxy-client" certificate and key
[certs] Generating "etcd/ca" certificate and key
[certs] Generating "etcd/server" certificate and key
[certs] etcd/server serving cert is signed for DNS names [k8s-1 localhost] and IPs [11.0.1.21 127.0.0.1 ::1]
[certs] Generating "etcd/peer" certificate and key
[certs] etcd/peer serving cert is signed for DNS names [k8s-1 localhost] and IPs [11.0.1.21 127.0.0.1 ::1]
[certs] Generating "etcd/healthcheck-client" certificate and key
[certs] Generating "apiserver-etcd-client" certificate and key
[certs] Generating "sa" key and public key
[kubeconfig] Using kubeconfig folder "/etc/kubernetes"
[kubeconfig] Writing "admin.conf" kubeconfig file
[kubeconfig] Writing "super-admin.conf" kubeconfig file
[kubeconfig] Writing "kubelet.conf" kubeconfig file
[kubeconfig] Writing "controller-manager.conf" kubeconfig file
[kubeconfig] Writing "scheduler.conf" kubeconfig file
[etcd] Creating static Pod manifest for local etcd in "/etc/kubernetes/manifests"
[control-plane] Using manifest folder "/etc/kubernetes/manifests"
[control-plane] Creating static Pod manifest for "kube-apiserver"
[control-plane] Creating static Pod manifest for "kube-controller-manager"
[control-plane] Creating static Pod manifest for "kube-scheduler"
[kubelet-start] Writing kubelet environment file with flags to file "/var/lib/kubelet/kubeadm-flags.env"
[kubelet-start] Writing kubelet configuration to file "/var/lib/kubelet/config.yaml"
[kubelet-start] Starting the kubelet
[wait-control-plane] Waiting for the kubelet to boot up the control plane as static Pods from directory "/etc/kubernetes/manifests". This can take up to 4m0s
[apiclient] All control plane components are healthy after 15.003801 seconds
[upload-config] Storing the configuration used in ConfigMap "kubeadm-config" in the "kube-system" Namespace
[kubelet] Creating a ConfigMap "kubelet-config" in namespace kube-system with the configuration for the kubelets in the cluster
[upload-certs] Skipping phase. Please see --upload-certs
[mark-control-plane] Marking the node k8s-1 as control-plane by adding the labels: [node-role.kubernetes.io/control-plane node.kubernetes.io/exclude-from-external-load-balancers]
[mark-control-plane] Marking the node k8s-1 as control-plane by adding the taints [node-role.kubernetes.io/control-plane:NoSchedule]
[bootstrap-token] Using token: y1wqi3.xsn8x5vlctxsb7x8
[bootstrap-token] Configuring bootstrap tokens, cluster-info ConfigMap, RBAC Roles
[bootstrap-token] Configured RBAC rules to allow Node Bootstrap tokens to get nodes
[bootstrap-token] Configured RBAC rules to allow Node Bootstrap tokens to post CSRs in order for nodes to get long term certificate credentials
[bootstrap-token] Configured RBAC rules to allow the csrapprover controller automatically approve CSRs from a Node Bootstrap Token
[bootstrap-token] Configured RBAC rules to allow certificate rotation for all node client certificates in the cluster
[bootstrap-token] Creating the "cluster-info" ConfigMap in the "kube-public" namespace
[kubelet-finalize] Updating "/etc/kubernetes/kubelet.conf" to point to a rotatable kubelet client certificate and key
[addons] Applied essential addon: CoreDNS
[addons] Applied essential addon: kube-proxy

Your Kubernetes control-plane has initialized successfully!

To start using your cluster, you need to run the following as a regular user:

  mkdir -p $HOME/.kube
  sudo cp -i /etc/kubernetes/admin.conf $HOME/.kube/config
  sudo chown $(id -u):$(id -g) $HOME/.kube/config

Alternatively, if you are the root user, you can run:

  export KUBECONFIG=/etc/kubernetes/admin.conf

You should now deploy a pod network to the cluster.
Run "kubectl apply -f [podnetwork].yaml" with one of the options listed at:
  https://kubernetes.io/docs/concepts/cluster-administration/addons/

Then you can join any number of worker nodes by running the following on each as root:

kubeadm join 11.0.1.21:6443 --token y1wqi3.xsn8x5vlctxsb7x8 \
        --discovery-token-ca-cert-hash sha256:165cf4057b99b964234e2987802172fde221bee1970f5ce8df80e45a4ecec1fa
lxhub@k8s-1:~$
执行kubeadm init命令后,输出有“Your Kubernetes control-plane has initialized successfully!”表示初始化成功。
根据kubeadm init命令输出中的提示,继续执行:
mkdir -p $HOME/.kube
sudo cp -i /etc/kubernetes/admin.conf $HOME/.kube/config
sudo chown $(id -u):$(id -g) $HOME/.kube/config
运行实例:
lxhub@k8s-1:~$ mkdir -p $HOME/.kube
lxhub@k8s-1:~$ sudo cp -i /etc/kubernetes/admin.conf $HOME/.kube/config
lxhub@k8s-1:~$ sudo chown $(id -u):$(id -g) $HOME/.kube/config
此时,可以执行kubectl get pods,输出表明在默认命名空间中没有找到任何资源。
lxhub@k8s-1:~/.kube$ kubectl get pods
No resources found in default namespace.
需要复制输出中的以下命令,用于后面节点加入集群时使用:
kubeadm join 11.0.1.21:6443 --token y1wqi3.xsn8x5vlctxsb7x8 \
--discovery-token-ca-cert-hash sha256:165cf4057b99b964234e2987802172fde221bee1970f5ce8df80e45a4ecec1fa
四、Installing a Pod network add-on
需要部署一个基于容器网络接口(Container Network Interface,CNI)的 Pod 网络插件,以便 Pod 之间可以进行通信。在安装网络之前,集群 DNS(CoreDNS)将不会启动。
在 Kubernetes 1.24 之前,CNI 插件也可以通过 kubelet 使用 cni-bin-dir 和 network-plugin 命令行参数进行管理。然而,在 Kubernetes 1.24 中,这些命令行参数被移除了,kubelet 不再负责管理 CNI。
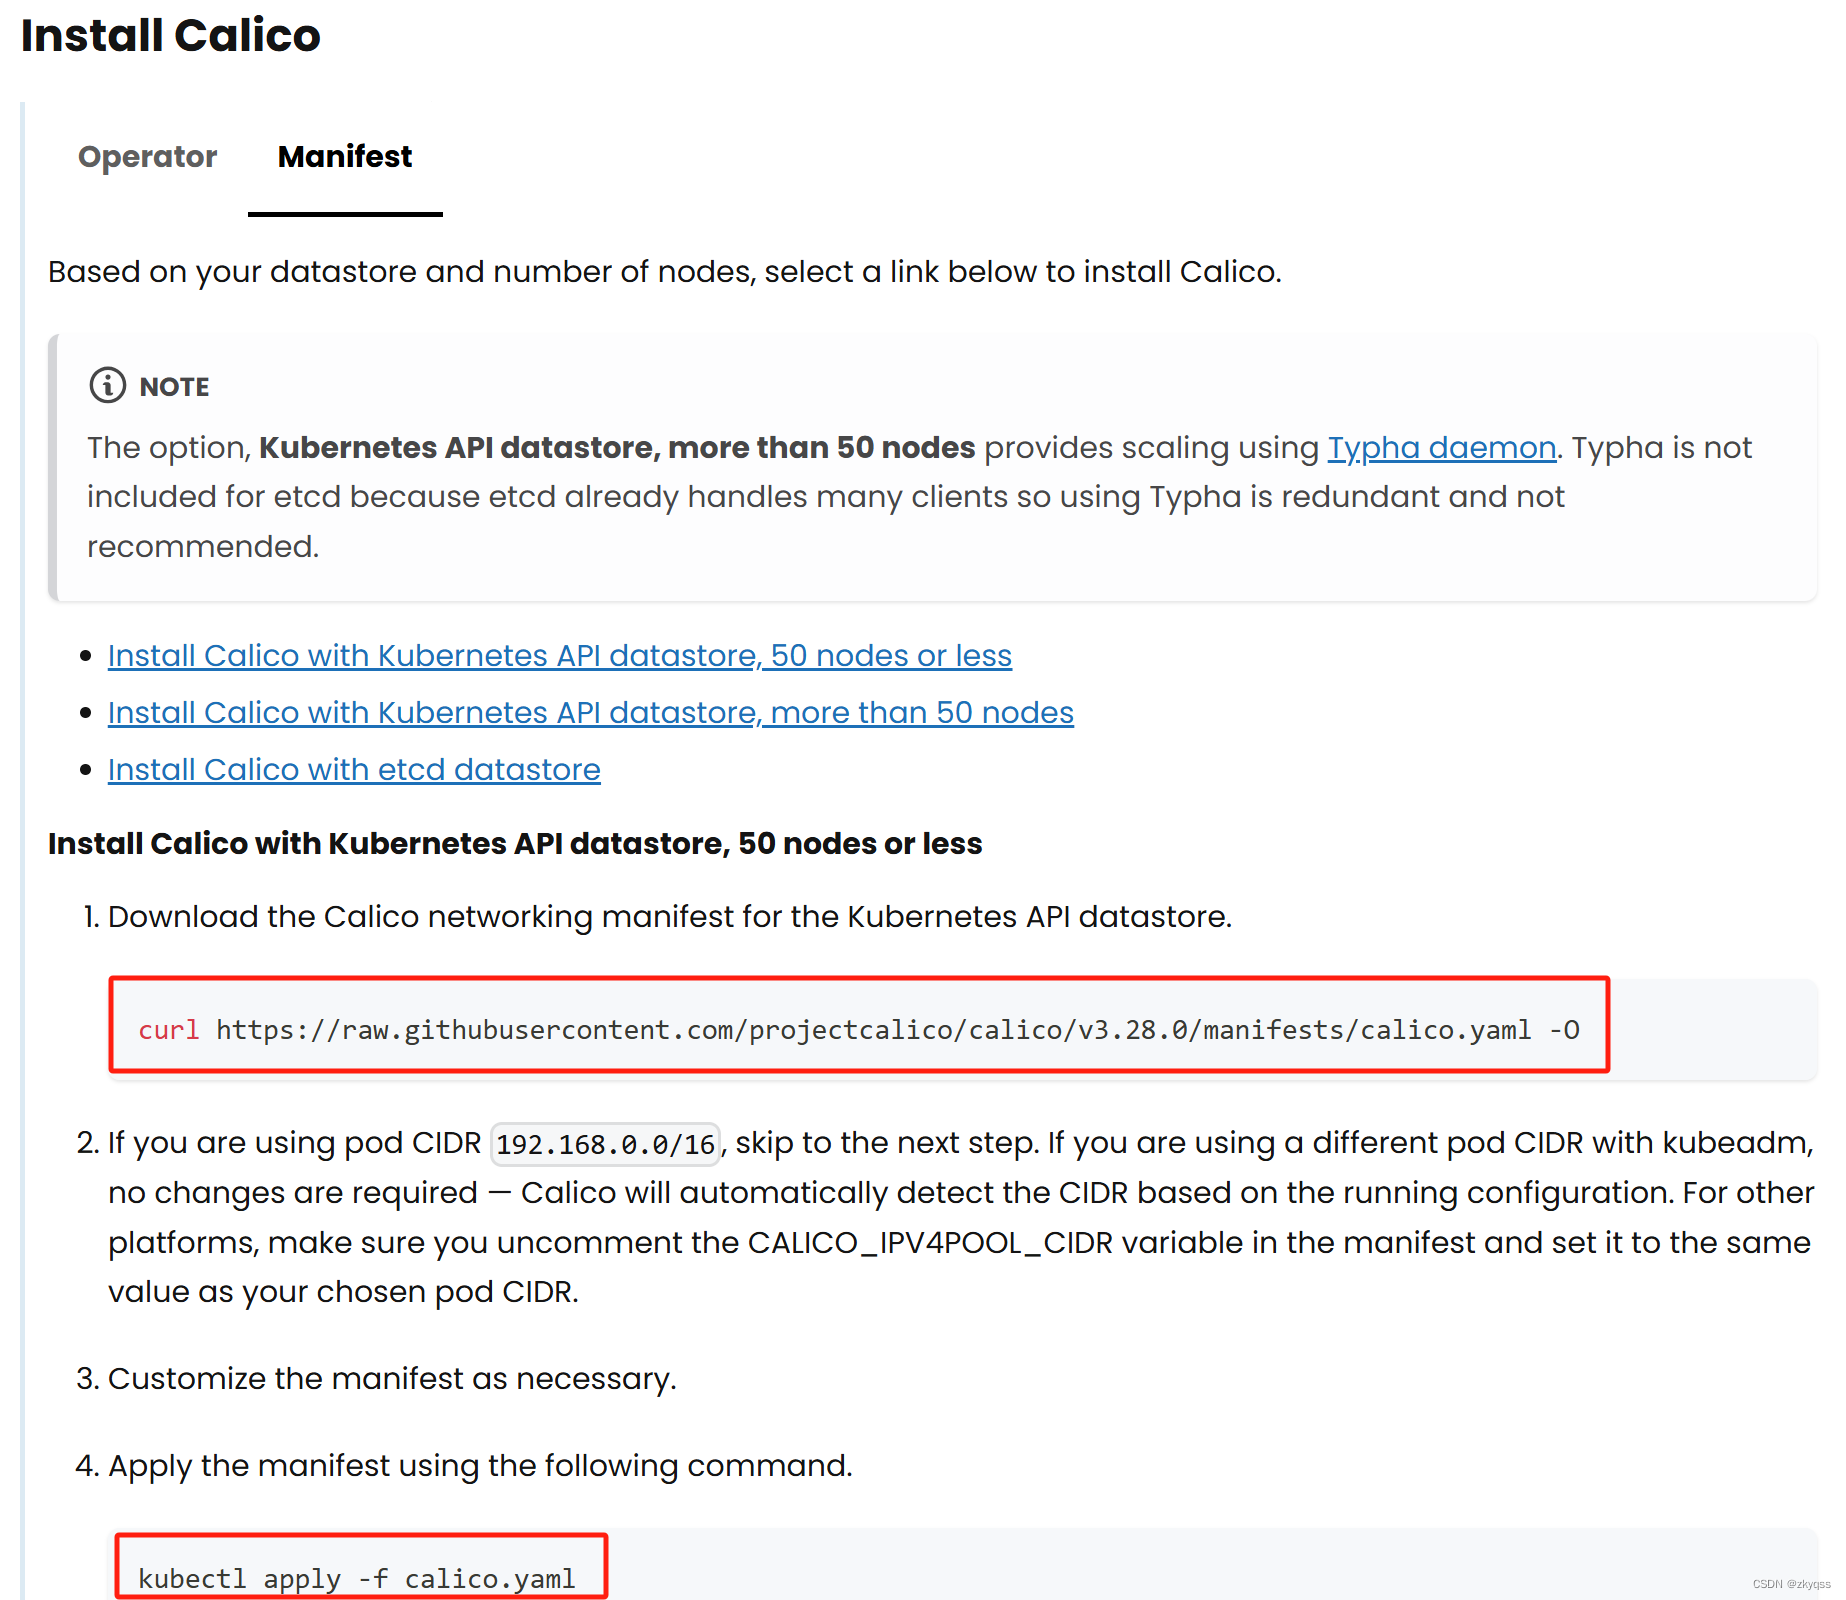
本文选择安装Calico网络插件,同时选择Calico manifests安装方式(网页截图如下)
只在k8s-1上执行以下命令。
1、Download the Calico networking manifest for the Kubernetes API datastore.
下载的 Calico 配置文件 calico.yaml 通常保存在你运行 curl -O 命令的当前目录下。
curl https://raw.githubusercontent.com/projectcalico/calico/v3.28.0/manifests/calico.yaml -O


运行实例:

lxhub@k8s-1:~$ curl https://raw.githubusercontent.com/projectcalico/calico/v3.28.0/manifests/calico.yaml -O
  % Total    % Received % Xferd  Average Speed   Time    Time     Time  Current
                                 Dload  Upload   Total   Spent    Left  Speed
100  247k  100  247k    0     0   195k      0  0:00:01  0:00:01 --:--:--  195k

lxhub@k8s-1:~$ ls -l calico.yaml
-rw-rw-r-- 1 lxhub lxhub 253815 May 18 21:57 calico.yaml (文件大小可能不一致)
2、关于Pod CIDR
如果你在使用 kubeadm 初始化 Kubernetes 集群时指定了一个与calico网络插件默认的 Pod CIDR(192.168.0.0/16)不同的 CIDR 地址(本文为10.244.0.0/16),那么在部署 Calico 时不需要做任何更改。因为 Calico 会自动检测正在运行的配置,并根据它来配置自己。
这意味着,当你使用不同的 Pod CIDR 地址时,Calico 会根据当前配置来适应,并正确地配置自己以使其与集群一起正常工作。因此,你可以继续按照部署 Calico 的步骤进行,而无需手动更改任何配置以适应你的 Pod CIDR。
3、Apply the manifest using the following command.
kubectl apply -f calico.yaml
运行实例:

lxhub@k8s-1:~$ kubectl apply -f calico.yaml
poddisruptionbudget.policy/calico-kube-controllers created
serviceaccount/calico-kube-controllers created
serviceaccount/calico-node created
serviceaccount/calico-cni-plugin created
configmap/calico-config created
customresourcedefinition.apiextensions.k8s.io/bgpconfigurations.crd.projectcalico.org created
customresourcedefinition.apiextensions.k8s.io/bgpfilters.crd.projectcalico.org created
customresourcedefinition.apiextensions.k8s.io/bgppeers.crd.projectcalico.org created
customresourcedefinition.apiextensions.k8s.io/blockaffinities.crd.projectcalico.org created
customresourcedefinition.apiextensions.k8s.io/caliconodestatuses.crd.projectcalico.org created
customresourcedefinition.apiextensions.k8s.io/clusterinformations.crd.projectcalico.org created
customresourcedefinition.apiextensions.k8s.io/felixconfigurations.crd.projectcalico.org created
customresourcedefinition.apiextensions.k8s.io/globalnetworkpolicies.crd.projectcalico.org created
customresourcedefinition.apiextensions.k8s.io/globalnetworksets.crd.projectcalico.org created
customresourcedefinition.apiextensions.k8s.io/hostendpoints.crd.projectcalico.org created
customresourcedefinition.apiextensions.k8s.io/ipamblocks.crd.projectcalico.org created
customresourcedefinition.apiextensions.k8s.io/ipamconfigs.crd.projectcalico.org created
customresourcedefinition.apiextensions.k8s.io/ipamhandles.crd.projectcalico.org created
customresourcedefinition.apiextensions.k8s.io/ippools.crd.projectcalico.org created
customresourcedefinition.apiextensions.k8s.io/ipreservations.crd.projectcalico.org created
customresourcedefinition.apiextensions.k8s.io/kubecontrollersconfigurations.crd.projectcalico.org created
customresourcedefinition.apiextensions.k8s.io/networkpolicies.crd.projectcalico.org created
customresourcedefinition.apiextensions.k8s.io/networksets.crd.projectcalico.org created
clusterrole.rbac.authorization.k8s.io/calico-kube-controllers created
clusterrole.rbac.authorization.k8s.io/calico-node created
clusterrole.rbac.authorization.k8s.io/calico-cni-plugin created
clusterrolebinding.rbac.authorization.k8s.io/calico-kube-controllers created
clusterrolebinding.rbac.authorization.k8s.io/calico-node created
clusterrolebinding.rbac.authorization.k8s.io/calico-cni-plugin created
daemonset.apps/calico-node created
deployment.apps/calico-kube-controllers created
lxhub@k8s-1:~$
4、检查各组件运行状态,Pod 都在 Running 状态,这意味着它们都在正常运行。
- Calico:负责管理网络和安全策略,两个 Calico Pod(控制器和节点代理)都在正常运行。
- CoreDNS:提供 DNS 服务,两个 Pod 都在正常运行。
- etcd:Kubernetes 的数据存储,运行正常。
- Kubernetes 控制平面组件(API Server、Controller Manager、Scheduler):都在正常运行。
- kube-proxy:负责网络规则和负载均衡,运行正常。
lxhub@k8s-1:~$ kubectl get pods -A
NAMESPACE     NAME                                      READY   STATUS    RESTARTS      AGE
kube-system   calico-kube-controllers-8d76c5f9b-8x75z   1/1     Running   0             15m
kube-system   calico-node-flzxf                         1/1     Running   0             15m
kube-system   coredns-76f75df574-kwxtc                  1/1     Running   0             6h58m
kube-system   coredns-76f75df574-xrb8n                  1/1     Running   0             6h58m
kube-system   etcd-k8s-1                                1/1     Running   1 (26m ago)   6h59m
kube-system   kube-apiserver-k8s-1                      1/1     Running   1 (26m ago)   6h59m
kube-system   kube-controller-manager-k8s-1             1/1     Running   1 (26m ago)   6h59m
kube-system   kube-proxy-t85km                          1/1     Running   1 (26m ago)   6h58m
kube-system   kube-scheduler-k8s-1                      1/1     Running   1 (26m ago)   6h59m
lxhub@k8s-1:~$

lxhub@k8s-1:~$ kubectl get nodes
NAME    STATUS   ROLES           AGE    VERSION
k8s-1   Ready    control-plane   7h2m   v1.29.5
lxhub@k8s-1:~$
五、Joining your nodes
kubeadm join 命令用于将一个新的节点加入到现有的 Kubernetes 集群中。在k8s-2/k8s-3上直接执行之前复制的kubeadm join命令即可。
k8s-2(worker node)上执行:
lxhub@k8s-2:~$ sudo su -
[sudo] password for lxhub:
root@k8s-2:~# kubeadm join 11.0.1.21:6443 --token y1wqi3.xsn8x5vlctxsb7x8 \
>         --discovery-token-ca-cert-hash sha256:165cf4057b99b964234e2987802172fde221bee1970f5ce8df80e45a4ecec1fa
[preflight] Running pre-flight checks
[preflight] Reading configuration from the cluster...
[preflight] FYI: You can look at this config file with 'kubectl -n kube-system get cm kubeadm-config -o yaml'
[kubelet-start] Writing kubelet configuration to file "/var/lib/kubelet/config.yaml"
[kubelet-start] Writing kubelet environment file with flags to file "/var/lib/kubelet/kubeadm-flags.env"
[kubelet-start] Starting the kubelet
[kubelet-start] Waiting for the kubelet to perform the TLS Bootstrap...

This node has joined the cluster:
* Certificate signing request was sent to apiserver and a response was received.
* The Kubelet was informed of the new secure connection details.

Run 'kubectl get nodes' on the control-plane to see this node join the cluster.
k8s-3(worker node)上执行:
lxhub@k8s-3:~$ sudo su -
[sudo] password for lxhub:
root@k8s-3:~# kubeadm join 11.0.1.21:6443 --token y1wqi3.xsn8x5vlctxsb7x8 \
>         --discovery-token-ca-cert-hash sha256:165cf4057b99b964234e2987802172fde221bee1970f5ce8df80e45a4ecec1fa
[preflight] Running pre-flight checks
[preflight] Reading configuration from the cluster...
[preflight] FYI: You can look at this config file with 'kubectl -n kube-system get cm kubeadm-config -o yaml'
[kubelet-start] Writing kubelet configuration to file "/var/lib/kubelet/config.yaml"
[kubelet-start] Writing kubelet environment file with flags to file "/var/lib/kubelet/kubeadm-flags.env"
[kubelet-start] Starting the kubelet
[kubelet-start] Waiting for the kubelet to perform the TLS Bootstrap...

This node has joined the cluster:
* Certificate signing request was sent to apiserver and a response was received.
* The Kubelet was informed of the new secure connection details.

Run 'kubectl get nodes' on the control-plane to see this node join the cluster.
k8s-1(control plane node)上检查:
lxhub@k8s-1:~$ kubectl get nodes
NAME    STATUS   ROLES           AGE     VERSION
k8s-1   Ready    control-plane   7h26m   v1.29.5
k8s-2   Ready    <none>          8m44s   v1.29.5
k8s-3   Ready    <none>          7m28s   v1.29.5
lxhub@k8s-1:~$ kubectl get pods -A
NAMESPACE     NAME                                      READY   STATUS    RESTARTS      AGE
kube-system   calico-kube-controllers-8d76c5f9b-8x75z   1/1     Running   0             43m
kube-system   calico-node-6smqr                         1/1     Running   0             8m52s
kube-system   calico-node-bdl5g                         1/1     Running   0             7m36s
kube-system   calico-node-flzxf                         1/1     Running   0             43m
kube-system   coredns-76f75df574-kwxtc                  1/1     Running   0             7h26m
kube-system   coredns-76f75df574-xrb8n                  1/1     Running   0             7h26m
kube-system   etcd-k8s-1                                1/1     Running   1 (54m ago)   7h26m
kube-system   kube-apiserver-k8s-1                      1/1     Running   1 (54m ago)   7h26m
kube-system   kube-controller-manager-k8s-1             1/1     Running   1 (54m ago)   7h26m
kube-system   kube-proxy-j8vpd                          1/1     Running   0             8m52s
kube-system   kube-proxy-smcnn                          1/1     Running   0             7m36s
kube-system   kube-proxy-t85km                          1/1     Running   1 (54m ago)   7h26m
kube-system   kube-scheduler-k8s-1                      1/1     Running   1 (54m ago)   7h26m
lxhub@k8s-1:~$
六、简单测试
可以通过创建/删除pod简单检查集群是否正常工作。
lxhub@k8s-1:~$ kubectl run nginx --image=nginx
pod/nginx created

lxhub@k8s-1:~$ kubectl get pod
NAME    READY   STATUS    RESTARTS   AGE
nginx   1/1     Running   0          26s

lxhub@k8s-1:~$ kubectl get pod -o wide
NAME    READY   STATUS    RESTARTS   AGE   IP               NODE    NOMINATED NODE   READINESS GATES
nginx   1/1     Running   0          59s   10.244.200.193   k8s-2   <none>           <none>

lxhub@k8s-1:~$ kubectl delete pod nginx
pod "nginx" deleted

lxhub@k8s-1:~$ kubectl get pod
No resources found in default namespace.
lxhub@k8s-1:~$ 


 1573
1573


 被折叠的 条评论
为什么被折叠?
被折叠的 条评论
为什么被折叠?
 到【灌水乐园】发言


