1.下载tomcat 插件
首先下载 对应 eclipse 版本的 tomcat 插件版本,(这里要注意: Tomcat 插件是Tomcat 插件,Tomcat 是 Tomcat, 两者不能混淆!),下载地址:http://www.eclipsetotale.com/tomcatPlugin.html 2.安装方法(见所下插件安装包中的readme文件,这里是最新的插件3.3.0)
Installation
- This plugin does not contain Tomcat.
(Download and install Tomcat before using it) - Download tomcatPluginV??.zip
- Unzip it in <eclipse_home>/plugins
- Plugin activation for Eclipse 3.x :
- launch eclipse once using this option : -clean
- if Tomcat icons are not shown in toolbar : select menu 'Window>Customize Perspective...>Commands', and check 'Tomcat' in 'Available command groups'
- Set Tomcat version and Tomcat home : Workbench -> Preferences, select Tomcat and set Tomcat version and Tomcat home
(Tomcat version and Tomcat home are the only required fields, other settings are there for advanced configuration).
- This plugin launches Tomcat using the default JRE checked in Eclipe preferences window.
To set a JDK as default JRE for Eclipse open the preference window : Window -> Preferences -> Java -> Installed JREs.
This JRE must be a JDK (This is a Tomcat prerequisite).
- The plugin sets itself Tomcat classpath and bootclasspath. Use Preferences -> Tomcat ->JVM Settings, only if you need specific settings.
将得到的压缩包解压,放入 eclipse 的 plugins 目录中重启 eclipse, Tomcat 插件安装成功!
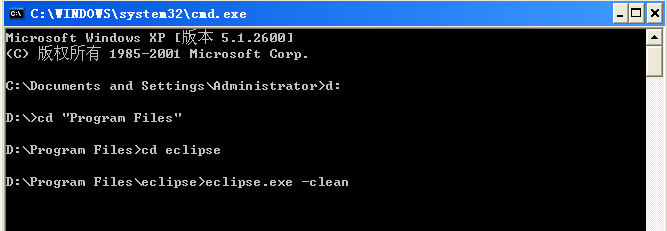
如此时eclipse工具栏中的tomcat图标仍未显示,可在cmd窗口,进入安装eclipse的文件夹,然后使用 “eclipse.exe -clean”命令启动eclipse重新加载工具栏即可。如下图:

3.修改tomcat配置文件(注:以下为tomcat配置与上文无关)
修改tomcat安装文件中conf文件夹下的server.xml文件:
1.添加
URIEncoding="utf-8"/>
防止中文乱码。
<Connector port="8080" protocol="HTTP/1.1"
connectionTimeout="20000"
redirectPort="8443" URIEncoding="utf-8"/>
connectionTimeout="20000"
redirectPort="8443" URIEncoding="utf-8"/>
2.后面添加项目路径配置:
<Context path="/econtract" docBase="G:\workspace\econtract\WebContent" reloadable="true" />


 在Eclipse中安装Tomcat插件后,若遇到工具栏未显示Tomcat图标,可以通过菜单'Window>Customize Perspective...>Commands'勾选'Tomcat'来解决。首先下载并解压tomcatPlugin到<eclipse_home>/plugins目录,然后通过Workbench -> Preferences设置Tomcat版本和Tomcat主目录。确保使用的是JDK,并在Eclipse偏好设置中设置默认JRE。若需特定JVM设置,可在Preferences -> Tomcat -> JVM Settings中调整。


 1万+
1万+

 被折叠的 条评论
为什么被折叠?


