


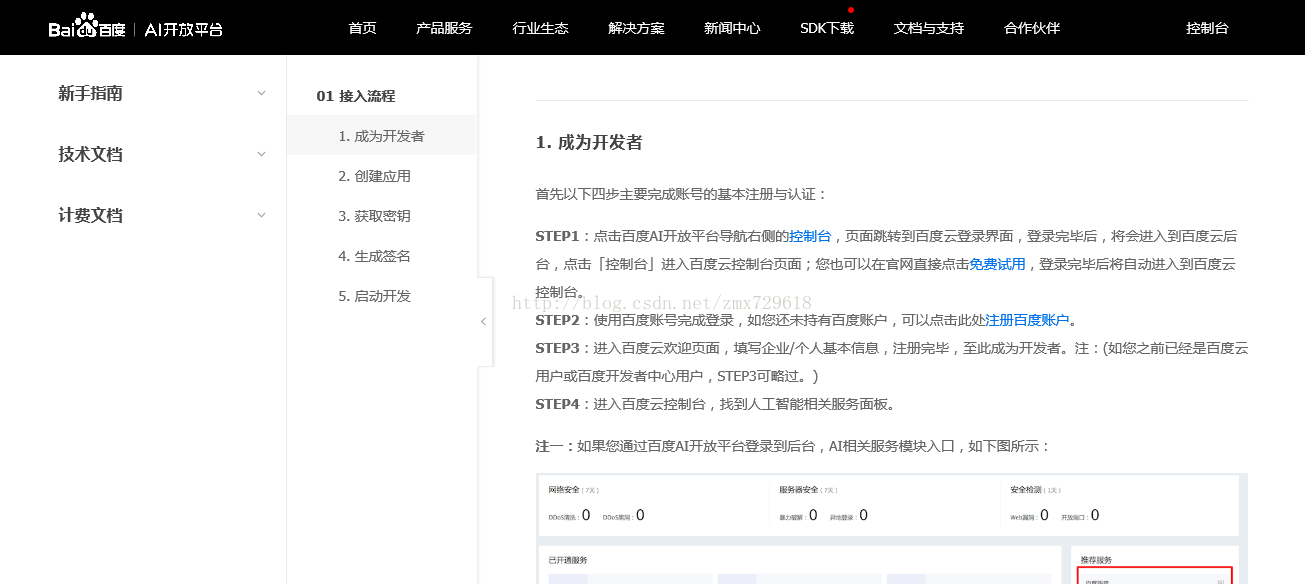
1.注册开发人员并查看官网API文档
网址:http://ai.baidu.com/docs
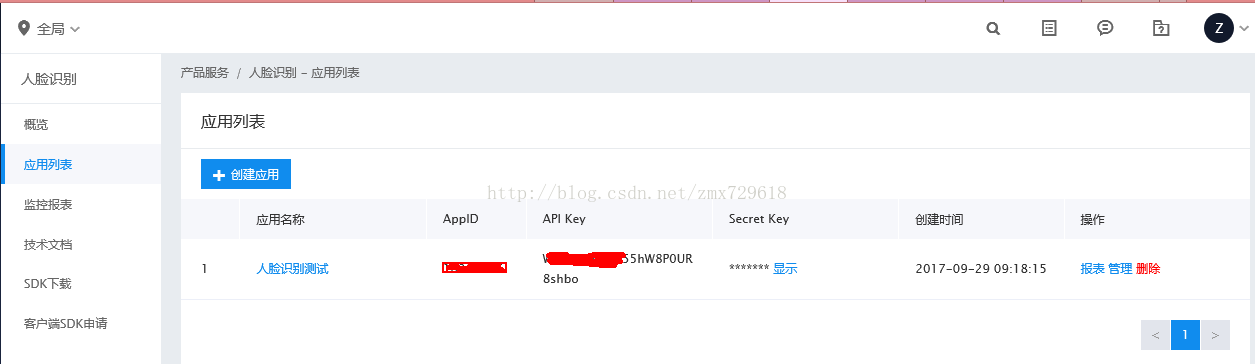
2.在管理中心创建应用及查看相关参数 AppID APIKey SecretKey都需要保存起来
3.开发测试
3.1、调用百度云人脸识别API需要两步
1、首先根据创建的应用,获取token,该token有效期为1个月。token的授权服务地址:https://aip.baidubce.com/oauth/2.0/token;
发送请求(推荐使用POST),并在URL中带上以下参数:
grant_type: 必须参数,固定为“client_credentials”;
client_id: 必须参数,应用的API Key;
client_secret: 必须参数,应用的Secret Key;
2、根据token调用api,服务地址:https://aip.baidubce.com/rest/2.0/face/v1/detect
具体实现代码如下:
package com.zmx.baiduaitest;

import org.apache.http.client.methods.CloseableHttpResponse;

import java.util.HashMap;
import java.util.Map;

/**
 * Created by zhangwenchao on 2017/9/29.
 */
public class FaceAPITest {

    public static void main(String[] args) {
        //  getToKenTest() ;
        faceDetecttest();
    }

    //获取token
    public static void getToKenTest(){

        //使用其测试百度云API---获取token
        //url: http://console.bce.baidu.com/ai

        String APPID ="10201***"; //管理中心获得

        //百度人脸识别应用apikey
        String API_KEY = "WVsGWvDxyn55hW8P*******"; //管理中心获得

        //百度人脸识别应用sercetkey
        String SERCET_KEY = "z0uSr16LGyTNIMRRnP6f8jCL*****"; //管理中心获得

        //百度人脸识别token 有效期一个月
        String TOKEN = null;


        String access_token_url = "https://aip.baidubce.com/oauth/2.0/token?grant_type=client_credentials"
                +"&client_id="+API_KEY +"&client_secret="+SERCET_KEY;

        CloseableHttpResponse response =  HttpClientUtils.doHttpsGet(access_token_url,null);

        System.out.println(HttpClientUtils.toString(response));


        //得到token = 24.1d786b9cdbdd8ac7cf55d56c7f38372b.2592000.1509244497.282335-10201425


    }

    //使用token调用API
    public static void faceDetecttest(){

        String token = "24.1d786b9cdbdd8ac7cf55d56c7f38372b.2592000.1509244497.282335-10201425";

        String Filepath = "E:/test.jpg";
        String image = Base64ImageUtils.GetImageStrFromPath(Filepath);
        String url = "https://aip.baidubce.com/rest/2.0/face/v1/detect?access_token="+token;

        Map<String, String> headers = new HashMap<String, String>();
        headers.put("Content-Type", "application/x-www-form-urlencoded");

        Map<String, String> bodys = new HashMap<String, String>();
        bodys.put("image", image);
        bodys.put("face_fields", "age,beauty,expression,gender,glasses,race,qualities");

        try {
            CloseableHttpResponse response =  HttpClientUtils.doHttpsPost(url,headers,bodys);
            System.out.println(HttpClientUtils.toString(response));
        } catch (Exception e) {
            e.printStackTrace();
        }


    }

}
上述用到了几个工具类如下:
HttpClientUtils.java:httpclient工具类用于发起get、post请求
package com.zmx.baiduaitest;

import org.apache.http.*;
import org.apache.http.client.CookieStore;
import org.apache.http.client.config.AuthSchemes;
import org.apache.http.client.config.CookieSpecs;
import org.apache.http.client.config.RequestConfig;
import org.apache.http.client.entity.UrlEncodedFormEntity;
import org.apache.http.client.methods.CloseableHttpResponse;
import org.apache.http.client.methods.HttpGet;
import org.apache.http.client.methods.HttpPost;
import org.apache.http.client.protocol.HttpClientContext;
import org.apache.http.config.Registry;
import org.apache.http.config.RegistryBuilder;
import org.apache.http.conn.socket.ConnectionSocketFactory;
import org.apache.http.conn.socket.PlainConnectionSocketFactory;
import org.apache.http.conn.ssl.NoopHostnameVerifier;
import org.apache.http.conn.ssl.SSLConnectionSocketFactory;
import org.apache.http.cookie.Cookie;
import org.apache.http.impl.client.*;
import org.apache.http.impl.conn.PoolingHttpClientConnectionManager;
import org.apache.http.message.BasicNameValuePair;
import org.apache.http.util.EntityUtils;

import javax.net.ssl.SSLContext;
import javax.net.ssl.TrustManager;
import javax.net.ssl.X509TrustManager;
import java.io.IOException;
import java.security.KeyManagementException;
import java.security.NoSuchAlgorithmException;
import java.security.cert.CertificateException;
import java.security.cert.X509Certificate;
import java.util.ArrayList;
import java.util.Arrays;
import java.util.List;
import java.util.Map;

/**
 * HttpClient4.5.X实现的工具类
 * 可以实现http和ssl的get/post请求
 */
public class HttpClientUtils{
    //创建HttpClientContext上下文
    private static HttpClientContext context = HttpClientContext.create();

    //请求配置
    private static RequestConfig requestConfig = RequestConfig.custom()
                    .setConnectTimeout(120000)
                    .setSocketTimeout(60000)
                    .setConnectionRequestTimeout(60000)
                    .setCookieSpec(CookieSpecs.STANDARD_STRICT)
                    .setExpectContinueEnabled(true)
                    .setTargetPreferredAuthSchemes(Arrays.asList(AuthSchemes.NTLM, AuthSchemes.DIGEST))
                    .setProxyPreferredAuthSchemes(Arrays.asList(AuthSchemes.BASIC)).build();

    //SSL的连接工厂
    private static SSLConnectionSocketFactory socketFactory = null;

    //信任管理器--用于ssl连接
    private static TrustManager manager = new X509TrustManager() {


        public void checkClientTrusted(X509Certificate[] x509Certificates, String s) throws CertificateException {

        }

        public void checkServerTrusted(X509Certificate[] x509Certificates, String s) throws CertificateException {

        }

        public X509Certificate[] getAcceptedIssuers() {
            return null;
        }
    };

    //ssl请求
    private static void enableSSL() {
        try {
            SSLContext sslContext = SSLContext.getInstance("TLS");
            sslContext.init(null, new TrustManager[]{manager}, null);
            socketFactory = new SSLConnectionSocketFactory(sslContext, NoopHostnameVerifier.INSTANCE);
        } catch (NoSuchAlgorithmException e) {
            e.printStackTrace();
        } catch (KeyManagementException e) {
            e.printStackTrace();
        }
    }

    /**
     * https get请求
     * @param url
     * @param data
     * @return
     * @throws IOException
     */
    public static CloseableHttpResponse doHttpsGet(String url, String data){
        enableSSL();
        Registry<ConnectionSocketFactory> socketFactoryRegistry = RegistryBuilder.<ConnectionSocketFactory>create()
                                                   .register("http", PlainConnectionSocketFactory.INSTANCE)
                                                   .register("https", socketFactory).build();

        PoolingHttpClientConnectionManager connectionManager = new PoolingHttpClientConnectionManager(socketFactoryRegistry);

        CloseableHttpClient httpClient = HttpClients.custom()
                                        .setConnectionManager(connectionManager)
                                        .setDefaultRequestConfig(requestConfig).build();

        HttpGet httpGet = new HttpGet(url);

        CloseableHttpResponse response = null;

        try {
            response = httpClient.execute(httpGet, context);
        }catch (Exception e){
            e.printStackTrace();
        }

        return response;
    }

    /**
     * https post请求 参数为名值对
     * @param url
     * @param headers
     * @param bodys
     * @return
     * @throws IOException
     */
    public static CloseableHttpResponse doHttpsPost(String url, Map<String, String> headers, Map<String, String> bodys) {
        enableSSL();
        Registry<ConnectionSocketFactory> socketFactoryRegistry = RegistryBuilder.<ConnectionSocketFactory>create()
                                                       .register("http", PlainConnectionSocketFactory.INSTANCE)
                                                       .register("https", socketFactory).build();

        PoolingHttpClientConnectionManager connectionManager = new PoolingHttpClientConnectionManager(socketFactoryRegistry);

        CloseableHttpClient httpClient = HttpClients.custom()
                                         .setConnectionManager(connectionManager)
                                         .setDefaultRequestConfig(requestConfig).build();

        HttpPost httpPost = new HttpPost(url);

        for (Map.Entry<String, String> e : headers.entrySet()) {
            httpPost.addHeader(e.getKey(), e.getValue());
        }

        if (bodys != null) {
            List<NameValuePair> nameValuePairList = new ArrayList<NameValuePair>();
            for (String key : bodys.keySet()) {
                nameValuePairList.add(new BasicNameValuePair(key, bodys.get(key)));
            }
            UrlEncodedFormEntity formEntity = new UrlEncodedFormEntity(nameValuePairList, Consts.UTF_8);
            formEntity.setContentType("application/x-www-form-urlencoded; charset=UTF-8");
            httpPost.setEntity(formEntity);
        }

        CloseableHttpResponse response = null;
        try {
            response = httpClient.execute(httpPost, context);
        }catch (Exception e){}
        return response;
    }
    /**
     * https post请求 参数为名值对
     * @param url
     * @param values
     * @return
     * @throws IOException
     */
    public static CloseableHttpResponse doHttpsPost(String url, List<NameValuePair> values) {
        enableSSL();
        Registry<ConnectionSocketFactory> socketFactoryRegistry = RegistryBuilder.<ConnectionSocketFactory>create()
                                                       .register("http", PlainConnectionSocketFactory.INSTANCE)
                                                       .register("https", socketFactory).build();

        PoolingHttpClientConnectionManager connectionManager = new PoolingHttpClientConnectionManager(socketFactoryRegistry);

        CloseableHttpClient httpClient = HttpClients.custom()
                                         .setConnectionManager(connectionManager)
                                         .setDefaultRequestConfig(requestConfig).build();

        HttpPost httpPost = new HttpPost(url);

        UrlEncodedFormEntity entity = new UrlEncodedFormEntity(values, Consts.UTF_8);

        httpPost.setEntity(entity);

        CloseableHttpResponse response = null;
        try {
            response = httpClient.execute(httpPost, context);
        }catch (Exception e){}
        return response;
    }

    /**
     * http get
     * @param url
     * @param data
     * @return
     */
    public static CloseableHttpResponse doGet(String url, String data) {

        CookieStore cookieStore = new BasicCookieStore();

        CloseableHttpClient httpClient = HttpClientBuilder.create()
                            .setKeepAliveStrategy(new DefaultConnectionKeepAliveStrategy())
                            .setRedirectStrategy(new DefaultRedirectStrategy())
                            .setDefaultCookieStore(cookieStore)
                            .setDefaultRequestConfig(requestConfig).build();

        HttpGet httpGet = new HttpGet(url);

        CloseableHttpResponse response = null;

        try {
            response = httpClient.execute(httpGet, context);
        }catch (Exception e){}
        return response;
    }

    /**
     * http post
     *
     * @param url
     * @param values
     * @return
     */
    public static CloseableHttpResponse doPost(String url, List<NameValuePair> values) {
        CookieStore cookieStore = new BasicCookieStore();
        CloseableHttpClient httpClient = HttpClientBuilder.create()
                            .setKeepAliveStrategy(new DefaultConnectionKeepAliveStrategy())
                            .setRedirectStrategy(new DefaultRedirectStrategy())
                            .setDefaultCookieStore(cookieStore)
                            .setDefaultRequestConfig(requestConfig).build();

        HttpPost httpPost = new HttpPost(url);

        UrlEncodedFormEntity entity = new UrlEncodedFormEntity(values, Consts.UTF_8);

        httpPost.setEntity(entity);

        CloseableHttpResponse response = null;
        try {
            response = httpClient.execute(httpPost, context);
        }catch (Exception e){}
        return response;
    }


    /**
     * 直接把Response内的Entity内容转换成String
     *
     * @param httpResponse
     * @return
     */
    public static String toString(CloseableHttpResponse httpResponse) {
        // 获取响应消息实体
        String result = null;
        try {
            HttpEntity entity = httpResponse.getEntity();
            if (entity != null) {
                result = EntityUtils.toString(entity,"UTF-8");
            }
        }catch (Exception e){}finally {
            try {
                httpResponse.close();
            } catch (IOException e) {
                e.printStackTrace();
            }
        }
        return result;
    }


    public static void main(String[] args){
       //使用其测试百度云API---获取token
       //url: http://console.bce.baidu.com/ai

        String APPID ="10201425"; //管理中心获得

        //百度人脸识别应用apikey
        String API_KEY = "WVsGWvDxyn55hW8P0UR8shbo"; //管理中心获得

        //百度人脸识别应用sercetkey
        String SERCET_KEY = "z0uSr16LGyTNIMRRnP6f8jCLMLXAYkIj"; //管理中心获得

        //百度人脸识别token 有效期一个月
        String TOKEN = null;


        String access_token_url = "https://aip.baidubce.com/oauth/2.0/token?grant_type=client_credentials"
                                   +"&client_id="+API_KEY +"&client_secret="+SERCET_KEY;

        CloseableHttpResponse response =  HttpClientUtils.doHttpsGet(access_token_url,null);

        System.out.println(HttpClientUtils.toString(response));


        //得到token = 24.1d786b9cdbdd8ac7cf55d56c7f38372b.2592000.1509244497.282335-10201425


    }


}
Base64ImageUtils.java:图片转换工具类,用于图片文件与base64数据格式图片进行互转
package com.zmx.baiduaitest;


import java.io.FileInputStream;
import java.io.FileOutputStream;
import java.io.IOException;
import java.io.InputStream;
import java.io.OutputStream;
import java.net.HttpURLConnection;
import java.net.URL;

import sun.misc.BASE64Decoder;
import sun.misc.BASE64Encoder;

/**
 * Created by zhangwenchao on 2017/9/29.
 * 本地或者网络图片资源转为Base64字符串
 */
public class Base64ImageUtils {
    /**
     * @Title: GetImageStrFromUrl
     * @Description: 将一张网络图片转化成Base64字符串
     * @param imgURL 网络资源位置
     * @return Base64字符串
     */
    public static String GetImageStrFromUrl(String imgURL) {
        byte[] data = null;
        try {
            // 创建URL
            URL url = new URL(imgURL);
            // 创建链接
            HttpURLConnection conn = (HttpURLConnection) url.openConnection();
            conn.setRequestMethod("GET");
            conn.setConnectTimeout(5 * 1000);
            InputStream inStream = conn.getInputStream();
            data = new byte[inStream.available()];
            inStream.read(data);
            inStream.close();
        } catch (IOException e) {
            e.printStackTrace();
        }
        // 对字节数组Base64编码
        BASE64Encoder encoder = new BASE64Encoder();
        // 返回Base64编码过的字节数组字符串
        return encoder.encode(data);
    }

    /**
     * @Title: GetImageStrFromPath
     * @Description: (将一张本地图片转化成Base64字符串)
     * @param imgPath
     * @return
     */
    public static String GetImageStrFromPath(String imgPath) {
        InputStream in = null;
        byte[] data = null;
        // 读取图片字节数组
        try {
            in = new FileInputStream(imgPath);
            data = new byte[in.available()];
            in.read(data);
            in.close();
        } catch (IOException e) {
            e.printStackTrace();
        }
        // 对字节数组Base64编码
        BASE64Encoder encoder = new BASE64Encoder();
        // 返回Base64编码过的字节数组字符串
        return encoder.encode(data);
    }

    /**
     * @Title: GenerateImage
     * @Description: base64字符串转化成图片
     * @param imgStr
     * @param imgFilePath  图片文件名,如“E:/tmp.jpg”
     * @return
     */
    public static boolean saveImage(String imgStr,String imgFilePath) {
        if (imgStr == null) // 图像数据为空
            return false;
        BASE64Decoder decoder = new BASE64Decoder();
        try {
            // Base64解码
            byte[] b = decoder.decodeBuffer(imgStr);
            for (int i = 0; i < b.length; ++i) {
                if (b[i] < 0) {// 调整异常数据
                    b[i] += 256;
                }
            }
            // 生成jpeg图片
            OutputStream out = new FileOutputStream(imgFilePath);
            out.write(b);
            out.flush();
            out.close();
            return true;
        } catch (Exception e) {
            return false;
        }
    }
}
3.2、人脸识别API使用方法
功能:检测人脸美丑及年龄
官网:http://ai.baidu.com/docs#FACE官网文档
请求参数:
| 是否必选 | 类型 | 说明 | |
|---|---|---|---|
| image | 是 | string | base64编码后的图片数据,图片大小不超过2M。 |
| max_face_num | 否 | uint32 | 最多处理人脸数目,默认值1 |
| face_fields | 否 | string | 包括age,beauty,expression,faceshape,gender,glasses,landmark,race,qualities信息,逗号分隔,默认只返回人脸框、概率和旋转角度。 |
-
URL参数:
| 参数 | 值 |
|---|---|
| access_token | 通过API Key和Secret Key获取的access_token,参考“Access Token获取” |
- Header如下:
| 参数 | 值 |
|---|---|
| Content-Type | application/x-www-form-urlencoded |
- Body中数据如下:
| 参数 | 值 |
|---|---|
| image | 图像base64编码 |
| max_face_num | 非必填,默认1 |
| face_fields | 非必填 |
3.3、返回JSON字符串内容解释
age 年龄 (目前官网还是没有说明年龄的误差范围)
beauty 美丑分数 0-100 越大值越美,如花识别年龄38 美丑评分21 表示不太合理
对于其他API也是同样的方式进行调用,相信大家都可以举一反三,今天项目用到一些复杂的API可以直接使用第三方提供的API,大体调用方式都类似。


 192
192

 被折叠的 条评论
为什么被折叠?
被折叠的 条评论
为什么被折叠?
 到【灌水乐园】发言


