


文章目录
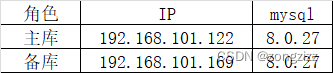
一、主库备库安装,环境
二、相关配置
1.主从binlog开启,server-id配置
**主从binlog开启:**主库需要开启binglog、备库可有选择开启binlog,mysql8.0是默认开启binlog的,所以这边无需操作。
**server-id配置:**主库my.cnf添加server-id=122,备库my.cnf添加server-id=169
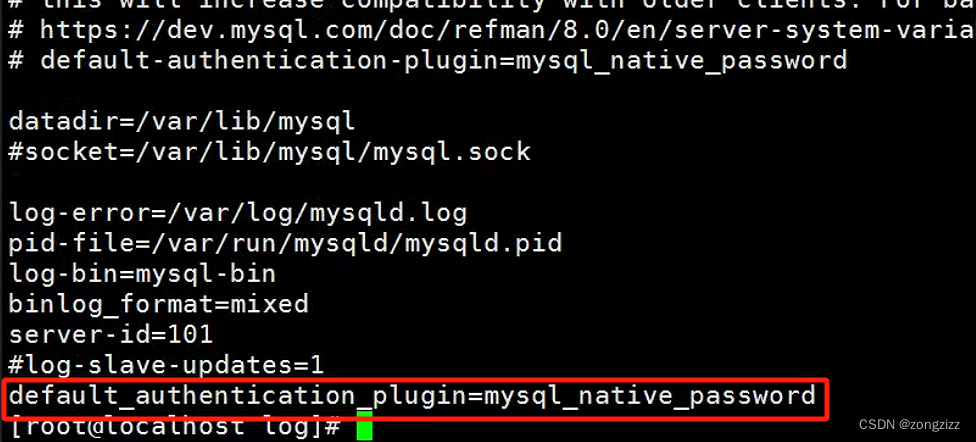
8.0版本主库my.cnf配置文件需要加个default_authentication_plugin=mysql_native_password,不然从库无法连接主库
2.主库创建有同步权限用户且能在备库登录
CREATE USER 'rep'@'192.168.101.169' IDENTIFIED BY 'Huawei12#$';

grant replication slave, replication client on *.* to 'rep'@'192.168.101.169';

flush privileges;
我这边赋予了一个mysql.user的查询权限来验证,在备库登录后是否能查询主库user表,验证是否登录成功。
grant select on *.* to 'rep'@'192.168.101.169';
验证
[root@hisdg local]# mysql -urep -h192.168.101.122 -p'Huawei12#$'
mysql: [Warning] Using a password on the command line interface can be insecure.
Welcome to the MySQL monitor.  Commands end with ; or \g.
Your MySQL connection id is 15
Server version: 8.0.27 MySQL Community Server - GPL

Copyright (c) 2000, 2021, Oracle and/or its affiliates.

Oracle is a registered trademark of Oracle Corporation and/or its
affiliates. Other names may be trademarks of their respective
owners.

Type 'help;' or '\h' for help. Type '\c' to clear the current input statement.

mysql> select user from mysql.user;
+------------------+
| user             |
+------------------+
| mysql.infoschema |
| mysql.session    |
| mysql.sys        |
| root             |
| test             |
| test3            |
| test4            |
| test5            |
| rep              |
| test2            |
+------------------+
10 rows in set (0.00 sec)
查询结果与主库一直,登录成功。
3.主库全库备份(如主备库都是空库,可略过)
mysql> flush table with read lock;
--将全库置为只读
Query OK, 0 rows affected (0.01 sec)

mysql> exit
Bye
5.7版本用--master-data参数
[root@hisdb local]# mysqldump -uroot -p'Huawei12#$' -A -B --events --master-data=2 > /usr/local/backup/cw-$(date +%F)-all.sql
mysqldump: [Warning] Using a password on the command line interface can be insecure.

8.0版本用--source-data参数
[root@hisdb backup]# mysqldump -uroot -p'Huawei12#$' -A -B --events --source-data=2 > /usr/local/backup/cw-$(date +%F)-all.sql
mysqldump: [Warning] Using a password on the command line interface can be insecure.

[root@hisdb local]# cd backup/
[root@hisdb backup]# ls
cw-2022-11-11-all.sql     #备份文件已经生成
[root@hisdb backup]# du
1196

mysql> unlock tables;     #备份结束解锁全库表
Query OK, 0 rows affected (0.00 sec)
4.备库导入主库全备
[root@hisdg local]# mysql -uroot -p </usr/local/cw-2022-11-11-all.sql
Enter password:
5.备库指定同步位置并开始同步
主库查询binglog和position
mysql> show master status;
+---------------+----------+--------------+------------------+-------------------+
| File          | Position | Binlog_Do_DB | Binlog_Ignore_DB | Executed_Gtid_Set |
+---------------+----------+--------------+------------------+-------------------+
| binlog.000052 |      156 |              |                  |                   |
+---------------+----------+--------------+------------------+-------------------+
1 row in set (0.00 sec)
备库指定同步位置
mysql> change master to
    ->   master_host='192.168.101.122',
    ->   master_user='rep',    ---之前在主库创建的用于同步的用户
    ->   master_password='Huawei12#$',
    ->   MASTER_LOG_FILE='binlog.000052',
    ->   MASTER_LOG_POS=156 ;     --上面在主库查出的binlog和position
Query OK, 0 rows affected, 8 warnings (0.12 sec)
备库开始同步
mysql> start slave;
Query OK, 0 rows affected, 1 warning (0.02 sec)
查看同步状态
mysql> show slave status\G
*************************** 1. row ***************************
               Slave_IO_State: Connecting to source
                  Master_Host: 192.168.101.122
                  Master_User: rep
                  Master_Port: 3306
                Connect_Retry: 60
              Master_Log_File: binlog.000052
          Read_Master_Log_Pos: 156
               Relay_Log_File: hisdg-relay-bin.000001
                Relay_Log_Pos: 4
        Relay_Master_Log_File: binlog.000052
             Slave_IO_Running: Connecting
            Slave_SQL_Running: Yes
              Replicate_Do_DB:
          Replicate_Ignore_DB:
           Replicate_Do_Table:
       Replicate_Ignore_Table:
      Replicate_Wild_Do_Table:
  Replicate_Wild_Ignore_Table:
                   Last_Errno: 0
                   Last_Error:
                 Skip_Counter: 0
          Exec_Master_Log_Pos: 156
              Relay_Log_Space: 156
              Until_Condition: None
               Until_Log_File:
                Until_Log_Pos: 0
           Master_SSL_Allowed: No
           Master_SSL_CA_File:
           Master_SSL_CA_Path:
              Master_SSL_Cert:
            Master_SSL_Cipher:
               Master_SSL_Key:
        Seconds_Behind_Master: NULL
Master_SSL_Verify_Server_Cert: No
                Last_IO_Errno: 0
                Last_IO_Error:
               Last_SQL_Errno: 0
               Last_SQL_Error:
  Replicate_Ignore_Server_Ids:
             Master_Server_Id: 0
                  Master_UUID:
             Master_Info_File: mysql.slave_master_info
                    SQL_Delay: 0
          SQL_Remaining_Delay: NULL
      Slave_SQL_Running_State: Replica has read all relay log; waiting for more updates
           Master_Retry_Count: 86400
                  Master_Bind:
      Last_IO_Error_Timestamp:
     Last_SQL_Error_Timestamp:
               Master_SSL_Crl:
           Master_SSL_Crlpath:
           Retrieved_Gtid_Set:
            Executed_Gtid_Set:
                Auto_Position: 0
         Replicate_Rewrite_DB:
                 Channel_Name:
           Master_TLS_Version:
       Master_public_key_path:
        Get_master_public_key: 0
            Network_Namespace:
1 row in set, 1 warning (0.00 sec)
--此时Slave_IO_Running还是Connecting状态表示备库正在连接主库
稍候查看
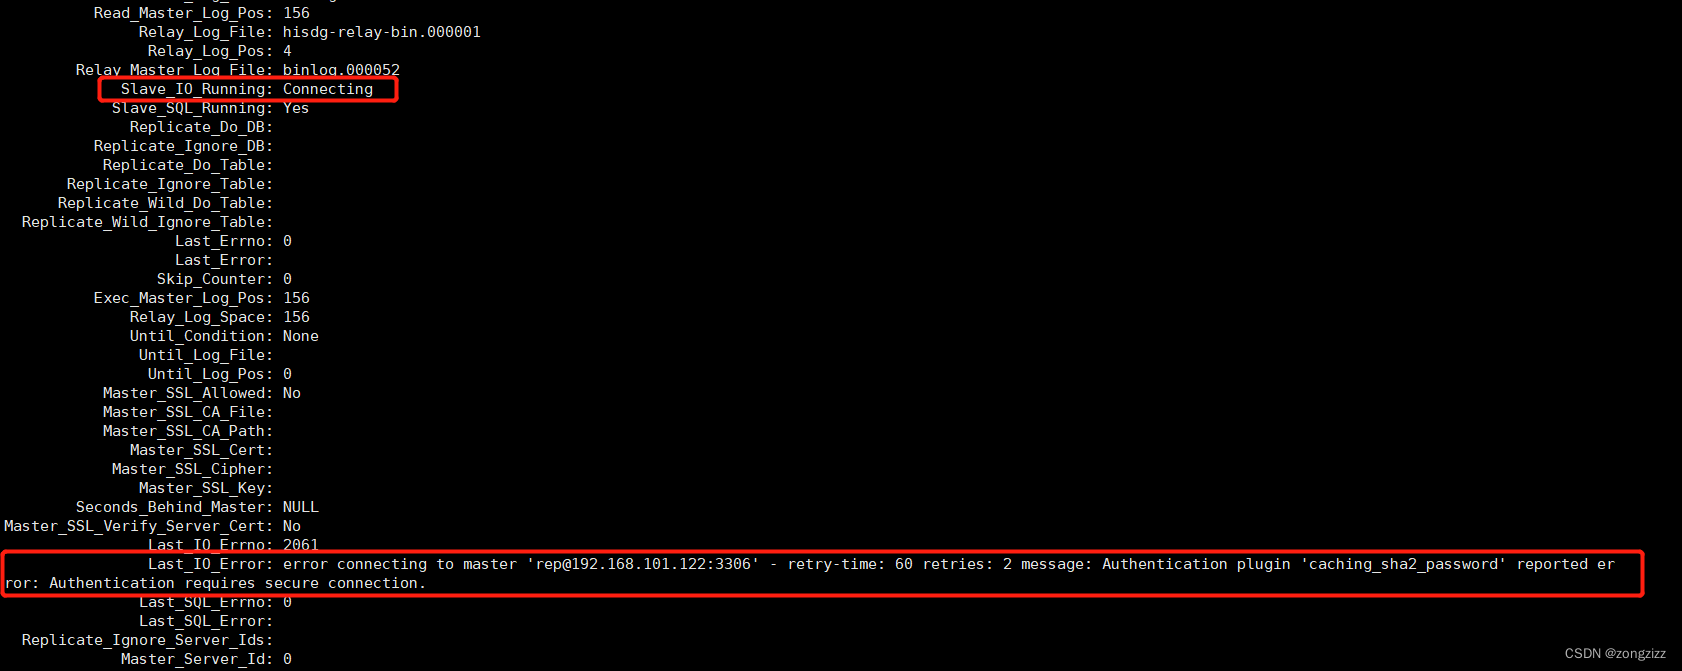
这里Slave_IO_Running还是Connecting状态表示主备库还是未连接成功,这里出现了Last_IO_Error
再次刷新状态,显示已经连接正常
mysql> show slave status\G
*************************** 1. row ***************************
               Slave_IO_State: Waiting for source to send event
                  Master_Host: 192.168.101.122
                  Master_User: rep
                  Master_Port: 3306
                Connect_Retry: 60
              Master_Log_File: binlog.000052
          Read_Master_Log_Pos: 156
               Relay_Log_File: hisdg-relay-bin.000002
                Relay_Log_Pos: 321
        Relay_Master_Log_File: binlog.000052
             Slave_IO_Running: Yes
            Slave_SQL_Running: Yes
              Replicate_Do_DB:
          Replicate_Ignore_DB:
           Replicate_Do_Table:
       Replicate_Ignore_Table:
      Replicate_Wild_Do_Table:
  Replicate_Wild_Ignore_Table:
                   Last_Errno: 0
                   Last_Error:
                 Skip_Counter: 0
          Exec_Master_Log_Pos: 156
              Relay_Log_Space: 530
              Until_Condition: None
               Until_Log_File:
                Until_Log_Pos: 0
           Master_SSL_Allowed: No
           Master_SSL_CA_File:
           Master_SSL_CA_Path:
              Master_SSL_Cert:
            Master_SSL_Cipher:
               Master_SSL_Key:
        Seconds_Behind_Master: 0
Master_SSL_Verify_Server_Cert: No
                Last_IO_Errno: 0
                Last_IO_Error:
               Last_SQL_Errno: 0
               Last_SQL_Error:
  Replicate_Ignore_Server_Ids:
             Master_Server_Id: 1
                  Master_UUID: a68b1af8-691e-11ec-ab81-0800276a9516
             Master_Info_File: mysql.slave_master_info
                    SQL_Delay: 0
          SQL_Remaining_Delay: NULL
      Slave_SQL_Running_State: Replica has read all relay log; waiting for more updates
           Master_Retry_Count: 86400
                  Master_Bind:
      Last_IO_Error_Timestamp:
     Last_SQL_Error_Timestamp:
               Master_SSL_Crl:
           Master_SSL_Crlpath:
           Retrieved_Gtid_Set:
            Executed_Gtid_Set:
                Auto_Position: 0
         Replicate_Rewrite_DB:
                 Channel_Name:
           Master_TLS_Version:
       Master_public_key_path:
        Get_master_public_key: 0
            Network_Namespace:
1 row in set, 1 warning (0.00 sec)
报错:1
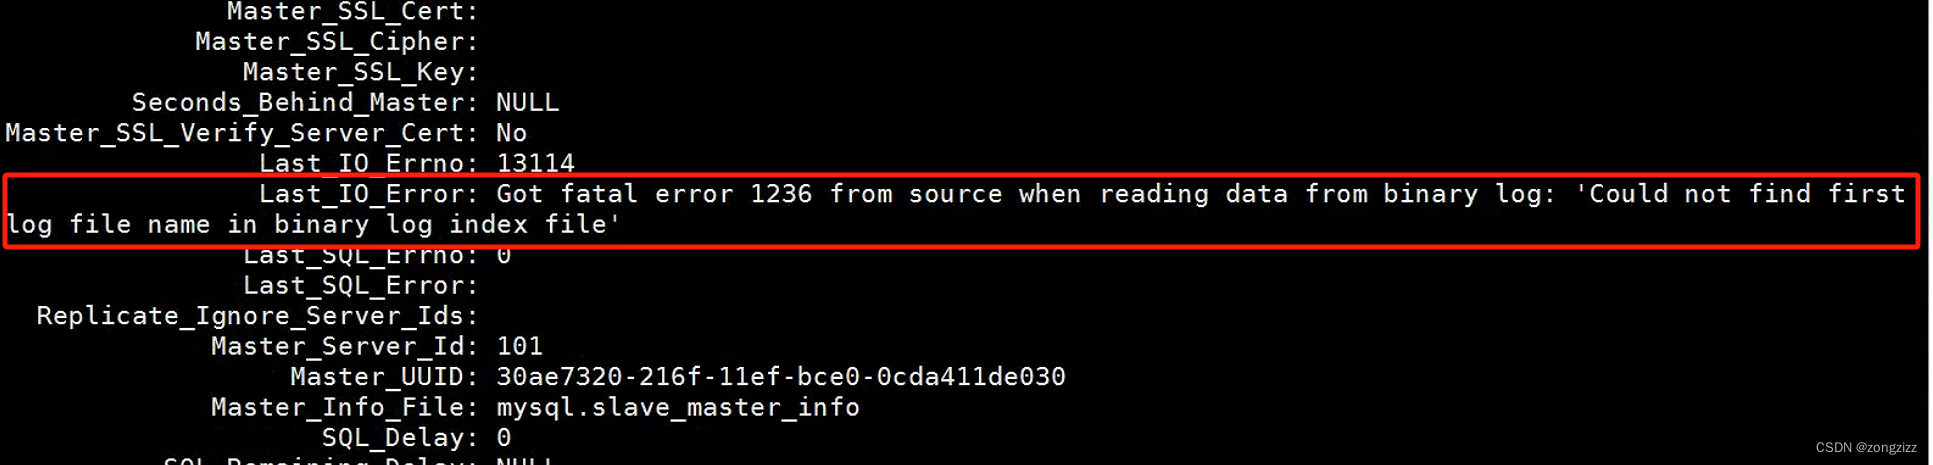
解决方法:
mysql> stop slave;
Query OK, 0 rows affected, 1 warning (0.01 sec)

mysql> reset slave;
Query OK, 0 rows affected, 1 warning (0.04 sec)

mysql> start slave;
Query OK, 0 rows affected, 1 warning (0.03 sec)
6.在主库插入数据验证备库是否同步
主库插入
mysql> desc t1;
+-------+------+------+-----+---------+-------+
| Field | Type | Null | Key | Default | Extra |
+-------+------+------+-----+---------+-------+
| id    | int  | YES  |     | NULL    |       |
+-------+------+------+-----+---------+-------+
1 row in set (0.00 sec)

mysql> insert into t1(id) values(8);
Query OK, 1 row affected (0.00 sec)

mysql> insert into t1(id) values(8);
Query OK, 1 row affected (0.09 sec)

mysql> insert into t1(id) values(8);
Query OK, 1 row affected (0.02 sec)


mysql> select * from t1;
+------+
| id   |
+------+
|    8 |
|    8 |
|    8 |
+------+
3 rows in set (0.00 sec)
备库查询验证
mysql> use mysql;
Reading table information for completion of table and column names
You can turn off this feature to get a quicker startup with -A

Database changed
mysql> select * from t1;
+------+
| id   |
+------+
|    8 |
+------+
1 row in set (0.00 sec)

mysql> select * from t1;
+------+
| id   |
+------+
|    8 |
|    8 |
+------+
2 rows in set (0.00 sec)

mysql> select * from t1;
+------+
| id   |
+------+
|    8 |
|    8 |
|    8 |
+------+
3 rows in set (0.00 sec)
最简单的同步已经完成。
7.主备库都关机后重新开启同步
重新从第5步开始执行就行了。
三、说明
1.状态参数说明
Slave_IO_state 显示当前IO线程的状态,一般情况下就是显示等待主服务器发送二进制日志。
Master_log_file 显示当前同步的主服务器的二进制日志。
Read_master_log_pos 显示当前同步到主服务器上二进制日志的偏移量位置。
Relay_master_log_file 当前中继日志同步的二进制日志。
Relay_log_file 显示当前写入的中继日志。
Relay_log_pos 显示当前执行到中继日志的偏移量位置。
Slave_IO_running 从服务器中IO线程的运行状态,yes代表正常
Slave_SQL_running 从服务器中sql线程的运行状态,YES代表正常
Exec_Master_log_pos 表示同步到主服务器的二进制日志的偏移量位置。
2.slave启停常用命令
STOP SLAVE IO_THREAD; 停止IO进程
STOP SLAVE SQL_THREAD; 停止SQL进程
STOP SLAVE; 停止IO和SQL进程
START SLAVE IO_THREAD; 启动IO进程
START SLAVE SQL_THREAD; 启动SQL进程
START SLAVE; 启动IO和SQL进程
RESET SLAVE; 用于让从属服务器忘记其在主服务器的二进制日志中的复制位置, 它会删除master.info和relay-log.info文件,以及所有的中继日志,并启动一个新的中继日志,当你不需要主从的时候可以在从上执行这个操作。
SHOW SLAVE STATUS; 查看MySQL同步状态
STOP SLAVE;SET GLOBAL SQL_SLAVE_SKIP_COUNTER=1;START SLAVE; 经常会朋友mysql主从同步遇到错误的时候,比如一个主键冲突等,那么我就需要在确保那一行数据一致的情况下临时的跳过这个错误,那就需要使用SQL_SLAVE_SKIP_COUNTER = n命令了,n是表示跳过后面的n个事件
CHANGE MASTER TO MASTER_HOST=‘10.1.1.75’, MASTER_USER=‘replication’, MASTER_PASSWORD=‘123456’, MASTER_LOG_FILE=‘mysql-bin.000006’, MASTER_LOG_POS=106; START SLAVE; 从指定位置重新同步
3.主备一致的相关参数
innodb_flush_log_at_trx_commit=1 0:log buffer 将每秒一次地写入 log file 中,并且 log file 的 flush (刷到磁盘) 操作同时进行。该模式下在事务提交的时候,不会主动触发写入磁盘的操作。 1:每次事务提交时 mysql 都会把 log buffer 的数据写入 log file,并且 flush (刷到磁盘) 中去,该模式为系统默认。2:每次事务提交时 mysql 都会把 log buffer 的数据写入 log file,但是 flush (刷到磁盘) 操作并不会同时进行。该模式下,MySQL 会每秒执行一次 flush (刷到磁盘) 操作
sync_binlog=1 sync_binlog=0,当事务提交之后,MySQL 不做 fsync 之类的磁盘同步指令刷新 binlog_cache 中的信息到磁盘,而让 Filesystem 自行决定什么时候来做同步,或者 cache 满了之后才同步到磁盘。sync_binlog=n,当每进行 n 次事务提交之后,MySQL 将进行一次 fsync 之类的磁盘同步指令来将 binlog_cache 中的数据强制写入磁盘。
sync_master_info=1 每间隔多少事务刷新master.info,如果是table(innodb)设置无效,每个事务都会更新
sync_relay_log_info=1 每间隔多少事务刷新relay-log.info,如果是table(innodb)设置无效,每个事务都会更新
sync_relay_log=10000 默认为10000,即每10000次sync_relay_log事件会刷新到磁盘。为0则表示不刷新,交由OS的cache控制
master_info_repository=TABLE 记录主库binlog的信息,可以设置FILE(master.info)或者TABLE(mysql.slave_master_info)
relay_log_info_repository=TABLE 记录备库relaylog的信息,可以设置FILE(relay-log.info)或者TABLE(mysql.slave_relay_log_info)


 4645
4645


 被折叠的 条评论
为什么被折叠?
被折叠的 条评论
为什么被折叠?
 到【灌水乐园】发言


