Jupyter notebook )前身为IPython Notebook,学习时,可以找两者的教程
Jupyter Project Documentation
Jupyter Notebook Documentation
Jupyter/IPython Notebook Quick Start Guide
Old IPython Notebook Homepage
Jupyter安装
Installing Jupyter Notebook
先决条件:已经安装了Python(python 2.7 或者是python3.3)
安装:
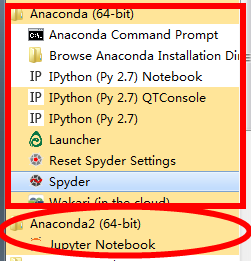
官方建议利用Anaconda安装Jupyter,关于Anaconda的安装见安装配置安装theano环境(非GPU版)
安装Jupyter的方法:打开cmd,输入:conda install jupyter
注意:安装完anaconda后,自带了了ipython notebook,即jupyter的低版本,按照上面的方法安装后,会发现,又多安装了一个jupyter notebook,原来的ipython notebook还在
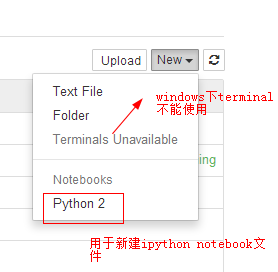
这样安装完的jupyter不具有New a terminal的功能
经过各种查询才知道,原来是因为windows不具有terminal需要的TTY,所以,windows下的jupyter是不支持Terminal模式的,而且短期内也没有增加这种支持的计划
更改Jupyter notebook的工作空间
(1)Jupyter的工作空间在哪里指定?
在其配置文件jupyter_notebook_config.py中,有如下一句
<code class="hljs fsharp has-numbering" style="display: block; padding: 0px; color: inherit; box-sizing: border-box; font-family: 'Source Code Pro', monospace;font-size:undefined; white-space: pre; border-radius: 0px; word-wrap: normal; background: transparent;"># The directory <span class="hljs-keyword" style="color: rgb(0, 0, 136); box-sizing: border-box;">to</span> <span class="hljs-keyword" style="color: rgb(0, 0, 136); box-sizing: border-box;">use</span> <span class="hljs-keyword" style="color: rgb(0, 0, 136); box-sizing: border-box;">for</span> notebooks <span class="hljs-keyword" style="color: rgb(0, 0, 136); box-sizing: border-box;">and</span> kernels.
# c.NotebookApp.notebook_dir = u''
</code><ul class="pre-numbering" style="box-sizing: border-box; position: absolute; width: 50px; top: 0px; left: 0px; margin: 0px; padding: 6px 0px 40px; border-right-width: 1px; border-right-style: solid; border-right-color: rgb(221, 221, 221); list-style: none; text-align: right; background-color: rgb(238, 238, 238);"><li style="box-sizing: border-box; padding: 0px 5px;">1</li><li style="box-sizing: border-box; padding: 0px 5px;">2</li><li style="box-sizing: border-box; padding: 0px 5px;">3</li></ul><ul class="pre-numbering" style="box-sizing: border-box; position: absolute; width: 50px; top: 0px; left: 0px; margin: 0px; padding: 6px 0px 40px; border-right-width: 1px; border-right-style: solid; border-right-color: rgb(221, 221, 221); list-style: none; text-align: right; background-color: rgb(238, 238, 238);"><li style="box-sizing: border-box; padding: 0px 5px;">1</li><li style="box-sizing: border-box; padding: 0px 5px;">2</li><li style="box-sizing: border-box; padding: 0px 5px;">3</li></ul>
该句就是用来指定其工作空间的,例如,默认的工作空间是:用户名文件夹,例如,现在想要将工作空间变为D:\Jupyter,那么,需要做如下更改(要记得删掉注释#)
<code class="hljs python has-numbering" style="display: block; padding: 0px; color: inherit; box-sizing: border-box; font-family: 'Source Code Pro', monospace;font-size:undefined; white-space: pre; border-radius: 0px; word-wrap: normal; background: transparent;"><span class="hljs-comment" style="color: rgb(136, 0, 0); box-sizing: border-box;"># The directory to use for notebooks and kernels.</span>
c.NotebookApp.notebook_dir = <span class="hljs-string" style="color: rgb(0, 136, 0); box-sizing: border-box;">u'D:\Jupyter'</span>
</code><ul class="pre-numbering" style="box-sizing: border-box; position: absolute; width: 50px; top: 0px; left: 0px; margin: 0px; padding: 6px 0px 40px; border-right-width: 1px; border-right-style: solid; border-right-color: rgb(221, 221, 221); list-style: none; text-align: right; background-color: rgb(238, 238, 238);"><li style="box-sizing: border-box; padding: 0px 5px;">1</li><li style="box-sizing: border-box; padding: 0px 5px;">2</li><li style="box-sizing: border-box; padding: 0px 5px;">3</li></ul><ul class="pre-numbering" style="box-sizing: border-box; position: absolute; width: 50px; top: 0px; left: 0px; margin: 0px; padding: 6px 0px 40px; border-right-width: 1px; border-right-style: solid; border-right-color: rgb(221, 221, 221); list-style: none; text-align: right; background-color: rgb(238, 238, 238);"><li style="box-sizing: border-box; padding: 0px 5px;">1</li><li style="box-sizing: border-box; padding: 0px 5px;">2</li><li style="box-sizing: border-box; padding: 0px 5px;">3</li></ul>
注意:路径最后一级后面不要加符号“\”
Jupyter各种用法
代码的导入
即: 导入代码到jupyter notebook的cell中
将本地的.py文件load到jupyter的一个cell中
问题背景:有一个test.py文件,需要将其载入到jupyter的一个cell中
test.py内容如下:
<code class="hljs java has-numbering" style="display: block; padding: 0px; color: inherit; box-sizing: border-box; font-family: 'Source Code Pro', monospace;font-size:undefined; white-space: pre; border-radius: 0px; word-wrap: normal; background: transparent;"><span class="hljs-keyword" style="color: rgb(0, 0, 136); box-sizing: border-box;">import</span> caffe
SolverName = <span class="hljs-string" style="color: rgb(0, 136, 0); box-sizing: border-box;">"/root/workspace"</span>
sovler = caffe.AdamSolver(SolverName)</code><ul class="pre-numbering" style="box-sizing: border-box; position: absolute; width: 50px; top: 0px; left: 0px; margin: 0px; padding: 6px 0px 40px; border-right-width: 1px; border-right-style: solid; border-right-color: rgb(221, 221, 221); list-style: none; text-align: right; background-color: rgb(238, 238, 238);"><li style="box-sizing: border-box; padding: 0px 5px;">1</li><li style="box-sizing: border-box; padding: 0px 5px;">2</li><li style="box-sizing: border-box; padding: 0px 5px;">3</li></ul><ul class="pre-numbering" style="box-sizing: border-box; position: absolute; width: 50px; top: 0px; left: 0px; margin: 0px; padding: 6px 0px 40px; border-right-width: 1px; border-right-style: solid; border-right-color: rgb(221, 221, 221); list-style: none; text-align: right; background-color: rgb(238, 238, 238);"><li style="box-sizing: border-box; padding: 0px 5px;">1</li><li style="box-sizing: border-box; padding: 0px 5px;">2</li><li style="box-sizing: border-box; padding: 0px 5px;">3</li></ul>
方法步骤:
(1)在需要导入该段代码的cell中输入
<code class="hljs haml has-numbering" style="display: block; padding: 0px; color: inherit; box-sizing: border-box; font-family: 'Source Code Pro', monospace;font-size:undefined; white-space: pre; border-radius: 0px; word-wrap: normal; background: transparent;"><span class="hljs-tag" style="color: rgb(0, 102, 102); box-sizing: border-box;">%<span class="hljs-title" style="box-sizing: border-box; color: rgb(0, 0, 136);">load</span></span> test.py #test.py是当前路径下的一个python文件</code><ul class="pre-numbering" style="box-sizing: border-box; position: absolute; width: 50px; top: 0px; left: 0px; margin: 0px; padding: 6px 0px 40px; border-right-width: 1px; border-right-style: solid; border-right-color: rgb(221, 221, 221); list-style: none; text-align: right; background-color: rgb(238, 238, 238);"><li style="box-sizing: border-box; padding: 0px 5px;">1</li></ul><ul class="pre-numbering" style="box-sizing: border-box; position: absolute; width: 50px; top: 0px; left: 0px; margin: 0px; padding: 6px 0px 40px; border-right-width: 1px; border-right-style: solid; border-right-color: rgb(221, 221, 221); list-style: none; text-align: right; background-color: rgb(238, 238, 238);"><li style="box-sizing: border-box; padding: 0px 5px;">1</li></ul>

(2)运行该cell
利用快捷键“Shift+Enter”,可以看到如下结果:

(3)可以看到,运行后,%load test.py被自动加入了注释符号#,test.py中的所有代码都被load到了当前的cell中
从网络load代码到jupyter
在cell中输入%load http://.....,然后运行该cell,就会将load后面所对应地址的代码load到当前的cell中;
下面给出一个例子,导入matplotlib中的一个小例子color example code
首先,在想要导入该段代码的cell中输入
<code class="hljs haml has-numbering" style="display: block; padding: 0px; color: inherit; box-sizing: border-box; font-family: 'Source Code Pro', monospace;font-size:undefined; white-space: pre; border-radius: 0px; word-wrap: normal; background: transparent;"><span class="hljs-tag" style="color: rgb(0, 102, 102); box-sizing: border-box;">%<span class="hljs-title" style="box-sizing: border-box; color: rgb(0, 0, 136);">load</span></span> test.py #test.py是当前路径下的一个python文件</code><ul class="pre-numbering" style="box-sizing: border-box; position: absolute; width: 50px; top: 0px; left: 0px; margin: 0px; padding: 6px 0px 40px; border-right-width: 1px; border-right-style: solid; border-right-color: rgb(221, 221, 221); list-style: none; text-align: right; background-color: rgb(238, 238, 238);"><li style="box-sizing: border-box; padding: 0px 5px;">1</li></ul><ul class="pre-numbering" style="box-sizing: border-box; position: absolute; width: 50px; top: 0px; left: 0px; margin: 0px; padding: 6px 0px 40px; border-right-width: 1px; border-right-style: solid; border-right-color: rgb(221, 221, 221); list-style: none; text-align: right; background-color: rgb(238, 238, 238);"><li style="box-sizing: border-box; padding: 0px 5px;">1</li></ul>
然后,Shift+Enter运行,可以看到如下结果:

可以看到,运行后,%load test.py被自动加入了注释符号#,test.py中的所有代码都被load到了当前的cell中
运行python文件
利用jupyter的cell是可以运行python文件的,即在cell中运行如下代码:
<code class="hljs haml has-numbering" style="display: block; padding: 0px; color: inherit; box-sizing: border-box; font-family: 'Source Code Pro', monospace;font-size:undefined; white-space: pre; border-radius: 0px; word-wrap: normal; background: transparent;"><span class="hljs-tag" style="color: rgb(0, 102, 102); box-sizing: border-box;">%<span class="hljs-title" style="box-sizing: border-box; color: rgb(0, 0, 136);">run</span></span> file.py</code><ul class="pre-numbering" style="box-sizing: border-box; position: absolute; width: 50px; top: 0px; left: 0px; margin: 0px; padding: 6px 0px 40px; border-right-width: 1px; border-right-style: solid; border-right-color: rgb(221, 221, 221); list-style: none; text-align: right; background-color: rgb(238, 238, 238);"><li style="box-sizing: border-box; padding: 0px 5px;">1</li></ul><ul class="pre-numbering" style="box-sizing: border-box; position: absolute; width: 50px; top: 0px; left: 0px; margin: 0px; padding: 6px 0px 40px; border-right-width: 1px; border-right-style: solid; border-right-color: rgb(221, 221, 221); list-style: none; text-align: right; background-color: rgb(238, 238, 238);"><li style="box-sizing: border-box; padding: 0px 5px;">1</li></ul>
file.py为要运行的python程序,结果会显示在该cell中


其他用法
(1)jupyter的cell可以作为unix command使用!
具体方法为:在在unitx command前面加入一个感叹号“!”
例子:
查看python版本:!python --version
运行python文件:!python myfile.py
(2)Magic functions
还没有太明白,具体细节见The cell magics in IPython
(3)获取current working directory
(即当前运行的代码所在的路径):current_path = %pwd
这样得到的current_path就是当前工作路径的字符转
python常用的modules
scikit-image基于scipy的高级图像处理模块,该模块将图片作为numpy ndarray进行处理,比较方便
The scikit-image SciKit (toolkit for SciPy) extends scipy.ndimage to provide a versatile set of image processing routines.
安装:pip install scikit-image
使用:import skimage
Markdown 语法手册 (完整整理版)
参考这里写链接内容


 666
666

 被折叠的 条评论
为什么被折叠?
被折叠的 条评论
为什么被折叠?
 到【灌水乐园】发言


