


weex-toolkit
首先确认已经安装weex-toolkit,这是weex的集成环境,我使用的版本是0.5.8
$ weex --version
info 0.5.8
在创建项目前我们先来了解下Weex的命令
$ weex
info
Usage: weex foo/bar/we_file_or_dir_path  [options]
Usage: weex debug [options] [we_file|bundles_dir]
Usage: weex init

选项:
  --qr          display QR code for PlaygroundApp                      [boolean]
  --smallqr     display small-scale version of QR code for PlaygroundApp,try it
                if you use default font in CLI                         [boolean]
  -o, --output  transform weex we file to JS Bundle, output path must specified
                (single JS bundle file or dir)
                [for create sub cmd]it specified we file output path
                                                  [默认值: "no JSBundle output"]
  --watch       using with -o , watch input path , auto run transform if change
                happen
  -s, --server  start a http file server, weex .we file will be transforme to JS
                bundle on the server , specify local root path using the option
                                                                        [string]
  --port        http listening port number ,default is 8081         [默认值: -1]
  --wsport      websocket listening port number ,default is 8082    [默认值: -1]
  --np          do not open preview browser automatic                  [boolean]
  -f, --force   [for create sub cmd]force to replace exsisting file(s) [boolean]
  --help        显示帮助信息                                           [boolean]
  -h, --host                                               [默认值: "127.0.0.1"]

weex debug -h for Weex debug help information.

for cmd example & more information please visit
https://www.npmjs.com/package/weex-toolkit
如果你想调试某个we文件,那么在终端中执行weex 文件名.we即可以运行在本地浏览器中
weex 文件名.we–qr 可显示本地地址文件的二维码,安装playground后既可以扫描二维码看到we文件的页面
-h 是热更新,但只对浏览器有效
weex 文件名.we --qr
weex 文件名.we -h
初识WE文件
weex程序的文件拓展名是.we。因此我们创建一个.we的文件。Mac OSX的同学,可以使用touch命令创建文件。
$ touch helloworld.we 若我们打开空白的helloworld.we文件,可以看到内容为三个标签:
<template></template>
<style></style>
<script></script>
为helloworld.we 的 template 添加内容并增加些简单的样式
<template>
   <div>
     <text class="text" style="color:red;">Hello world</text>
   </div>
 </template>
 <style>
   .text{
       font-size:160;
   }
 </style>
 <script></script>
现在使用weex-toolkit来编译代码,使用weex命令编译helloworld.we文件
$ weex helloworld.we即可在浏览器中看见效果图,我们既然运行了程序,那么一定有一个.html作为程序入口。其实,weex-toolkit给我们生成了相关文件。我们可以到helloworld.we同级目录下查找,就会发现有一个weex_tmp文件。该文件夹就是生成的可以执行的浏览器代码。

初始化工程
这里采用weex init命令创建一个整体项目,而不只是创建we文件。首先,我们创建一个目录存放我们的项目,启动命令行
$ mkdir weex-test
$ cd weex-test
$ weex init
prompt: Project Name:  (weex-test)
file: .gitignore created.
file: README.md created.
file: index.html created.
file: package.json created.
file: src/main.we created.
file: webpack.config.js created.
接着安装依赖
$ npm install这时有可能提示
npm WARN babel-loader@6.2.5 requires a peer of babel-core@^6.0.0 but none was installed.你可以输入
npm install babel-core到这里我们创建了一个目录,然后初始化了一个weex项目。让我们看看他的目录结构:
src-代码目录
index-浏览器启动页面
webpack.config.js-webpack的配置文件
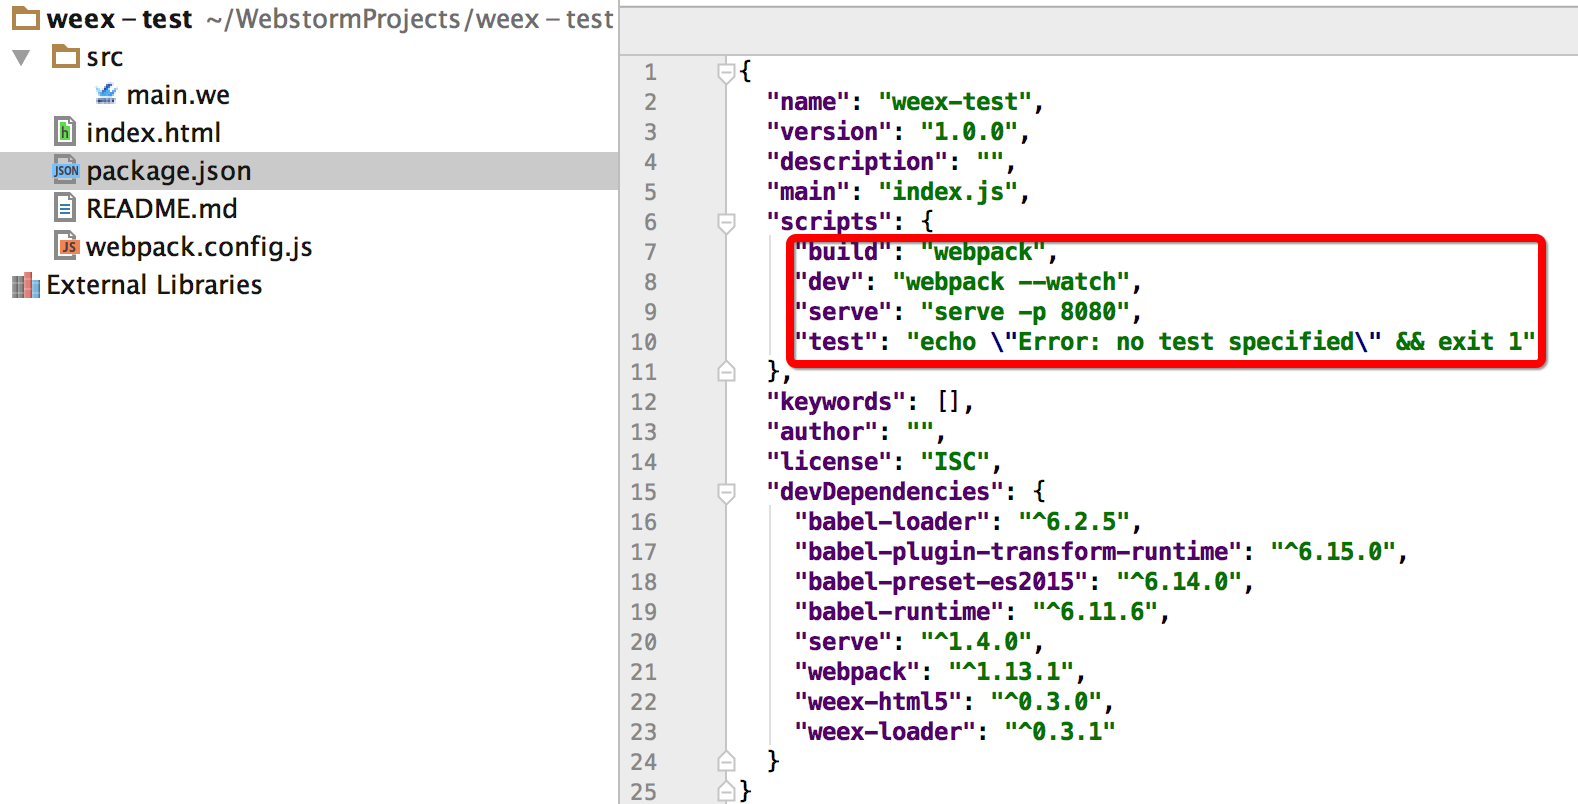
从package.json文件可以看出npm run dev实际上相当于 webpack –watch, 而webpack实际上是执行了默认的webpack.config.js配置文件
依赖安装完成后,启动项目编译
$ npm run dev

> weex-yy@1.0.0 dev /Users/nostalgia/weex-yy
> webpack --watch

Hash: 5c4f33f5664bbf3f139c
Version: webpack 1.13.2
Time: 864ms
  Asset     Size  Chunks             Chunk Names
main.js  3.34 kB       0  [emitted]  main
    + 4 hidden modules
再启动轻量服务器
$ npm run serve

> weex-yy@1.0.0 serve /Users/nostalgia/weex-yy
> serve -p 8080

serving /Users/nostalgia/weex-yy on port 8080这时,打开浏览器输入http://127.0.0.1:8080看看

当看到该界面效果,我们已经成功启动了这个项目。
不完美的webpack.config.js
刚刚说到webpack实际上是执行了默认的webpack.config.js配置文件,这里先来看一下webpack.config.js文件,其中:
webpack.config.js 引入webpack和weex-loader
entry属性是表示入口文件
output表示输出文件,默认输出到dist文件夹。
require('webpack')
require('weex-loader')

var path = require('path')

module.exports = {
  entry: {
    main: path.join(__dirname, 'src', 'main.we?entry=true')
  },
  output: {
    path: 'dist',
    filename: '[name].js'
  },
  module: {
    loaders: [
      {
        test: /\.we(\?[^?]+)?$/,
        loaders: ['weex-loader']
      }
    ]
  }
}
不过这个自动产生的webpack.config.js的文件的不完美在于entry仅仅只有一个main.js文件,当你添加一个新的we文件,他不会自动build为js文件,为解决这个问题,我们可以:
1、在代码中逐个手动添加,如添加helloworld.we
entry: { main: path.join(__dirname, 'src', 'main.we?entry=true'), helloworld: path.join(__dirname, 'src', 'helloworld.we?entry=true') }2、自动遍历所有的we文件(推荐)
require('webpack')
require('weex-loader')

var path = require('path');
var fs = require('fs');

var entry = {};

(function walk(dir) {
  dir = dir || '.'
  var directory = path.join(__dirname, 'src', dir);
  fs.readdirSync(directory)
    .forEach(function(file) {
      var fullpath = path.join(directory, file);
      var stat = fs.statSync(fullpath);
      var extname = path.extname(fullpath);
      if (stat.isFile() && extname === '.we') {
        var name = path.join('dist', dir, path.basename(file, extname));
        entry[name] = fullpath + '?entry=true';
      } else if (stat.isDirectory() && file !== 'dist' && file !== 'include') {
        var subdir = path.join(dir, file);
        walk(subdir);
      }
    });
})();

module.exports = {
  entry: entry,
  output: {
    path: '.',
    filename: '[name].js'
  },
  module: {
    loaders: [
      {
        test: /\.we(\?[^?]+)?$/,
        loader: 'weex'
      },
      {
        test: /\.js(\?[^?]+)?$/,
        loader: 'weex?type=script'
      },
      {
        test: /\.css(\?[^?]+)?$/,
        loader: 'weex?type=style'
      },
      {
        test: /\.html(\?[^?]+)?$/,
        loader: 'weex?type=tpl'
      }
    ]
  }
}

//获取当前ip地址
function getIPAddress(){
  var os = require('os');
  var ips = os.networkInterfaces();
  var address ;
  for(var item in ips){
    for(var data in ips[item]){
      var ip = ips[item][data];
      if(ip.address.indexOf('192')==0){
          address = ip.address;
          return address;
      }
    }
  }
}

//生成原生调试二维码
var qrcode = require('qrcode-terminal');
qrcode.generate("http://"+getIPAddress()+":12580/dist/main.js");

console.log("\r\n按住ctrl点击右侧地址打开应用--->http://localhost:12580\r\n");
此时执行 npm run dev的时候便可以对src文件夹进行遍历,同时根据当前ip生成了一下main.js文件的二维码,方便playground直接调试。
源码结构
另外有想了解源码目录结构的小伙伴们可以在GitHub上下载源代码,或使用git克隆代码到本地
$ git clone https://github.com/alibaba/weex.git具体源码结构的介绍可以参考文章:了解Weex源码结构,修改example


 646
646


 被折叠的 条评论
为什么被折叠?
被折叠的 条评论
为什么被折叠?
 到【灌水乐园】发言


